

 Thanks: 0
 Likes: 0
 Needs Pictures: 0
 Picture(s) thanks: 0
Results 1 to 15 of 99
Thread: Two new machines to restore
-
14th April 2007, 02:21 PM #1
 Old machine fanatic


- Join Date
- Jan 2007
- Location
- Alabama, USA
- Posts
- 100
 Two new machines to restore
A common saying here is "When it rains, it pours". Well seems that way in my shop. I have been looking for two machines for a while now. A 12" jointer and big bandsaw. I found the jointer but was having problems getting delivered to me. Everything finally came together and it was on it's way.
Then I ran an advertisement to sell a newer bandsaw I bought and got an offer to trade for 30"/760mm bandsaw. After looking for so long they both end up in my shop within a couple of days of each other.
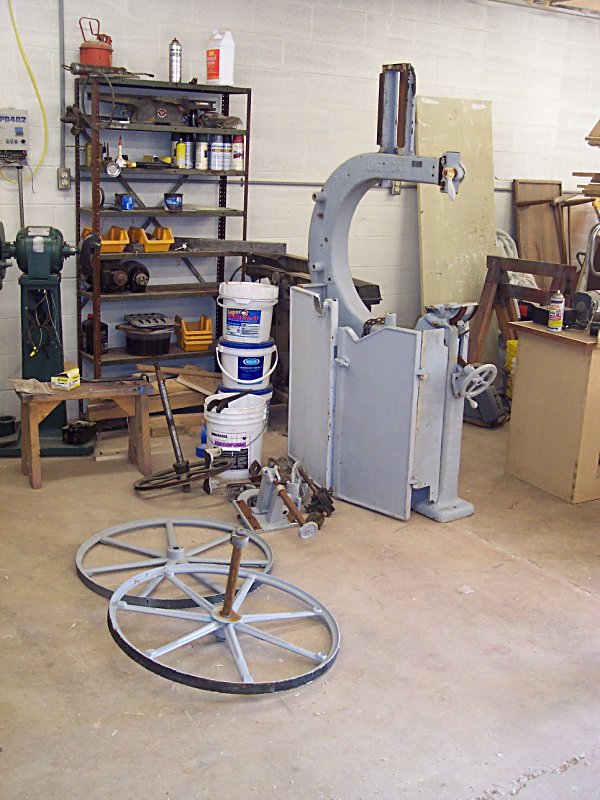
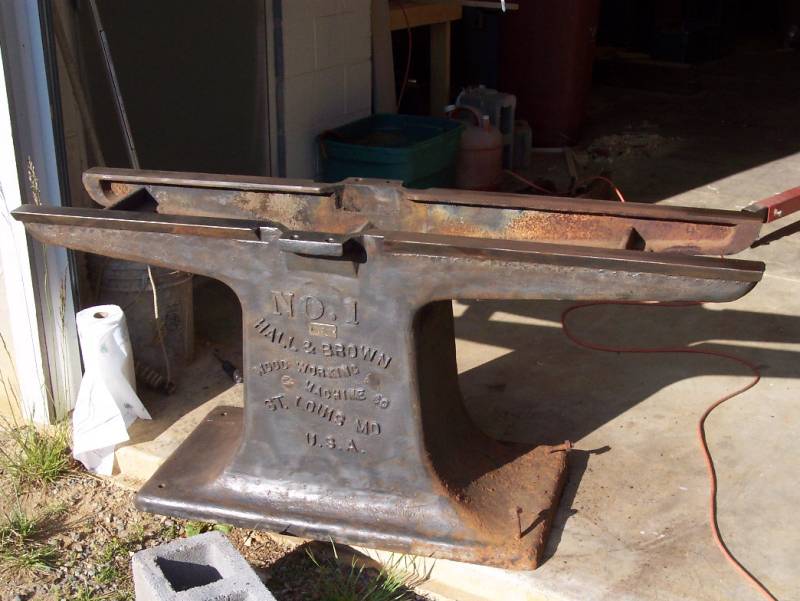
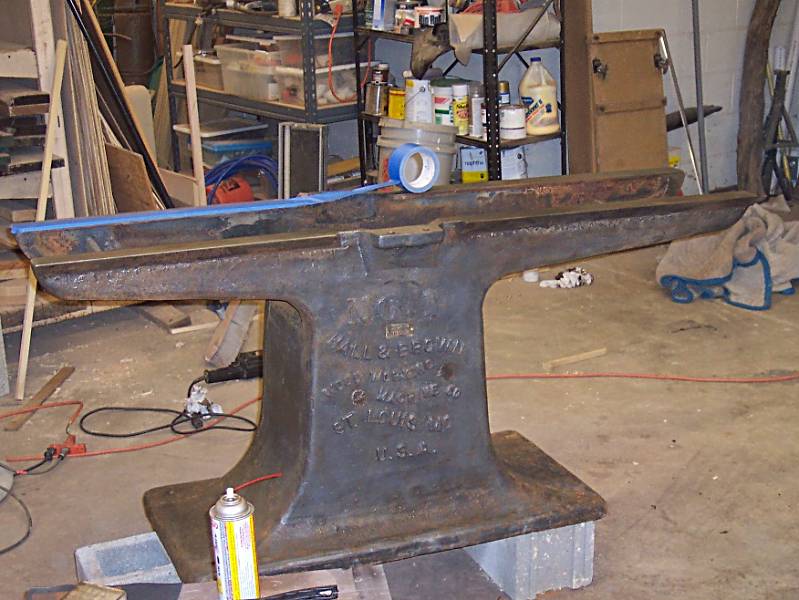
This is the bandsaw as it came to me. I have since got it put together just to see what is missing and keep track of the parts till I can start restoring it. It's a 1915 to 1920 model from what we can gather. Fairly complete actually.
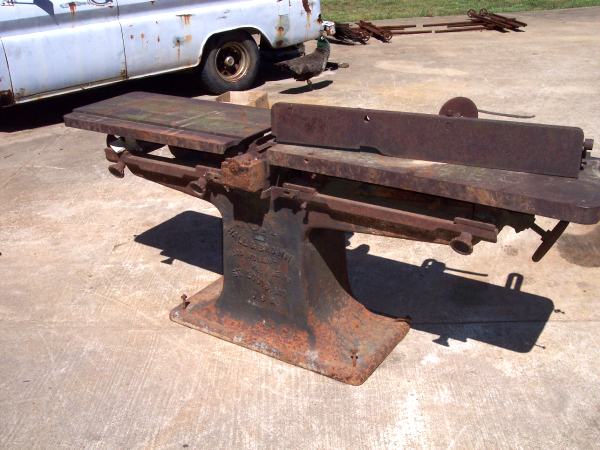
12: jointer. Again a very complete machine. Amazingly so for something it age. It appears to be missing one knob and that is it. Obviously it's going to a lot of work but this is going to make a nice jointer! I have started on it and hope to get it disassembled.
If there is any interest I will post updates as I restore these.
JeffJeff

When we remember we are all mad, the mysteries disappear and life stands explained.
- Mark Twain
Excelsior Woodworks My little space on the web
-
14th April 2007 02:21 PM # ADSGoogle Adsense Advertisement
- Join Date
- Always
- Location
- Advertising world
- Posts
- Many
-
14th April 2007, 03:38 PM #2
You've got to risk it to get the biscuit
- Join Date
- Jan 2006
- Location
- Canberra
- Age
- 32
- Posts
- 4,195
looking forward to more posts
cheersS T I R L O
-
14th April 2007, 04:11 PM #3
......say what?
- Join Date
- Feb 2005
- Location
- Melbourne, Australia
- Age
- 46
- Posts
- 2,346
yep, would also like to see the restoration progress pics.
They are beautiful old machines and I would love to have some like it if I had the space.
Is that a square head in the jointer?I know not with what weapons World War III will be fought, but World War IV will be fought with sticks and stones.
Albert Einstein
-
14th April 2007, 04:30 PM #4
Bricoleur
- Join Date
- Jul 2005
- Location
- Toowoomba Qld.
- Age
- 65
- Posts
- 2,792
Hi Kudzo,
Thats a lovely looking bandsaw, please keep posting as you go.
Cheers,Andy Mac
Change is inevitable, growth is optional.
-
14th April 2007, 08:34 PM #5
The Goldfish
- Join Date
- Mar 2006
- Location
- Bowral
- Posts
- 837
Jeff, I'd love you to post info on the restorations. I'm keen on old tools, but about as useful mechanically as a fencepost. But I'd love to learn....
They look like great old tools, good luck with getting them working again.Bob C.
Never give up.
-
14th April 2007, 09:17 PM #6
Sum ergo cogito (Cogito)
- Join Date
- Oct 2006
- Location
- Tallahassee FL USA
- Age
- 82
- Posts
- 4,650
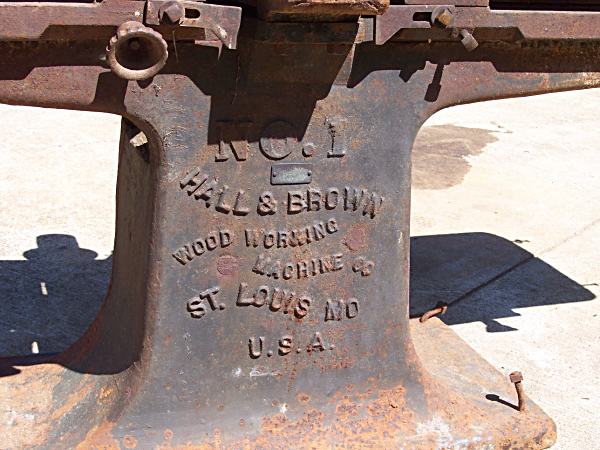
Here's a link for some info on Hall & Brown. Hit the tabs for some available documentation. One of them contained a title that sounds like your jointer. If you have a manufacturer for the bandsaw, boink the "Home" button to secure a menu. This site is a great resource for repairing and/or identifying such tools.
http://www.owwm.com/MfgIndex/Detail.asp?ID=411
Best of luck. You may need a quart or two of penetrating oil. Eagerly awaiting your WIP pics.
Hmmmm. Just noticed your sub-name. So you probably already know about this site, but some other viewers might not.
JoeOf course truth is stranger than fiction.
Fiction has to make sense. - Mark Twain
-
15th April 2007, 12:45 AM #7
Old machine fanatic
- Join Date
- Jan 2007
- Location
- Alabama, USA
- Posts
- 100
Good deal, guess I will keep you up dated on this. Started tearing the jointer down last night and hope to get it in a lot of pieces today and tomorrow.
Matrix, that is the finger eating square head. Haven't decided if I am going to keep it or change to a new round head. (I have one) But I really would like to keep it original if I can. So I am looking at adding some guarding to it. I want to try to use existing holes so I don't have to alter the machine. But if is it not safe then I will change it over since it will be used.
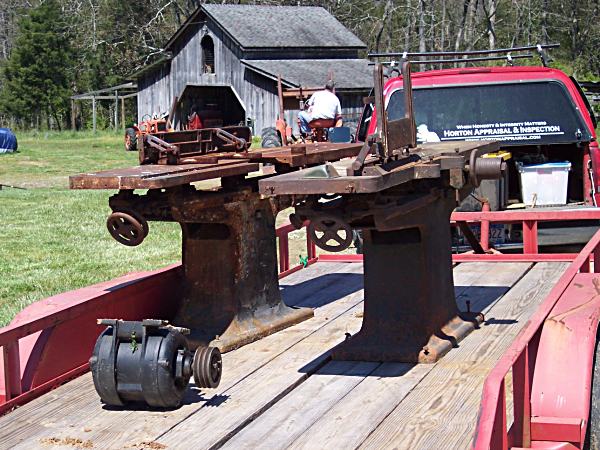
Joe, I just posted this one to the OWWM site. And amazingly I have it's twin on my trailer. It's going to an Aircraft museum to be used in their shop. I will be delivering it next week probably. Got to get the info of of it and post it to OWWM too.I am just amazed to see two of these in one place!
 Jeff
Jeff
When we remember we are all mad, the mysteries disappear and life stands explained.
- Mark Twain
Excelsior Woodworks My little space on the web
-
15th April 2007, 12:49 AM #8
Dances with splinters
- Join Date
- Jul 2005
- Location
- Oberon, NSW
- Age
- 63
- Posts
- 13,360
I trust that the one going to the aircraft museum will be missing one knob?
- Andy Mc
-
15th April 2007, 01:58 AM #9
Sum ergo cogito (Cogito)
- Join Date
- Oct 2006
- Location
- Tallahassee FL USA
- Age
- 82
- Posts
- 4,650
Turn and/or carve a wooden duplicate knob for the museum version. Should be satisfactory for inoperative use, and would look better than missing pieces.
JoeOf course truth is stranger than fiction.
Fiction has to make sense. - Mark Twain
-
15th April 2007, 01:04 PM #10
Old machine fanatic
- Join Date
- Jan 2007
- Location
- Alabama, USA
- Posts
- 100
The other jointer doesn't have any knobs. And it is going to be user at the museum helping restore old airplanes Here's what I got done today..
4/14/2007 Approximately 3 hours
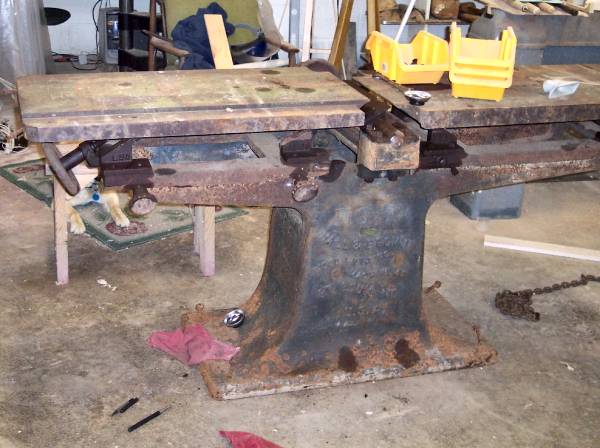
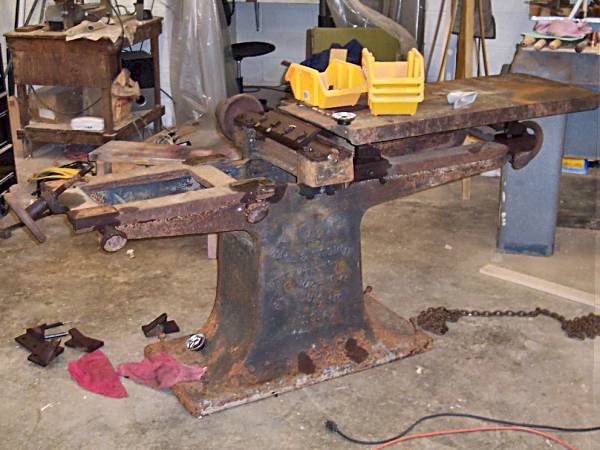
Started with the tear down today. That's the easy part most times. I didn't have any stuck nuts or bolts. Only one handle that didn't want to come off of a shaft but it gave it pressure, a big hammer.

Piece by piece it come apart till she it's down to the bare casting. Now if only assembly would go this fast!

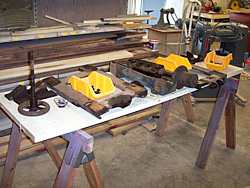
One thing I do is keep all the pieces stored together in order. They will probably get mixed up along the way but by that time I have handled them enough to know what goes were. Here they on the make-shift bench, a door on sawhorses, laid out as they came off the jointer.
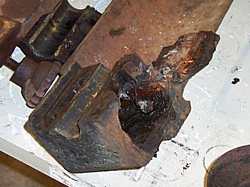
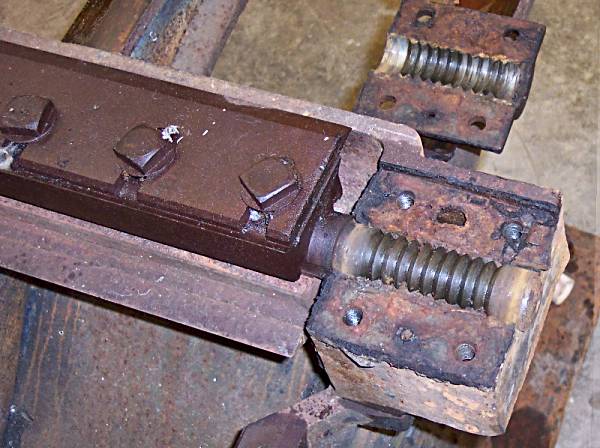
Here is broken piece on the bearing box. It was worse than I thought and no doubt in my mind that this was water freezing that caused this. Will have to find someone that can weld it for me.
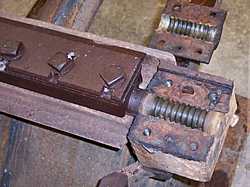
Close up of the babbit bearing and grooved shaft. This is the first one I have seen. but it keeps the shaft in place. A thrust bearing of sorts.
Now it's time for the unglamous part, cleaning up all the parts and pieces.
Jeff
Jeff
When we remember we are all mad, the mysteries disappear and life stands explained.
- Mark Twain
Excelsior Woodworks My little space on the web
-
15th April 2007, 01:46 PM #11
Sum ergo cogito (Cogito)
- Join Date
- Oct 2006
- Location
- Tallahassee FL USA
- Age
- 82
- Posts
- 4,650
With digital "film" so cheap, it's easy to photograph each step of the disassembly, then look at the photos in reverse order while re-assembling. Especially useful when working in unfamiliar and/or complicated territory.
JoeOf course truth is stranger than fiction.
Fiction has to make sense. - Mark Twain
-
19th April 2007, 12:00 AM #12
Old machine fanatic
- Join Date
- Jan 2007
- Location
- Alabama, USA
- Posts
- 100
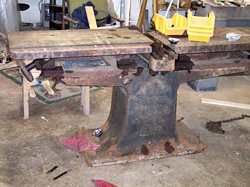
I got to spend the afternoon working on the Great Pumpkin. Still haven't got my game plan in my mind so I spent some time cleaning the base while I decided on the order of things. Thats something that has be done.
As much as I dreaded it I decided that wire brushing was the best option. Even if I had a tank (for electrolysis) I couldn't swing it over into it with the engine lift. So the wire brush won. And I completely wore out an almost new cup brush on this thing. There is nothing left but a nub!
I cleaned the ways on the base too. They still need some attention but they are much better. They are sort of shiny again instead of rusty.
It's cleaner that it looks in these photos. Camera amazes me what it picks up that isn't always there.

The base is primed and my back aches! Next time I will do something like this I will get the base up off the ground. I REALLY fell for anyone that has back problems.Jeff
When we remember we are all mad, the mysteries disappear and life stands explained.
- Mark Twain
Excelsior Woodworks My little space on the web
-
19th April 2007, 12:10 AM #13
Cool dude
- Join Date
- Oct 2001
- Location
- Warwick, QLD
- Age
- 45
- Posts
- 3,462
Jeff, just have to say that it enjoyable reading about your escapades.
I recently refurbished an old 12" bandsaw and really enjoy using the machine now. I'm sure you will too!Have a nice day - Cheers
-
19th April 2007, 07:56 AM #14
Quick and Rough
- Join Date
- Sep 2005
- Location
- Leithfield, New Zealand
- Posts
- 915
Jeff, as before with the drill press, I'm watching with great interest. Did you consider sandblasting the buzzer(s) instead of using a wire brush? Keep up with the photos please.
-
19th April 2007, 03:32 PM #15
Sum ergo cogito (Cogito)
- Join Date
- Oct 2006
- Location
- Tallahassee FL USA
- Age
- 82
- Posts
- 4,650
For power brushing tiny fillets, I've made some DIY end brushes from wire rope, from 1/8" to 3/8", aluminum tubing, and smaller wire seizing. Mounts in a drill motor, and the tubing forms a stationary handle. The seizing (with optional epoxy) forms a shank for the chuck. These used 1/4" coated cable. I thought the coating would form a barrel bushing, but the bottom one in the pic melted and locked up instead, although the handle can still spin in a stout glove. As the brush wears down, cut off some of the tube, or better yet, replace with a shorter one. Smallest commercially available I've found is about 1/2", usually larger.
JoeOf course truth is stranger than fiction.
Fiction has to make sense. - Mark Twain


 Reply With Quote


Similar Threads
-
Mortising machines
By sinjin1111 in forum HAND TOOLS - POWEREDReplies: 36Last Post: 11th May 2009, 10:29 PM -
Badge engineering - Rebadging identical machines
By boban in forum HAND TOOLS - POWEREDReplies: 53Last Post: 18th January 2008, 02:44 AM -
System restore trouble again
By jow104 in forum NOTHING AT ALL TO DO WITH WOODWORKReplies: 7Last Post: 28th August 2006, 07:39 PM -
Various types of GMAW machines
By Grahame Collins in forum WELDINGReplies: 0Last Post: 24th December 2005, 10:22 PM -
combination machines
By stevepay in forum TABLE SAWS & COMBINATIONSReplies: 5Last Post: 2nd August 2003, 12:21 AM
