

 Thanks:
  Likes:
  Needs Pictures:
  Picture(s) thanks:
Results 1 to 7 of 7
Thread: Grinder & Buffer Rebuild.
-
3rd September 2012, 09:47 PM #1
 New Member


- Join Date
- Aug 2012
- Location
- Brisbane
- Posts
- 4
 Grinder & Buffer Rebuild.
Hi All,
A quick intro first.
After googleing many topics over the years I often found I ended up here reading some old thread. There is clearly a lot of knowledge going around which I hope to soak up so it was about time I signed up. I have recently moved into my first house, and for the first time have an old tin shed to call my own. woohoo I have big dreams of turning it in to a small versatile workshop. Unfortunately I don't have any particular metal/wood skills, but my frugal nature drives me to all sorts of ad hoc and creative/dodgy solutions when it comes to making things.
Searching the local classifieds i came across a bench grinder and buffing machine. Now my dad had a bench grinder (with wire wheel and buffing attachments) which i have abused much over the years so i knew it was a tool i wanted. So I am now the proud owner of both.
The machines:
Waldown 6" 150mm bench grinder. 0.3Hp 1.7A 3000rpm
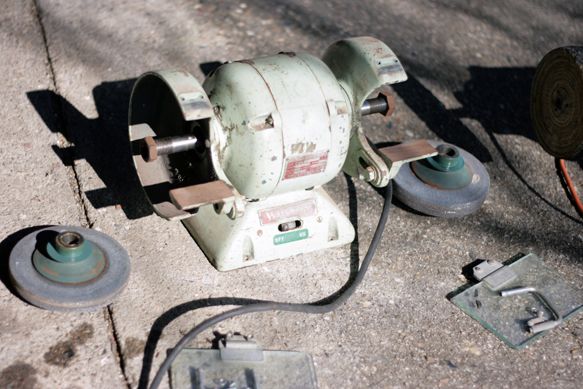
GMF "Buffing Machine" 0.33Hp 2.2A 2800rpm

Both are OLD machines, but I'm not too fussed. I think (hope) they would be better quality than a cheaper generic new machine. I plan on rebuilding/servicing them to make sure they are reliable and give them some extended life. I will be using the grinder for general steel grinding (looking at getting something to grind aluminum eventually), and the buffer will be used for mainly polishing aluminum (bicycle parts).
My plans include:
- Strip apart, inspect, clean, repair where necessary
- Paint outer bodies
- Replace some parts like bolts as required
- New grinding wheels
- New buffing wheels (I think i can reuse the existing ones but want some new softer wheels for final polishing)
- Get some compounds (1 cutting and 1 final polishing for aluminum)
- Sort out some sort of pedestal stand for each one
The power cords are perished on the grinder. I will replace both (They have to have matching power cords right?) with some salvaged (new) PC power supply cords. I can wire them up like for like, as they currently both work so that shouldnt be an issue.
After some preliminary dismantling, the buffer looks nice and clean internally and has sealed bearings. I will not be doing any major cleaning to this as it looks good as it is. For this reason I will probably focus on the buffer first as it seems easier and quicker to get finished.
The grinder has "loose" bearings and looks quite dirty inside. I will regrease all the bearings using high temp bearing grease. Now the part that I am not so sure on is how (if necessary) to clean up the motor.
Now to some questions to help me on my way
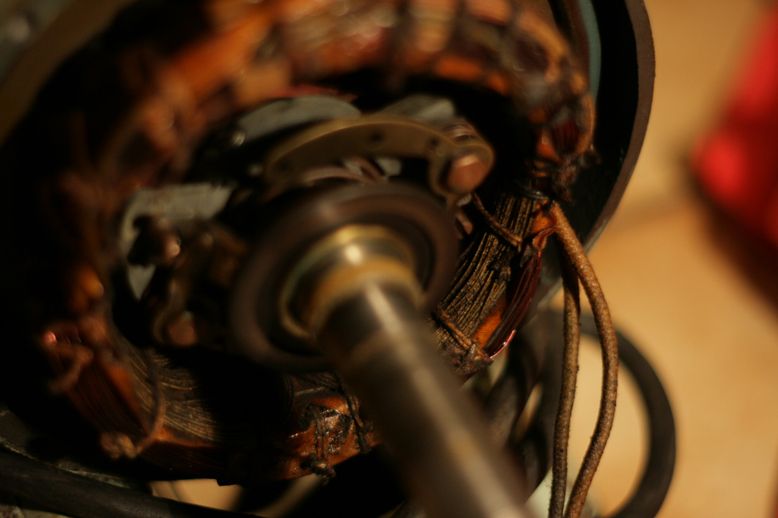
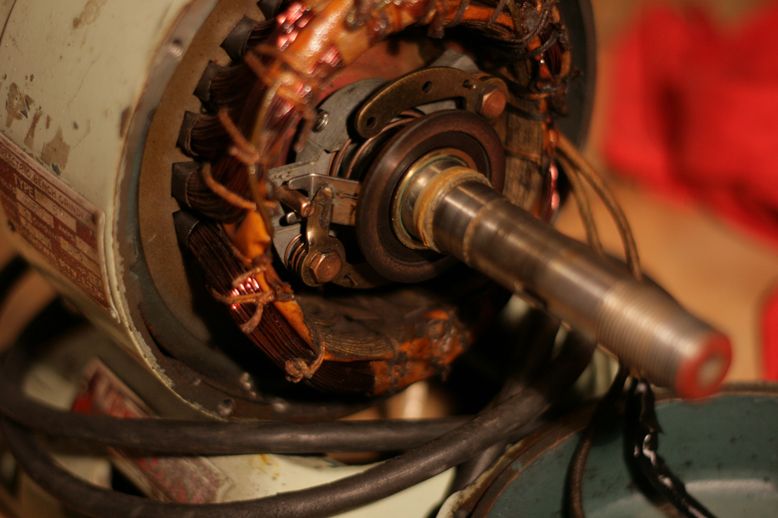
 As you can see in the photos the grinder motor wiring (windings?) have a lot of dust/dirt on them. How can I clean this up? Some sort of solvent/cleaner/aerosol spray? I can't imagine the dirt is doing any good, but I don't want to damage anything.
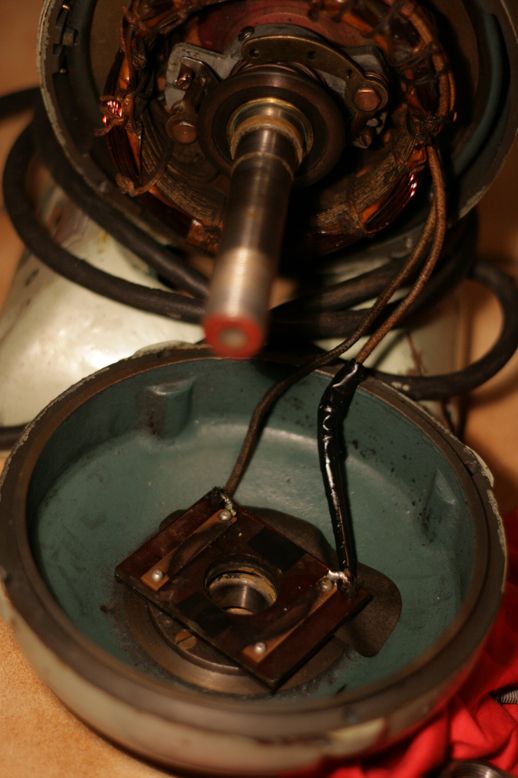
In the last photo of the grinder internals you can see attached to the end housing, that there are wires leading to two copper "bars". These appear to contact the copper looking ring on the shaft. What is this part and how does it work? Is there something I can do to service/maintain it? (polish it for better contact? grease it to reduce friction?)
The buffer housing is aluminum. What's a good way to repaint this. My past research/experience/available tools are pointing me to Prep housing with wire brushes/sand paper, use an etch primer (i already have this) to prime (i understand this is better for painting aluminum) Then finish up using an engine enamel (tougher and oil resistant) aerosol paint.
Any general tips and info that may help me?
Cheers,
Emil
-
3rd September 2012 09:47 PM # ADSGoogle Adsense Advertisement
- Join Date
- Always
- Location
- Advertising world
- Posts
- Many
-
4th September 2012, 09:13 AM #2
GOLD MEMBER

- Join Date
- Apr 2011
- Location
- McBride BC Canada
- Posts
- 3,543
Bearings: the "play" in the bearings may be from wear, without replacement, the beast may wobble enough to make precision an issue. I bought a power miter box in a garage sale for $50, $30 to get the arbor shaft bearings redone.
Cleaning the motor: I built a motorized apple crusher, the press is the next project.
To clean the guts of the old motor, I ran my ShopVac while I 'dusted' the thing with a new & stiff paint brush. . . . . motor seems to run fine. I think that it's only the running surfaces making electrical contact which are important.
-
4th September 2012, 10:19 AM #3
 Butcher of wood
- Join Date
- Jun 2010
- Location
- Bundaberg
- Age
- 54
- Posts
- 3,429
Hi Emil and welcome to the forums.
Electric motors are fairly easy to sort out so you've picked a good couple of projects to set you on your way.
Ok, firstly I would replace the bearings, whatever the condition of them appears to be. Take them to a bearing supplier who will replace them with modern sealed types. Do this and these will run happily for another thirty or forty years.
As well as replacing the power cords I would look at replacing the switches too. As those old bakelite ones are going to be pretty hard to come by you can either replace them with modern switches, or if you want to keep the vintage look then bypass them completely but put a HUGELY OBVIOUS on/off switch on the grinder pedestal, if your electrical knowledge is up to it fit a NVR switch. Check out all the "loose-ish" wires and joints inside the motor, don't be afraid to replace any that are starting to look dodgy and you can pick up new heat shield sleeving from Dick Smith/Jaycar (the sleeving is that fibreglass looking stuff on the wires inside the motor). Definately sort out that cable with the electrical tape around it; either replace it or desolder one end and slip on some new sleeving.
The mechanical gizmo on the end of the rotor is a set of brushes that connect a set of starter windings to enable the motor to spin up from a standstill, once up to a set speed they disengage using a flyweight arrangement. Just make sure all the linkages are free and you shouldn't have any trouble. Lubricate them with a tiny amount of PTFE, graphite or silicone lubricant. The electrical contacts just need to be cleaned up to remove any black scorching; my prefered tool for this is a pen with glass-fibre bristles, but an "ink" type rubber eraser will do.
For cleaning the inside of the motors, the dust can be brushed out or blown with compressed air. Electrical contact cleaner will shift any unsightly staining or fouling from grease. The wires inside will be enamelled so there's not a lot that can be damaged from solvents, but beware of the rubber type insulation on the "loose" wiring, if you don't plan on replacing them outright don't put any solvents near them.
You've pretty much nailed how to sort out the paintwork. I like the look of old machinery and a hammered enamel finish in either lime green or pale blue looks the biz. I wouldn't try to remove the rivetted on information plates, but there are guys on this forum who properly restore old tooling and can tell you how to do this if you really want to.
Polishing stuff (mops and the like) are readily available; your local Big Green Shed will stock pretty much everything you need. If not go to a dedicated tool shop. Same goes for new grinding wheels but, if you are serious about grinding aluminium you would be better off getting a cheapy belt and disc sander. You can get wheels for ally but they are very specialised and I can't say I've ever seen them for sale in Australia (not that I've actually looked real hard). The same goes for copper or brass or bronze.
Lastly, you will need some form of wheel dresser. When you initially fit new wheels they will wobble slightly and vibrate, a wheel dresser cuts into the wheel and trues it concentric to the shaft. Also, as a wheel "blunts" a quick lick with the dresser restores the sharp cutting edges of the gains. I prefer single point diamond wheel dressers for truing and shaping wheels, and a multi point one for flattening and squaring. McJing, Carbatec and Timbecon sell these and you can get them on fleabay too.
Have fun, and don't forget to post pictures!
-
4th September 2012, 08:25 PM #4
GOLD MEMBER
- Join Date
- Nov 2007
- Location
- melbourne australia
- Posts
- 2,643
Emil,
Definitely replace the bearings with sealed ones.
I wouldn't use wire wheels or brushes on the aluminium housing. See the before and after pics of my GMF Junior grinder. I used paint stripper and a scotchbrite pad to remove the old paint. Then etch primer followed by hammer-tone paint in a spray can from Bunnings.
The old bakelite switch in mine is still going strong. You'll need to make a judgement call about whether to replace that.
this bloke has cheap diamond dressers. single point and flat.
eBay Australia: Buy new & used fashion, electronics & home d
Chris
-
4th September 2012, 09:57 PM #5
New Member
- Join Date
- Aug 2012
- Location
- Brisbane
- Posts
- 4
Thanks for all the advice.
I have to clarify when I referred to the bearings as "loose" I simply meant this as opposed to sealed bearings. It's often used this way on bicycle forums. When the previous owner switched the grinder on to show it working, (simply sitting on the floor) the unit was solid and smooth, no obvious vibrations or movement (although I probably wasn't paying too much attention).
I'll see how I go with the other aspects and make a call regarding getting sealed bearings when i get closer to that stage on the grinder.
Chris. Awesome job on that grinder. It has a real art deco design to it. I do have paint stripper, but thought it might be too harsh on the aluminum. After seeing your job I will give it a go. I also didn't think of bunnings for paint. I was thinking Supercheap auto/repco/autobahn, which unfortunately has only a very limited range of colours in engine enamel. I want to try get some old machine colour, light desaturated blue/green.
Chief Tiff. Cheers for all the info. I will have a better look at the electrics and do what I can to fix up whats there.
For the motor I'm going to to try get hold of some electrical contact cleaner. I'll first try wipe out any dirt with a dry rag, move up to using a dry old toothbrush. Then once i have done all i can i will try spraying it with contact cleaner. From what I've read it should be pretty safe.
Next up for me is to track down some electrical cleaner, check out my options for paint (I want to establish a "paint system" before I spray any primer to make sure it all works/adheres together), and start preparing the buffer body for primer.
-
16th September 2012, 09:25 PM #6
New Member
- Join Date
- Aug 2012
- Location
- Brisbane
- Posts
- 4
It's been a while but I'm back.
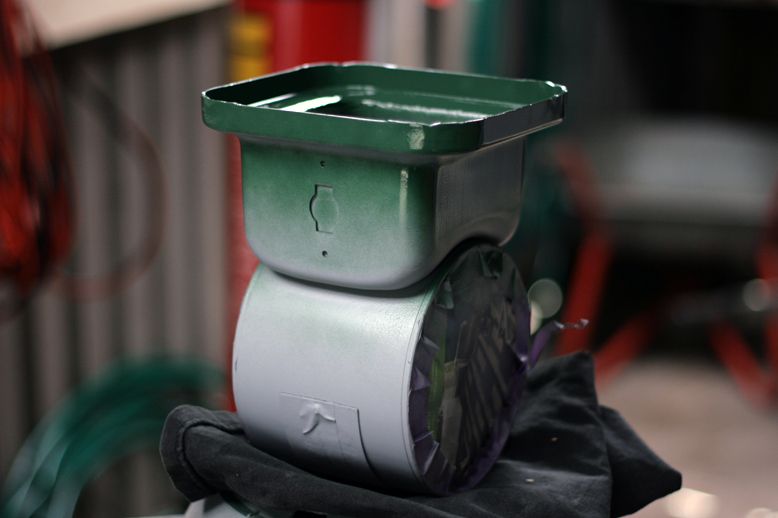
As I said I started on the Buffer first as it looked easier.
So I went to the big green shed to check out their range of paints and it was much better than the automotive stores. I settled on a dark green which was the nicest "old machine" style colour I could find. I ended up spending $$80!! on paint... this better work out
The buffer end housings had a lot of paint already coming off so I started with these. Some rough sanding, some paint stripper and some more sanding, some hand wire brushing and I had it down to bare metal. The old paint almost fell off in parts with the 80 grit. It was relatively easy and so I was happy I also was happy that i managed to get the cast GMF logos nice and clean.
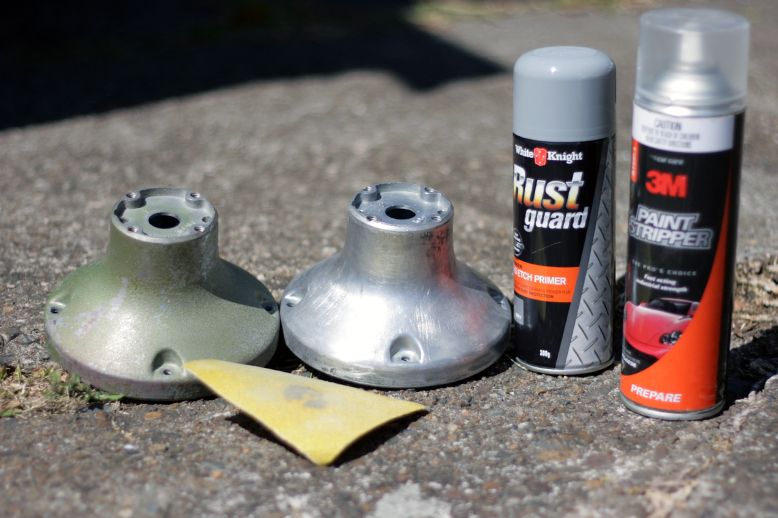
I settled on the White Knight Rust Guard series of paint. They appear to be heavy duty and designed for outdoor metal goods (cast iron stuff). I got an SLS etch primer for aluminum parts, normal primer for steel parts, Green colour paint, a red engine enamel for contrasting parts, and a clear coat for covering labels etc. I already had some paint stripper, and black engine enamel at home.
Once the old paint was removed, I gave it a quick rub down with some wax and grease remover and proceeded to prime it with some etch primer. This dried real fast and went on real smooth.
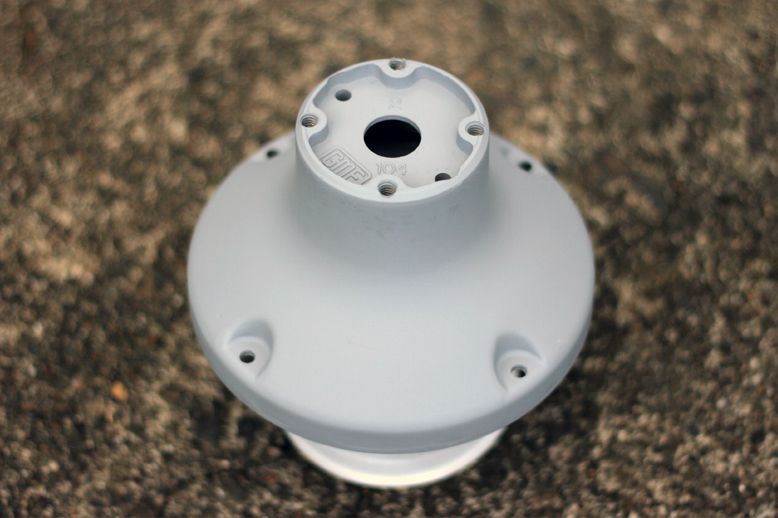
I let this dry for about an hour then hit it with some colour. I left the can in the sun a bit to warm up, and was very impressed with how nice it flowed and solidly covered the parts. I don't have a painting area set up, but I was lucky with the wind and I didn't get much dust/dirt on the parts.
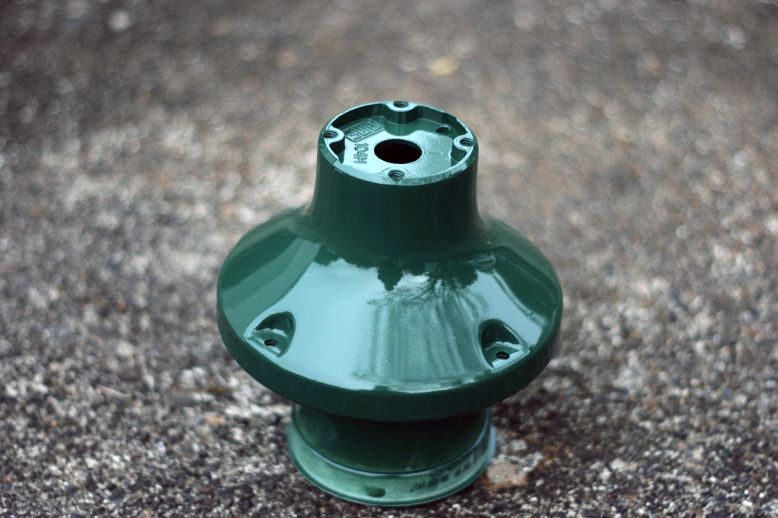
Overall I was very happy how it turned out so far. The colour looks great (maybe a little too glossy) and the finish is much better than I could have hoped for.
Enough paint fumes for now, stay tuned for more...
-
27th September 2012, 06:24 PM #7
New Member
- Join Date
- Aug 2012
- Location
- Brisbane
- Posts
- 4
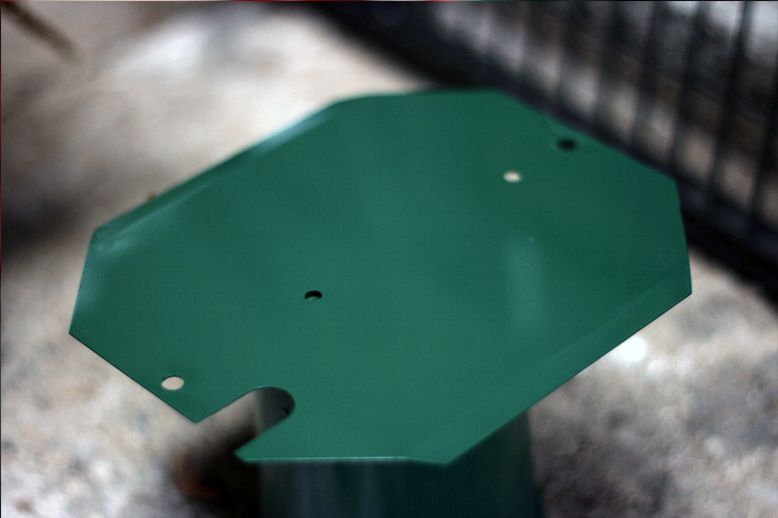
On to the body. Dues its size and shape, this was a lot more difficult to work on. I couldnt remove all the paint but still managed to get a good surface for painting.
Body in primer. At this stage I had removed the cover plate underneath, the switch, wiring and capacitor. I took a few photos of the wiring to make sure I could get it running again.
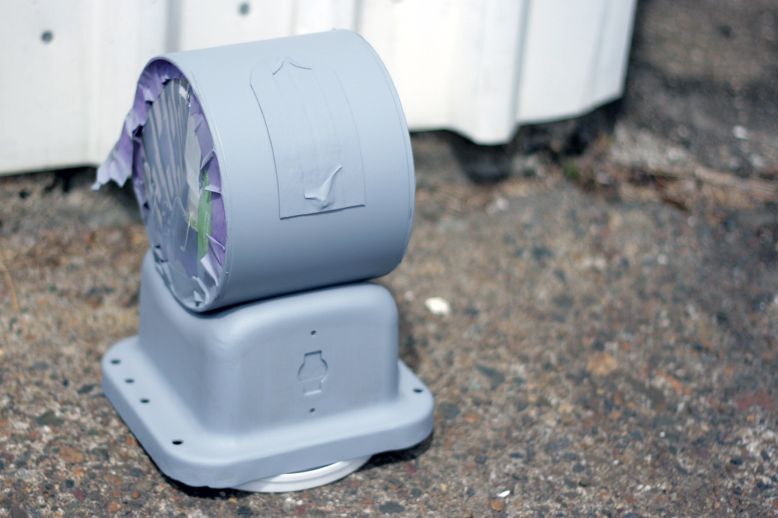
I used some painters tape to mask off the machine badge/label.
Body painted.

Underneath the body, the edges that would be seen should someone unbolt it and look underneath... I actually did the underside before the "top" as I wanted the visible side to cover any overspray and create a more consistent coat.
The body took some more coats than the end housings due to have a slightly textured surface. So I sanded it back a bit and did a second final coat.
Even thought you cant see underneath the machine, it felt better to paint it... This is the cover that well.. covers the electrics (switch and capacitor).
More shall follow soon.

 Reply With Quote
Similar Threads
-
Macson Bench Surface Grinder Rebuild
By CGroves in forum METALWORK FORUMReplies: 47Last Post: 19th July 2013, 11:26 PM -
polisher/buffer for wood
By Superbunny in forum FINISHINGReplies: 3Last Post: 19th August 2009, 09:48 PM -
Travelling Buffer/Grinder System
By OGYT in forum WOODTURNING - GENERALReplies: 15Last Post: 18th September 2007, 12:10 AM -
Small Buffer
By Penpal in forum WOODTURNING - PEN TURNINGReplies: 5Last Post: 17th October 2006, 05:00 PM -
bench buffer
By pipegunn in forum HAND TOOLS - POWEREDReplies: 2Last Post: 23rd September 2005, 12:41 AM
