

 Thanks: 0
 Likes: 0
 Needs Pictures: 0
 Picture(s) thanks: 0
Results 1 to 13 of 13
-
19th March 2012, 09:12 AM #1
 Senior Member


- Join Date
- Feb 2011
- Location
- Mornington Peninsula
- Posts
- 183
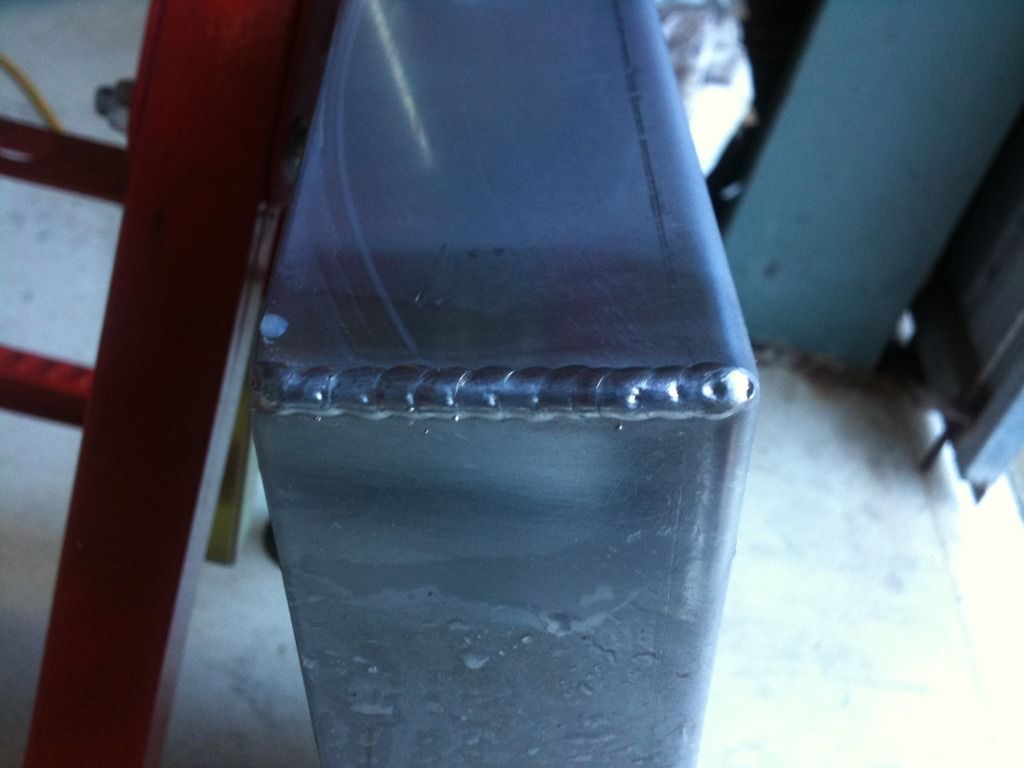
 Welding Critique: SS 2mm Thick MIG
Just wanted to know what peoples thoughts were on the weld pictured:
Back Story:
This is the top tray for my SS welding trolley.
The tray was folded up for me in 2mm SS.
Initially I wanted the fabricator to weld up the corners for me because I wasn't confident enough to get a decent looking weld wit the MIG.
MIG welds really not as pretty as a TIG weld. And I didn't want to grind it.
Anyway after chatting to the fabricator who is in his 60's about my venture into stainless welding he said: "Why don't you weld it yourself?"
Explained how a neat MIG weld that required no further work was a bit beyond me. And I could run a bead but it never looks that flash. So he suggested welding it a bit at a time as that is how he would do it with a MIG. He also gave me a chunk of copper to clamp to the back side of the weld.
So I gave it a go and I'm pretty happy with how it turned out just wondering what others think.
I have not touched the weld except going over it with a hand stainless wire brush just after welding and then pickling it. Did not use proper stainless MIG gas either.
Cheers
Justin
-
19th March 2012 09:12 AM # ADSGoogle Adsense Advertisement
- Join Date
- Always
- Location
- Advertising world
- Posts
- Many
-
19th March 2012, 10:07 AM #2
Timber Hoarder
- Join Date
- Sep 2002
- Location
- Minbun, FNQ, Australia
- Age
- 66
- Posts
- 12,881
Looks damned fine to me.
 Cliff.
If you find a post of mine that is missing a pic that you'd like to see, let me know & I'll see if I can find a copy.
-
19th March 2012, 05:40 PM #3
SENIOR MEMBER
- Join Date
- Feb 2010
- Location
- Ballina, NSW
- Posts
- 725
Nice job Justin - so is this done with a string of on/off pulses or a continuous run? How'd the back of the weld turn out? - clean? Cheers - Mick
-
19th March 2012, 05:42 PM #4
Member
- Join Date
- Jul 2008
- Location
- Lismore, NSW
- Posts
- 53
For a welding trolley? Looks great.
For anything more structural, it's just a bunch of tacks.
-
19th March 2012, 05:46 PM #5
Senior Member
- Join Date
- Feb 2011
- Location
- Mornington Peninsula
- Posts
- 183
It's a series of tacks but each tack blends in with the next. Originally Posted by WelderMick

Basically I weld, STOP, wait for the helmet to un-shade, and weld again.
Just keep doing this over and over until it's done.
It's a corner weld so once welded has full penetration.
Back of the weld due to the copper looks really good and like it's been done professionally.
Cheers
Justin
-
19th March 2012, 05:49 PM #6
Senior Member
- Join Date
- Feb 2011
- Location
- Mornington Peninsula
- Posts
- 183
That's probably true. Originally Posted by distractor
I can do full penetration welds no problem but being MIG they are just nowhere as neat as a TIG for decorative purposes.
I noticed at the 4x4 and camping show all the stainless water tanks are MIG welded and they don't pickle the welds either.
Could easily run a bead but didn't want to grind or finish it in anyway.
Cheers
Justin
-
19th March 2012, 06:22 PM #7
GOLD MEMBER

- Join Date
- Sep 2010
- Location
- Lebrina
- Posts
- 1,099
I really don't want to sound negative, so I hope you take this in the spirit it is intended. Originally Posted by Jarh73
Why do you feel that if you were to run a bead it would take any more finishing than your series of tacks, (as it has been described)?
My suggestion would be to have a bit of a play with some scrap ss and practice setting your voltage and wirespeed. Believe me you will be able to lay down the sweetest little corner to corner joint you have ever seen. I would suggest that for any more extensive work that you get a cylinder of the correct gas as your corrosion resistance and strenght may be compromised by the incorrect gas.
On the subject of pickling paste - that is seriously nasty stuff, so remember your ppe - face visor and rubber gloves. By the way, you don't need to wire brush before pickling your welds and either a red or grey scotchbrite pad will blend your welds in nicely.
Keep playing around and good luck.
-
19th March 2012, 06:41 PM #8
Senior Member
- Join Date
- Feb 2011
- Location
- Mornington Peninsula
- Posts
- 183
Lots more to learn and practice and the right gas is on the cards. Originally Posted by Karl Robbers
Bear in mind I had discussions with an experienced SS fabricator before deciding to do it this way. Sure he maybe wrong but the work I have seen in his factory looks excellent so I had some faith in his advice.
Cheers
Justin
-
20th March 2012, 07:43 PM #9
GOLD MEMBER
- Join Date
- Sep 2010
- Location
- Lebrina
- Posts
- 1,099
Not saying that your stainless fabricator is wrong at all. Originally Posted by Jarh73
Where I was headed with my comment was along the lines of saying that a continuous bead would not be all that hard to achieve, particularly as you had a copper backing bar in place and would have actually been more aesthetically pleasing, (if you look carefully at the weld that you did it can be seen that each tack hasn't really blended properly and a visible crater can be seen in each tack weld).
When cutting/grinding/sanding stainless be careful to only use iron free wheels and do not use wheels on carbon steel and then stainless as iron can be transfered to the stainless that will cause staining.
It's all a learning curve.
-
20th March 2012, 08:08 PM #10
Senior Member
- Join Date
- Feb 2011
- Location
- Mornington Peninsula
- Posts
- 183
It's all good and taken on board. Absolutely no offense taken. Originally Posted by Karl Robbers
All grinding, cutting and sanding equipment is marked for SS only. And all iron free too.
When I get the right gas mix for stainless I'll certainly be giving thin material another go. Doesn't seem to "wet" as well on the thin material. I did some excellent practice right angle welds on some 1.6 mm that required no further treatment. However that was at higher current and the weld wet in very nicely. Welds had no starting lump and finishing slump.
Might do away with the oxyset bottles and get some stainless gas.
Cheers
Justin
-
21st March 2012, 03:29 PM #11
GOLD MEMBER
- Join Date
- Oct 2010
- Location
- melbourne, laverton
- Posts
- 1,469
copper?
is the copper for removing heat from the work so you don't make holes?
aaron
-
22nd March 2012, 07:29 AM #12
GOLD MEMBER
- Join Date
- Sep 2010
- Location
- Lebrina
- Posts
- 1,099
That is partly the reason. The copper block also has the effect of supporting the joint and preventing over penetration with the resultant poor appearance plus the copper stops the atmosphere from contacting the penetration bead to some extent leaving a much cleaner weld from behind. Aluminium will also work but copper is best. Originally Posted by azzrock
This technique is also of benefit where fit up is less than perfect.
If welding Aluminium a stainless steel block could be used.
-
24th March 2012, 04:54 PM #13
Cricket Tragic
- Join Date
- Jan 2011
- Location
- South Brisbane QLD
- Age
- 64
- Posts
- 61
I like it, Justin. I'd be happy with it.


Similar Threads
-
Welding Critique
By monkeyrelish in forum WELDINGReplies: 4Last Post: 17th June 2010, 07:20 PM -
welding very thick heavy duty steel??
By Mathuranatha in forum WELDINGReplies: 6Last Post: 21st June 2008, 09:28 AM -
Welding thick to thin section RHS
By Grahame Collins in forum WELDINGReplies: 1Last Post: 6th November 2007, 08:34 PM -
critique please
By holzman in forum WOODTURNING - GENERALReplies: 37Last Post: 31st October 2006, 11:55 AM -
A bit of a critique
By Wild Dingo in forum WOODCARVING AND SCULPTUREReplies: 2Last Post: 19th June 2006, 06:44 PM
