

 Thanks: 0
 Likes: 0
 Needs Pictures: 0
 Picture(s) thanks: 0
Results 31 to 45 of 65
Thread: Welding strength?
-
9th May 2009, 01:05 AM #31
 .
.


- Join Date
- Feb 2006
- Location
- Perth
- Posts
- 27,795

yeah I think you are still a bit quick especially that first thin weld. It looks like your wandering a bit and then correcting, I also think you are also perhaps not keeping your weld stick angle at the optimum. Rather than practicing a freehand line, mark yourself a couple of paralles lines and stick to one line. Then mark a zigzag and stick to that, then a castellated run, then loops, etc eventually you should be able to sign your name in copperplate!
As others have said - just compare your welds today with yesterdays - if you do they same practice every day for a week you will be HOT!
-
9th May 2009 01:05 AM # ADSGoogle Adsense Advertisement
- Join Date
- Always
- Location
- Advertising world
- Posts
- Many
-
9th May 2009, 01:35 AM #32
 Intermediate Member
- Join Date
- Oct 2007
- Location
- sydney
- Posts
- 37
Yeah figured a bevel may help but wouldn't the rod arc to the outer edges of the bevel since that is the shortest path?
My concern is having to weld 50mm wide plate to 50mm wide rhs as i cant seem to get the weld into the area where the RHS rolls in the corners...
Anyone in Sydney willing to work for a case of beer? I just need someone to help with the critical welds and some private guidance?
haha
i'll try and get some small scraps from the metal shop tomorrow to do more practice...I hope I can get it right soon as I want to finish the trailer before the snow season starts! and atleast take it to one camping trip!
-
9th May 2009, 07:51 AM #33
 Super Moderator
- Join Date
- Jan 2004
- Location
- Mackay Qld
- Posts
- 3,466
Hi, Motegi,
In my former life as a Tafe Metalfab teacher I have taught plenty of fellas to weld. Its no big thing but means lots of practice to develop your hand and eye co -ordination for the motor skills involved in stick welding.
Also I helped a few blokes on this forum develop their skills. It can be done and only requires a bit of effort in practice and the determination to stick to it when the results get a bit pear shaped.I know when you are on your own with out any guidance it can be a bit tough in not knowing good from bad or where to start, but hey,we are all here to help.
What you are looking for is a bench mark to gauge your efforts against.
What helps is a handy tool to break the process down into individual components and work on perfecting them.
My tech teacher taught me the Anagram SAVAGE some 40 years ago.
It goes like this
S - Speed of travel- you control that
A - Angle of the electrode- 2 angles ,drag angle and lateral(side) angle
V - Voltage -believe it or not ,controlled to an extent by your arc length
A - Amperage -Set by you to meet the requirements of the electrode
G - Gauge -another way of saying electrode diameter.
E - Electrode -Selecting the correct diameter electrode to suit metal thickness and type to suit the metal you are about to weld.
Obviously we start at the Electrode end and choose a diameter of electrode suitable to weld that thickness. The box thickness will likely run 2.4 to 3.2 thickness .You just don't build trailers out of light wall thickness box sections. Gauge or electrode diameter of 2.6mm will be OK.
The packet or box the electrode came will will usually bear a recommendation
of how much Amperage needed .Ok you have no markings on your adjustment.
Practice and check time - run beads on scrap until your get a bead similar as per the photo set- Put a mark on your adjuster and make a note what the mark equates to-ie 2.6mm weldcraft on 2.4mm thick box section.
Arc length -The distance you set by electrode manipulation between the yet unburnt electrode and the surface of what you are welding is very important. It sets your Voltage and that is the heat factor -too little arc length and you get that ropy look -too much and the bead starts to flatten out.
Next to be considered is Angle - Drag angle in the direction of movement will affect how deep the arc will bite into the metal( along with the amps setting )The other angle the lateral is just 90 degrees each side for a butt joint and varies from 30 to 45 for a fillet(inside corner ) weld.
Lastly the speed of travel, let the ripple pattern like a crescent shape determine your travel Speed..
Once you get the savage thing locked in you are set as it become a guide.
Another thing that's important is vision. If you struggle to read the paper or phone book it may be time for glasses. Before I got script glasses ,I used the ones off the tree at the chemists-not perfect but still a good start.
Happy welding
Grahame
-
10th May 2009, 01:15 AM #34
Senior Member
- Join Date
- May 2008
- Location
- Australia, Qld, Toowoomba
- Posts
- 102
Attachment 104709motegi,
This photo here with the two weld beads. You have the rod too close to the metal.
-
10th May 2009, 10:44 PM #35
Senior Member
- Join Date
- May 2008
- Location
- Australia, Qld, Toowoomba
- Posts
- 102
Have a quick look over here at this page of mine. I'm not a pro but it might help you on how to arc weld a bit better.
How to arc weld: Starting the weld and laying a weld bead
Peter
-
11th May 2009, 01:06 AM #36
Intermediate Member
- Join Date
- Oct 2007
- Location
- sydney
- Posts
- 37
A weekend of welding and practicing, i think I am getting the hangs of it!
What i tried here is a zigzag patern, the penetration is actually quite good from the look of it we I was welding...
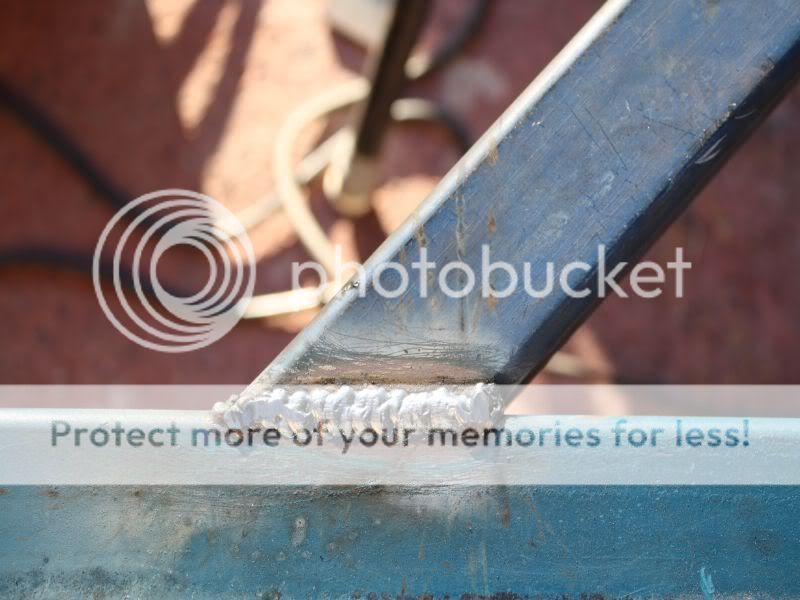
with this weld i actually cut a shallow V groove to weld over...fairly flat.

From these images do you think these are strong enough welds?
-
11th May 2009, 08:58 AM #37
Senior Member
- Join Date
- May 2008
- Location
- Australia, Qld, Toowoomba
- Posts
- 102
The first weld should be a lot smoother, you should be able to get a similar finish to the bottom weld.
What size box ans what size thickness is the metal? Yes weaving left and right is okay, but you have not quite make them complete.
They look almost like a series of blobs not quite a full straight stringer bead.
The second one is probably going to hold stronger as you beveled it out. It is nice and smooth which is a good indication that you should not have any inclusions or holes in it. There is a bit of undercutting which you can see that the height of the weld is lower than the height of the steel.
To make it just that little bit stronger you probably should run another weld over the top. But on the other hand it probably ain't gonna fall off anyway so what's the point, sorta thing.
Yep, you are getting there.
-
11th May 2009, 01:14 PM #38
Senior Member
- Join Date
- Jan 2008
- Location
- Melbourne
- Posts
- 251
One of the best ways to get the electrode started and to get a nice straight weld, is to get some nice thick gauntlets, and support the electrode with your left hand or knuckle, especially if you have a shaky hand like me. This means you can strike the arc a bit easier, and guide it nicely along the weld line.
Pre heating the electrode on a scratch plate briefly also helps, especially for the first strike. It helps bed the earth connection down.
-
11th May 2009, 01:32 PM #39
Intermediate Member
- Join Date
- Oct 2007
- Location
- sydney
- Posts
- 37
I'm now actually thinking about buying a MIG welder for gasless application, I keep hearing that the fumes from them are toxic and gasless MIGS will cease to exist? Whats the GO with that? is that true?
I dont want to pay for a bottle that I will not use all the time...
-
11th May 2009, 04:04 PM #40
Pink 10EE owner
- Join Date
- Aug 2008
- Location
- near Rockhampton
- Posts
- 4,304
Yes that is what I do when the rod is long...Also I might add I have seen professional welders do it as well.. Originally Posted by quercus

Here is a mock up of what is meant. The rod is resting on that seam in the gloves...I pull the hand along as I weld to keep it steady..When it gets too hot I stop..
Link to big picture -->>
http://img.photobucket.com/albums/v6...ngstick002.jpg
-
11th May 2009, 05:18 PM #41
GOLD MEMBER
- Join Date
- Jun 2007
- Location
- sydney
- Age
- 64
- Posts
- 3,566
If you are regularly using your free hand to guide your rod or possably mig torch I would be beneficial for you to use Glove protectors.
Would probably allow you to use more of your rod with out the Heat working its way through the leather as well as stopping the leather cooking and getting hard,nothing worse than when the finger tips of your glove get hard and dont bend to well.
-
11th May 2009, 05:52 PM #42
Senior Member
- Join Date
- May 2008
- Location
- Australia, Qld, Toowoomba
- Posts
- 102
motegi,
The fumes from anything are probable bad.
The fumes form stick are probablt bad too. About all you can do is to use in a well ventilated area. Maybe have a fan blowing the smoke away from a distance.
-
11th May 2009, 05:54 PM #43
Intermediate Member
- Join Date
- Oct 2007
- Location
- sydney
- Posts
- 37
more importantly...are gasless MIGS going to be obsolete? I dont wanna buy another welder and find that i cannot use it (without gas) in 12 months time...
-
11th May 2009, 06:07 PM #44
GOLD MEMBER
- Join Date
- Jun 2007
- Location
- sydney
- Age
- 64
- Posts
- 3,566
If you are thinking of buying a Mig why not get one that is Gas or Gasless.
What things are you considering to do with the Mig that you cant do with the Stick.
-
11th May 2009, 06:12 PM #45
Builder, Joiner, Father
- Join Date
- Jan 2006
- Location
- Blue Mountains NSW Australia
- Posts
- 592
This is your best so far. You have the basics down pat now. You now need to practice fabrication skills.... ie..Planning the job, starts and stops for welds, keeping fabricated parts true while welding, avoiding heat distortion etc etc.
It is a shame DJ removed your first pics on page 1.
A pic as above, alongside your first posted pic would make your positive progress obvious for all newcomers to this thread. How about resizing and replacing the original pics DJ.
I will do it if you like??
Thanks for that DJHe was asked to resize them but after 24 hrs they hadn't been, so they were removed.
You're more than welcome to do so Fossil, here is a link to his Photobucket Album.
I have added the original bird poop weld I was referring to.


Similar Threads
-
Timber strength
By ElizaLeahy in forum WOODTURNING - GENERALReplies: 3Last Post: 8th February 2009, 10:46 AM -
Strength of Steel
By smidsy in forum METALWORK FORUMReplies: 8Last Post: 11th March 2008, 09:53 AM -
shelf strength
By forunna in forum WOODWORK - GENERALReplies: 3Last Post: 13th July 2007, 05:30 PM -
Mdf Strength
By clampjaw25 in forum BOX MAKINGReplies: 3Last Post: 23rd March 2007, 09:34 AM -
Lid Strength
By LineLefty in forum WOODWORK - GENERALReplies: 5Last Post: 22nd April 2005, 05:00 PM
