

 Thanks:
  Likes:
  Needs Pictures:
  Picture(s) thanks:
Results 1 to 8 of 8
Thread: 1955 L.S.Barker Planer.
-
1st December 2012, 11:00 PM #1
 Rusty doesn't mean its dead


- Join Date
- Dec 2010
- Location
- Melbourne, Australia.
- Posts
- 825
 1955 L.S.Barker Planer.
Frankly the prospect of restoring another planer/buzzer the traditional way was not exciting me in the least, the thought of hours on the angle grinder and wire cup brush grinding out old paint, rust and paint and filler, only to fill and sand again for hours and not to mention breathing in the dust, or even if your wearing a dust mask your still covered in it, and then you still had to mask up and undercoat and final coats, with overspray every where, and in my work shop space is a premium, there is never enough room for these projects to spread out.
I have done many machines over the years and although I had managed to get good results, the paint it self was still very fragile, a piece of heavy equipment fell on my newly restored Greenlee Table saw recently chipping the paint at the base, ouch !!
I have been a big fan of powder coating for a long time now, the process is clean and straight forward, most Powder Coaters will have some kind of sandblasting process as sandblasting helps to �key in� or get good adhesion to the surface being powder coated.
The powder is applied to the surface using an application gun the sprays a mist of powder colour over the part being painted, most of the particles are attracted because of the negative charge being run through the part.
The finished Baked surface is incredibly durable and strong, I have dropped item�s before only to pick them up with-out any marks on them.
I have had a few very small machines powder coated, table saws, combination machines etc, but never a big heavy solid cast machine like my 1955 L.S.Barker Planer.
I spoke to my Powder Coater and he said bring it in and we will do it.
I was very excited, the planer was going to be sand blasted, then I was to get a phone call and go down and fill all the imperfections in the cast to get it flat and mask up the areas that do not need paint, myself, just to save a little money.
I then picked up the parts a few days ago after it had gone through the bake oven at 200 degrees, dam hot in there.
This is my Barker planer so far ............
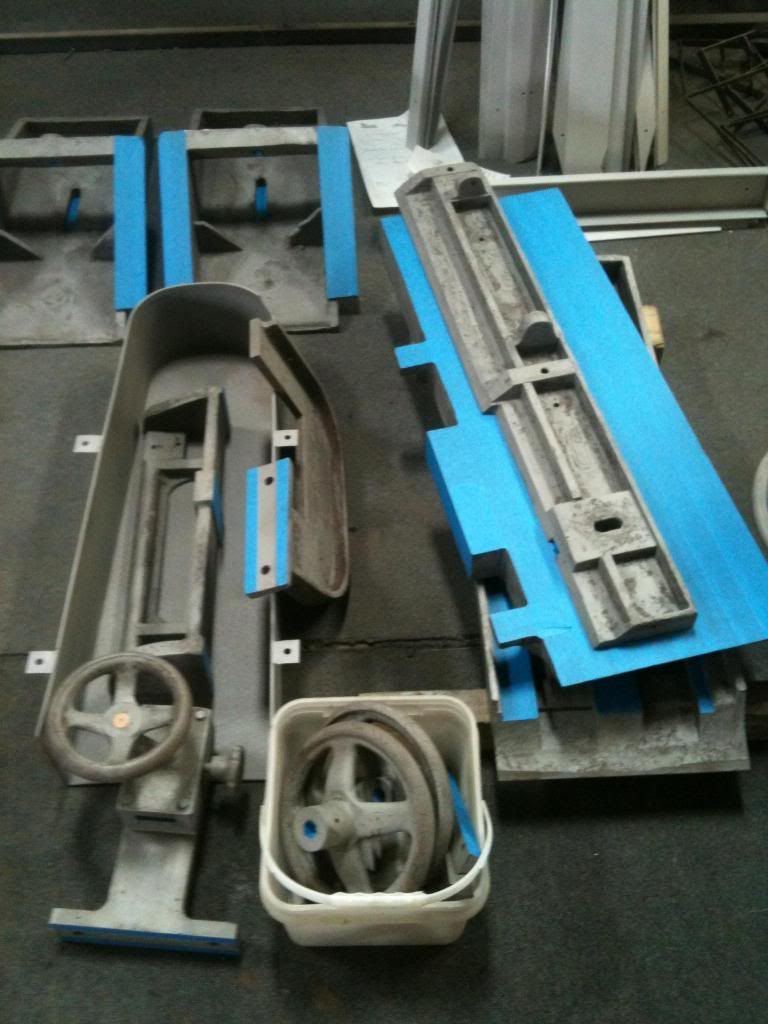
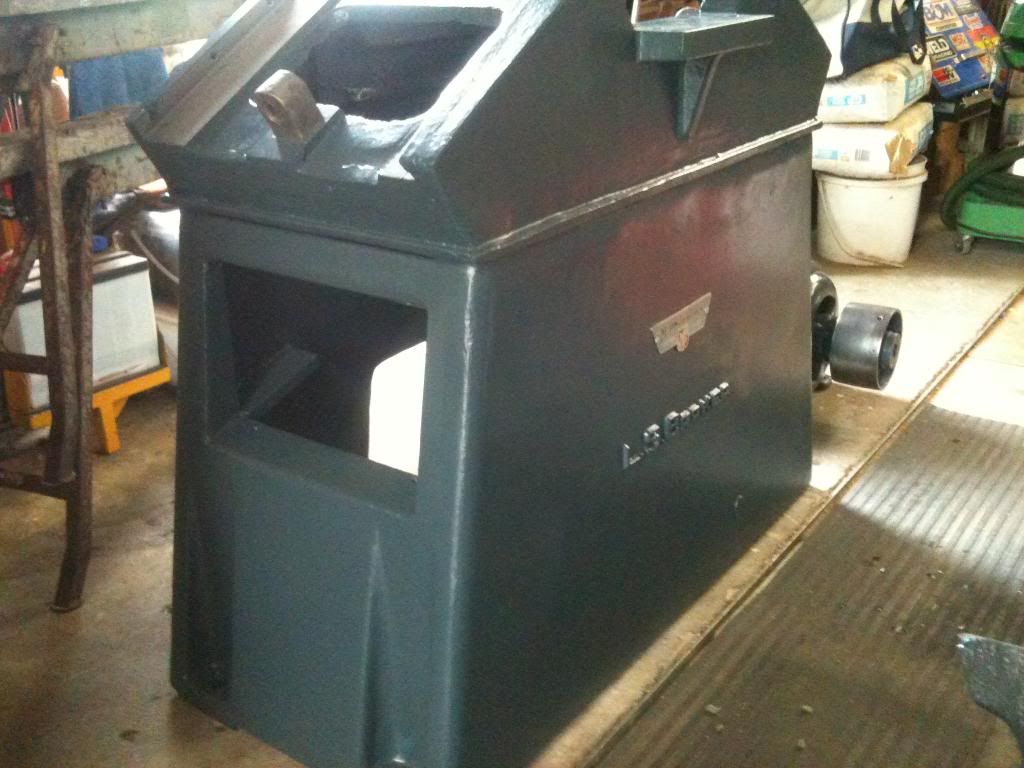
Parts sand blasted and ready for powder coating.
The base section sand blasted with the minimum amount of filler just to smooth out any imperfections in the cast.
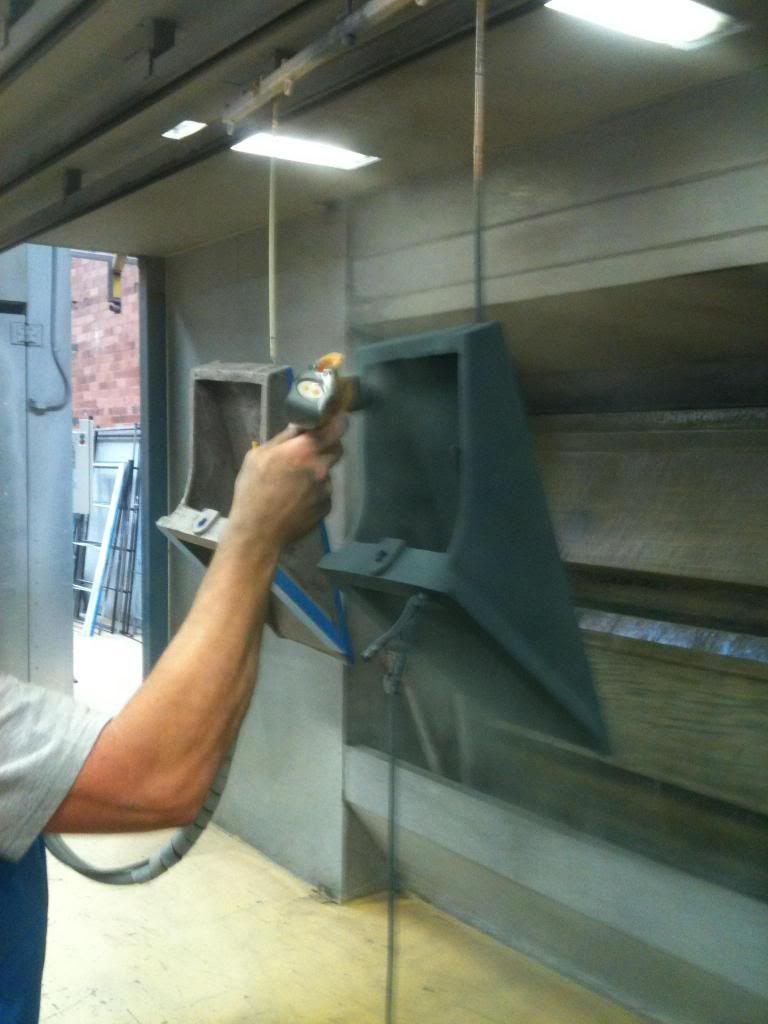
The Powder Coating process, applying the powder.
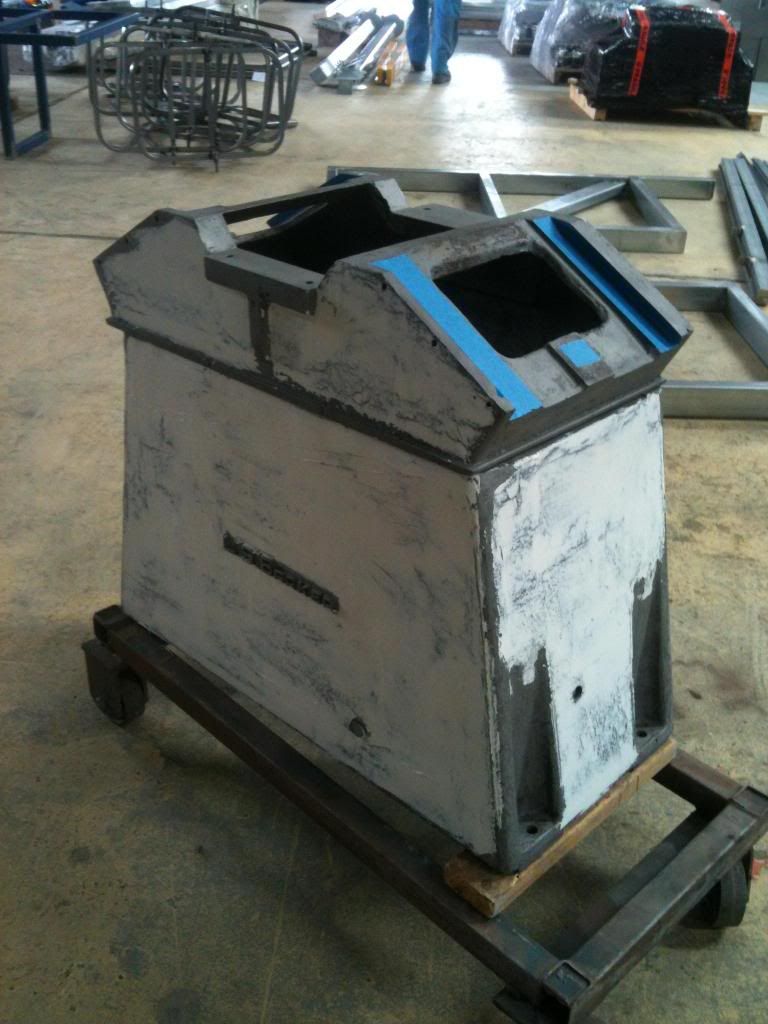
Some of the finished items.
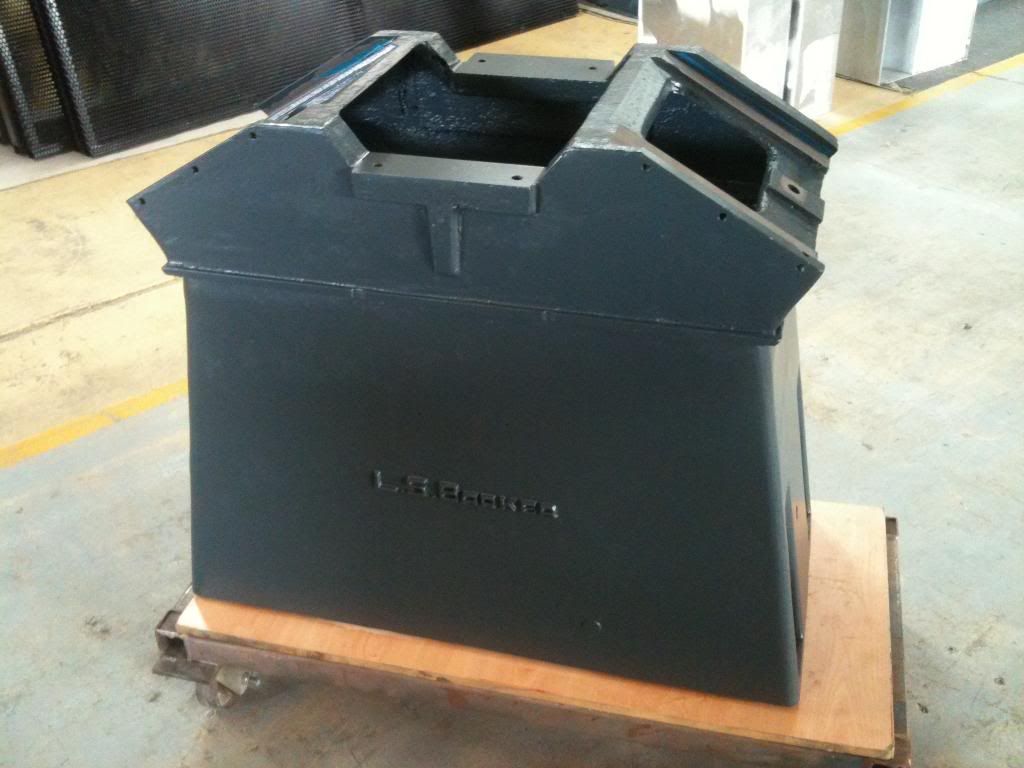
The finished base and top section.

The electric motor cleaned up and sprayed (not powder coated).
The finished Base at home in the shop.
Now the assembly begins, more to come.......
Melbourne Matty.
-
1st December 2012 11:00 PM # ADSGoogle Adsense Advertisement
- Join Date
- Always
- Location
- Advertising world
- Posts
- Many
-
2nd December 2012, 12:05 AM #2
SENIOR MEMBER
- Join Date
- Nov 2011
- Location
- Newcastle NSW
- Posts
- 775
Matty,
What do they say, "Work smarter not harder". Looks awesome!! Looking forward to seeing this come together.
I was debating on if the following question was a bit rude, so feel free to not answer if it is, but I am curious to know what this process costs, having just gone through the process of painting I can appreciate the benefits, so it is definately something I would consider in the future.
cheers,
Camo
-
2nd December 2012, 08:22 AM #3
Rusty doesn't mean its dead
- Join Date
- Dec 2010
- Location
- Melbourne, Australia.
- Posts
- 825
Thats a fair and reasonable question Cam, it totaled about $450 dollars, the sandblasting was the most expensive, it was very hard going to remove the original paint and filler. Originally Posted by camoz

But my opinion is that money is well spent, as I look really closely how many hours I would of spent (and everyone's time is worth something) grinding, sanding, painting and looking at fact that my lungs are not the best these days even though I do wear PPE, it is still dusty dirty work, cost also of the electricity to run power tools, consumables, paint, thinners, prepsol, rags etc...
The other consideration worth mentioning was that the process took two days, how many of our restorations go for months...
The Barker was a large machine too, the smaller table saw and Combination machines I have had done in the past were easy to blast and the cost totaled between $250 and $300.
I think it is a great process, it may not be everyones cup of tea, as many may balk at the cost, but consider the big picture, your time, your health, and the durability of the finish.
Any way, food for thought Cam....
Melbourne Matty.
-
2nd December 2012, 09:56 AM #4
SENIOR MEMBER
- Join Date
- Nov 2011
- Location
- Newcastle NSW
- Posts
- 775
I was actually expecting it to be greater than $1000. To me that sounds like something I would seriously consider (especially with the memories of prep time so fresh). Thanks Matty for the info, I wouldn't of even considered getting a quote for this in the past, as I was sure it would cost far more than that.
Doing it yourself is definately cheaper,but it still costs some money in materials. The other factor is the strength of the finish, I have been very careful when reassembling the Stenner ABM as every part weighs so much that one part hitting another is probably going to remove paint, but ultimatly I will be using this machine not putting it under glass. Eventually I am going to take some paint off, a powder coated finish makes sense and in the larger picture is probably better value if you intend to keep the machine for a long time.
Thanks for sharing.
cheers,
Camo
-
3rd December 2012, 11:21 AM #5
Senior Member
- Join Date
- Nov 2012
- Location
- Sydney
- Posts
- 266
Matty
That looks great, and I'm a big fan of the AGE motors.
You're spot on with the durability and speed of powdercoat vs paint....but there are a couple of things about it that I've never been sure of (and hence I've not tried it....cost aside)
Have you noticed any movement in any of the machined surfaces of the castings @200�C (eg surface flatness), and did the filler you applied underneath the powdercoat survive without breakdown or outgassing?
Regards
John
-
3rd December 2012, 10:11 PM #6
Rusty doesn't mean its dead
- Join Date
- Dec 2010
- Location
- Melbourne, Australia.
- Posts
- 825
Hi John, Originally Posted by jcge
Barker put the AGE motors in most of their machines, I am a big fan too, they just seem to run forever !
After I read your post I was very curious to see if there had been any movement in the top's especially, so I wound up both to a level point and placed a metal straight edge over them.
They looked good, still very even and nothing that a very thin metal shim won't perfect, but the heat settling the cast was something I did not even think of, the cast tops and body are very thick in places, but I am not sure if this had something to do with its stability.
Yes it did surprisingly, the filler I used was a Norfill product, Binks Marine :: Boat Accessories, Sailmakers Adelaide, Hobie Kayaks, Yacht Products, Ronstan.
fantastic stuff, took a while to cure but when it did, wow, very hard, we also pushed proceedings along a little by baking the filler in the oven as it cooled down for the evening as well.
I used the minimum amount, there were some deep areas, not many, but these did suffer from some pin holes in the final finish, but you have to look close, I was pleased with the finish considering it was a mess when sandblasted with grinding and casting marks, the filler and the powder coat paint all played a part to help the final finish.
My Powder Coater said Builder's Bog or Car filler will give the same results, I just wanted to be sure so I went the good stuff !
Thanks for you comments John.
Melbourne Matty.
-
4th December 2012, 11:26 AM #7
Rusty doesn't mean its dead
- Join Date
- Dec 2010
- Location
- Melbourne, Australia.
- Posts
- 825
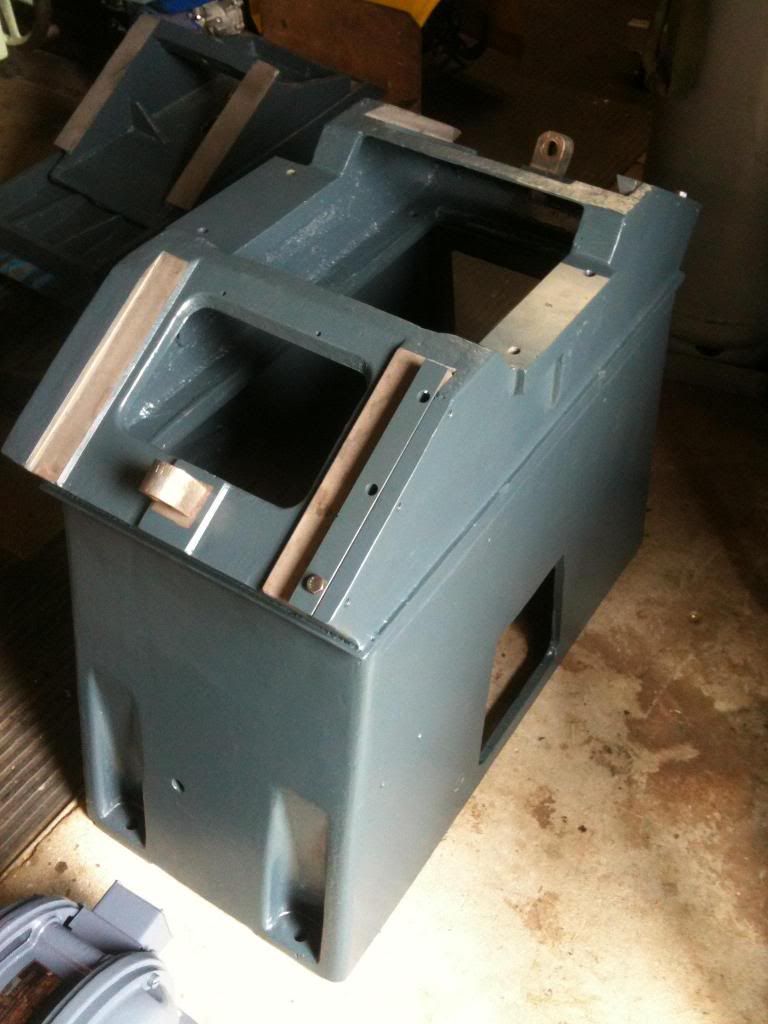
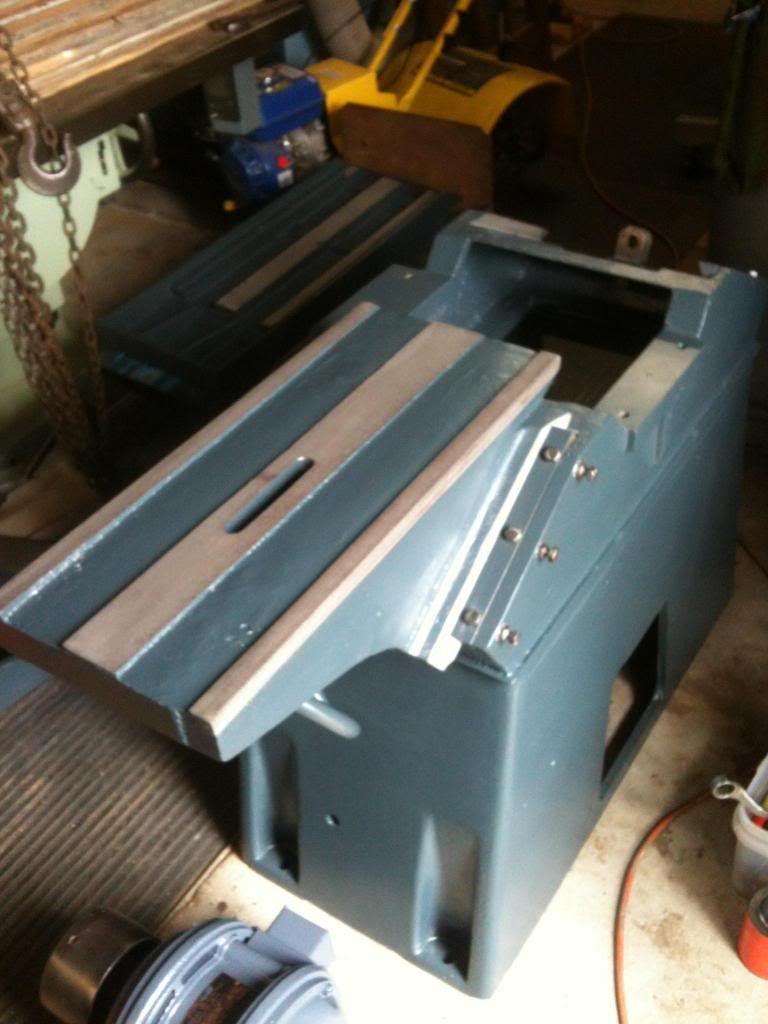
Well I have pushed on with assembly and it was all looking great over the weekend, until I could not find a missing part for the fence tilt mechanism, I looked every where for two days, back of the ute, work shop, even went for a walk up the road incase it was resting on the ute while I unloaded and then I have driven of, I had thought of every scenario.
Then a text message this morning, "you left a part behind" well I nearly fell over, I had missed it at the Powder Coaters, gee whizz, how hopeless am I ?!?
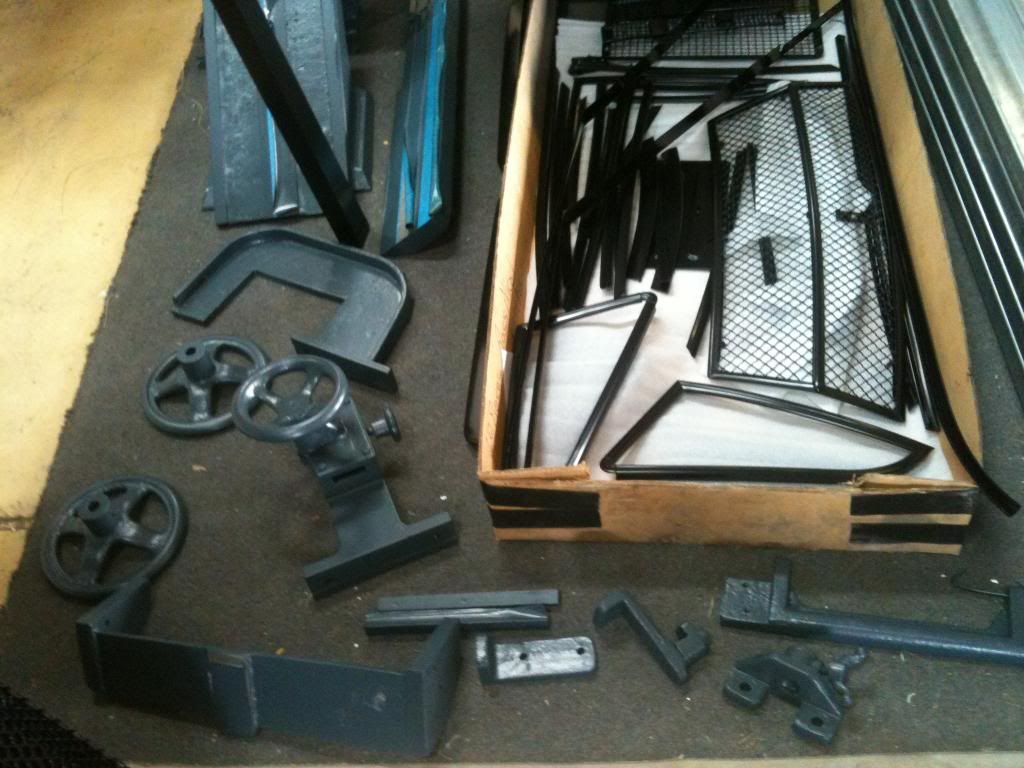
Here are some progress pic's anyway, I'm off to the powder coaters to pick this part up.......
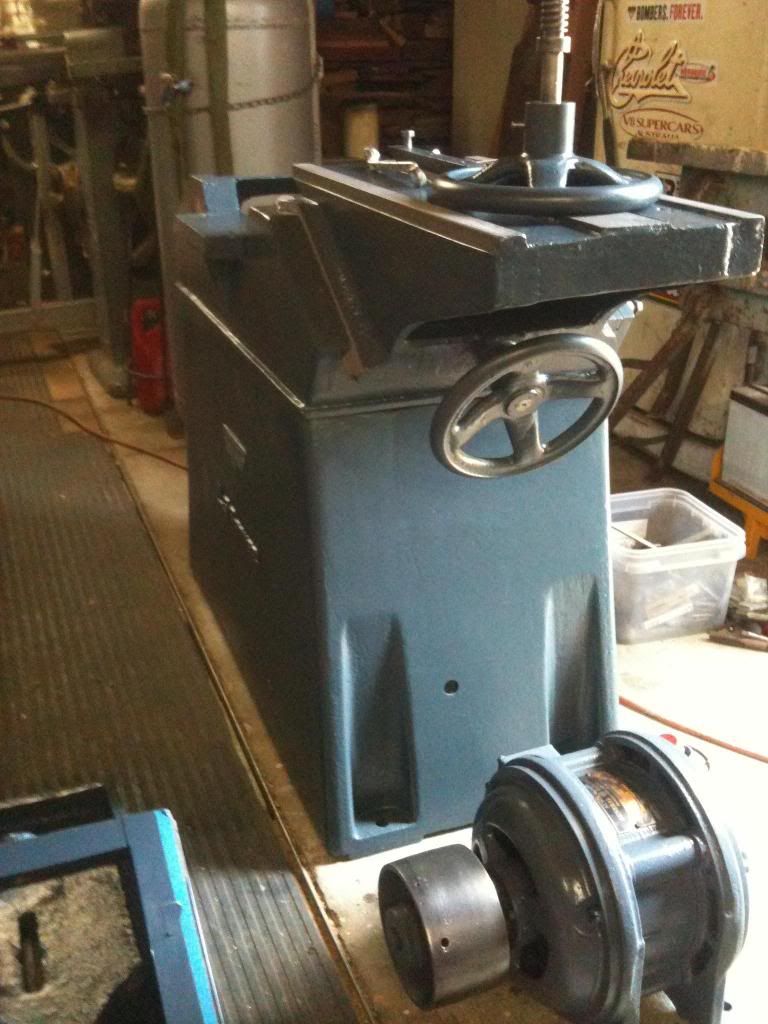
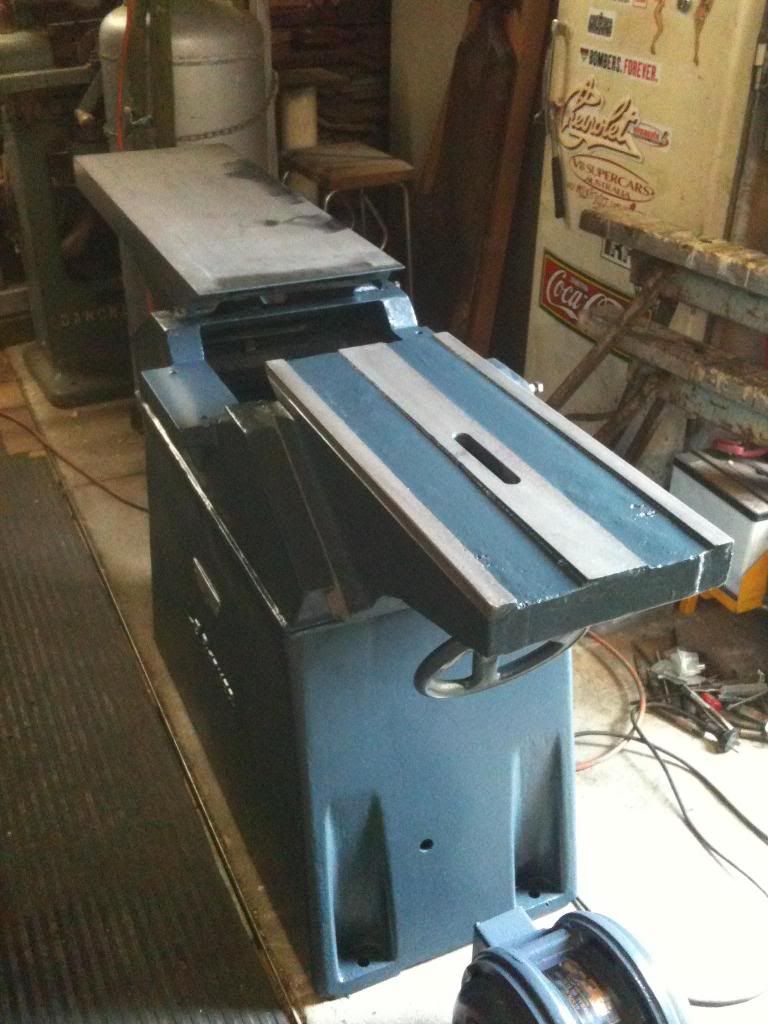
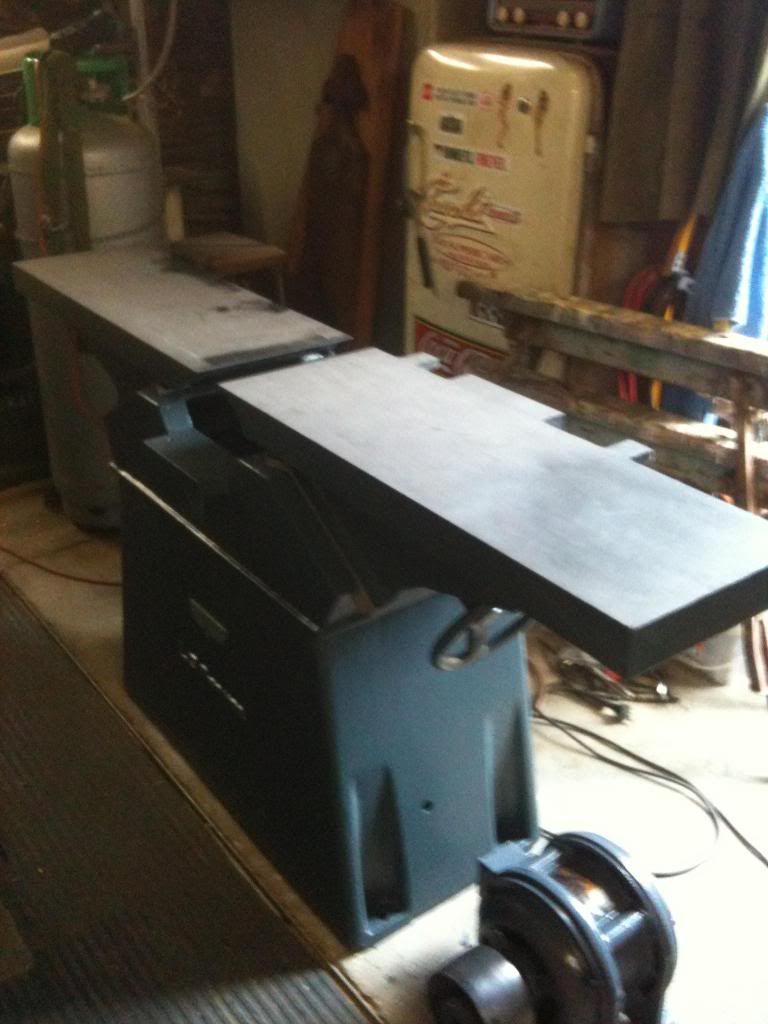
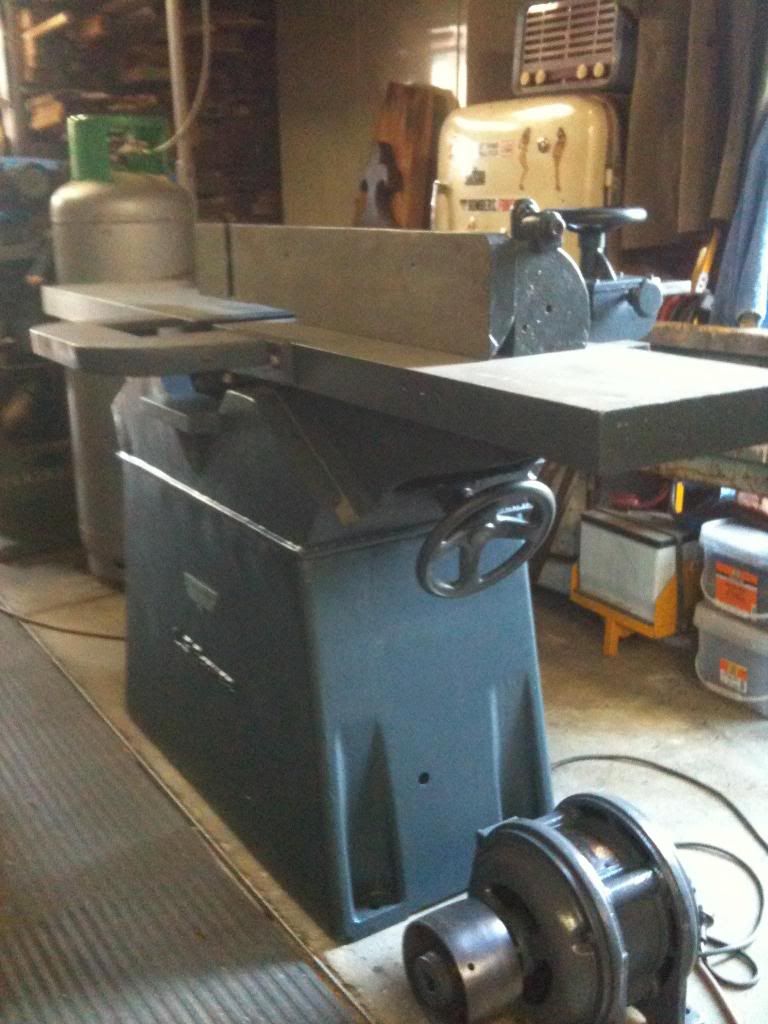
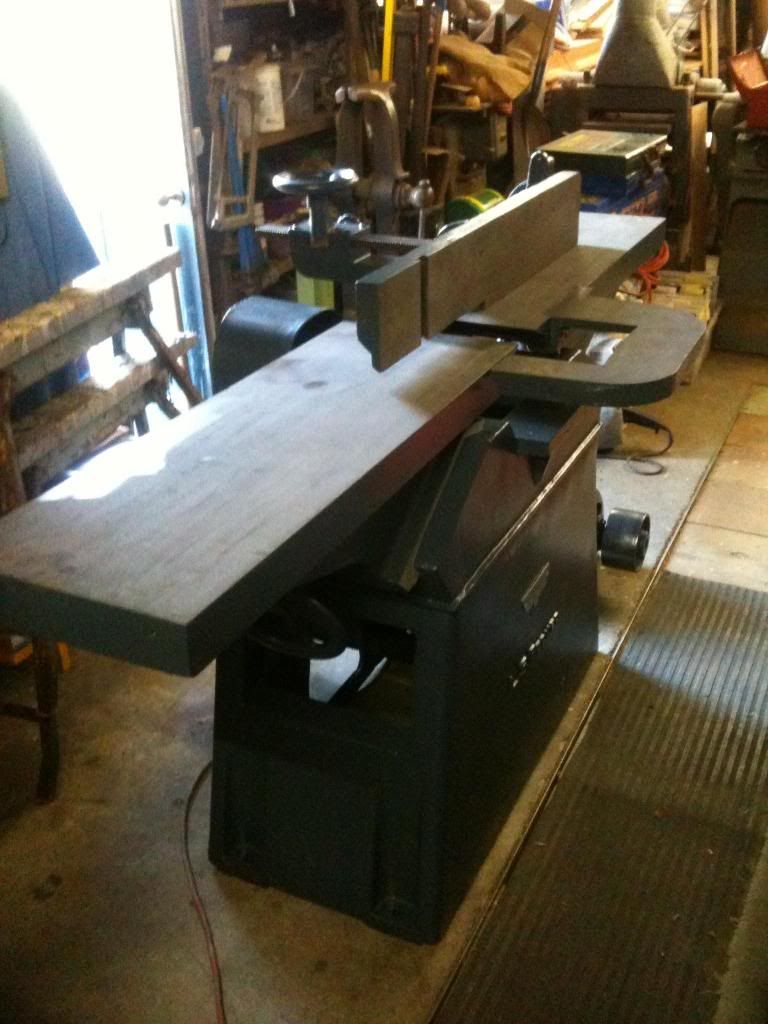
Melbourne Matty.
-
4th December 2012, 01:18 PM #8
Senior Member
- Join Date
- Nov 2012
- Location
- Sydney
- Posts
- 266
Matty
I hadn't thought of pre-bake of the body filler to drive off volatiles and promote full cure prior to the powdercoating and hi temp baking....an excellent idea !!, and very happy to hear you have not seen any appreciable adverse movement in the tables. I had always wondered about this so greatly appreciate you sharing your first hand process and product experience.
Please do post progress - it's looking great.
Regards
John


 Reply With Quote
Similar Threads
-
A tale of woe, Barker woe
By auscab in forum ANTIQUE AND COLLECTABLE TOOLSReplies: 3Last Post: 18th January 2012, 01:16 PM -
No Sex Since 1955
By nev25 in forum WOODIES JOKESReplies: 4Last Post: 31st March 2008, 02:54 PM -
1955
By John Saxton in forum WOODIES JOKESReplies: 0Last Post: 28th October 2006, 08:40 PM -
No Sex Since 1955
By Baz in forum WOODIES JOKESReplies: 2Last Post: 10th March 2006, 09:50 PM -
Ronnie Barker R.I.P.
By normell in forum WOODIES JOKESReplies: 10Last Post: 20th October 2005, 10:50 PM
