

 Thanks:
  Likes: 0
 Needs Pictures: 0
 Picture(s) thanks: 0
Results 1 to 12 of 12
Thread: Infill Plane ID
-
12th July 2016, 05:35 PM #1

 Senior Member


- Join Date
- Jun 2016
- Location
- Rockhampton
- Posts
- 439
 Infill Plane ID
Ok guys... I have an infill Panel plane that I picked up on eBay. Probably paid too much but liked the look of it.
 There are no makers names on the plane or cap iron. There is what I think is an owners stamp that appears in a couple of spots "G. MILNE". The cap Iron has 2 1/4 cast into the back of it, however the Iron is 2 3/8 wide and has Hearnshaw Bros Stamped into it. The Chip breaker has Thos IBBOTSON & Co. The Iron is parallel at 3/16 the whole length.
The plane itself is 13 5/8 long and 2 3/4 wide I suspect it has been modified at some point as there is a second set of cap Iron pivot holes that have been filled with a soft metal, maybe lead, just in front of the existing ones. I want to restore it but thought I would see if anyone knows anything about this and how best to restore a plane like this. I have never worked on a infill before and don't want to stuff it up if it does have any value.
Infill Plane Front.jpgInfill Plane Left Side.jpgInfill Chip Breaker Maker.jpgInfill Iron Maker.jpg
-
12th July 2016 05:35 PM # ADSGoogle Adsense Advertisement
- Join Date
- Always
- Location
- Advertising world
- Posts
- Many
-
15th July 2016, 01:09 PM #2
Senior Member
- Join Date
- Jun 2016
- Location
- Rockhampton
- Posts
- 439
For those that are interested... I have contacted Hans Brunner regarding this plane and this is his reply.
"this is an unnamed cast iron panel plane. The body and the lever cap were bought from a hardware shop and stuffed by the former owner. The infill looks like beech, definitely not walnut. The handle is almost certainly sourced from a beech jack plane. The extra hole indicates that the lever cap could have been replaced at some stage. As to who made the body or the lever cap... we’ll never know. All markings on this plane would be owner’s marks. It’s an ok plane but fairly rough compared to factory made tools. I don’t think you can wreck much by giving this plane a decent cleaning, shine up the brass and clean and refinish the wood to make it more attractive. It certainly would improve the tool."
Thanks Hans for your feedback it is much appreciated. I have shared this info in the hope it may be useful to others that are interested in these planes. I am going to enjoy restoring it without the fear that I am going to wreck a valuable tool. The experience will be invaluable for the day when something awesome heads my way.
-
16th July 2016, 06:18 PM #3
almost a woodworker
- Join Date
- Feb 2007
- Location
- blue mountains
- Posts
- 4,891
The early Spyr's planes were sold as a body and cash strapped tradesmen would do the infill themselves. May be one of them?
Found some google images.
https://www.google.com.au/search?q=s...w=1366&bih=657
Regards
John
-
17th July 2016, 09:30 AM #4
Senior Member
- Join Date
- Jun 2016
- Location
- Rockhampton
- Posts
- 439
Thanks John......I checked out your link and there is certainly some resemblance to these. I am thinking the Lever Cap has a Mathieson look to it. I am sure this is not original though, as it doesn't go all the way to the sides and the fact that there are two sets of pivot holes. I removed a couple of the screws on the side and noted that some had nickle/zinc? finish to them. I wouldn't have thought that screws of that era would have been made with this option, although I recovered some screws out of an old piano once that looked like they were chrome plated.
-
17th July 2016, 11:35 AM #5
almost a woodworker
- Join Date
- Feb 2007
- Location
- blue mountains
- Posts
- 4,891
The other guess is that it is made up of all sorts of bits. Not unusual in a tool that's been around for over a hundred years.
As you say a bit of a clean up won't hurt.
Regards
John
Regards
John
-
17th July 2016, 06:29 PM #6
Senior Member
- Join Date
- Jun 2016
- Location
- Rockhampton
- Posts
- 439
Had another look at it earlier today.... I would say the handle is definitely Beech but I think the rest of it is a better timber. Looks like it has been made from three narrower boards laminated together.... not sure if this was a usual practice... even the front section is laminated.
-
18th July 2016, 12:47 PM #7
almost a woodworker
- Join Date
- Feb 2007
- Location
- blue mountains
- Posts
- 4,891
I had a look at the 2 infills I have. A Norris same size as your plane and a Matheson smoother. As far as I can see the infills are solid. That said I cant see anything wrong with laminating the infills especially the back end just for ease of construction. I would probably go that way if I had to do one. At first look the back end will look like 3 bits anyhow. I had to take out the blade and look at the bed surface to be sure.
Regards
John
-
18th July 2016, 03:55 PM #8
Senior Member
- Join Date
- Jun 2016
- Location
- Rockhampton
- Posts
- 439
Thanks John.... You gotta be a Sherlock Holmes to work out this plane stuff. The more I look the more I realize I know nothing. I notice that the thread on the lever cap screw is a square cut one. Is that normal on these or do some brands use them and others don't?
-
19th July 2016, 01:15 PM #9
Peter McBride
- Join Date
- Nov 2007
- Location
- Melbourne
- Posts
- 1,139
Hi Gaza,
The plane you have is, as Hans has told you a cast iron plane, and is user made.
Unlike him, I would suggest the unused holes for the lever pivot were place there by someone who is a first time maker. They will never work with any blade set.
They look to have been placed in the middle of the hump, which is not were they are in the usual side profile used in most of the known makers planes.
Below is a Norris.
It is a mistake, that if you make at all, is only made once!
The aim is to get the lever screw perpendicular to the blade set for a couple of important reasons.
The lever is what it says it is. A lever that gains you a mechanical advantage of about 3:1
That is 3 units of movement at the screw to 1 at the front edge, and 3 units of force at the front edge to one at the screw, provided it is at a right angle to the blade set.
Also, for every few mm of misplacement of the lever pivot away from the blade set, the top of the screw moves away from the blade set by the same 3:1 ratio, and a longer screw is needed, and the angle the screw makes with the back iron quickly moves away from 90 deg, so the screw will tend to move the blade considerably as you wind it tight. The reason is that it is not a nice point placement on the the back iron, but the edge of a curve trying to push the blade sideways.
The pivot pin placement on that plane is still too far forward, and perhaps a little too high.
The screw isn't at right angles to the blade, and the front edge is too far up the plane blade set.
That lever cap with square thread could be bought as a spare part from many tool catalogues, and the body made in the many small foundries existing at the time. It may even have been sold in hardware stores at the time. Looks like they either used what was at hand being the wrong width, or not realized a wider one could be cut down to fit.
I've never heard or seen named makers like Spiers, Mathieson, Norris, selling unfinished planes as a kit.
The lever caps yes, but never the bodies.
I've seen articles from the time with instruction on making patterns to send for casting, and that would mean many bodies to be passed around colleagues or friends.
Spiers is reported to have started plane making after he bought his first cast plane body in Edinburgh for 1/6d, made it into a plane and sold it for 18/-
Cheers,
Peter
 <!--[if gte mso 9]><xml> <w:WordDocument> <w:View>Normal</w:View> <w:Zoom>0</w:Zoom> <w
 oNotOptimizeForBrowser/> </w:WordDocument> </xml><![endif]-->
-
20th July 2016, 07:08 AM #10
Senior Member
- Join Date
- Jun 2016
- Location
- Rockhampton
- Posts
- 439
Wow... thanks Peter...... who would have thought all that maths at school was involved in plane making as well
. The information shared is a very valuable insight and makes perfect sense. I am going to hazard a guess that the name "G. Milne" that is stamped all over it is probably the owner who made this particular plane... Would this sort of thing be something an apprentice tackle in the day or as John has suggested in the realm of a cash strapped tradie. I am thinking along the line of what John has suggested as an apprentice would have had some guidance as to the pivot hole placement. When time permits, I would love to have a go at making my own infill plane and the information provided here will help me avoid the same mistake. Thanks heaps.
Gaza
-
20th July 2016, 12:08 PM #11
almost a woodworker
- Join Date
- Feb 2007
- Location
- blue mountains
- Posts
- 4,891
Thanks Peter for the info. I had been thinking Spyrs started this kind of plane but if he bought his first plane body then it must have been a well established design even then.
Regards
John
-
21st July 2016, 11:57 AM #12
Peter McBride
- Join Date
- Nov 2007
- Location
- Melbourne
- Posts
- 1,139
John,
There is an earlier generation of commercial infill plane makers before Spiers.
A couple I have are pictured below.
Stewart was born in 1820, and was apprenticed as a cabinetmaker to his father in mid 1830s.
He started calling himself a Cabinetmaker and Iron Planemaker about 1849 in Trade Directories and Census Documents.
He claimed to have started Iron Plane making in 1840.
Peter
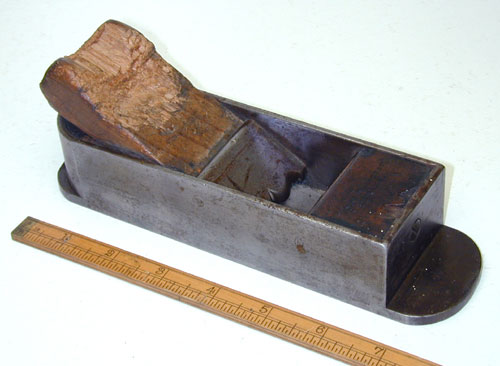
Here is a Robert Towell marked plane, he was working around 1820 - 1850 in London.

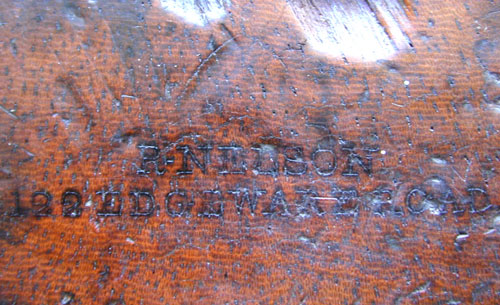
And an R. Nelson, 122 Edgewater Road London 1831-1852
 <!--[if gte mso 9]><xml> <w:WordDocument> <w:View>Normal</w:View> <w:Zoom>0</w:Zoom> <woNotOptimizeForBrowser/> </w:WordDocument> </xml><![endif]-->

 Reply With Quote

Similar Threads
-
infill plane project W.I.P
By scrounger in forum ANTIQUE AND COLLECTABLE TOOLSReplies: 5Last Post: 25th May 2014, 07:16 PM -
Infill Plane
By Gezawa in forum HAND TOOLS - UNPOWEREDReplies: 16Last Post: 27th December 2010, 03:23 PM -
Infill plane
By Gezawa in forum HAND TOOLS - UNPOWEREDReplies: 12Last Post: 4th November 2010, 12:15 AM -
infill plane
By John Saxton in forum HAND TOOLS - UNPOWEREDReplies: 1Last Post: 24th October 2006, 04:25 PM
