

 Thanks:
  Likes:
  Needs Pictures:
  Picture(s) thanks:
Results 1 to 15 of 34
-
6th March 2012, 11:27 PM #1
 SENIOR MEMBER


- Join Date
- Nov 2011
- Location
- Newcastle NSW
- Posts
- 775
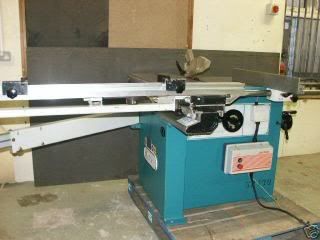
 Just purchased a Wadkin Table Saw for $53
Hello all,
So today I picked up a second hand Wadkin table saw, from what I can tell from google searching and the details in the auction description, I think it is a Wadkin BGP (the smaller one not the 60”), if anyone can confirm that from the photo (if I attached it correctly) that would be great.
Anyway I managed to get it on a graysonline auction for a total of $53 (including the graysonline 13.5% commission) . http://www.graysonline.com/lot/0066-5002537/ its 3 phase so that probably put a lot of people off, and it seemed to be hidden in a completely unrelated auction (bits of everything in it), I only found it when I was searching the key work 3 phase (hoping to pick up some cheap plugs and sockets).
It's heavy so it was very easy for the guy at grays to get on the back of my trailer with the forklift, but not so easy to get back off (no access to a forklift at home). So total cost so far $53 + about $30 petrol.
I've spent the day looking for major faults expecting the worst. I was initially thinking: I bet the motor doesn't work, and then I bet the arbor is bent or the bearings are shot, then I bet that under the surface rust the table is cracked, I bet it's not just surface rust and the table is all pitted.
I have never been any more happy to find out I am wrong, after taking the motor out and testing everything with the multimeter, then testing the motor out of the table, then checking everything else before putting the motor back in, it seems to be working perfectly (I did have a minor hiccup where the blade did not seem to cut, just burning, until my wife pointed out that the blade seemed to be turning the wrong way , but changing L1 and L2 fixed that). It even came with a 96 tooth blade and what look like new or near new belts.
Over the next few weeks I hope to clean it right up and repaint it (can anyone advise on how to go about matching the colour and what would be the best paint for the job). I am going to have to make a riving knife for it (if anyone has this table saw with a riving knife, I would appreciate any assistance with dimensions), and I will need to add a blade guard. I think I will also look at either replacing the on/off switch, or adding a kick plate for easy shutdown in an emergency. May also need to upgrade the fence (not sure on the quality of the existing one at this stage).
I'm not too sure how difficult it is going to be to adjust and setup (I'm used to my old contract saw), I haven't had a chance to really look at if the trunnion attached to the table top or the base, and if I just adjust the trunnion so the blade matches the tracks in the tables, or the fixed top and sliding top to match the blade. Any help with a step by step process for this specific type of table saw would be greatly appreciated.
This is my first real restoration attempt so any advice I could get especially from anyone who currently owns or has owned one of these table saws would be greatly appreciated. Also I would appreciate any opinions on the quality of this particular machine, and so if I can expect to get it setup for a good standard of cut, or have I just bought a very cheap, but also cheaply made table saw.Last edited by RETIRED; 27th June 2012 at 10:37 PM.
-
6th March 2012 11:27 PM # ADSGoogle Adsense Advertisement
- Join Date
- Always
- Location
- Advertising world
- Posts
- Many
-
7th March 2012, 11:23 AM #2
Senior Member
- Join Date
- Sep 2011
- Location
- Northern Beaches, Sydney
- Age
- 68
- Posts
- 329
Good score.
A lot of the Wadkin parts should still be available too, should you need any.
Others like bearings etc are easily obtained.
Stewie
-
7th March 2012, 02:55 PM #3
GOLD MEMBER
- Join Date
- Aug 2009
- Location
- Armadale Perth WA
- Age
- 55
- Posts
- 4,524
Very very excellent score!!

It is similar to my Danckaert in many ways. I was writing about it here:
https://www.woodworkforums.com/f163/c...l-fool-144597/
You probably have to wade through a bunch of rubbish before getting to anything relevant to you about setting up your new saw
My runners were able to be adjusted up and down as well as left and right ... so it took a bit of work to get them where they needed to be ... level with the fixed table ... level in total ... and close in to the blade. I added a wooden infill in the gap in front of the blade between the fixed and sliding tables. Yours being a Wadkin, I'll be interested to know if there is any gap there at all.
My first (semi) project was to try to make up some replacement mdf shelves for my mum - for one of those hammerlock shelf frames. It was a good learning experience, cos the grooves are only a few mm deep and only a few mm wide and only a few mm in from the edge and need to have the boards square and the grooves square to the edge. I only managed to make a couple before I ran out of my near-xmas time. I probably want to make a few more little adjustments to the saw ... I just can't remember
Well done,
Paul McGee
-
7th March 2012, 06:53 PM #4
Senior Member
- Join Date
- Nov 2009
- Location
- GB
- Posts
- 139
I'm jealous, I never come across bargains like that! Not that it would fit in my little shed anyway. I cant wait to see the pics of it all cleaned and painted in the standard hammertone green.
Col
-
7th March 2012, 07:00 PM #5
Rusty doesn't mean its dead
- Join Date
- Dec 2010
- Location
- Melbourne, Australia.
- Posts
- 825
That's Cool.....
I am with Stewie and Paul on this one, that is a good find, and price to boot.
looked every where in my Wadkin bursgeen catalogs for a brochure for you but no joy, I had the AGS and BGS, but not yours that I could see.
Jack is your man as far as Wadkin/Bursgeen is concerned, he is a serious wealth of knowledge on their machinery, restoration, electrical, history and use, I hope he chimes in soon !!
Also there may be some information on your machine on the US, Vintage Machinery site, Here is a link to a Wadkin/Bursgreen catalog any way.
VintageMachinery.org - Wadkin Bursgreen - Publication Reprints - Wadkin Bursgreen Machinery
Melbourne Matty.
-
7th March 2012, 11:09 PM #6
SENIOR MEMBER
- Join Date
- Nov 2011
- Location
- Newcastle NSW
- Posts
- 775
Thanks guys for all your responses.
Paul, it really looks like you have a great setup (I was looking at the background of some of your photo's with real envy). I am not too sure about the gap yet as we had to take the sliding table off to move it (trying to reduce the load in the trailer to a legal weight), and it's very heavy so it is going to have to stay separated until I get more of the restoration done.
Matty, thanks for looking, and the link you provided, which was a great help, I managed to find the table on the 16th page of the catalogue. Now I know what the threaded holes are for on the front of the sliding table (unfortunately I seem to be missing a straight fence with stop bar and 2 turnover stops), that will have to be another part to the restoration, but I think I might try to add a bit of a modern touch to it.
Col thanks for your advice on the hammertone green, to ask a stupid question, is this an actual colour type (can I walk into a paint shop and ask for hammertone green, and I end up with the colour that this machine was originally painted) or is that just a general term that covers a wide variety of greens that most machines are painted? I would like to try to get the colour as close as possible if I can. I spoke to a paint shop today, they seemed to think that if I took in a piece, they should be able to match the colour for me, but any help I can get on this would be great.
After lots of searching, I have managed to track down a manual:
http://www.rjmachinery.co.uk/manuals-files//wadkin/BGP%2012%20manual.pdf this website lists a lot of manuals for wadkin so would be a great resource for anyone who has a wadkin piece of machinery.
So today was all about getting the table tops cleaned (lots and lots of surface rust mixed with years of oil etc.)
Attachment 200687
Attachment 200688
Want to get stuck into the rails, but I think I need a bit of a change, so if I get a chance tomorrow I might try to take off the fixed table top to get a better look at the trunnion (I think it needs some lubrication, the tilt seems to turn easily, but the raising and lowering is a bit tight, hopefully nothing is warn).
Attachment 200689
Above is a photo of one of the bolts that holds the fixed table down (well I hope the photo is above, as I am not sure if I am attaching these photo's correctly, I guess I will find out when I post this). It looks to me like it is a bolt within a hollow bolt setup (the hollow bolt moves up and down to set the height of each corner, and the internal bolt enables orientation of the table top to the blade and holds the top down when set). If anyone can confirm this for me that would be great, but I guess either way if I get time, I will find out tomorrow.
CamoLast edited by RETIRED; 27th June 2012 at 10:41 PM.
-
7th March 2012, 11:24 PM #7
GOLD MEMBER
- Join Date
- Dec 2007
- Location
- Sydney
- Posts
- 2,209
Bgp
I have the brochure and instruction book for this saw.
Have used a few over the years and find them a compromise not a panel saw and not a dimension saw either.
The long table slide bar which is in the operator's way if trying to cut smaller stuff should slide forward out of the way.
We bought one of these for the Strathfield mens shed from ID at UNSW last year then the one from the old teachers college at Syd Uni came up for $0 it went to another Sydney 'shed.
These are a developement of the 12 inch AGS or the 12 inch BGS?
Just ventured out to the shed and cant find the 60's Bursgreen cat which sheds more light.Will post more info later if you are interested.
H.
-
8th March 2012, 12:55 AM #8
HP of WT
- Join Date
- Jul 2009
- Location
- ottawa canada
- Posts
- 266
H. is right
The older panel saws like the BGP and BGS were only 3HP. Later SP12, SP130s and the like were similarly only about 4HP with a much smaller number of PanelMaster (CP) saws being supplied with motors as big as 10HP
Really a panel saw will be able to do a full rip of an 8ft sheet of MDF/ply. That means you'll need a work space around 20ft long and 12 to 16ft wide with no other machinery in there just to use the thing. The question then becomes "is my garage big enough to hold 3 or 4 cars". If as I suspect it's a dimension saw (like a PP or PK) it's a lot smaller panel saw or 1/2 panel saw, but still a big bit of kit. Either way dimension saw, half-panel or panel, IF you worked out how you're going to move it as these machines can weigh a tonne or more and are really awkward shapes.
A riving knife is attached to the rise and fall mechanism on the trunion (the bit which allows the blade to tilt) in such a way that it's height and anlgel of tilt are automatically the same as the blade. A riving knife is also normally positioned no more than 3 or 4mm behind the blade, frequently closer. This means in effect that the rise and fall mechanism for the blade is almost always a true vertical rise and fall.
At some point wadkin went from a Splitters attached to the rear of the saw bench or the trunion in some instances. This means that not all splitters can tilt with the blade (on some machines tilting is effected manually) and splitters are also not normally adjustable for height of cut. Because of this, splitters tend to be long and floppy, go out of alignment easily and are often postioned 10mm or more behind the blade reducing their effectiveness, rather than a riving knife as there would be no way to keep the position of the riving knife the same relative to the blade. In other words the riving knife is better than a splitter.
when you get into braking it down put up more pics
As to the usefulness of the sliding carriage I think it depends on the size and type of the stock you are handling. For most joinery applications (i.e. frame and panel constructions, etc) a rip saw (or a table saw with a rip blade and run-off table) or bandsaw in conjunction with a crosscut saw (i.e. a chop saw or radial arm saw) will be more flexible than a table saw with a sliding carriage - partly because long narrow stock tends to flop about on most small sliding carriages. The two main instances I can see a sliding carriage being of great use is where you don't have a cross cut saw in the shop or where large quantities of small panel stock are being sized.
jack
English machinesAll tools can be used as hammers
-
11th March 2012, 12:47 AM #9
GOLD MEMBER
- Join Date
- May 2007
- Location
- Sth Gippsland Vic
- Posts
- 4,375
Camo , I bought a AGS 10 of ebay a while back and did a resto on it . Your main body with the rise and fall and tilt looks the same as mine. When it came to painting I went to Paint Spot in Moorabbin Mebourne with piece off the saw, and they matched it perfectly with a fast drying enamel,It was such a good match I touched out some rust on the front and couldnt pick it from the original next to it. Off the shelf hammer tone greens wont be as good a match.I have them as well.
I have the can at work still with the details of the mix recorded on the lid. I will take a shot of it and post it.
Cheers Rob
-
11th March 2012, 01:15 AM #10
HP of WT
- Join Date
- Jul 2009
- Location
- ottawa canada
- Posts
- 266
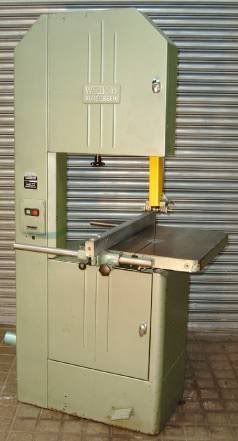
Your colours on the BGP is probably Hammerrite green, although to be frank there is almost nobody left at the company who can remember the pre duo-tone green days of the 1970s let alone the change from grey to metallic green in the 1960s. At least until about 1958 all Wadkins/Bursgreens were delivered as standard in grey paint with names picked-out in white (or sometimes in machines like the PK, red) unless the customer specified otherwise. This paint was lead based, so if you strip it you will need to be careful . Bursgreen became part of Wadkin in the 1950s, but even there Bursgreen machines continued to be painted grey for a number of years. The green colour came about as a result of either/both the retention and marketing of the "Bursgreen" name (post 1957) or (according to some) as a result of changes in the regulations governing machine colours at the Hannover Fair in the early to mid 1960s when all woodworking machines exhibited had to be green. How very German!. It became a popular "ruse" on the part of dealers to repaint older machines during the 1960s to make them look newer, and as the newer machines were green that was often the colour they chose. Either way by the 1960s Bursgreen machines were green, but that green was normally a metallic green(hammerite) as in this Wadkin BZB20 (a mid to late 1960-s machine):
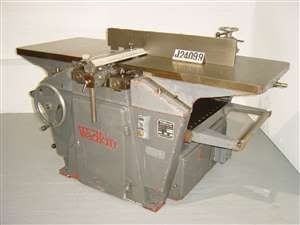
This Wadkin FM (an early 1960s example) is in Wadkin's standard grey of the period:
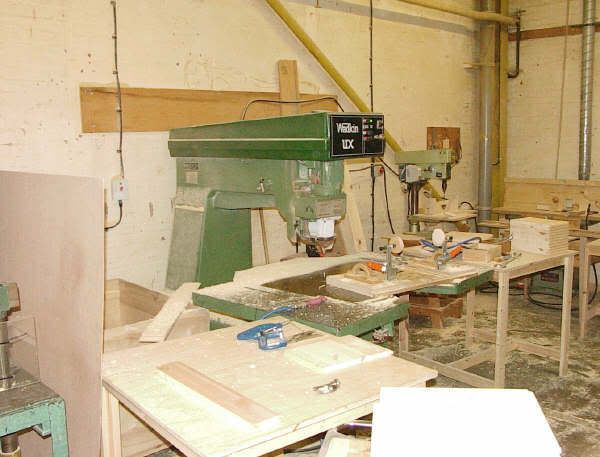
Later still in the 1970s Wadkin changed to a duo-tone green livery. Like this UX pin router (1981):
the BGP of this period might well be either a lighter green or a darker one. I've seen both.For a period wadkin painted them in a hammer rite green never to be made again.
As you know Hamerite is not a custom color paint. some have had good results with a light coat over a base that is color matched to the old wadkin Green. If you have never sprayed Hammerite before there is a learing curve. here is a great link for tips. most of the best textures come from heavy coats IMO.
Hammerite UK - Metal Paint: Tips
there are othere colors in there range so make sure you check them all.
Product
they say you can't mix them , but you can and some have just combined yellow and black hammerite and mix them to the darker Hammerite green to get a lighter Wadkin green.
Finally for a few years in the 1980s Wadkin chose to use the green here in this pic:
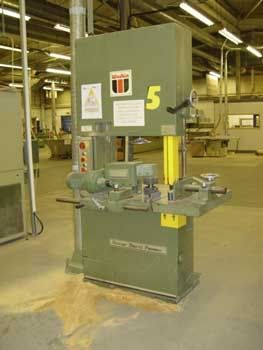
although relatively few machines were delivered in this colour as Wadkin started to go into decline during this period. They subsequently moved to a blue/light grey livery in the mid 1990s:
jack
English machinesAll tools can be used as hammers
-
11th March 2012, 08:10 AM #11
GOLD MEMBER
- Join Date
- Aug 2009
- Location
- Armadale Perth WA
- Age
- 55
- Posts
- 4,524
That's ridiculous Originally Posted by camoz
 the place is a complete mess. Actually I've cleaned up a bit ... so it's more of an incomplete mess ... but I am working to regain my previous accreditation.
I think I sent you on a bit of a semi-wild goose chase ... I should have linked to:
https://www.woodworkforums.com/f163/d...on-saw-145405/
I am appreciating the catalogues and manuals for your saw, as I don't have anything for mine, and they are obviously in the same general family.
Your table is indented where the blade is ... typical Wadkin ... think they're so good Mine just runs straight next to the blade, so needed a gap-filler to help it all to work nicely.
Have fun with it,
Paul.
-
13th March 2012, 09:32 PM #12
SENIOR MEMBER
- Join Date
- Nov 2011
- Location
- Newcastle NSW
- Posts
- 775
Thanks again guys for all the input and information (Jack, so far I think you get the award for the Wadkin expert, I love this kind of information, it somehow makes the machine more valuable to me
). Paul I'm glad to hear that the manual was of some use (makes me feel a little less like a leach, sucking information and giving nothing back).
Rob if you manage to get the info on the correct colour, please let me know, I will still be interested, but after examining and cleaning the machine it is quite clear that lots of different touch up attempts have been made (so I feel a little less guilty about going with a shade of hammer green that is not quite the original).
So I have had a bit of a chance to get started on the project.
Dismantle:
The fixed table top comes off as expected.
Trunnion and cast main frame removed, it was a little hard to get the trunnion out until I finally found a small set screw hidden under some of the grease. Once this was removed the rise and fall shaft bearing could be twist 45 degrees to fit through the cast main frame
Attachment 201265
The below pictures show the extent of surface rust and flaked paint (way past touching up).
Attachment 201266
Attachment 201267
Removed the cast feet then lots of prep work (especially after looking up the required precautions for lead paint).
Below is the sheet metal frame after prepping, adding a primer, and 2 coats of hammer finish. Need to paint in panels and turn as I go, so it's going to take a bit more time to finish it (in order to get a good hammer finish, it appears that I need to add fairly thick coats, but it is a fine line between adding enough and overdoing it and having it run, so it's best to do each panel horizontally).
Attachment 201268
Still more panels to go
Attachment 201269
I need to let the other panels dry before moving on to the front and inside, but I have lots of other things to paint in the meantime
Attachment 201273
I am thinking of getting an electrolysis tank setup, to try to get the adjusting screws loose from the cast feet, and to clean up some of the nuts and bolts etc. I have an old computer power supply already set up as a 12 volt 15 amp power source, so it shouldn't be too hard to get going. I wouldn't mind working out a way to handle some of the bigger pieces (like the rails) without having to make some sort of ridiculously large tank. If anyone has any ideas please let me know.
Thanks,
Camo
-
14th March 2012, 06:54 AM #13
Senior Member
- Join Date
- Nov 2009
- Location
- GB
- Posts
- 139
Looking good
Col
-
14th March 2012, 08:18 AM #14
GOLD MEMBER
- Join Date
- Aug 2009
- Location
- Armadale Perth WA
- Age
- 55
- Posts
- 4,524
Transformation!
Nice job.

Re the feet ... you can spray/soak with WD40 - leave for some time - give it a test wrench with spanner etc and repeat.
Sometimes tightening the bolt a tiny bit will break the hold enough to get it starting to move, and then you can work on undoing it step by step.
Gas torch can help too ... maybe just on the bolt or apply to the opposite side to the new paint job
Cheers,
Paul
-
14th March 2012, 09:35 AM #15
 Burnt Out Chip
- Join Date
- Feb 2009
- Location
- moonbi nsw Aus
- Age
- 69
- Posts
- 2,065
What is it about restoring old equipment? What sucks us in to get down and dirty with Cast Iron and Alloy?
I don't know either but its addictive and extremely satisfying. May be its the collection of before and after photos? I still don't know but I do know its enjoyable.
Great story! Keep us posted please. The chairs for the audience are filling fast Just do it!
Kind regards Rod

 Reply With Quote


Similar Threads
-
First plane purchased
By Matt Thomas in forum HAND TOOLS - UNPOWEREDReplies: 7Last Post: 18th November 2010, 01:59 AM -
Massive amount of GB guide bars purchased
By Sawchain in forum SMALL TIMBER MILLINGReplies: 7Last Post: 26th January 2009, 02:23 AM -
Just Purchased my 1st triton
By sawdust62 in forum TRITON / GMCReplies: 3Last Post: 14th March 2004, 10:14 PM
