

 Thanks: 0
 Likes: 0
 Needs Pictures: 0
 Picture(s) thanks: 0
Results 31 to 45 of 112
Thread: Beth - New Build 'Boreal'
-
10th January 2012, 07:48 AM #31
 Member


- Join Date
- Oct 2011
- Location
- Victoria, BC, Canada
- Posts
- 76

Thanks Michael (Mik?)
These photos are mostly with my cell phone which seems to give quite good results about 30% of the time (what you see here), and then results from mediocre to abysmal the rest of the time. Luckily boats are very patient when it comes to getting their picture taken.
Working on the last few details for the interior before painting.
The mast step came together very easily. I marked out the mortice, drilled four 1" holes to remove most of the material, 4 0.25" holes for the corners, and then chiselled out the remaining material, using the edges of the holes as a guide. This went so quickly that I forgot to take any photos, but it turned out like this:

I then moved on to the main mast partner. It starts like this:

It has a tricky angled hole in it so I stapled 6+4mm of ply to the bottom to raise it to the correct angle.


Forsner bits are great because they don't wander when cutting overlapping holes. Using the same 1" bit I used for the mast step I drilled a series of holes around the marked circle.


I then tried to file and sand the hole into a nice round shape. This went poorly, and I realized I made a few mistakes:
1) didn't plane the top of the partner, leaving it rough (it gets bevelled to the deck camber later, so I didn't bother). This made it hard to mark accurately.
2) my compass was blunt so it made a wide mark.
3) partially due to the poor marking, I my holes weren't precisely touching the marked circle.
Because of this my hole ended up a bit misshaped and oval shaped. I think the many holes method would work well if I had marked it better and been more careful in drilling the holes. Instead, I'm just going to pick up a large drill bit of the correct size and do it all in one shot. Stay posted!
-
10th January 2012 07:48 AM # ADSGoogle Adsense Advertisement
- Join Date
- Always
- Location
- Advertising world
- Posts
- Many
-
15th January 2012, 04:15 PM #32
Member
- Join Date
- Oct 2011
- Location
- Victoria, BC, Canada
- Posts
- 76
Nothing terribly exciting this time, just good steady progress.
I solved the problem of the mast partner by buying a 2 7/16" drill, but have yet to install the partner. It severely restricts access to the bow compartment so I need to sand everything before the partner goes in.
The rear cockpit beam was roughed out a while back, but I never got around to gluing it in so I ended up gluing the mizzen partner and the beam as one unit.

And beveled this new structure to match the deck camber...

Fitting the rudder blocks was complicated by the difference in heights of the sheerclamps. I should have made sure the bottoms were even with each other, but now the upper rudder blocks have a bit of a strange jog in them. Not that that's really a problem considering nobody is likely to see them again.

Next step was to fit and glue the riblets. Fitting them actually took less time than gluing; somehow in my mind gluing is always a quick task to fit in before leaving for the day but sometimes it really isn't. The riblets required some creative clamping to make sure they were tight all along the side.


More exciting was starting on the spars! I'd roughed them out when I milled the rest of the wood for the boat but today I planed them to final square dimensions and started marking and cutting the tapers. I managed to do the two smallest - the mizzen boom and yard.
I marked the taper line using a batten clamped to the spar

After marking the taper I roughed out the taper on the bandsaw and finished up with a long bed hand plane. Then, on the tapered faces I marked out the taper again and cut and cleaned up again to end up with a square sectioned tapered spar.

Last bit of progress was the main mast glue up. To get the required 60mm diameter I need to laminate two 50mm sections. So far so good, but cutting the taper will be exciting. Might even require a helper.

-
16th January 2012, 01:24 AM #33
SENIOR MEMBER
- Join Date
- Oct 2007
- Location
- Poland
- Age
- 67
- Posts
- 805
All looks really fantastic

Your progress are really fast! Bravo!
-
23rd January 2012, 04:18 PM #34
Member
- Join Date
- Oct 2011
- Location
- Victoria, BC, Canada
- Posts
- 76
Thanks Robert,
Progress continues on the spars. It's a bit hard to capture the progress in a photo, but here goes...
Got all the spars other than the main mast tapered in square cross section - probably the most time consuming part for the small spars.

I made a spar gauge as shown in the plans but something didn't seem right... turns out the dimension from centerline to the marking nail needs to be doubled (at least for the 8 sided version, I haven't checked the 16 side numbers). Once that change was made the gauge worked wonderfully. I tried making one of these before but using nails instead of pencils and having a drill press made a huge difference.
After marking I roughed out the octagonal shape by setting the bandsaw to cut an amount suitable for the widest portion of each spar. This gets most of the waste removed very quickly and you just need to go in and remove some extra towards the tapered ends. You can also do this with a table saw or probably even just with a circular saw.

The past few days we've had snow (unusual!) and today the wind was around 50 knots which actually made it difficult to cut the mast on the bandsaw because I need to open the door and feed it in from outside. The wind kept blowing me around! Finally after much work of getting the mainmast cut out of its blank, I cut the tenon on the end while things were still square.

Last week a parcel of goodies arrived from Duckworks: hatches, rudder hardware, and sailcloth and other sail materials. I'll probably start on the sails soon - I'm looking forward to that.
-
25th January 2012, 11:08 PM #35
Happily receives emails.
- Join Date
- Jul 2005
- Location
- 'Delaide, Australia
- Age
- 65
- Posts
- 8,138
Of course ... Duckworks can supply sailmaking material ... didn't think of it!!!
Michael
-
6th February 2012, 05:41 PM #36
Member
- Join Date
- Oct 2011
- Location
- Victoria, BC, Canada
- Posts
- 76
Must be about time for an update!
My time has been split between sailmaking and sparmaking.
Sailmaking:
I plotted the panel shapes in Sailcut CAD. With this program you can design the various cambers and edges curves and it'll spit out the panel shapes. Without much experience I referred to the Sailmaker's Apprentice and tried to err towards the flatter cut range with about an 8% camber in the main and a bit less in the mizzen.
First drew out the panels and cut them out, leaving a bit of a margin around the outside edges of the sail to allow for any errors in measurement. This was tedious.

After cutting them out I stuck the first two panels together with double sided sailmaking tape and then sewed them. I added each panel one at a time until the whole sail was assembled. That done, I moved on to corner patches. I went with simple triangles to save time; more complicated shapes take a lot of time and are really difficult to sew (try and figure out how to spin a whole sail around to sew a rounded corner patch... not easy!). To quote Emiliano Marino (author of the Sailmaker's apprentice) sarcastic line, "For me, sewing individual reef-point patches comes close to cutting corner patches in degree of excitement".

The corner patches are assembled, from the sail out, with the 2nd biggest first, then getting smaller, then the biggest last.
The patches are sew in place slightly inside the edge of the sail to make sure the hem can be folded over properly.

Then finally the hems are folded over and sewn and things look like this:

I still need to sew right around the very outside of the sail (at the outer edge of the hems) and add a luff tape. I think on a sail this small the luff tape is probably overkill but it'll cover a join in the hem and should make things look cleaner. The main is currently stitched together but still needs patches cut out, and all the rest of it.
Sparmaking:
I found someone advertising a bunch of old planes including some wooden ones so I went to take a look at them to see if I could pick some up to modify into spar planes (planes with a concave sole, for shaping spars and oars and other round things). Turns out there were actually pair of spar planes for $10 each! I picked them up along with an interesting stanley #113 compass plane (a plane with an adjustable sole for planing around curves - would have been handy for planing the deck stringers, though a spokeshave works just about as well for work this small).

After 16-siding the spars I took the corners off with my new spar planes which got them very close to round (the radius of the blade is somewhat larger than the radius of the spar) and then sandpaper took care of the rest.


And finally, I found someone who could sell me marine alkyd (oil based) paint. Apparently since I last bought this (a couple years ago) it has been banned, along with pretty much all oil based paints. The water-based replacements for household use don't look as good and tend to wear more easily and the marine paints (interlux brightsides, etc.) only come in specific colours.
With the spars nearly done I'll be back to working on the hull. I have to sand and put the finishing touches on the interior, paint it, and then get on with gluing the deck.
-
7th February 2012, 02:03 AM #37
SENIOR MEMBER
- Join Date
- Aug 2010
- Location
- New Jersey, USA
- Posts
- 767
Hooray for another homemade Lugs'l! Looks as great as your spars do. Keep up the great work!
Dave
StorerBoat Builder, Sailor, Enthusiast
Dave's GIS Chronicles | Dave's Lugs'l Chronicles | Dave's StorerBoat Forum Thread
-
7th February 2012, 09:59 AM #38
Happily receives emails.
- Join Date
- Jul 2005
- Location
- 'Delaide, Australia
- Age
- 65
- Posts
- 8,138
I'll see you and raise you 10!
Great to see another sail done!
Michael
-
14th February 2012, 03:44 PM #39
Member
- Join Date
- Oct 2011
- Location
- Victoria, BC, Canada
- Posts
- 76
2 sails done! Sewing your own sails sure makes the $350 Duckworks sails look like an ever better deal.
I'm really pretty happy with how my ancient sewing machine has handled things. Last time I sewed sails I borrowed a Pfaff 1222 which, although I didn't really realize the significance at the time, had a walking foot, which greatly improves the feeding of the fabric. Without that the stitches tend to be less even because the machine is trying to pull the entire sail through itself with only the feed dogs under the fabric and sometimes slips a bit.

I now have a "Domestic Zig Zag" that cost me $20 in mint condition with all the original accessories, even down to the original oil bottle and needles. A quick re-oil and it works wonderfully. It came in a table but I built a portable box for it. However, it doesn't have a huge amount of power. It did everything I needed but struggled a bit on some portions of the main where I was sewing through 10 or 11 layers of sailcloth. For anyone interested in giving a shot at sailmaking I'd encourage finding a used machine and just giving it a shot. For sails this small most machines will work just fine, especially if you tape the seams. In North America at least Singer, White/Domestic, Kenmore (Sears), Pfaff, Viking and I'm sure other are generally robust brands and you can usually find well built machines for well under $100 in good operating condition.

The only real issue I ran into was a couple skipped stitches when going through the many, many layers of the patches and luff tapes on the main.

All sewn up! Just waiting for grommets. I'll also see if I can find something to sew into the leech as a telltale.

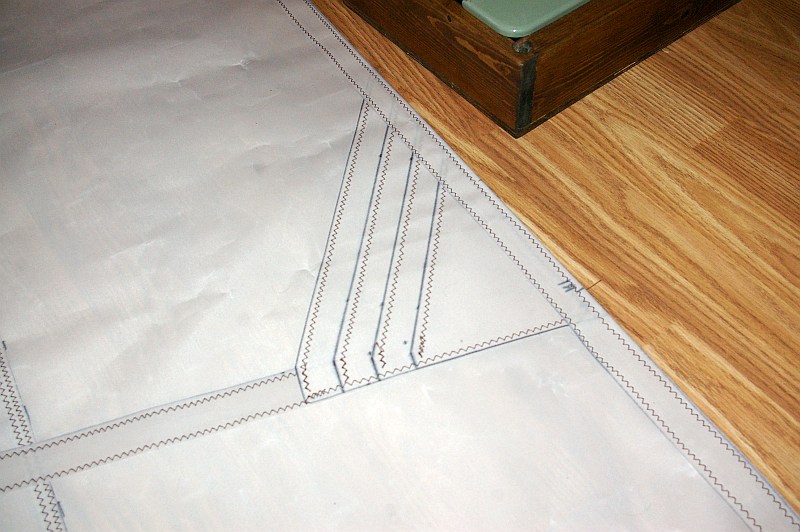
You'll see that I marked out the sails with felt pen. I used a Staedtler Lumocolor Non-Permanent pen on the recommendation of the stationary shop. I ran a couple tests to see how easily it came out of sailcloth. You can see the results below.
water and laundry detergent
Middle: water and bleach (Clorox)
Right: just water

The water alone did a very good job getting the marks out. I expect in the real sail they'd be pretty much unnoticeable and would fade in the sun very quickly. The detergent completely removed the stain with no apparent effect on the fabric. The bleach removed the marker, but also changed the colour of the fabric and damaged the coating somehow so water no longer beads off it normally.
I bought grommets and a grommet set tool, but couldn't find a punch to make the holes in the first place. I decided to try making one, and ended up turning one out of a random alternator spacer I found in the garage. I think the metal is a bit soft but it seems to work adequately.

Meanwhile, I'm back working on the hull. As a haiku:
sand sand sand sand sand
sand sand sand sand sand sand sand
sand sand sand sand sand

At least it's progress, and this week I should get a coat of primer on the interior. That'll be a milestone! Bit more paint, glue the deck, add trim bits, paint more, and I'll have a boat!
-
15th February 2012, 12:59 AM #40
SENIOR MEMBER
- Join Date
- Aug 2010
- Location
- New Jersey, USA
- Posts
- 767
Best haiku I've read all morning! (The morning is young though...)
Do you think your make-shift hole punch will get through the multi-layer stack? If not, you can easily get by using the spacer to mark and then cutting the hole with an Xacto or other razor-like blade.
Keep up the good (sand) work!Dave
StorerBoat Builder, Sailor, Enthusiast
Dave's GIS Chronicles | Dave's Lugs'l Chronicles | Dave's StorerBoat Forum Thread
-
15th February 2012, 07:12 AM #41
Member
- Join Date
- Oct 2011
- Location
- Victoria, BC, Canada
- Posts
- 76
I think the punch will do better than the photo might indicate. I tried it on some scrap sailcloth and it seemed to cut fine - I think the harder cloth of the sail works better than the paper towel because it doesn't stretch as much.
-
18th February 2012, 08:59 AM #42
Member
- Join Date
- Oct 2011
- Location
- Victoria, BC, Canada
- Posts
- 76
We'll continue by posting more photos of essentially the same thing!
I continued sanding for another couple hours and got to a point I was happy with. I then vacuumed out all the dust, wiped everything down with a rag soaked in paint thinner, and glued in the mainmast partner.


When gluing the partner I again ran into the problem with trying to get glue to stay on the faying surfaces while I slipped it between the sheer clamps. I think leaving the lower edge full size and cutting a hollow above that would help - similar to what I did on the aft cockpit beam. That way I would have a tight fit at the bottom but a nice wide opening at the top to squeeze the epoxy back into after sliding the partner into place.
I finished the fillets below the partner before gluing it but then scraped one away accidentally while cleaning up the squeeze out. Re-forming the fillet without being able to see it was a challenge. I had to keep taking off my gloves and sticking the camera down there to get a look at what was happening - my only mirror was way too small to be of help.

-
18th February 2012, 10:16 AM #43
Novice
- Join Date
- May 2010
- Location
- Tasmania, Australia
- Posts
- 14
What a fantastic write-up and quality of build
Thanks for the great construction log of your Beth build, makes my Beth look like a hack-job in comparison. Congratulations on the sail-making too!
I won't try and make my own sails from scratch, but I have a mainsail from a Yngling yacht that I have cut down into something resembling a lugsail that I will initially use. I also have the mizzen from my Navigator for the stern.
Laurie
-
18th February 2012, 11:55 AM #44
Happily receives emails.
- Join Date
- Jul 2005
- Location
- 'Delaide, Australia
- Age
- 65
- Posts
- 8,138
Hi Laurie,
You are a little up against it using second hand sails. They will make the boat a bit less predictable because the centre of balance won't be as finely tuned. Also I have concerns that the excessive weight of the mainsail might not show the movements of the wind fast enough for you to respond in your Beth.
I do have a pair of sail designs for making your own sails in a very simplified way.
That way they can be the right relative sizes and cloth weights.
So if you find it a bit difficult to sail ... a sail swapover could be worthwhile.
Best wishes
Michael
-
18th February 2012, 01:32 PM #45
Novice
- Join Date
- May 2010
- Location
- Tasmania, Australia
- Posts
- 14
Hi Michael,
Points taken.
The cut-down mainsail is intended for a second sail for my other boat, so its use initially on my Beth will just let me get out on the water a little quicker (that's if it stays upright as a result!) I will probably go for some Duckworks sails as soon as I can.
Cheers,
Laurie

 Reply With Quote


Similar Threads
-
Beth with outriggers?
By keyhavenpotter in forum Michael Storer Wooden Boat PlansReplies: 26Last Post: 11th June 2010, 04:52 PM -
BETH - new build with pics by Norm Lehman
By Boatmik in forum Michael Storer Wooden Boat PlansReplies: 62Last Post: 1st April 2009, 12:25 AM -
First sail of my new BETH on video!
By outofthenorm in forum Michael Storer Wooden Boat PlansReplies: 8Last Post: 17th November 2008, 10:04 PM -
Plans for Beth Available digitally?
By jbbaird in forum Michael Storer Wooden Boat PlansReplies: 3Last Post: 16th October 2008, 10:01 PM -
Beth Ireland DVD
By baxter in forum BANDSAWN BOXESReplies: 11Last Post: 31st December 2006, 03:42 PM
