

 Thanks: 0
 Likes: 0
 Needs Pictures: 0
 Picture(s) thanks: 0
Results 46 to 60 of 112
Thread: Beth - New Build 'Boreal'
-
18th February 2012, 02:53 PM #46
 Happily receives emails.


- Join Date
- Jul 2005
- Location
- 'Delaide, Australia
- Age
- 65
- Posts
- 8,138

Howdy Laurie,
If you like you can just ask for the Beth sailmaking stuff. The instructions are a funny mix of the OzRacer/PDRacer stuff with newly drawn shapes for the BETH sails. But it is all there. Then you can see what to do.
Basically it means sewing up a sheet of sailcloth big enough to cut the sail out of.
But you can see everything if you send me an email.
MIK
-
18th February 2012 02:53 PM # ADSGoogle Adsense Advertisement
- Join Date
- Always
- Location
- Advertising world
- Age
- 2010
- Posts
- Many
-
23rd February 2012, 10:00 AM #47
Member
- Join Date
- Oct 2011
- Location
- Victoria, BC, Canada
- Posts
- 76
Well, I got the inside primed. 48 hours later it still wasn't quite dry enough to sand, and in the mast well it was actually still wet to the touch. I think this is due to lack of ventilation and the cool temperature. So, I put a lightbulb in the mast well to warm it up and get some convection airflow going and tonight, after another 48 hours, I'd better be able to get the next coat on.
I decided to paint the mast well, storage holds and cockpit while leaving the buoyancy tanks with just epoxy.

Apparently I forgot to prime the back of the cockpit beam.

Painting in here was a huge pain. I chopped half the handle off a paintbrush to try for the next coat which should help. Just not much room down there.

-
24th February 2012, 06:23 AM #48
Member
- Join Date
- Oct 2011
- Location
- Victoria, BC, Canada
- Posts
- 76
Paint! Finally! What an exciting day it is (or was, yesterday).
After my 2 hour quick dry primer finally dried after 96 hours I sanded it all silky smooth. I think another coat of primer would have improved things but I really don't think the few imperfections in the cockpit will hinder my enjoyment of the boat.

And then painted the cockpit with a dark greyish green, and the cargo hold and mast well with white. About 3 hours in I came to the conclusion that I need a bigger good quality paintbrush. After 5 hours of painting I finally finished but decided that a 1" brush is far too small to paint the entire cockpit with.


I'm going to do another coat all over but the decks are getting tantalizingly close to going on.
-
2nd March 2012, 05:23 PM #49
Member
- Join Date
- Oct 2011
- Location
- Victoria, BC, Canada
- Posts
- 76
Progress continues slowly. I haven't done anything for the past few days after I somehow managed to hurt my neck moving the boat out of the garage to test-step the mast.
The second coat of paint really made everything look fantastic. It's certainly not a mirror finish (I'm far too lazy to sand all those little corners enough) but I'm really happy with it. After my grueling first coat that I applied with the 1" paint brush I picked up some 4" foam rollers and rolled and tipped the cockpit in about 5 minutes (not including the edges, but it saved a huge amount of time and looks good).

I found that the paint in the mast well would stay wet for an incredibly long time if just let to sit, so I hung a lamp down there and things dried up nicely. I think the solvent coming out of the paint must be heavier than air and so it quickly saturates the space and basically blocks out the oxygen. The lamp keeps things warm, which helps, and probably also generates enough convection to keep the air moving.

Mast test went very well apart from the neck thing. Seems to fit in there nice and snug. I'll probably take a tiny bit more off before varnishing but I can now get on with putting the deck on!

I got both decks roughed out and all the under deck structure marked out. I don't have a photo but I did cut the rest of the cockpit out too which will let me use clamps along the carlins. Might as well have as few staple holes to fill as possible. Hopefully the decks can go on this weekend.

-
6th March 2012, 12:09 AM #50
Better Recognize
- Join Date
- Jun 2009
- Location
- New Hampshire
- Posts
- 960
-
7th March 2012, 10:23 AM #51
Member
- Join Date
- Oct 2011
- Location
- Victoria, BC, Canada
- Posts
- 76
Thanks, glad you're enjoying it. Originally Posted by callsign222

After weeks of putting it off, I finally glued the deck! Everything went much more smoothly than I was expecting and I'm really happy with how things glued down.
The last task before the deck was to glue in hatch covers while it was still easy. I decided to try the suggestion in the plans of omitting fasteners. I used BoatLIFE Lifeseal which is some silicone/polyurethane mixture that is compatible with the ABS plastic of the hatches. I believe 3m 4000 (not 4200, unfortunately, because I already had a tube of that) is similar. One 80mL tube was just enough for all 4 hatches, and my tube had a fairly big dried up chunk in the bottom.

I was a bit apprehensive about how I was going to align these big floppy bits of deck singlehandedly when everything was covered with glue. What I decided to do was position them dry and then drill two holes in each piece, slightly oversize for a small nail. I then drove a nail through the hole, removed the deck and had four nice alignment pins. I practiced finding putting the deck on the pins quite a few times until I could do it first try.
Following the advice I received after my last coating session I decided to try coating using a squeegee. It worked great! I found it far easier to spread the epoxy out and got a much smoother surface - way more like the photos in the plans. It was almost relaxing.

No photos mid-process because I was running around, mixing epoxy, bag-squeezing epoxy, brushing epoxy and scraping epoxy with the inevitable result that my gloves got very sticky.
I opted to use the staple method to fasten down the decks and am very happy with how it turned out. I ended up using over 200 staples (and got a blister from the stapler!) and I think putting in that many tiny nails would be very tedious. On the other hand the nails could look really cool shining under the varnish!


My stapler wasn't really powerful enough to fire right through both layers of plywood so instead of using individual pads I cut a few thin strips of plywood and used these instead. The long strip gave me plenty to hold on to and protected the deck without stopping full penetration of the staple. After stapling I just snapped it off and went to the next one. The only problem with this method was sometimes the pads crumbled somewhat and I had to manually tap the staple down to maintain pressure. This was only a problem in maybe 10 staples out of the 200+ I used.

Finally, before the epoxy cured I pulled out the alignment nails. I didn't want to use a normal claw hammer because this would need to press down on the deck, potentially squeezing too much epoxy out of the joint. Instead I just used vice-grips and spun the nail so I could pull it straight up.

-
9th March 2012, 09:23 AM #52
Happily receives emails.
- Join Date
- Jul 2005
- Location
- 'Delaide, Australia
- Age
- 65
- Posts
- 8,138
Wow ... It is looking like a BETH!!!
Fantastic to see. A dry run is essential for this type of work .. and then the actual gluing down becomes dead easy!
Nice work
Best wishes
Michael
-
11th March 2012, 06:14 AM #53
SENIOR MEMBER
- Join Date
- Oct 2007
- Location
- Poland
- Age
- 67
- Posts
- 805
I totally agree!!! Originally Posted by Boatmik
Andykane,
Your BETH "Boreal" looks really great!
-
11th March 2012, 02:29 PM #54
Happily receives emails.
- Join Date
- Jul 2005
- Location
- 'Delaide, Australia
- Age
- 65
- Posts
- 8,138
Readers! Don't forget the other BETH building here
(disregard this note if you have followed the same note on the other thread!)
https://www.woodworkforums.com/f169/b...ml#post1457319
-
27th March 2012, 03:51 AM #55
Member
- Join Date
- Oct 2011
- Location
- Victoria, BC, Canada
- Posts
- 76
Thanks for the comments!
I've been distracted by other projects so I haven't made much progress lately, but I did manage to pull out all the staples and trim the deck. Trimming went fairly quickly with a japanese hand saw and a block plane although I somehow managed to saw a bit too much off right at the very end! It's not even through the outer ply of the side and the gunwale will cover most of it so it shouldn't be a problem.


I'm hoping to get the stem trimmed and glued tomorrow, and maybe even get the cockpit coaming cut out.
-
27th March 2012, 10:06 AM #56
Happily receives emails.
- Join Date
- Jul 2005
- Location
- 'Delaide, Australia
- Age
- 65
- Posts
- 8,138
As soon as the edge goes she looks startlingly beautiful!
Michael
-
27th March 2012, 04:19 PM #57
Member
- Join Date
- Oct 2011
- Location
- Victoria, BC, Canada
- Posts
- 76
Sure does!
Any progress on an updated centerboard plan? I sent you an email a while ago but never received a plan. It's getting mighty close to time to make foils.
-
29th March 2012, 11:41 PM #58
Happily receives emails.
- Join Date
- Jul 2005
- Location
- 'Delaide, Australia
- Age
- 65
- Posts
- 8,138
Hi ... I can't find your email address. Can you send me an email at [email protected]? And I will send the test print foil plot to you first.
Michael
-
31st March 2012, 03:54 AM #59
Member
- Join Date
- Oct 2011
- Location
- Victoria, BC, Canada
- Posts
- 76
Mik, I sent you an email. I'm andrewkbarclay@ google's email service (I realized there is no way to find my email from my forum account).
Progress continues at a good pace. I actually just ran out of microfibers which is unfortunate considering I have so little left to glue (cockpit coaming, rudder bearings and foils!) but such is life, and it's not like they won't keep.
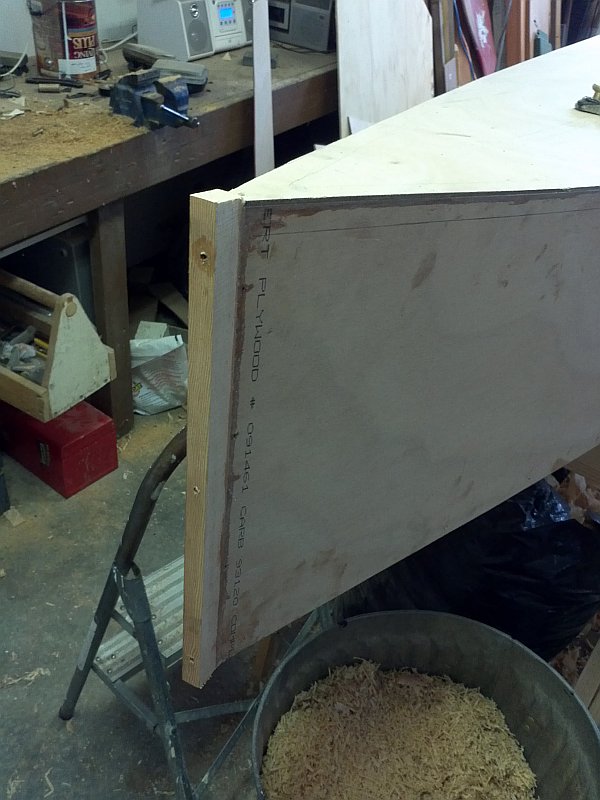
The outer stem is glued on as per the plans. More use of screws instead of what would be a very awkward clamping situation. I seem to remember reading somewhere that tape could be used instead and that would save filling holes in the stem. Might be worth a try, but might be more suited to an octopus. Holding the part and driving screws already make pretty good use of 2 arms.
I spent a bit of time milling out the Douglas Fir for the cockpit coaming. I considered using a lovely chunk of 50mm thick Sapele from an old project (it came from an amazing 50x300x very long chunk at the local wood store!) but it isn't long enough and I didn't feel like scarfing it, so I just went with the fir. I decided on a coffee brown for the hull and deck so the light fir should contrast nicely.

Meanwhile, I caught up on other little tasks that were postponed. Stern stem (?) cleaned up nicely. Note the shaded areas indicating the backing blocks for the rudder hardware. I'm glad I remembered to mark those before putting the deck on - now I just need to remember to drill the holes before I paint over the marks.

I spent a while trying to decide how to deal with the forward end of the cockpit coaming. The first step is done, and I'll show the rest of it when they happen.

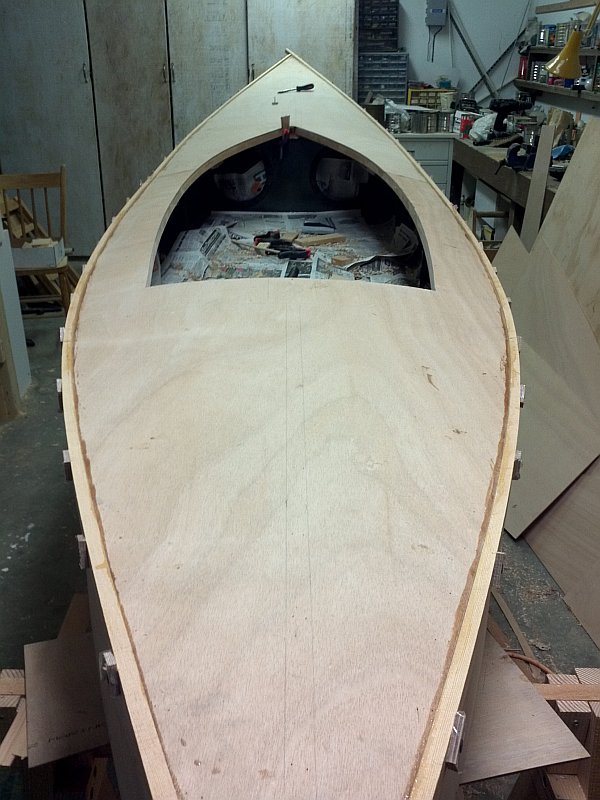
And finally, after shaping the (bow) stem I got the gunwales glued on. My available fir wasn't quite full length so I had to scarf it. I debating scarfing beforehand or in place but decided to do it in place. The downside to doing it in place is that you don't get quite a fair curve (it theoretically has a kink where they join) but the curve is so slight and the gunwale gets trimmed flush to the deck so it should disappear by the time the paint goes on.


This photo makes the hull shape look very strange for some reason. Not sure if it's the camera or the gunwales not being quite even, but hopefully it goes back to normal after the gunwales are trimmed flush.
-
1st April 2012, 03:53 AM #60
SENIOR MEMBER
- Join Date
- Oct 2007
- Location
- Poland
- Age
- 67
- Posts
- 805
I think - this is due to the characteristics of the lens. She looks really great! Originally Posted by Andykane


 Reply With Quote


Similar Threads
-
Beth with outriggers?
By keyhavenpotter in forum Michael Storer Wooden Boat PlansReplies: 26Last Post: 11th June 2010, 04:52 PM -
BETH - new build with pics by Norm Lehman
By Boatmik in forum Michael Storer Wooden Boat PlansReplies: 62Last Post: 1st April 2009, 12:25 AM -
First sail of my new BETH on video!
By outofthenorm in forum Michael Storer Wooden Boat PlansReplies: 8Last Post: 17th November 2008, 10:04 PM -
Plans for Beth Available digitally?
By jbbaird in forum Michael Storer Wooden Boat PlansReplies: 3Last Post: 16th October 2008, 10:01 PM -
Beth Ireland DVD
By baxter in forum BANDSAWN BOXESReplies: 11Last Post: 31st December 2006, 03:42 PM
