

 Thanks: 0
 Likes: 0
 Needs Pictures: 0
 Picture(s) thanks: 0
Results 91 to 105 of 112
Thread: Beth - New Build 'Boreal'
-
29th May 2012, 04:10 AM #91
 Member


- Join Date
- Oct 2011
- Location
- Victoria, BC, Canada
- Posts
- 76

Thanks for all the comments!
Actually just Douglas Fir, but they look very similar. This Fir has very tight grain: 30+ rings per inch, although that apparently doesn't really matter when it comes to strength.are those Sitka
Agreed. Now that the glass is on there I can't bend the trailing edge at all, and the whole board is much stiffer.Even with more robust timber the trailing edge tends to split off or break. But once glassed to prevent that mode of failure it is virtually indestructable.
Definitely sounds like some intense sailing. I wonder if the greater flexibility of fiberglass is more durable here.I saw some Paper Tiger foils made with WRC and just the 1 layer of carbon, and the trailing edges broke off completely during a windy day.
I finally got a coat of topcoat on the hull! I'm not totally sure how I feel about the colour but I think once I see it in daylight it'll look good. The 2nd coat always seems to help too, even if it looks like the first coat covered well.

Got the foils glassed. I had a bunch of extra 10 or 12oz cloth that I decided to use instead of the designed 2 layers of 6oz. We'll see if that was wise - I assume strength will be similar although the heavier cloth may need more filler to fill the weave. I'll glass the tips too eventually although I wonder if it's really necessary.

Now I have a question about lashing the sails to the spars. The rigging guide makes it clear that you need to have the sail pulled both to the end of the spar and tight against it, but I'm not sure if I can get away with using one line for both, like this:

Or if I need to use two lines like this:

On the mizzen everything is so small that it gets rather messy if you leave enough tail to tie the knots. Maybe these lashing would be best done with smaller lacing cord and only use spectra on the main.
Either way, it's going to look very nice!

-
29th May 2012 04:10 AM # ADSGoogle Adsense Advertisement
- Join Date
- Always
- Location
- Advertising world
- Posts
- Many
-
15th June 2012, 01:55 AM #92
SENIOR MEMBER
- Join Date
- Oct 2007
- Location
- Poland
- Age
- 67
- Posts
- 805
Andykane,
All looks great indeed, but we are waiting for launching with growing impatience
***
My Beth "Yuanfen" in last Sunday was transported to the Zegrze (Reservoir) Lake and she is waiting for launching for next Saturday social regatta (race) of members of Forum Żeglarskie.
-
16th June 2012, 10:11 AM #93
Happily receives emails.
- Join Date
- Jul 2005
- Location
- 'Delaide, Australia
- Age
- 65
- Posts
- 8,138
-
20th June 2012, 05:43 AM #94
Member
- Join Date
- Oct 2011
- Location
- Victoria, BC, Canada
- Posts
- 76
I know the feeling!we are waiting for launching with growing impatience
Despite distractions I've been making progress. More painting, painting, painting.
Painting the underside of the deck was a special kind of fun. Lots of tiny little corners to sand and paint. I put the boat on its side so at least I didn't have to work upside down. I've since put a coat of green on and I'll leave it like that for now.

I'm really happy with how the foils turned out. Getting the 10oz cloth to bend nicely around the ends was a bit tricky (the plans call for 2 layers of 6oz which would bend easier).

And finally, I got a second coat of brown on the hull. I'm glad I went with the white bottom and ran the white up the sides a bit. Since I can't paint it all at once it's really no extra work and it makes a nice clean line between the sides and bottom.


I think I'll probably be finished this weekend but won't launch until the following weekend. It's sure taken longer than I expected, but I also haven't had nearly as much time to devote to it the past couple months.
-
21st June 2012, 06:12 AM #95
SENIOR MEMBER
- Join Date
- Oct 2007
- Location
- Poland
- Age
- 67
- Posts
- 805
Go Andykane - go! Originally Posted by Andykane


Finishing the boat being always longer than we would like ... This is because my BETH "Yuanfen" is not as nicely finished as envisioned ...
-
23rd June 2012, 02:37 PM #96
Happily receives emails.
- Join Date
- Jul 2005
- Location
- 'Delaide, Australia
- Age
- 65
- Posts
- 8,138
Nice to see her being painted a different way Andy!
MIK
-
26th June 2012, 05:20 AM #97
Member
- Join Date
- Oct 2011
- Location
- Victoria, BC, Canada
- Posts
- 76
So close, so very close.
After carefully rounding over the ends and fiberglassing it all, I realized that I need a flat top on the rudder so I can mount the steering yoke. Oops... I contemplated moulding an epoxy filler to fill the gap but decided it would just be easier to lobotomize the rudder so after a few seconds on the bandsaw it was good to go.
I'm quite pleased with these rudder gudgeons I got from Duckworks. I can't use all the mounting holes due to the width of the stern but even with just 4 bolts per fitting it should be more than strong enough. If anything they'll just bend before pulling out the bolts, which are set in epoxy soaked holes into the fir backing blocks (no nuts - I can't reach that far!).

I was hoping to use a similar epoxy soaked hole technique for the main halyard and downhaul cleats to guarantee no leaks into the storage compartments. Unfortunately there really isn't enough thickness in the centercase deck clamps, and they're also soft red cedar. I contemplated adding an extra block but at this point I decided to just through bolt them with some sealant.
I found it helpful to put masking tape on the areas I was going to be drilling so I could easily mark things up.

I spent a while trying to decide how to attach the mainsheet to the deck. The centercase spacer is just wide enough to make it difficult to through bolt and too narrow to bolt into... unless you only have one bolt! I found this eye and decided to set it in epoxy in an oversized hole. I decided the original 100mm bolt was just excessive so I cut it off to 50mm. According to the Gougeon Bros' book (highly recommended reading!) this arrangement should be good for something like 1800 lbs (800kg) of direct pull, so I daresay it's not a weak point.

The plans are a bit vague on how the mizzen halyard and downhaul are supposed to be mounted and I couldn't find any good photos so I decided the simplest way to go was a pair of 3" horn cleats. The only issue here is that I wish the partner was slightly wider. I ended up filling the holes you see here and moving them very slightly outboard because there just wasn't enough space between the cleat and mast.

The mizzen sheet deadeye is bolted straight into the stern stem, again with epoxy soaked holes. I ran into a slightly issue here - you might notice that the holes are straight in line with the one I drilled for the mooring line! The bolts are short enough they don't actually interfere so I filled the lower ends with thickened epoxy after installing the deadeye.

Even a simple boat has a lot of bolts and blocks and fittings.

These loops are for the main halyard and downhaul blocks (the blocks will be lashed in place). Getting the washers and nuts on the underside was a bit tricky but I only dropped 2 washers. You can see my special washer-removal tool.

I've actually got another day's work done after this so now all the hardware is bolted down and I've made a tiller extension. Really all that's left is lashing the blocks in place and bending on the sails!
-
26th June 2012, 05:33 AM #98
SENIOR MEMBER
- Join Date
- Oct 2007
- Location
- Poland
- Age
- 67
- Posts
- 805
She looks really beautiful!

Go forward! To the launch day!
-
26th June 2012, 06:51 PM #99
Happily receives emails.
- Join Date
- Jul 2005
- Location
- 'Delaide, Australia
- Age
- 65
- Posts
- 8,138
Hi Andy,
It is really nice to put washers underneath the saddle/deckeyes. Their base is so narrow that they tend to damage the paint and crack the epoxy.
You are doing a really nice job!!!
Michael
-
28th June 2012, 05:40 PM #100
i-Sails Australia
- Join Date
- Apr 2009
- Location
- Hunter Valley NSW
- Age
- 69
- Posts
- 1,759
Good idea MIK. I like the colours a lot and also the treatment of wrapping the white bottom around the sides a bit to give it a nice retro feel. Originally Posted by Boatmik
Interesting gudgeons, I've not seen these before with a removeable pin. Gives a few more options with the rudder pintles. I use smaller pins like these on the Laser to replace those awful circle pins to make rigging and derigging faster.
-
28th June 2012, 11:40 PM #101
Happily receives emails.
- Join Date
- Jul 2005
- Location
- 'Delaide, Australia
- Age
- 65
- Posts
- 8,138
Hi Bruce,
Those pins are simple clevis pins ... extra long to fit in the gudgeons. I can't remember if they were made by Riley or Ronstan in Australia.
MIK
-
29th June 2012, 03:20 AM #102
Member
- Join Date
- Oct 2011
- Location
- Victoria, BC, Canada
- Posts
- 76
That is a good idea - I'll keep that in mind if I do have a problem, but for now since it's already bolted up I'll just see how it goes. If it does cause any damage I figure I can use a forstner bit to drill through the deck and then cast a little epoxy puck on top of the partner which would fix any damage and probably make a solid enough base to eliminate the need for a washer anyway. If I was thinking I would have drilled all the hardware holes before painting so I could clean them up without worrying about scratching the paint.
I actually took the white bottom idea from this boat on Mik's flicker page.
DSCN0733 by Storer Boat Plans, on Flickr
The gudgeons are from Duckworks and were supplied with the pins. I really like how solid they seem while still being easily removed, although I wish I could find a pin long enough to go through both gudgeons.
Not much new in the way of photos. I've got the deck hardware installed and the blocks lashed in place. 3mm spectra is really too big to make the lashing look tidy but I can't find anything smaller without buying a very expensive 50 foot spool of 1.5mm (for $50! that's about triple the price of the 3mm line...). At any rate I'm sure it'll be perfectly functional.

Like I said before, I wish I'd made the mizzen partner slightly wider to give more clearance here. Of course the move you move the cleats outboard, the sooner the tiller yoke hits the cleats. Compromises...

I didn't make a tiller extension earlier because I had decided it would be worth the $50 to save some time and get a manufactured one but I just couldn't bring myself to put a carbon fiber and foam "Battlestick" on this boat so I whipped up this one. 2 coats of varnish on it so far, everything else has 5 now and is looking very good.

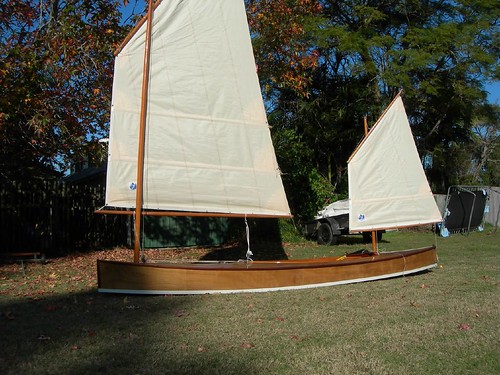
Elsewhere I've got both sails lashed to the spars but still need to do some lacing. Even so, looks like I'll be launching this weekend!
-
29th June 2012, 08:24 PM #103
i-Sails Australia
- Join Date
- Apr 2009
- Location
- Hunter Valley NSW
- Age
- 69
- Posts
- 1,759
I needed a new longer tiller extension for my Goat. Have opted for an organic carbon one for the princely sum of $2. Chinese bamboo and very light & strong
 It's so good that if my Laser's carbon Fatso ever breaks, I'll replace it with bamboo.
-
30th June 2012, 10:16 AM #104
SENIOR MEMBER
- Join Date
- Aug 2010
- Location
- New Jersey, USA
- Posts
- 767
Is that class legal?

Sent from my iPhone using TapatalkDave
StorerBoat Builder, Sailor, Enthusiast
Dave's GIS Chronicles | Dave's Lugs'l Chronicles | Dave's StorerBoat Forum Thread
-
30th June 2012, 01:28 PM #105
i-Sails Australia
- Join Date
- Apr 2009
- Location
- Hunter Valley NSW
- Age
- 69
- Posts
- 1,759
Yup, one of the Laser quirks. Tiller and tiller extension can made out of anything you like. Tillers tend to be mainly carbon, but why this is the case is quite interesting. I'll tell you why....... Originally Posted by davlafont
So you can maximise leech tension!
Think about it and if you're stumped, I'll explain

 Reply With Quote


Similar Threads
-
Beth with outriggers?
By keyhavenpotter in forum Michael Storer Wooden Boat PlansReplies: 26Last Post: 11th June 2010, 04:52 PM -
BETH - new build with pics by Norm Lehman
By Boatmik in forum Michael Storer Wooden Boat PlansReplies: 62Last Post: 1st April 2009, 12:25 AM -
First sail of my new BETH on video!
By outofthenorm in forum Michael Storer Wooden Boat PlansReplies: 8Last Post: 17th November 2008, 10:04 PM -
Plans for Beth Available digitally?
By jbbaird in forum Michael Storer Wooden Boat PlansReplies: 3Last Post: 16th October 2008, 10:01 PM -
Beth Ireland DVD
By baxter in forum BANDSAWN BOXESReplies: 11Last Post: 31st December 2006, 03:42 PM
