

 Thanks: 0
 Likes:
  Needs Pictures: 0
 Picture(s) thanks: 0
Results 61 to 74 of 74
-
24th August 2012, 03:21 PM #61
 Happily receives emails.


- Join Date
- Jul 2005
- Location
- 'Delaide, Australia
- Age
- 65
- Posts
- 8,138

Howdy ... progress - good!
The big problem is your halyard. It has nothing to do with the end of the yard it is tied to ... it needs to be tied to front end and the block on the yard needs to be halfway along the yard or a little forward.
This will solve most of your headroom problem. You do have to duck your head, but before the gap was too small.
Correct from a couple of the others above - the block on the yard is not needed, but it might save some chafing if your ropes are not as tough as others. But it doesn't effect the rigging method.
Also the mainsheet will look like the red line in the attached pic - otherwise you will end up with a twist in the mainsheet.
Good work!
MIK
-
24th August 2012 03:21 PM # ADSGoogle Adsense Advertisement
- Join Date
- Always
- Location
- Advertising world
- Age
- 2010
- Posts
- Many
-
24th August 2012, 05:51 PM #62
Intermediate Member
- Join Date
- May 2012
- Location
- Elk Grove, California, USA
- Posts
- 32
Thank you so much everyone!!!!!!
Ah Yes, I did put halyard backward.
I will take her out this weekend with new set up.
Thanks again.
-
29th August 2012, 04:06 PM #63
Intermediate Member
- Join Date
- May 2012
- Location
- Elk Grove, California, USA
- Posts
- 32
After 3 hours of sailing I've noticed that varnish has been worn through and bare wood has been exposed where boom and spar contact mast. It has been glassed and varnished but still wasn't enough. Should I re-glass the damdaged area? I am also considering adding some leather sleeves to spars.

By the way, the new setup is working really well. Over the weekend, my kid's college friend took the boat out and capsized it almost immediately (lee board high position).It was a great opportunity to test the capsize set up without me actually in water. Unfortunately, I didn't do a good job with setup and he couldn't free up the rope. Well.... we all felt sorry for him, after laughing and watching him struggling in water for 15 minutes. We finally fished him out and put the boat back up. Air boxes and hollow mast worked and boat was pretty much dry. Everyone was safe except his wet iPhone.
-
29th August 2012, 09:16 PM #64
i-Sails Australia
- Join Date
- Apr 2009
- Location
- Hunter Valley NSW
- Age
- 69
- Posts
- 1,759
Pharmer, there are some great tape products available from marine chandlers. One product is called "Anti Chafe Patch". If not available, Mylar tape 4-6" wide works a treat too. The great thing about these products is that they are almost invisible. I've had some Mylar tape around my GIS mast for ages, and it works.
-
30th August 2012, 10:51 AM #65
Happily receives emails.
- Join Date
- Jul 2005
- Location
- 'Delaide, Australia
- Age
- 65
- Posts
- 8,138
We really need a tips and tricks page for useful advice like this or it will be lost.
Nice one Bruce!
-
30th August 2012, 04:45 PM #66
Intermediate Member
- Join Date
- May 2012
- Location
- Elk Grove, California, USA
- Posts
- 32
Woodeneye, Excellent suggestion. Looks like Anti Chafe Patch is common in UK but not sure about in US. I am sure I can get some mylar tapes. Thanks so much.
-
30th August 2012, 07:59 PM #67
Happily receives emails.
- Join Date
- Jul 2005
- Location
- 'Delaide, Australia
- Age
- 65
- Posts
- 8,138
Howdy, the tape is also used to repair sails made of mylar so it will be available somewhere on the USA. It's compact enough to post.
West marine or a sailmaker would probably have it.
MIK
-
5th September 2012, 06:50 PM #68
Intermediate Member
- Join Date
- May 2012
- Location
- Elk Grove, California, USA
- Posts
- 32
Ok. Just taped up my mast and got some new ropes and parts from Duckworks. I am ready for another sailing.

However, I am suffering from a boat building withdrawal. I have to admit, I enjoy building more than using. Plus, I need to figure out what I am going to do with all those left over parts from OZ Racer RV. So I just purchased a Quick Canoe plan. Eventually, I will get to GIS.
Mik, I really want to add buoyancy tanks to quick canoe for safety reason. I don't want to see my work sink to the bottom of lake. Do you have any supplemental plan for adding buoyancy tanks? I read about Rick suggesting using pool noodles as buoyancy. I am not sure if I want to do that.
-
5th September 2012, 07:14 PM #69
Senior Member
- Join Date
- Jul 2011
- Location
- Finland
- Posts
- 131
It should be very easy to add boyancy tanks. Cut first out the vertical plywood piece as accurate (but sligthly on the bigger side) you can get. Then glue a frame on it. After that take a plane and adjust the sides until it is fitting. Once it is fitting and you have it glued into its place, glue supports to the sides of the canoe for the horizontal plywood piece. Again plane the plywood piece until it is fitting there.
-
5th September 2012, 09:34 PM #70
Senior Member
- Join Date
- Aug 2011
- Location
- Black Forest. Germany.
- Age
- 67
- Posts
- 219
Hi Pharmer,
You could do the decks and tanks the same as with the Eureka plan. What I would suggest first is to lay a piece of ply over the top of the bow and stern and mark the shapes of the decks from underneath. To do it later is a bit tricky. I then leveled out the canoe and ran a string line down the middle. I made my measurements for the bulkheads on the sring line and then squared them off that. If I remember right the Quick Canoe is fairly square sided so the bulkheads should be fairly easy to cut to size. You can clamp a piece of wood across where the bulkheads go and clamp them to that and fillet/tape them in. Then as Engblom suggests, glue a support on the inside of the bulkhead and around the insides of the tanks. You will need a center stringer to support the middle of the deck. It's probably better to have a curve on the deck.
Here's some pics to maybe give you a better idea.
Hope this helps.
Cheers, Kev.
Attachment 222450 Attachment 222451
Attachment 222452Attachment 222453
-
6th September 2012, 03:08 AM #71
Intermediate Member
- Join Date
- May 2012
- Location
- Elk Grove, California, USA
- Posts
- 32
Thank you so much for some great ideas and suggestions. While I was googling, I found this. Instead of building tanks, basically adding some polystyrene form blocks. Covering blocks with some nice fabrics may not look too bad. Plus, it will add less weight to the boat. But I think I read it somewhere Mik mentioned about not adding buoyancy blocks to tanks.
By the way, I might need to find a Quick Canoe thread and start posting my questions now on.
-
6th September 2012, 03:35 AM #72
SENIOR MEMBER
- Join Date
- Aug 2010
- Location
- New Jersey, USA
- Posts
- 767
I love how you've gotten hooked! I still vote for GIS as the next boat, but maybe you should wear out the OzRV first.
https://www.woodworkforums.com/f169/q...ur-own-126426/ Originally Posted by Pharmer

Dave
StorerBoat Builder, Sailor, Enthusiast
Dave's GIS Chronicles | Dave's Lugs'l Chronicles | Dave's StorerBoat Forum Thread
-
6th September 2012, 04:12 AM #73
Intermediate Member
- Join Date
- May 2012
- Location
- Elk Grove, California, USA
- Posts
- 32
Excellent!!! Thanks for directing me to the right direction. Let me go through 7 pages of postings and see what I can learn.
Understandably my wife is not too trilled about me starting another boat project. I told her that this one is really a short project. It will be done before you know it. She said, yeah right.
-
6th September 2012, 10:28 AM #74
Happily receives emails.
- Join Date
- Jul 2005
- Location
- 'Delaide, Australia
- Age
- 65
- Posts
- 8,138
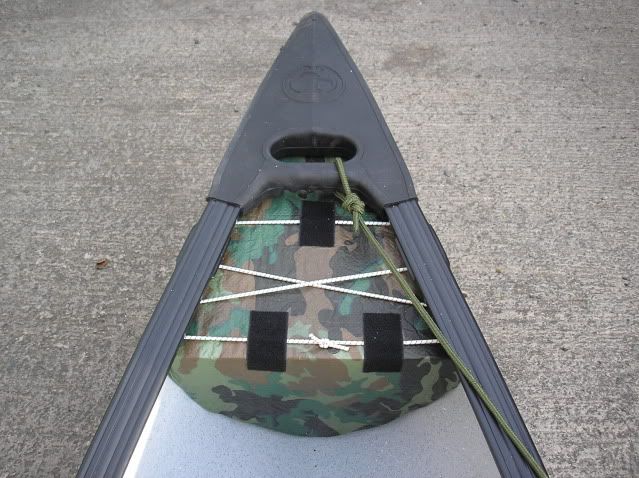
We have info on making bags
DIY PVC Buoyancy bags and dry bags for dinghies, kayaks and canoes | Michael Storer Wooden Boat Plans
The bags don't work by high pressure but are made oversize then put in place then inflated.
The ones on that canoe are too small I think compared to what I have seen.
You might have to move the seats a little too to make sure you have enough leg room at the front and then move the back to balance.
Michael.


 Reply With Quote

Similar Threads
-
Building a cot - need some help
By snaps in forum WOODWORK - GENERALReplies: 10Last Post: 3rd October 2009, 11:40 PM -
The building of a cot
By bo-greenie in forum WOODWORK - GENERALReplies: 5Last Post: 29th July 2009, 09:59 PM -
building my MK 3
By aussiejunk in forum TRITON / GMCReplies: 2Last Post: 24th July 2008, 03:07 PM -
Building a bed
By bizzy in forum WOODWORK - GENERALReplies: 11Last Post: 16th January 2008, 09:00 AM -
Building a bed
By bizzy in forum WOODWORK - GENERALReplies: 1Last Post: 21st January 2006, 11:52 AM
