

 Thanks: 0
 Likes: 0
 Needs Pictures: 0
 Picture(s) thanks: 0
Results 1 to 4 of 4
-
4th May 2008, 01:23 AM #1
 Happily receives emails.


- Join Date
- Jul 2005
- Location
- 'Delaide, Australia
- Age
- 65
- Posts
- 8,138
 Eureka Canoe or any boat - alt. deck method & filleting hull instead of glassing.
After writing a fair bit of promotional fluff over the last few days (sorry sorry sorry) finally something of substance.
I have separated the pics of the Eureka that was built at the Duck Flat Autumn School over the last few weeks and commented any interesting bits.
We did use a slightly different method in some places compared to the plans method. None of the below is (in particular) better than what is in the plans, but if you like the idea and understand what we were getting at then .... why not.
Bob the builder had some understanding of tools (orthopaedic surgeon) - though he kept pointing out that his were not covered with epoxy!!!
All the pics are here
http://www.flickr.com/photos/boatmik...7604721680117/
the comments on the pics in this set are more detailed than the comments below with many cautions and caveats. So please read.
But some interesting processes.
We made one of each type of panel from the boat and used it to mark out the other which were cut with a small margin. Then we screwed everything together and used a router with the accurate one on the underside to act as a guide. One mistake with a router and your two and a half sheets of ply are firewood.

We used the Chesapeake Light Craft Method of stitching the bottom three panels but then making the two upper panels as a separate assembly and kept them stable on top while stitching with two pieces of horizontal timber between the two.

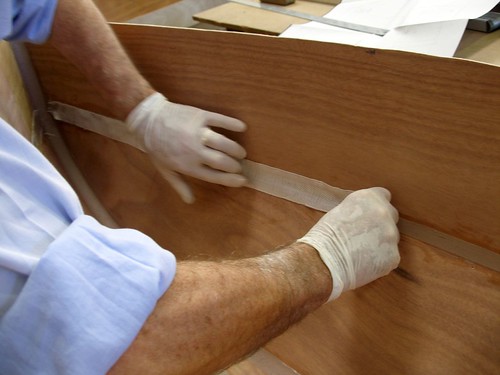
We used mini fillets between the copper stitches then removed the copper wire the next day. Then went over the mini fillets with a big clean fillet.
Mini fillets

Covered with a big neat fillet

The plywood was all pre epoxied and sanded before assembly so that made it easy to remove excess glue without staining the timber.
The problem with the fillet method is that up in the bow two of the panels that make the topside have little angle between them at the join. So we used glass tape to reinforce that area laying it down into a wet fillet before brushing with resin. Because this area (was carefully measured to make sure that it) would be inside the buoyancy tank it wasn't necessary to tidy up much.
If you don't read the notes in the photo series ... you only have yourself to blame if you try the methods above and below and find problems.
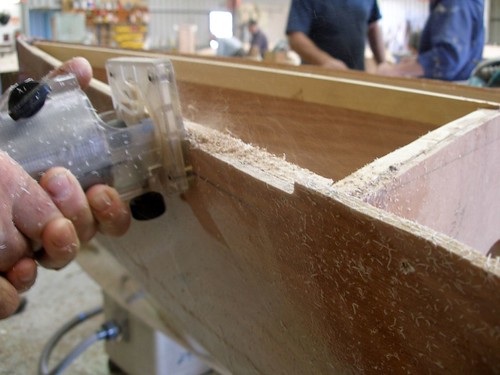
The main change was to simplify the fitting of the decks. Fitting them inside the hull skin is a tricky cut and try and slowly trim type procedure. So we removed the hull sides to the depth of the ply using the router after the deck supports had been glued in - (they were the guide for the router bearing).
Then when the decks went on the end grain would be covered by the gunwale. The gluing process for this was trickier, longer and more complicated than I liked but we were under some time pressure. Only ended up with three screw holes in the deck and it all flexed into place pretty easily.

The beauty was that the deck edge was a lovely tight fit against the gunwale so it looked like a master craftsperson - rather than a lazy builder like me and a new builder like Bob working together.
All in all it was a pretty pleasing 10 days of building.

Bob and "Lizzie" his canoe.

Best wishes
Michael Storer
-
4th May 2008 01:23 AM # ADSGoogle Adsense Advertisement
- Join Date
- Always
- Location
- Advertising world
- Age
- 2010
- Posts
- Many
-
4th May 2008, 11:17 AM #2
Member
- Join Date
- Mar 2008
- Location
- Ca, USA
- Age
- 67
- Posts
- 73
RE: Eureka
A really good thread!
Some good ideas too. How thick are the gunwhales? They look
pretty stout.
Regard's Keith
-
4th May 2008, 11:56 AM #3
Happily receives emails.
- Join Date
- Jul 2005
- Location
- 'Delaide, Australia
- Age
- 65
- Posts
- 8,138
howdy Keith,
25 x 19 (1" x 3/4") I think they could be thinned down quite a bit without altering the adequacy of the stiffness.
In these pics they are the specified size - though you lose a bit of size as they are tapered at the ends (VERY important to keep thee appearance in proportion - but only needs a little) and also trimmed down to on top (I am the the belt sander king - tool of choice) match the plywood sides of the boat.
Same happens with the inwales.
Michael
-
4th May 2008, 12:06 PM #4
Member
- Join Date
- Mar 2008
- Location
- Ca, USA
- Age
- 67
- Posts
- 73
My belt sander is my "go to tool, also" LOL.
Keith


 Reply With Quote
Similar Threads
-
Eureka Canoe
By bitingmidge in forum Michael Storer Wooden Boat PlansReplies: 723Last Post: 14th October 2013, 10:41 AM -
Eureka Canoe Building Record. THE MAN builds one in 2 weeks
By theman in forum Michael Storer Wooden Boat PlansReplies: 8Last Post: 14th August 2009, 05:01 PM -
The Moose builds a Eureka Canoe.
By Boatmik in forum KAYAK & CANOE BUILDINGReplies: 6Last Post: 8th June 2008, 12:09 PM -
Eureka - Deck Choice
By imafigureskater in forum Michael Storer Wooden Boat PlansReplies: 6Last Post: 7th March 2008, 05:13 AM -
The best method for calculating deck spacing! Without ripping boards.
By The Apprentice in forum WOODWORK - GENERALReplies: 3Last Post: 10th February 2005, 02:17 PM
