

 Thanks: 0
 Likes: 0
 Needs Pictures: 0
 Picture(s) thanks: 0
Results 106 to 120 of 562
-
21st November 2009, 09:35 PM #106
 Grumpy old Bugga


- Join Date
- May 2003
- Location
- South Oz, the big smokey bit in the middle
- Age
- 67
- Posts
- 4,377
 That's a scandalous suggestion ... it was a Wolf Blass Reisling
 Originally Posted by woodeneye


Richard
-
21st November 2009 09:35 PM # ADSGoogle Adsense Advertisement
- Join Date
- Always
- Location
- Advertising world
- Age
- 2010
- Posts
- Many
-
23rd November 2009, 11:06 AM #107
Happily receives emails.
- Join Date
- Jul 2005
- Location
- 'Delaide, Australia
- Age
- 65
- Posts
- 8,138
No issues of the major type. It is just to apply some hydro theory that is probably worth about 0.5% Originally Posted by woodeneye
MIK
-
25th November 2009, 11:42 PM #108
Better Recognize
- Join Date
- Jun 2009
- Location
- New Hampshire
- Posts
- 960
I glued the bottom on last night, I'm still recovering! That was a long hard, one-man job. Temps in the lower 50's upper 40's (F) definitely helped keep me sane, it kept the epoxy workable for a long time. I just got up this morning, and before the epoxy totally cures I have a quick question: I glued some thin cedar spacers to the bottom of the BH's to fill in a gap between the bottom and the BH's. Now, I've glued the bottom to those spacers. Would it be wise to add small fillets between the bottom and BH's up to the BH/spacer seam for re-enforcement, or is that not necessary?
I really don't want to do it because I'm sick of all the gluing, but I also don't want the bottom and the spacer to rip out.
EDIT: I guess my main concern is that the cedar ended up being very soft (obviously) and it chipped and planed easily. There's probably a technical term, but it was a dark wood that was very easy to chew through with the plane and chisel when putting in the limber holes. So I have these visions of the wood separating, but that's because I am ignorant of how such things work. Maybe the strength over the whole pieces is more than sufficient.
Sorry, long post, just waking up. Coffee time!
EDIT 2: Boat looks great in the morning! Stiff! HULL I HAVE!
-
26th November 2009, 01:48 AM #109
SENIOR MEMBER
- Join Date
- May 2008
- Location
- Portland, ME USA
- Posts
- 837
Callsign....something I've learned over the past couple dozen dories and skiffs (actually, I was just trying to think of #'s...I think I've built or directed 36 boat projects not including the 40 skiff I directed groups to build during our BB-ing festivals) is a simple philosophy called not regretting. That is, do the thing that you won't regret later. You might regret (or worry about) not putting in a fillet to reinforce things....there is no way you could regret actually doing it.
Cheers,
Clint
-
26th November 2009, 09:45 AM #110
Happily receives emails.
- Join Date
- Jul 2005
- Location
- 'Delaide, Australia
- Age
- 65
- Posts
- 8,138
Howdy,
You won't need any reinforcement if it was Bhd#1 or #2 as the mast step will increase the surface area by a huge amount and prevent the cedar from splitting.
If it was one of the other two bulkheads I would do a fillet on the hidden side and leave it at that.
I have one of my rare disagreements with Clint here. I know what he means, but it is from the context of a person that has spent a lot of time looking at boats.
Most new builders will add too much strength and add fillets everywhere.
It is not necessary and is part of the "strength and materials creep" that I talk about. The boat is adequately designed but one person thinks of adding fillets and it becomes like a new standard. And then later someone adds a bit more.
This is definitely not what Clint is suggesting! He has an internal balance, but I thought I should mention it for readers of the thread.
Also I think a boat with properly designed wood to wood joints just looks silly if fillets are added - it looks much more complicated, taking away a lot of the simplicity of the appearance.
Happily this fillet can be hidden away - so thanks for checking on the forum!
Well done
MIK
-
26th November 2009, 05:02 PM #111
Better Recognize
- Join Date
- Jun 2009
- Location
- New Hampshire
- Posts
- 960
Thank you, thank you both! Clint, I totally hear you, Mik, you too, and I understand the fine line between too much and not enough. That's why I was asking, the plans stress to not use too much epoxy if I have extra because it might not do any good, but on the other hand sometimes we might come across amateurish mistakes. A good balance between both of you! Mik, thanks for the encouragement-- it was a bear of a job last night!
One more question: Because my BH's were a little messed in height, it may change the angle for the seats. For instance: BH4 was placed a little higher than it should have. My fault. When the boat is in the water and level, water that is splashed aboard could theoretically pool by the transom-- annoying. How can I sit the boat as if she was in the water to see if I need to shim the seat so it doesn't slant into the bow or the transom?
Will just place on flat ground suffice, or are there 'level hoist points' that I can place my crates under that will simulate "in the water" attitude?
Happy Thanksgiving to the US contingent! Eat, Drink, and Be Merry!
-
27th November 2009, 09:40 AM #112
Happily receives emails.
- Join Date
- Jul 2005
- Location
- 'Delaide, Australia
- Age
- 65
- Posts
- 8,138
Whatever height got added at the bottom of Bhd 4 could be added to the top of the seat cleat on the transom.
I think it was only about 6mm. I actually don't think it will make a difference.
-
27th November 2009, 10:13 AM #113
SENIOR MEMBER
- Join Date
- May 2008
- Location
- Portland, ME USA
- Posts
- 837
Even better when you can hide a fillet...it would look weird to have a lone fillet....brings to mind the old trick of making your mistakes symmetrical so they look intentional! Originally Posted by Boatmik
Callsign, if the glue joint was full and the epoxy cured 100% then the wood would be the weak part. I'm wondering, as I write this, if the shim's grain direction would be the key factor. So, if it is quartersawn the wood would be quite strong. Food for thought anyway.
-
28th November 2009, 05:05 AM #114
Better Recognize
- Join Date
- Jun 2009
- Location
- New Hampshire
- Posts
- 960
Cool, Clint, you nailed the next direction I wanted this conversation to go.
What's "quartersawn" and how do I see if a piece of wood is cut such? What do you look for when you're picking out spruce/fir etc. for the boat? Most of the frames and stem on the BH's are all built from cedar that is dark in color and quite light, without a very tight ring pattern that I can see, and now, apparently quite chip-able. I grabbed what I could from the lumberyard that was straight and not bent.
Like the gluing conversation, the "what to look for in wood" conversation is just as vital, I think.
-
28th November 2009, 05:10 AM #115
Senior Member
- Join Date
- Dec 2008
- Location
- McAllen, Texas, USA
- Age
- 64
- Posts
- 154
The short answer without getting into all the weird ways it gets cut out,
Quartersawn wood is where the rings end up being vertical on the short face:
|||||||||||||||
as opposed to
))))))))))))))))))
or
//////////////////
-
28th November 2009, 09:47 AM #116
Happily receives emails.
- Join Date
- Jul 2005
- Location
- 'Delaide, Australia
- Age
- 65
- Posts
- 8,138
haha
You are one smart man Mr Kirtley - the graphics of the plank ends is great!
Quarter sawn is nice if you can get it. However, the main reason for choosing it relates to traditional boatbuilding where the timber will swell and shrink as it dries and gets wet (seasonally or with use)
The quarter sawn stays square/rectangular through these cycles without cupping or turning into a trapezoid.
This is very good for traditional boats where it was only the tighness of fits that kept the water out of the structure.
With an epoxy sealed boat it probably has little real relevance.
But it is nice. And with many woods it is easier to plane the face that approximates quarter sawn.
MIK
-
14th January 2010, 02:44 PM #117
Better Recognize
- Join Date
- Jun 2009
- Location
- New Hampshire
- Posts
- 960
Yo ho ho!
Bumbling alone over here in NH, but progess is being made.
I have a structural integrity question.
My stem is too high, I did not leave room to place the knee over the stem. I can do one of two things, from what I see:
1. Place the knee directly behind the stem and maybe cover the whole thing with a piece of ply to make it look nice, this is my favorite option.
2. Place the knee over the stem, gunwales, and inwales, like Dave G. did, if he did?
http://www.duckworksmagazine.com/06/projects/sisu/3.jpg
I don't know what's going on underneath Sisu's knee-- maybe there's another one under it?
I want the strongest solution. My knee is already cut a little overlarge. Not by much, a little, and I'm ok with that.
-
14th January 2010, 02:47 PM #118
Better Recognize
- Join Date
- Jun 2009
- Location
- New Hampshire
- Posts
- 960
Also a separate question:
What is your estimate of max payload for the GIS and still stay seaworthy in chop?
-
14th January 2010, 08:07 PM #119
Senior Member
- Join Date
- Jul 2006
- Location
- Portland, Oregon, USA
- Posts
- 334
Hi Concord, Originally Posted by callsign222
When we built Sisu, I decided I didn't want simple plywood triangles for knees. So I used some 1.5" thick mahogany. The quarter knees (where the sides meet the transom) are epoxied into place. The breasthook is simply screwed into place. There is NO sub-knee below it.
Mik detests it. He's much too polite and politic to actually say anything (except to murmur diplomatic and noncommittal phrases). I saw, though, when he visited here, every time he looked at that breasthook... he shuddered a little, and once I think he may have thrown up a little in his mouth
Whatever you think of the aesthetics of this approach, it's turned out to be plenty strong. Believe me... Sisu has been subjected to much more abuse than any lightweight sailing dinghy ever should be. We've punched holes in the bottom. We've cracked a rib. But the knees have held up fine. Once could certainly glue it. I didn't because it was an experiment I thought might not stay. I wanted it to be reversible. Now, it shows no signs of needing to be glued. Another touch that I'm quite partial to is that the overlay method allows the knee to extend forward a tiny bit. We used this micro-bowsprit as a spot for a socket for a flagstaff... and we fly our Coots burgee there when she's in powerboat mode.
Now I have a question for you. Having lived in Manchester for 4 years while my wife went to grad school in Boston, I'm curious what body of water is your intended sailing spot... or spots. Will you take her to Winnipesaukee? Portsmouth? Or some of the smaller lakes?
-
14th January 2010, 08:17 PM #120
Senior Member
- Join Date
- Jul 2006
- Location
- Portland, Oregon, USA
- Posts
- 334
Mik can give a more definitive answer. I can tell you what our experience has been. Let's talk about oars or outboard first. In general, it seems like the more you load this dory-like hull, the more stable she becomes. The issue then becomes freeboard. We've had 7 bodies in ours under power in sheltered waters - maybe 6" chop. Maybe we could have fit one more body in there. Maybe. And we still had more than adequate freeboard. The calculus changes when the water gets rougher. Originally Posted by callsign222
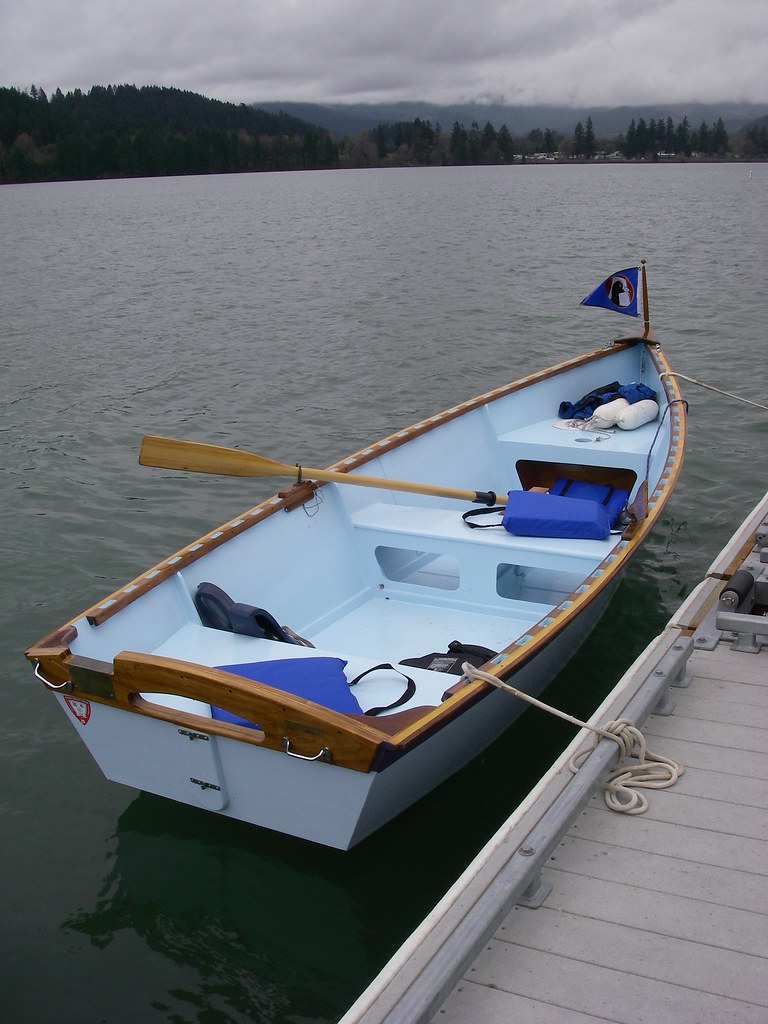
Here's another version. My two sons and I, carrying the sailing rig, and a long weekends worth of camping gear. We've rowed up the slough, and out into the Columbia River to get to our camping spot on an island. Here we are docked in the slough. One nice thing with all the extra weight is that one gets a satisfying amount of "carry" with each rowing stroke - far more than when solo in this normally very light hull.

You can see how much freeboard she has still.


 Reply With Quote

Similar Threads
-
Screwcutting for beginners
By Kody in forum METALWORK FORUMReplies: 49Last Post: 1st January 2010, 02:31 PM -
Chisels for Beginners
By hitch in forum WOODTURNING - GENERALReplies: 2Last Post: 21st June 2008, 12:15 AM -
Astronomy for Beginners
By pawnhead in forum NOTHING AT ALL TO DO WITH WOODWORKReplies: 19Last Post: 5th January 2007, 11:26 AM -
A Project for Beginners
By Bob H in forum INTARSIAReplies: 2Last Post: 24th November 2004, 01:20 AM -
Beginners course
By Noidea in forum WOODWORK - GENERALReplies: 1Last Post: 8th March 2004, 09:37 AM
Tags for this Thread
apologies,
art,
attempting,
beautiful,
beginner,
beginners,
build,
building,
concord,
contingent,
crafts,
directed,
england,
experience,
fun,
gis,
hack,
log,
lot,
mind,
online,
piece,
sail-meet-up,
sailing,
simple,
specifically,
storer,
tools,
vein,
wood-working
