

 Thanks:
  Likes:
  Needs Pictures:
  Picture(s) thanks:
Results 61 to 75 of 724
Thread: GIS - Sacramento
-
17th April 2009, 11:15 AM #61
 SENIOR MEMBER


- Join Date
- Jul 2008
- Location
- Fenwick, Michigan
- Age
- 75
- Posts
- 908

Jamie,
Thanks. I've heard gluing with epoxy explained two ways: Thickened epoxy on bare wood and thickened epoxy over green (uncured) epoxy. I've done it both ways (and my experience is limited!) with no apparent failures. But you are right, no need to do extra work that is unnecessary.
Of course that would save me some work this evening. I plan to have my son help with setting clamps and so forth and he isn't available tonight. But I can tape the supports and figure out how to wrap the clamps most likely to get any epoxy on them...
Would rolling or spreading thickened epoxy work on the five staves clamped together? That may be a way to get a thinner coat of epoxy and minimize the excess. Guess it would depend on the consistency of the thickened mix.
Thanks again.
Bob
-
17th April 2009 11:15 AM # ADSGoogle Adsense Advertisement
- Join Date
- Always
- Location
- Advertising world
- Age
- 2010
- Posts
- Many
-
17th April 2009, 11:52 AM #62
Senior Member
- Join Date
- Jul 2006
- Location
- Portland, Oregon, USA
- Posts
- 334
BW -
The way I do these joints - if I use epoxy, and not Titebond III - is to stack the staves with the edges showing, Apply unthickened epoxy. Your roller scheme works fine. Flip staves so that the flat faces are up, and they;re in the final order. Rub each joint. What that means is to press the two staves together firmly and slide one UP... smearing the glue over all of both edges. Same for each joint. Then I flip them edge up again (on a pair of sacrificial strips) , and apply some thickened epoxy. Your bag method works fine, but you can also just better them with a putty knife.
The theory is this --
Buttering the edges carefully and completely with unthickened ensures that there's glue on every square mm of joint surface. It also allows for more penetration into the wood, because it is less viscous (more watery texture). The thickened then fills any gaps resulting from joinery or clamping issues.
Also, when gluing up a panel of multiple staves, sometimes they want to slip out of alignment - so that the joints are not flush. This happens especially when the edges of the staves are not exactly 90 degrees to the faces. A small bit of that is hard to avoid, but epoxy can be quite slippery and result in some very uneven panels. To avoid this, you might want to have 4 cauls ready. Thick is good, narrow is fine, and plastic wrapped. These cauls can go across the grain at each end - 2 per end, and sandwich your foil panel between them with clamps. This will tend to keep the panel flat and the staves fairly flush.
-
17th April 2009, 12:17 PM #63
SENIOR MEMBER
- Join Date
- Jul 2008
- Location
- Fenwick, Michigan
- Age
- 75
- Posts
- 908
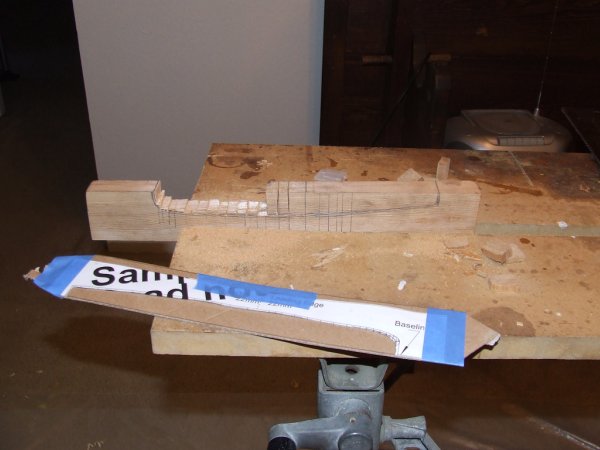
David -
Thanks for the explanation. What you described is pretty much what I am trying to accomplish, but your method is a one-step process instead of spanning a day to do both edges.
I think what I understand your description of using cauls (never heard/saw/read that word before - learned something new) to keep the blank flat is what this picture shows... except you said to put them on the ends and my test set up has them about a third of the way in from each end (the vertical clamps). The pic is a bit confusing and some of the detail got lost.

Am I close or did I completely misunderstand? (Those seem to be my only two options lately! )
)
Thanks.
Bob
-
17th April 2009, 01:12 PM #64
Senior Member
- Join Date
- Jul 2006
- Location
- Portland, Oregon, USA
- Posts
- 334
BW -
I just hadn't looked at your lovely fotos closely enough. That scheme will work fine, and those are, indeed, cauls.
-
19th April 2009, 08:10 AM #65
SENIOR MEMBER
- Join Date
- Jul 2008
- Location
- Fenwick, Michigan
- Age
- 75
- Posts
- 908
Much of today will be spent waiting for the epoxy in the rudder blank to cure. It is "dry" to the touch, but I want to wait at least 24 hours before I remove the clamps.
The waiting time has been put to good use - I made the pattern for shaping the foil.
I used the Adobe sizing tool to resize the plan page with the foil pattern drawing. I printed out two test efforts before getting it right on my third try: the sizing line measured 120 mm, which made the foil template drawing the correct size.
I cut the paper template out, taped it to a piece of left over 3/4" x 1-3/4" western red cedar. I drew a second outline -inside the correct line - to be a cut-to line. The piece was clamped into the WorkMate and I got out the Japanese saw. Cutting a series of kerfs down to the cut-to line, I then used a chisel to remove the wood between the kerfs...

...until I had a rough cut pattern for the foil shape. I plugged in the Dremel fitted with a used sanding drum. The western red cedar is pretty soft and I didn't want to risk sanding away too much material or gouging the pattern with a new drum. Being careful to stay within the lines, I was able to smooth out the rough chiseled pattern. A few more minutes of careful power sanding made the pattern ready for hand sanding.
A strip of 80 grit sandpaper wrapped around a wooden paint stir stick served as a mini-rasp to smooth the pattern and take it to the original shape outline. Some 120 grit paper finished the sanding job. I put the paper template over my wooden one - and I am satisfied with the result. If I try to fine-tune it any more I will probably take too much and have to start over.

I expect to begin shaping the rudder tomorrow.
Bob
-
19th April 2009, 11:05 AM #66
Happily receives emails.
- Join Date
- Jul 2005
- Location
- 'Delaide, Australia
- Age
- 65
- Posts
- 8,138
Howdy,
the inverted jigsaw method and using plywood is easier and more accurate,
But looks like the result is fine there BobWes.
The template does need to be cut in the flat section in the middle to make two separate templates.
One for the front edge and one for the back.
MIK
-
23rd April 2009, 01:25 PM #67
SENIOR MEMBER
- Join Date
- Jul 2008
- Location
- Fenwick, Michigan
- Age
- 75
- Posts
- 908
Progress
The rudder is nearly shaped and ready for sanding. With any good luck I'll be able to glass it this weekend. My small block plane did a great job (as far as I can tell - but since this is my first experience with a plane, what do I know?), but I am shopping eBay for a bench plane.
Once the rudder is glassed and finished, I'll laminate the blank for the centerboard. Hopefully, by the time I am ready to shape it, I will have obtained a bench plane.
This question may be a bit early, but since it is on my mind and for planning purposes, I'll ask it. I plan to scarf (at 10:1) the inwales and gunwales to get the lengths needed. How should the scarf joins be oriented? With the thickness (5/8" for the inwales, for example) or with the width (1-3/4" for the inwales)?
Thanks.
Bob
-
23rd April 2009, 01:50 PM #68
SENIOR MEMBER
- Join Date
- May 2008
- Location
- Portland, ME USA
- Posts
- 837
Bob, Depends how thick the stock is that you are starting with. Generally, you'd want the scarph oriented with the width...so for the inwales the scarph would be 1 3/4" wide and 6 1/4" long...check my math on that last one as I've had a few beers by now. The scarph joint will have a hard time bending if it were oriented with the bending direction...it show as a flat spot. How thick is your stock you are starting with?
-
23rd April 2009, 02:14 PM #69
SENIOR MEMBER
- Join Date
- Jul 2008
- Location
- Fenwick, Michigan
- Age
- 75
- Posts
- 908
Clint - What kind of beer are you drinking and where can I get some?
It took me a couple, three, times through your explanation before it made sense (maybe I should be drinking beer?).
For the inwales I will use 5/8" stock cut to 1-3/4" wide pieces. So, I would lay the piece flat (1-3/4" side down) and begin the cut 6-1/4" from the end... right? 6-1/4" is the correct measurement for a 10:1 ratio for 5/8" thick material.
Okay, I'm pretty sure I understand which way to cut the scarfs.
Thanks.
Bob
-
25th April 2009, 05:15 AM #70
SENIOR MEMBER
- Join Date
- May 2008
- Location
- Portland, ME USA
- Posts
- 837
Bob, I am still drinking beer...it is a local brew. I am on vacation in North Carolina. I feel about as fluid since I have not had lunch yet so I am feeling my three sips of beer already!
What you said abopu44...see...
What you said above sounds great. I'll give you a few tips. Scarph the stock while the board is still a little thicker than you want: after the glue cures, plane it down to final thickness. Then rip out your widths. When you glue the scarph together be sure that one edge (the edge that will like against the fence) is nice and straight. Sometimes, I snap a chalkline (be careful....even these can be snapped to a curve!) and glue the board with that as a reference. But if you are nice and square with your cuts and plane the scarph square things should line up nicely.
-
25th April 2009, 12:53 PM #71
SENIOR MEMBER
- Join Date
- Jul 2008
- Location
- Fenwick, Michigan
- Age
- 75
- Posts
- 908
Clint,
Thanks for the tips. There is so much to learn... I do appreciate you and everyone else sharing little bits and pieces of wisdom and experience. It sure speeds up my learning curve.
Another question - Describing the shaping of the foils, the plans state: "Note that it finishes to a narrow flat edge. DO NOT ROUND THE BACK EDGE IT IS TO BE FINISHED SQUARE. Do not round the trailing edge corners." (CAPS in the original)
How narrow is that "narrow flat edge?"
Thanks.
Bob
-
25th April 2009, 02:03 PM #72
SENIOR MEMBER
- Join Date
- May 2008
- Location
- Portland, ME USA
- Posts
- 837
Bob, I suspect when you fair the foils shape to the templates it will leave you with whatever width MIK factored in when specifying the thickness of the board. It might only be a mm or two. I don't know. I do know that you won't want to try to glass around that trailing edge with it being square. Same for the aft edge of the bottom plank of the boat where it meets the transom. Leaving it square makes for more laminar flow of water and better hydrodynamics.
Clint
-
25th April 2009, 10:44 PM #73
Happily receives emails.
- Join Date
- Jul 2005
- Location
- 'Delaide, Australia
- Age
- 65
- Posts
- 8,138
-
29th April 2009, 11:21 AM #74
SENIOR MEMBER
- Join Date
- Jul 2008
- Location
- Fenwick, Michigan
- Age
- 75
- Posts
- 908
This Week's Question
The rudder is shaping up nicely and I plan to glass it this weekend. I do, however, have some questions.
The plans suggest glassing in two steps (the tip and then the sides) unless you are brave - maybe that's not a direct quote but close enough. I am faint of heart and will do the tip and then the sides.
How does one support the rudder while glassing it? The plans suggest setting it up with the leading edge facing upward. This I understand. The glass is cut to drape over the leading edge and cover both sides simultaneously. This I understand.
What I don't understand is, "...set the foil up with the leading edge facing upward. The head and the tip of the board can be clamped to the sawhorses." If the cloth covers both sides simultaneously what is there of the foil to be clamped? Does anyone have pics of this (the ones in the plans seem to show the foil on its side rather than vertical)?
The use of a dry wall screw in the tip to suspend the foil between two sawhorses, but doesn't say anything about a screw at the head of the foil (maybe that is obvious). There is also no mention of mending the hole in the tip... again maybe obvious, but I'm not getting it.
Another question is, if the board is vertical, how do you prevent the resin from sagging and running?
Maybe all this is obvious, but I sure can't figure it out... HELP Please!
Thanks.
Bob
-
29th April 2009, 12:23 PM #75
GOLD MEMBER
- Join Date
- Mar 2007
- Location
- Adelaide
- Posts
- 2,139
Bob,
You are wise to ask, when glassing my foils (first time at glassing for me) I got into one unholy mess the glass started to lift on one side all sorts of bother.
A couple of tips I can provide.
Do it in two steps tip first.
Screws two drywall screws into both ends of the foil about 4 inches apart or slightly wider than the thickness of your sawhorse top this will support your foil while applying the pox. When coating the two screws rest on the horse when coating complete let the foil swing down and support it on one screw ( hope that makes sense) Another way is to clamp a single screw head to the horse so the foil can swing but I found when using this method the foil moved around too much.
Cut your glass with about an inch extra past the trailing edge and use some plastic cloths pegs to hold it in place while applying the coats.
Regarding sag a bit of sagging is not really an issue as you will need to do a fair bit of sanding after anyway. The issue is more ensuring the glass remains stuck to both sides of the foil without any air bubbles under the weave on both sides while the pox goes off. You will need to put three or four coats on to fill the weave each coat should be rolled out well then wait till the pox goes tacky before recoating. When coating is complete let the foil swing down in the vertical position each time this should prevent the underside cloth sagging away from the foil (that was my problem).
You will save materials if you do both foils at the same time
Hope this helps
MikeLast edited by m2c1Iw; 29th April 2009 at 12:45 PM. Reason: Added a bit


 Reply With Quote

Similar Threads
-
Hello from Sacramento California
By Keystonecop in forum G'day mate - THE WELCOME WAGON -Introduce yourselfReplies: 4Last Post: 8th December 2008, 03:34 PM
