

 Thanks:
  Likes:
  Needs Pictures:
  Picture(s) thanks:
Results 76 to 90 of 724
Thread: GIS - Sacramento
-
29th April 2009, 01:23 PM #76
 Happily receives emails.


- Join Date
- Jul 2005
- Location
- 'Delaide, Australia
- Age
- 65
- Posts
- 8,138

That is a pretty good rundown Mike.
To repair the screw holes ... after final sanding ... put some glue mix in and sand off flush when it cures
-
29th April 2009 01:23 PM # ADSGoogle Adsense Advertisement
- Join Date
- Always
- Location
- Advertising world
- Age
- 2010
- Posts
- Many
-
29th April 2009, 02:52 PM #77
SENIOR MEMBER
- Join Date
- Jul 2008
- Location
- Fenwick, Michigan
- Age
- 75
- Posts
- 908
Mike and Mik -
Thanks for the explanation. I have a much better idea of what's involved and can "see" the set up now.
Thanks.
Bob
-
3rd May 2009, 07:36 AM #78
SENIOR MEMBER
- Join Date
- Jul 2008
- Location
- Fenwick, Michigan
- Age
- 75
- Posts
- 908
I began glassing the rudder Thursday evening. And, trying to be a bit clever, I may have been just a bit too clever. But I wouldn't know for sure until Friday evening!
I cut a piece of FG cloth to fit the bottom (plus extra) of the rudder. I took another look at the rudder and decided a little more sanding wouldn't hurt anything either. So I clamped the rudder in the Work Mate, pulled out the Dremel, the Mouse, and a sanding stick and went to work.
Finally the bottom tip of the rudder was sanded and shaped to a satisfactory profile with nicely rounded-over edges. I dry-fit the FG cloth and taped off about an inch of the rudder to keep the epoxy from getting where it shouldn't go. I mixed up a small batch of epoxy. Taking a deep breath, I coated the end of the rudder, put the FG cloth in place, and began working resin into the cloth, making sure the cloth adhered to the surface of the rudder. Here's how it looked when I was done.
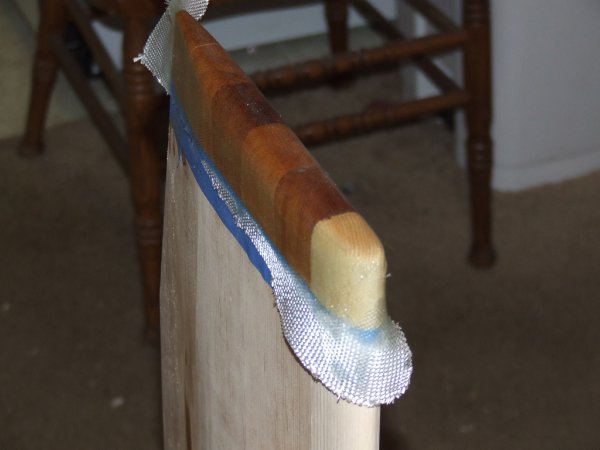
And a side view...
The whole process went well and I was pretty pleased with myself... until I looked at that second picture. My error is so obvious I cannot believe I didn't see it before I even applied the epoxy. I have successfully epoxied the masking tape to the rudder! Oh, I could still lift the edges of the cloth, remove the tape and, hopefully, get the cloth back in place - but I don't want to take the risk of totally mucking up the cloth, the resin that is already on there and make a bigger mess than it will otherwise be.
The extra cloth will be cut away and the edges sanded smooth before the sides are glassed. While removing the extra cloth I will remove the tape, and probably have to sand out the tape under the glass and resin.
This may be a big OOPS, or it may just be a minor inconvenience. I figured I'd know soon enough.
Yes, I was a bit too clever for my own good and the result of Thursday's effort was an OOPS. While I did an excellent job of glassing the masking tape to the rudder (!), that wasn't exactly the intended result - but in the grand scheme of things, it isn't that big a deal.
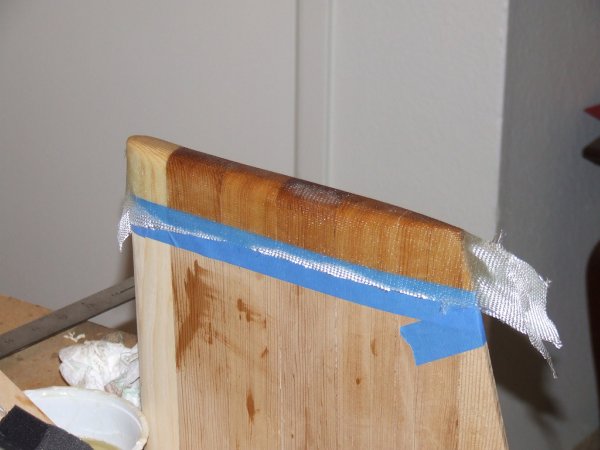
Friday evening's plan was to remove the tape with minimal damage to the rudder. Properly armed (with a chisel, a Dremel equipped with a sanding drum, and a Mouse with coarse, medium and fine sandpaper), I spent Friday evening and a good part of this morning working on the rudder. Here are the results so far,

The rudder actually looks better than the picture. I think the camera zoom and flash brought out and accentuated the detail, making things look worse than they really are. (Interesting, I was complaining just the other day about not getting enough detail in my photos! Guess I'm hard to please.) You can tell I did not apply enough resin to fill the weave of the cloth, but I guessed there would be a lot of sanding involved, and another coat of resin would have meant more sanding. Because there is still a distinct line where the the glass ends I will work on two things this afternoon. I will continue sanding to minimize the line and I will glass another strip of FG around the rudder, overlapping the line. I will not mask off any part of the rudder for this afternoon's work!
While that is setting up I will work on an idea for supporting the rudder so I can glass the rest of the rudder tomorrow.
Bob
-
3rd May 2009, 09:56 AM #79
Happily receives emails.
- Join Date
- Jul 2005
- Location
- 'Delaide, Australia
- Age
- 65
- Posts
- 8,138
Howdy,
Basically ... this is what has to be achieved anyhow.
Glass the end then sand it down flush with the timber so that you can do the faces. The two lots of glass naturally overlap each other with no bump that way.
Weapon of choice is a sander with a flat base kept flat on the main surfaces. You need to hand sand around the front radius as the sander will be WAAAAAY too fast.
MIK
-
3rd May 2009, 01:29 PM #80
AJ
- Join Date
- Jun 2007
- Location
- Aberfoyle Park SA
- Age
- 63
- Posts
- 1,787
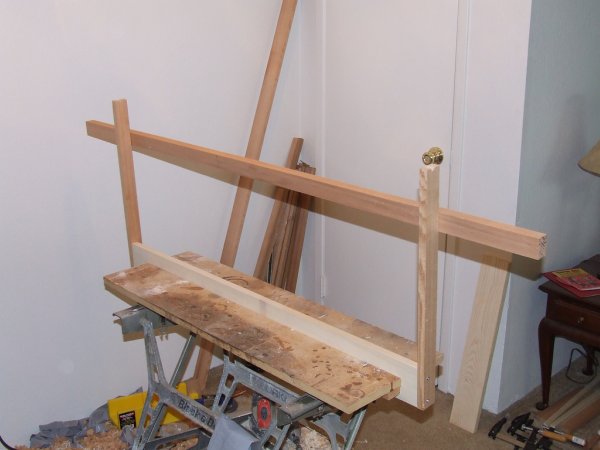
I suspended mine from 2 nails in a jig.
The tip is just the sides folded around it.
You solution for the tip is much neater.
cheers
AJ
-
3rd May 2009, 02:31 PM #81
SENIOR MEMBER
- Join Date
- Jul 2008
- Location
- Fenwick, Michigan
- Age
- 75
- Posts
- 908
AJ - That pic is exactly what I have in mind for supporting the rudder for glassing both sides! My execution of the idea may not be as substantial as yours is/was, but the idea is the same. Glad to see it works.. How did you keep the rudder from swinging back and forth while working the resin? Spread resin with one hand while holding the foil with the other?
My son may get to spend his happy 21st helping me glass the rudder tomorrow!
Mik, thanks for the comments. Every little bit helps.
Bob
-
4th May 2009, 01:15 AM #82
AJ
- Join Date
- Jun 2007
- Location
- Aberfoyle Park SA
- Age
- 63
- Posts
- 1,787
G'day Bob.
The only substantial bit is the beam across the bottom. A couple of fairly flimsy
oregon off-cuts & six 2" x 1/16" nails - 4 to hold the uprights to the beam, plus one at
each end of the foil. Held the foil steady with one (gloved) hand whilst painting resin
with the other. Have a vague recollection that I rather foolishly pre-wet the foil before
draping the glass. Object was to keep it from falling off. Effect was to make it a right
mongrel of a job to lay the glass without wrinkles! The mind tends to protect us
from painful memories...
cheers
AJ
-
4th May 2009, 04:14 AM #83
SENIOR MEMBER
- Join Date
- Jul 2008
- Location
- Fenwick, Michigan
- Age
- 75
- Posts
- 908
AJ,
Again, thanks for the explanation and the reminder to keep it simple. Earlier in the week I had figured out this rather elaborate Rube Goldberg sort of contraption to hold the rudder for glassing. The main difference between my set-up and anything Mr. Goldberg came up with? His worked, mine was doubtful. I was tending toward a simple U-Frame along the lines of yours and seeing the picture of yours convinced me to go that route. Pics later...
One of the (many) mysteries I've been trying to solve was how to get enough resin on both sides at the same time (this WRC seems to really suck up the resin), keep the cloth from sticking where I don't want it, and be able to work the resin in to the glass on both sides at the same time. From your remarks I take it you draped the cloth over the (bare dry?) foil and began working the resin into the cloth one side at a time. That's my take on it. I'll think about it a bit more and get to work on it this afternoon.
Thanks again.
Bob
-
4th May 2009, 05:24 AM #84
AJ
- Join Date
- Jun 2007
- Location
- Aberfoyle Park SA
- Age
- 63
- Posts
- 1,787
G'day Bob
The first one i did, I was aware & afeared of the wood sucking all the pox out of the
glass weave. So I pre-coated the wood & tried to drape the glass neatly over the
wet pox with the foil free-swinging on its pivots.

 etc.
etc.
The second one, I draped the glass over the dry board, & added pox, starting from the
leading edge & working down the glass till it was all wet. Then I went back to the
beginning & "topped up" the pox as it was sucked away. Took more time doing it this
way, but less frustration.
In retrospect, I could have applied the glass neatly to the pre-wetted foil by rolling it up
on a bit of broom handle or map tube a smidgen longer than the foil length, and unrolling
it up & over the foil. Tilting the foil to rest on a temporary cross-piece while doing this
would make it easier again (gravity is a marvellous invention). A couple of loose pins
lower down would hold the foil reasonably immobile whilst recoating & fiddling.
cheers
AJ
-
4th May 2009, 09:34 AM #85
SENIOR MEMBER
- Join Date
- Sep 2007
- Location
- Savannah GA USA
- Posts
- 583
I wouldn't consider wetting the foil before laying on the dry cloth--way to many potential problems. Unlike gluing up two pieces of wood, the dry cloth will take resin and pass it on through to the wood which will "suck up" what it will, unimpeded by the cloth.
The job is much easier if both surfaces are dry. If you drape the foil with it suspended vertically as in the picture above you don't even need to secure the glass with tape or clothespins. Gravity takes care of it.The "Cosmos Mariner,"My Goat Island Skiff
http://s176.photobucket.com/albums/w168/MiddleAgesMan/
Starting the Simmons Sea Skiff 18
http://www.flickr.com/photos/37973275@N03/
-
4th May 2009, 09:42 AM #86
Happily receives emails.
- Join Date
- Jul 2005
- Location
- 'Delaide, Australia
- Age
- 65
- Posts
- 8,138
It is a bit of a fiddly job, but not toooo bad.
Basically the method in the plan does work. It is the same as BOAT's method above. You can make up an epoxy mix and do the first face on the flat - ie on a table top.
Then hang it and get started with the second side. Main thing is the screws that you are using for the hanger are LONG so one end doesn't become dislodged and the whole lot fall down.
Leave the glass reasonably oversize in terms of width a good inch or two extra is great.
You do use your hand to hold it stable while you get the resin on the second side, a sqeegee is the best tool for spreading the epoxy quickly for that first coat working on the flat, though one of the epoxy rollers does a good job too.
And while it is easy to make up one mix of epoxy for the first side if you are doing it on the flat, you can always make up smaller ones when rolling the resin on the second side from the roller tray. Always work from the centre of the folded edge down and out toward the ends to keep tension in the cloth.
Do the Rudder blade first ... it is pretty small so is easier to handle.
Best wishes
MIK
-
4th May 2009, 09:51 AM #87
SENIOR MEMBER
- Join Date
- Jul 2008
- Location
- Fenwick, Michigan
- Age
- 75
- Posts
- 908
Gravity is a wonderful thing. But as with all good things it is possible for gravity to cause some mischief. True, one needs to misstep before gravity takes advantage, but it doesn't have to be a very big misstep...
No need to dwell on the negative...
I set up the U-frame. Mine is a bit less robust than AJ's - I used a 1x 4 cut an inch longer than the rudder and a couple of WRC cutoffs. I did use screws rather than nails because that's what was handy. The crossbar was a nice touch. Thanks for that idea AJ.
Here's the rudder all set to be glassed...
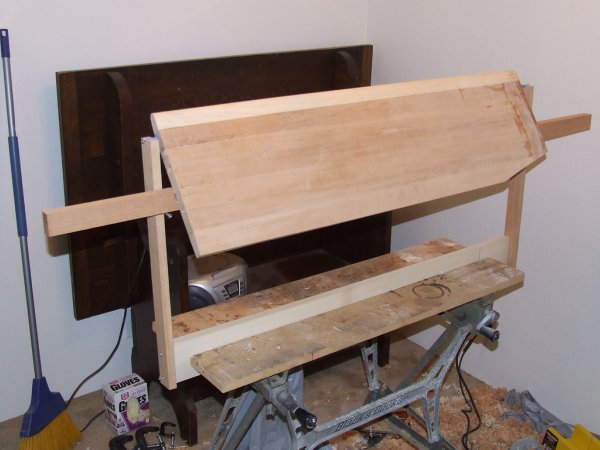
And, finally, here it is glassed...
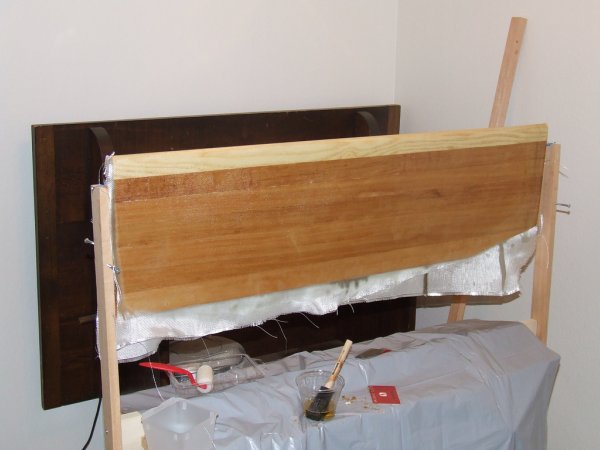
There could have been a rather lengthy photo sequence between those last two pics. Let's just say I learned three things this afternoon. Gravity is not always your friend. Drop cloths are a good thing. A basic law of physics,widely known as the jelly side down effect, applies to pots of Epoxy. (Clean up will be easier if I wait a bit...)
Thanks to Mik and AJ for your help and hand-holding while I got past this hurdle. I'm thinking (hoping) the centerboard will be less of a struggle.
Bob
-
4th May 2009, 11:39 AM #88
Happily receives emails.
- Join Date
- Jul 2005
- Location
- 'Delaide, Australia
- Age
- 65
- Posts
- 8,138
Howdy BobWes,
In some ways it is the most tricky part of the build. And once you've done one .. the following might not be easier, but at least you know that you can make it work!
I chose this method because it is incredibly durable. There are few disasters that these types of boards break in any significant way, even allowing for widely differing types and quality of timber.
Glad you got it looking good!
MIK
-
5th May 2009, 09:00 AM #89
Member
- Join Date
- Aug 2008
- Location
- Cranberry Twp, PA
- Age
- 51
- Posts
- 74
Keep up the good work Bob! Your questions (and the associated answers) are a great help to me!
Cheers,
Jamie
-
6th May 2009, 05:10 AM #90
SENIOR MEMBER
- Join Date
- Jul 2008
- Location
- Fenwick, Michigan
- Age
- 75
- Posts
- 908
Jamie,
Thanks. Glad you - and others - might benefit from my ramblings. I know I've benefited from your experiences, particularly so when I made my stem. So keep at it and help each other get these boats built!
By the way... what's the news on your baby?
Bob


 Reply With Quote

Similar Threads
-
Hello from Sacramento California
By Keystonecop in forum G'day mate - THE WELCOME WAGON -Introduce yourselfReplies: 4Last Post: 8th December 2008, 03:34 PM
