

 Thanks: 0
 Likes: 0
 Needs Pictures: 0
 Picture(s) thanks: 0
Results 136 to 150 of 277
-
2nd October 2008, 01:22 AM #136
 Senior Member


- Join Date
- Aug 2008
- Location
- Denmark
- Posts
- 198

Hey Mik
The bottom is exactly 945 mm wide!
Sounds good with a nice solution - i dont know what to do
Can i start to prepare the bottom of the boat to glue or shall i wait until you find a solution ?
Bjarne
-
2nd October 2008 01:22 AM # ADSGoogle Adsense Advertisement
- Join Date
- Always
- Location
- Advertising world
- Posts
- Many
-
2nd October 2008, 02:28 AM #137
Happily receives emails.
- Join Date
- Jul 2005
- Location
- 'Delaide, Australia
- Age
- 65
- Posts
- 8,138
OK Bjarne.
There will be no problem if you glue the bottom on even though it is narrower.
Just check 2 things.
1/ the bottom covers the chine log equally on both sides.
2/ that after gluing wait one hour then clean any excess epoxy off the chine logs in that area.
Best wishes
Michael.
-
2nd October 2008, 04:34 AM #138
Senior Member
- Join Date
- Aug 2008
- Location
- Denmark
- Posts
- 198
Yup, that's not a problem.
I were thinking about the same solution. Glue and use a lot of it so i'm sure its filled out and have max strength.
Bjarne
-
2nd October 2008, 04:39 AM #139
Happily receives emails.
- Join Date
- Jul 2005
- Location
- 'Delaide, Australia
- Age
- 65
- Posts
- 8,138
I think it is better if you just glue in place then clean up like normal.
I am still thinking about the best way.
Michael
-
2nd October 2008, 07:06 AM #140
Senior Member
- Join Date
- Aug 2008
- Location
- Denmark
- Posts
- 198
Let me know if you find another good solution to this little issue.
As you can see here:
[media]http://www.dmi.dk/dmi/femdgn_fyn.png[/media]
I'm not going to make so much boat the next week, i have to build it outside.
Bjarne
-
2nd October 2008, 10:44 PM #141
SENIOR MEMBER
- Join Date
- May 2008
- Location
- Portland, ME USA
- Posts
- 837
This happened at least once with some kids at Compass on a 12' rowing skiff we do with them. Our solution was to glue on a strip of wood to fill the gap and get excellent squeeze out from both sides. After trimming, the chine area received a little extra fiberglass to be conservative. That fixed the problem.
Cheers,
Clint
going back to watch the Pres debate, and Obama embarrassing McCain
-
2nd October 2008, 11:21 PM #142
Happily receives emails.
- Join Date
- Jul 2005
- Location
- 'Delaide, Australia
- Age
- 65
- Posts
- 8,138
That is pretty well what I was going to suggest. Probably backed up with a fillet on the inside between the floor and the chine log.
MIK
-
4th October 2008, 04:54 AM #143
Senior Member
- Join Date
- Aug 2008
- Location
- Denmark
- Posts
- 198
I got my problem solved, it look like it the glue will keep it on place with no problem. It will also help that i'm gonna give the bottom some f'glass.
One question, how do you make these hole so pretty (attached image) ??
-
4th October 2008, 09:40 AM #144
Happily receives emails.
- Join Date
- Jul 2005
- Location
- 'Delaide, Australia
- Age
- 65
- Posts
- 8,138
Howdy Bjarne,
They used a tool that you put in a drill called a "hole saw" in English.
This is one made by limex and sold by alibaba (I say that so maybe they dont mind if I use their photo
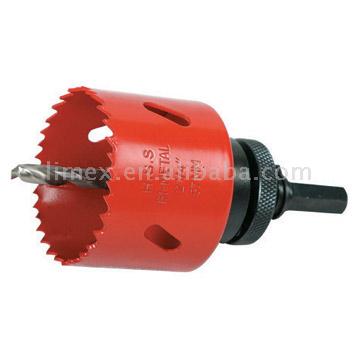
As you can see it needs to start with the centre so you need another piece of wood clamped adjacent so you cut TWO half holes at once. (Does anyone have a pic of this?
One important thing is to have the plwood face on the underside.
But, Bjarne, this won't work for you because you have your boat assembled already .
.
Or not easily.
-
4th October 2008, 06:59 PM #145
Senior Member
- Join Date
- Aug 2008
- Location
- Denmark
- Posts
- 198
Hey Mik
Yup, you are right about that one
I'll have to work out something else, just dont know what. I think i'll have to cut a hole with my jigsaw.
Another thing that not is going to be easy is the hole in the transom to the rudder, i have forgot everything about it and now that one also is glued - its really going smooth for me here in Denmark
PLUS that i made a really stupid error with the transom - when i glued it in place it somehow have slipped 2.3 cm in one of the sides and i did not see it. So i found yesterday that the transon were skew so i had to find a solution. The solution were to cut the side off from the transom at the corner between side and transom. And then move it 2.3 cm forward and glue it again. Luckily enough the operation went smoth, you can't see that i had made a error there
-
4th October 2008, 08:30 PM #146
Happily receives emails.
- Join Date
- Jul 2005
- Location
- 'Delaide, Australia
- Age
- 65
- Posts
- 8,138
The shape is like a rectangle with rounded corners.
The rounded corners can be done with a drill and the straight edges can be done with a jigsaw.
If you use the drill the timber will splinter and damage when the drill completes its action. You can prevent this by clamping a piece of timber to the back of the area being drilled.
Remember you don't need these holes in every bulkhead. Just Bulkhead 2 and 3.
Michael.
-
5th October 2008, 04:09 AM #147
SENIOR MEMBER
- Join Date
- May 2008
- Location
- Portland, ME USA
- Posts
- 837
Bjarne, I have students use drill bits to get the rounded corners of the limber hole and then saw the rest out by hand with a coping saw which can turn through the shape of a limber hole easily and slowly...a jigsaw is heavy and works quite quickly.
For the transom, the same approach would work, carefully mark the location of the ends of the slot, use the appropriate size drill bit to get the size spec'd on the plans and, after checking your measurements a number of times, drill the hole. I'd use a spade bit, which has a nice tip to for a pilot hole to keep the bit centered. To prevent chip out on the back you can drill in until the pilot tip of the bit starts emerging, then come in from the opposite side of the transom starting the drill bit on the small hole where the bit started to come out. Drill in square and meet the hole in the middle. Then finish the slot by connecting the two drilled holes with a jigsaw. Run the saw on slow speed and take your time. As you see all these things and be fixed, so check and recheck and go for it. Another approach is to make a pattern, tack it to the transom and flush cut to the pattern with a router and a flush-trim bit. The pattern allows you to get the drilling practice with out the worry of ruining the transom.
A cup of tea before you drill is a good way to get a fresh eye and calm the nerves! Or a sip or two of local microbrew is how we do it in the Maine!!
Have fun makin' holes!
Clint
-
6th October 2008, 06:14 PM #148
Senior Member
- Join Date
- Aug 2008
- Location
- Denmark
- Posts
- 198
Thank you for your help about the holes. I have to consider the best way to do it, it's a one chance only

btw, i have been looking in the doc's after how much rope that it's needed and what dimensions, but i can't find it again. Can one of you give me a page reference in the doc ?
Bjarne
-
6th October 2008, 07:00 PM #149
SENIOR MEMBER
- Join Date
- Apr 2008
- Location
- Tilburg, the Netherlands
- Age
- 51
- Posts
- 519
Bjarne,
For the lug rig set up for the GIS and the rope diameters and such you could follow this link:
http://www.storerboatplans.com/GIS/GISRigging.html
If you scroll down a bit you will come to the part rope sizes and lengths for GIS.
Joost
-
6th October 2008, 07:38 PM #150
Senior Member
- Join Date
- Aug 2008
- Location
- Denmark
- Posts
- 198
Thx Joost! Originally Posted by Joost

That explains why i could not find anything in the documents about it
Bjarne

 Reply With Quote
Similar Threads
-
Goat Island Skiff vs Green Island 15
By ausie in forum BOAT DESIGNS / PLANSReplies: 26Last Post: 15th July 2021, 05:19 PM -
Goat Island Skiff
By bitingmidge in forum Michael Storer Wooden Boat PlansReplies: 513Last Post: 31st October 2019, 04:03 PM -
Goat Island Skiff - Transom
By Joost in forum Michael Storer Wooden Boat PlansReplies: 2Last Post: 14th April 2008, 05:26 PM -
Goat Island Skiff - Now at the movies!
By bitingmidge in forum Michael Storer Wooden Boat PlansReplies: 5Last Post: 2nd February 2008, 06:04 PM -
Alright Mik... goat island skiff?
By Wild Dingo in forum BOAT BUILDING / REPAIRINGReplies: 7Last Post: 29th January 2007, 12:24 PM
