

 Thanks: 0
 Likes: 0
 Needs Pictures: 0
 Picture(s) thanks: 0
Results 1 to 15 of 404
-
20th April 2009, 06:55 PM #1
 Grumpy old Bugga


- Join Date
- May 2003
- Location
- South Oz, the big smokey bit in the middle
- Age
- 67
- Posts
- 4,377
 The Little Black Dog - MSD Rowing Skiff - Adelaide OZ
Yup, there's anothery starting and here she is in all her current glory (the brown, woody bits, not the great white whale they're sitting on)
Yes, I'm the 'Richard' Mik refers to on his website so I'm partially to blame to for this design. Now the timber's home and the build's about to begin. She'll be built cheap ie, Pacific Maple and with as much timber sourced from my shed as possible (hang on, the roof's sitting on oregon beams, I wonder if the landlord will notice if ...) Hopefully she'll be built quick but with reality being such a hard task master, progress will probably be patchy.
**Deep breath**
Richard
-
20th April 2009 06:55 PM # ADSGoogle Adsense Advertisement
- Join Date
- Always
- Location
- Advertising world
- Age
- 2010
- Posts
- Many
-
20th April 2009, 09:02 PM #2
GOLD MEMBER
- Join Date
- Mar 2007
- Location
- Adelaide
- Posts
- 2,139
 .......The Little Black Dog, I know That would be from coming across an old Led Zep album right

Have fun great to hear you are back in the shed.
Mike
-
20th April 2009, 10:24 PM #3
Grumpy old Bugga
- Join Date
- May 2003
- Location
- South Oz, the big smokey bit in the middle
- Age
- 67
- Posts
- 4,377
Ummmm, no, though if I knew the song I might find the connection is the same. Originally Posted by m2c1Iw

As for it being 'great' that I'm back in the shed ...HAH! You just like seeing grown men embarress themselves by displaying their incompetence
Said plywood is now in the shed. I've read the manual/plans and fondly imagine that I actually understood part of them (I think it was page 3, the blank one )
)
Richard
-
21st April 2009, 11:57 AM #4
Happily receives emails.
- Join Date
- Jul 2005
- Location
- 'Delaide, Australia
- Age
- 65
- Posts
- 8,138
it is the Zen of boatbuilding Richard.
Get to where the plans tell you to do something ... and do it.
Have a look at what happened with the GIS for the Autumn school on the other thread if you need more pics ... questions, questions if you don't undertand the first step.
MIK
-
21st April 2009, 12:12 PM #5
Grumpy old Bugga
- Join Date
- May 2003
- Location
- South Oz, the big smokey bit in the middle
- Age
- 67
- Posts
- 4,377
I was considering drawing up all the bits, then cutting them out to make a 'kit'. I know your manual talks about cutting things as you go but that could be seen as 'authorial convenience'. Then it occured to me ... yes, I'm thinking too much and cutting too little, but that happens in the middle of the night, but it occured to me that if I cut things as I need them, I can make the bits fit the boat. Such things as seat tops could be marked out using a joggle stick to fit the boat that exists rather than cut from the plans'.
Yes yes, I'm making hard work of it, but there comes a point where such 'complications' add to the journey. At least I'm not tempted to loft the thing first ... well, not yet anyway, I think I've got a wall long enough to loft the boat on
But back to the point - any thoughts of 'cut a kit first' versus 'cut bits as you need them'? About the only real consideration I can see is that cutting a kit gets them thumping great bit bits of plywood out of the way (not much room in my shed considering it's got Sixpence in there as well).
And precoating - I realise this is in the manual somewhere but I've only skimmed that. When's the best time to precoat the timber? Before cutting the bits (is there so little waste that this doesn't matter?). Precoat as I need them?
Ahh, the joy of boat building, all them decisions to make ... and only some of them really matter.
Richard
-
21st April 2009, 12:15 PM #6
Grumpy old Bugga
- Join Date
- May 2003
- Location
- South Oz, the big smokey bit in the middle
- Age
- 67
- Posts
- 4,377
The tasks for today are to drop off my latest set of lies to Centrelink, drop off some forms to my new employers (yes peeps, I finally have a job starting next week
), take the wee lass to an adventure playground, then I can do some boat building. My first job will be to clear off the moaning chair
Richard
-
21st April 2009, 01:25 PM #7
GOLD MEMBER
- Join Date
- Mar 2007
- Location
- Adelaide
- Posts
- 2,139
Sounds like I had better leave those clamps with you for a couple more weeks then.
-
21st April 2009, 03:42 PM #8
Novice
- Join Date
- Apr 2009
- Location
- Santiago, Chile
- Posts
- 11
Getting back to the shed
Congrats!
I hope to get a shed (the things one has to do to build a boat... )
)
Best of luck with the build Daddles.
Cheers,
Peter
-
21st April 2009, 05:40 PM #9
Grumpy old Bugga
- Join Date
- May 2003
- Location
- South Oz, the big smokey bit in the middle
- Age
- 67
- Posts
- 4,377
I remember reading a story about a bloke who built a boat in the lounge room of hos single bedroom apartment ... on the first floor ... that he was renting! Originally Posted by PDJ
Doesn't look like I'm getting to the boat today - the lass had over 2 hours at the playground, add travelling time to that plus what else I had to do and now it's nearly time to take the lad to soccer training
At least I had a good read of the plans - that blank page still makes sense
Richard
-
22nd April 2009, 03:19 PM #10
Member
- Join Date
- Aug 2008
- Location
- Adelaide, Australia
- Posts
- 63
I'll stick my head in here and wish you best of luck for the new build. Hopefully the ability to get out on the water easier on your own will be the motivation you need to keep plugging away at it.
I look forward to the hull-turning party. Oh...it's built up the right way you say? Oh well...we can always turn it a full 360 deg.
--
Hawk
-
22nd April 2009, 03:36 PM #11
Grumpy old Bugga
- Join Date
- May 2003
- Location
- South Oz, the big smokey bit in the middle
- Age
- 67
- Posts
- 4,377
Boats only work well if the hull has both beer stains and blood stains - donations of both will be gratefully accepted Originally Posted by Hawk
Seriously, anyone who wants to wander along and help me ruin something is welcome too ... but not this weekend, I've got a uni assignment due.
Richard
-
22nd April 2009, 05:36 PM #12
Grumpy old Bugga
- Join Date
- May 2003
- Location
- South Oz, the big smokey bit in the middle
- Age
- 67
- Posts
- 4,377
Right, some building type stuff

First job - quick sweep of shed, move stuff around, realise that this job would be easier if I didn't have Sixpence in the shed.
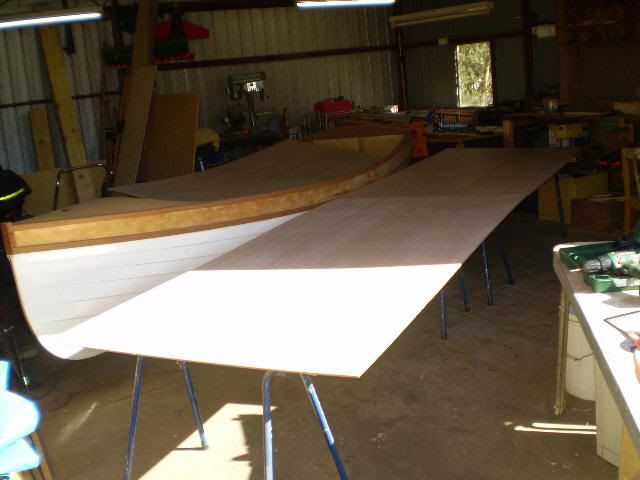
This picture shows my shed. The two sheets of ply are the actual size of the boat. The more observant will note the lack of space around said sheets. The table you can see in the bottom right corner has been turned at 90 degrees and is actually out of the shed - I'm standing well outside the shed to take the photo, which also helps explain the quality.
Yup, this build will be accomplished by moving things around ... a lot. Oh no, I've just realised that my table saw, thicknesser and timber are all in the back corner of that lot
Marking out.
The first problem was finding sheets that had been cut square - the sides and the bottom both feature a butt join in the middle so square sheets would make this easier. Of the two sheets forming the bottom, each had one end square and the other over 3mm out.
Right, first decision, square join in the middle.
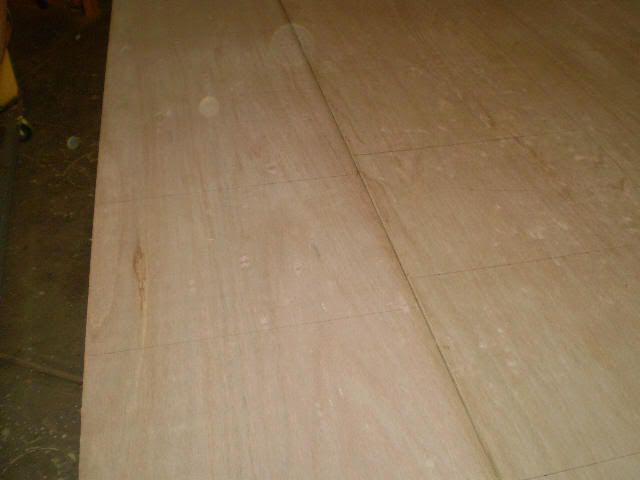
Next job was to mark out lines every 300mm from that join - you can see them in the above picture if you look closely.
Those two sheets are actually sitting there for a reason. You have to mark out the centreline of the bottom and the only straight edge I have that's both straight and the length of a sheet of ply ... was a sheet of ply. So I used each sheet as a straight edge to mark the centreline on the other sheet
Now Mik, I'm not ignoring your plans. I know I'm supposed to cut out one of the sides first. Thing is, the bottom and sides run across three sheets with the middle sheet sharing half the bottom and half of one side. I don't have the room to lay out three sheets of ply end to end so I'm going to mark out the bottom, put the end sheet to one side, put the other end sheet in place, THEN mark and cut out that first side, then return to cutting out the bottom. So I am building this as shown on the plans ... sort of. It sounds kinda messy but it involves the least amount of moving big sheets around.
One question Mik. The plans state you have to leave 12mm around the bottom piece when cutting it out. I haven't been able to work out why, especially as you're so specific about the 12mm. Could you explain please? (yes, I know it'll become obvious at some point but it's eluding me at the moment).
Now I have to go watch the lad play soccer. They're playing the state team tonight
Richard
-
22nd April 2009, 05:50 PM #13
Happily receives emails.
- Join Date
- Jul 2005
- Location
- 'Delaide, Australia
- Age
- 65
- Posts
- 8,138
Howdy Daddles.
You only need two sheets end to end.

to mark out the side panel. Important that front and back end get marked out at the same time of course - which is what you are doing.
Amazing that you plywood was not straight on one end. Just checked with Ducks ... they just found it out too. One end OK, the other has been trimmed ... maybe to get the euro standard 2500 long sheets into 2440 wide containers - maybe?
The line for the bottom is drawn inside the planking ... Have to add enough to cover the side panel ply and with all the angles of the side you will need at least 12mm to have a little margin.
MIK
-
22nd April 2009, 10:00 PM #14
Grumpy old Bugga
- Join Date
- May 2003
- Location
- South Oz, the big smokey bit in the middle
- Age
- 67
- Posts
- 4,377
You only 'need' two sheets at any one time. If I had more space, I'd do it as per the booklet. Because I've only got enough room for two sheets and the spare has to be man-handled around (lifted out of Sixpence as it happens), I'm marking up the bottom first, then removing the stern end sheet, placing the side sheet in place, marking up the side, cutting out the side and the bow of the bottom, then going back to cut out the stern. I'm just saving on shuffling full sheets of ply around. Originally Posted by Boatmik
It's not a comment on the building method, just a way of handling my space.
For the side though, I will be making a deviation from your plans by drawing a guideline down the middle. I'll use this when joining the two ends to make sure I get the right overall shape - put the two bits down, run a string line from end to end along the guideline, get the guide line straight, pin sides in place, glue on butt strap
I'll do the sides slightly differently to what you suggest too in that when it comes to final shaping, I'll pin the two sides together - this'll ensure that both sides are exactly the same ... and if we're lucky, that 'same' will be the right shape. That might save on time too - mark one side accurately, cut rough, trace for second side, cut rough, pin together, shape to line and hey presto, two identical sides. I reckon I'll try your belt sander suggestion too though I prefer to work with planes usually.
I was surprised too. Here I was with square and steel ruler, telling myself I'm being a pedantic panicker ... and one end of each sheet looked like I'd cut it. Hell, one of them wasn't even straightAmazing that you plywood was not straight on one end. Just checked with Ducks ... they just found it out too. One end OK, the other has been trimmed ... maybe to get the euro standard 2500 long sheets into 2440 wide containers - maybe?
Ah ha, I hadn't picked that. Next time you're editing the book, maybe mention that in the written instructions as well as on the plan - the plan is clear enough and you'd have to be a muggins to miss it, but the reason would be nice to know.The line for the bottom is drawn inside the planking ... Have to add enough to cover the side panel ply and with all the angles of the side you will need at least 12mm to have a little margin.
Your instructions are very good. There've been a few places where I haven't fully understood things on the first read but a moment or two looking at the diagrams has been all that's needed to get things clear. You can't write instructions that work perfectly for every reader on a first glance but your combination of excelent diagrams and clear instructions comes horribly close to perfection. Well done.
As it happens, my long batten is about 12mm wide. I'll mark the points, put in the panel pins (nails to rough sorts like me") ), then draw both sides of the line, cut rough just outside that line and the botton will be ready to go.
), then draw both sides of the line, cut rough just outside that line and the botton will be ready to go.
Richard
-
22nd April 2009, 11:02 PM #15
Happily receives emails.
- Join Date
- Jul 2005
- Location
- 'Delaide, Australia
- Age
- 65
- Posts
- 8,138
I know what you mean about explanation about why. I think it is more important to explain about how.
The forum is a good place for why. But plans need to focus on how.
Problem is of course the bulk of the writing ... if I explain everything I will have a plan the size of encyclopaedia britanica!!! Also I would have to choose what is worth explaining and what is not.
You are right about making changes in method ... I won't argue with an experienced builder like you, Richard. The plans just need to have a method that works reasonably efficiently ... Sometimes someone will come up with a better way ... but usually I am pretty close to the optimum method for someone who works the way I do. Check and recheck. Lo everything in a sensible order and make sure that every part of the assembly is prepared for properly.
Some will see many potential shortcuts ... but if they don't have experience the result might be worse than simply following the plan.
MIK


 Reply With Quote


Similar Threads
-
Oz PDR build in Adelaide - sexy black PDRacer
By m2c1Iw in forum Michael Storer Wooden Boat PlansReplies: 39Last Post: 27th April 2009, 06:30 PM -
Wherry style rowing boat
By Arron in forum BOAT DESIGNS / PLANSReplies: 30Last Post: 20th April 2009, 09:56 PM -
Two Foot Skiff
By bitingmidge in forum BOAT DESIGNS / PLANSReplies: 26Last Post: 24th May 2007, 12:28 AM -
Forward Facing Rowing System
By dopeydriver in forum MISC BOAT RELATED STUFFReplies: 7Last Post: 28th January 2007, 11:15 PM
