

 Thanks: 0
 Likes: 0
 Needs Pictures: 0
 Picture(s) thanks: 0
Results 181 to 195 of 404
-
14th September 2009, 01:46 AM #181
 AJ
AJ


- Join Date
- Jun 2007
- Location
- Aberfoyle Park SA
- Age
- 63
- Posts
- 1,787

Daddles
Have you considered doing what David at Flat Duck did with his catboat coaming
- laminated out of bendy plywood & capped with something thin ?
Bugger-all steaming & a bewdiful coaming with curves in all the right places...
AJ
-
14th September 2009 01:46 AM # ADSGoogle Adsense Advertisement
- Join Date
- Always
- Location
- Advertising world
- Age
- 2010
- Posts
- Many
-
14th September 2009, 10:22 AM #182
Grumpy old Bugga
- Join Date
- May 2003
- Location
- South Oz, the big smokey bit in the middle
- Age
- 67
- Posts
- 4,377
That's one of the options. I'm not considering them too carefully at the moment because how I do it will depend on how the project 'feels' when I get around to doing it and on what I find in the way of timber. Originally Posted by b.o.a.t.

Meanwhile, the Wee Dark Canine stands a good chance of becoming boat shaped today ... and having announced this, I'll get caught up with other stuff won't I
I still need to hack a couple of limber holes out of bulkheads 2 & 3 (through the centre seat/tank) - I'm actually tempted to go without limber holes altogether and just let the fore section fill up with water independantly of the rear section, but that just feels like laziness ... which it probably is
Richard
-
14th September 2009, 10:23 AM #183
Grumpy old Bugga
- Join Date
- May 2003
- Location
- South Oz, the big smokey bit in the middle
- Age
- 67
- Posts
- 4,377
Mate, I've sold THREE boats in the last five years, that's what's left ... and you can't see the one hanging in the shed Originally Posted by honkongphoie

Richard
-
14th September 2009, 02:46 PM #184
Grumpy old Bugga
- Join Date
- May 2003
- Location
- South Oz, the big smokey bit in the middle
- Age
- 67
- Posts
- 4,377
Limber Holes
The central seat of the Rowing Skiff is a sealed tank. This leaves foot wells fore and aft of this seat. The plans talk about having some method allowing water to move from one foot well to the other on the grounds that if you ship water over the bow it can flow into the rear and get your feet wet and that any water you drag into the boat with your feet when climbing in can flow forwards and get whatever you've placed in the forward foot well wet as well. I don't buy Mik's claim that it means you only have to bail one compartment because this is a row boat and hence not going to be tipped on its ear every five minutes like a sail boat would be ... and yes, I'm being grouchy about the whole exercise
Anyways, limber holes - the funny name you give to holes cut in otherwise sound surfaces so that water can get through.
The Little Black Dog varies from the plans in that I have this daft idea that I'd like to use half of the central seat for stowage - I have yet to decide the final hatch system though it has been discussed in this thread on hatches (any suggestions to go in there please - I'm still looking for PAR's bayonet catches).
The plan is to put a full depth spine down the centre of the middle seat (fore and aft of course) with stowage on one side and a sealed tank (with inspection port) on the other. The limber holes feed into the tank side and are positioned against that spine. I'll use ply to build a box tube for the water to flow through - spine one side, ply top, ply side, boat bottom on the fourth side. The alternative was to glue a pvc or plastic tube in there but I'm going for the plywood box.
Considering this tube/box is for water to flow through, the limber holes don't need to be the same shape as the box, just smaller than the box . It did mean cutting two nice looking holes in my neat bulkheads
So here's how I did it.
I fitted a 25mm spade bit into my drill press, and drilled two holes adjacent to each other. The size and position of the holes meant that these holes would pass through the framing but not come out the top of it.
Then, using a chisel, a rasp, my trimmer routher, some sand paper and much bad language, I joined the holes into one and smoothed out the entrances so they look nice and neat and weren't likely to break when some clumsy oaf stuck his ruddy great feet on them.
Due to the configuration of the boat, on one bulkhead, the framing is on the outside. Unfortunately, my choice of hole location meant that only a very thin sliver of timber would be left of the frame, so this was cut out and the hole neatened as I could see it being broken in very quick time.
The other bulkhead has the frame on the inside so I left that 'sliver' of timber in place and plan to glue the top of the box tube to that.
The attachments show 'before' and 'after'. Note that they're not as good as Alex's or Rob's work but aren't bad considering I was the mug doing them. Now all I have to do remember to slather epoxy all over the cut out areas to seal them.
Next job? Hopefully some attempts at a dry fit of the hull ... but I think Jan is planning some tasks that will have me driving all over Adelaide so I might get to put that off until tomorrow
Richard
-
14th September 2009, 02:52 PM #185
SENIOR MEMBER
- Join Date
- Jul 2008
- Location
- Fenwick, Michigan
- Age
- 75
- Posts
- 908
You have a drill press? I'm envious.
Looking good, Richard.
Bob
-
14th September 2009, 03:00 PM #186
Grumpy old Bugga
- Join Date
- May 2003
- Location
- South Oz, the big smokey bit in the middle
- Age
- 67
- Posts
- 4,377
I'm not sure you should be. It's a horrid old thing I 'acquired' from somewhere that's not good enough to do a really good job but not bad enough to justify buying a new one. It doesn't get used a lot but it's one of those tools I'd put on the 'grab one if you can find one really cheap' list, you know, the mental list you have when going to garage sales and open air markets and the like. Originally Posted by BobWes
Like I said, it doesn't get used a lot but sometimes, it really makes a difference - today's job would have been hell without it. Having a really sharp chisel was the other magic maker (I have a general purpose chisel for poxy, rough cutting, sharpening pencils and the like, plus my good ones that only get to do 'fine' woodwork)
Looking good, Richard.
Richard
-
14th September 2009, 03:10 PM #187
SENIOR MEMBER
- Join Date
- Jul 2008
- Location
- Fenwick, Michigan
- Age
- 75
- Posts
- 908
A drill press is on that list of mine. Browsing craigslist, I've found serviceable benchtop drill presses for $35-$40, but something else always jumps up to claim that bit of cash before I get to the drill press. Ah, one day it'll happen.I'd put on the 'grab one if you can find one really cheap' list, you know, the mental list you have when going to garage sales and open air markets and the like.
Bob
-
14th September 2009, 07:56 PM #188
Grumpy old Bugga
- Join Date
- May 2003
- Location
- South Oz, the big smokey bit in the middle
- Age
- 67
- Posts
- 4,377
I had a go at dry fitting it this afternoon ... and gave up in disgust

If starting from the front, as per the manual, the only way you can screw the bow together is to have the sides splayed waaaaayyyyyyy out, much wider than the space available in my workshop, which leads me to suggest I need to do this outside.
Secondly, once you get to bulkhead 2 or 3, the angle on the sides is so steep that you literally can not get to the screws to tighten them up if building it upright and on the ground.
However, if you start at the middle, getting the front to bend around enough to sit flush against that bow piece is going to be hell.
Tom, you did yours, upside down and starting at bulkhead 3, you've also got limited space like me, would you do it that way again? At the moment, apart from getting the bow in flush, that looks like the best move.
Does anyone who's built a goat, or Clint who's built rowing skiff, have any suggestions?
It also occurs to me that trying to assemble this thing with glue on it, on my own, is a recipe for disaster so I'm thinking that dry fitting it, getting it stable, and then removing and gluing each bulkhead is the way to go or, maybe, glue the stem piece to both sides, outside and widely splayed, then try to assemble the rest.
Note: Doing this on your own is hard work
Yeah, I'm a bit disappointed at the moment. I have to cook dinner right now but will start trawling the build threads later tonight.
Richard
-
14th September 2009, 09:24 PM #189
SENIOR MEMBER
- Join Date
- Apr 2008
- Location
- Tilburg, the Netherlands
- Age
- 51
- Posts
- 519
Hello Richard,
I went through the same experience as you did on my first go trying to put my GIS together (I assembled the boat in my carport which is about 9 ft wide). The ply and chinelogs required some carefully applied force to get it all neatly together.
In the end, and what worked very well, was to get 2 friends in. With the 4 of us (me, my girlfriend and my 2 friends) we managed to get everything together reasonably easily. In my experience, you just need the extra hands to carefully pull the sides inwards to the bulkheads and to keep them there when screwing them in place.
Getting bulkhead 1 and 2 in was the hard part. After bulkhead 3 it is all easy peasy as there is not that much bend anymore in the sides. One thing that requires exceptional care is attachment of the stem (this determines whether the sides will take a natural shape): the sides must be attached at the same height to the stem and at the same angle (fronts of the sides must be exactly parallel.
I went for the real thing (glued assembly rather than dry assembly) right away, as I didn't want to have to go through the same ordeal once more.
Attached are a few pics of what we did. Hope this helps.
Best regards,
Joost
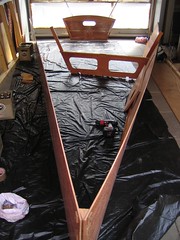
Stem glued in place, the midframe is only temporatly screwed in place to keep the structure upright.
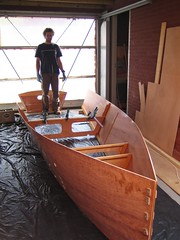
My friend checking out bulkheads 1, 2 and 3 which are glued in place.
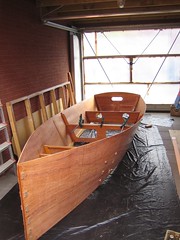
All bulkheads and the transom glued in place!
One more tip, put sufficient screws in and make sure they cover the full length of the bulkheads side.
-
14th September 2009, 09:33 PM #190
Grumpy old Bugga
- Join Date
- May 2003
- Location
- South Oz, the big smokey bit in the middle
- Age
- 67
- Posts
- 4,377
Thanks Joost.
One difference between the skiff and the goat is that the skiff's sides have far more flare - they lean over at least half as much again and that difference is dramatic. Having said that though, you confirm quite a few of my thoughts - thanks mate
Richard
-
14th September 2009, 09:55 PM #191
SENIOR MEMBER
- Join Date
- Oct 2008
- Location
- Victoria
- Age
- 71
- Posts
- 631
Richard I had trouble alone with curves and long planks too. Found it helpful to clamp temporary legs on the sheets so that they sat at the right height, then I only had to worry about pulling the curves. For this I found ratchet tie-down straps really useful to pull everything together incrementally...didn't fall over or go awry because of the "legs". Bungy cord is also great. I have ropes of 4-5 mm stuff I use for tie downs it stretches and has great holding power. Just don't let go quickly!
-
15th September 2009, 05:18 AM #192
Happily receives emails.
- Join Date
- Jul 2005
- Location
- 'Delaide, Australia
- Age
- 65
- Posts
- 8,138
Maybe some of the Adelaide Forumites might help you Richard?
-
15th September 2009, 01:49 PM #193
Grumpy old Bugga
- Join Date
- May 2003
- Location
- South Oz, the big smokey bit in the middle
- Age
- 67
- Posts
- 4,377
Well, not only did I not succeed in dry fitting my hull, I have decided to use closed inwales instead of open (spaced) inwales and will be deviating from Mik's construction process in one or two significant ways.
Why?
Because, after taking the sides out onto the driveway, joining the stem and then carrying the floppy mess back into the shed and sitting it on some saw horses I spent about five minutes trying to work out why the bow sloped backwards instead of forwards.
Why?
Because I glued the chine logs onto the TOP of the hull sides, not the bottom where they're supposed to be
I've been building this ruddy boat upsideflamindown
If you compare this photo from Tom's build
with this photo from my build
You can see what I've done.
The thing that really pisses me off is that I always label things with an arrow pointing forwards and upwards. I did so in this case ... but they disappeared during the sanding. When attaching the chine logs, I put them on the outside curve (boat bums curve downwards don't they) but the amount of flare in this hull means that the sheerline has the outside curve, not the bottom. The term 'unadulterated idiot' springs freely to mind.
I could, of course, plane off the chine logs and start again but my current thinking is that they can stay where they are and become inwales - closed inwales (dammit, I like open inwales) and slightly fatter ones (19mm) than the delicate little things (12mm) Mik specifies but that should still work.
Then I need to consider that I carefully masked off where the bulkheads will be glued when coating this thing ... those areas are now in the upper parts of the boat and will need sealing while the glue faces have been coated ... and are about to cop another sanding. I also predrilled the screw holes for fitting the bulkheads, so these too are now excess holes in the bare side of my boat and will need filling while I drill more holes to hold the bulkheads in their proper places.
I'm off for a therapeutic pie, pasty and sticky bun washed down with a health giving bottle Coke.
Richard
stupid bloody boat
-
15th September 2009, 02:08 PM #194
SENIOR MEMBER
- Join Date
- Jul 2008
- Location
- Fenwick, Michigan
- Age
- 75
- Posts
- 908
Richard...
You know what somebody once told me? ... it's just wood, and it grows on trees.
But you give encouragement to those of us less experienced souls - if a veteran boat builder, such as yourself, can make a mistake then why do we expect perfection from ourselves (personally, I keep expecting it but have never attained it; you'd think I's learn.).
Good grief, I'd be tempted to slit my wrists and consume vast quantities of whiskey.A therapeutic pie, pasty and sticky bun washed down with a health giving bottle Coke.
But now Mik has a reversible boat design.
Bob
-
15th September 2009, 04:26 PM #195
AJ
- Join Date
- Jun 2007
- Location
- Aberfoyle Park SA
- Age
- 63
- Posts
- 1,787
Daddles, about now, a whole bunch of us are feeling a lot better about ourselves & our
own mistakes.
Process for making joining easier perhaps. Adapted from how I did Teal, & do the panels on my kayaks.
Lay the two halves flat together & loosely wire the bow together to allow for some
spread & movement.
Stand up-right on a couple of saw horses, spread the stern & wire the transom into place.
Insert the centre frames & wire in place, forcing the proper shape to appear.
Square the ends (I usually forget to do this) & tighten all the ties.
When happy with square & fit, replace all wire with screws, & add inner stem.
Recheck square (I usually forget to do this too) & fit, back off the screws, insert
glue & re-tighten screws.
Means even more holes to fill, but means you don't have to get it right the first time,
before you have all visual cues to work with.
And remember, the best varish is white paint.
Starting 3 weeks leave next week-end. Will be away only a day or so here & there.
Should be able to give you a hand in between times if wanted.
cheers
AJ


 Reply With Quote


Similar Threads
-
Oz PDR build in Adelaide - sexy black PDRacer
By m2c1Iw in forum Michael Storer Wooden Boat PlansReplies: 39Last Post: 27th April 2009, 06:30 PM -
Wherry style rowing boat
By Arron in forum BOAT DESIGNS / PLANSReplies: 30Last Post: 20th April 2009, 09:56 PM -
Two Foot Skiff
By bitingmidge in forum BOAT DESIGNS / PLANSReplies: 26Last Post: 24th May 2007, 12:28 AM -
Forward Facing Rowing System
By dopeydriver in forum MISC BOAT RELATED STUFFReplies: 7Last Post: 28th January 2007, 11:15 PM
