

 Thanks: 0
 Likes: 0
 Needs Pictures: 0
 Picture(s) thanks: 0
Results 16 to 30 of 30
Thread: MSD Rowboat in Adelaide for WA
-
10th May 2012, 04:34 AM #16
 SENIOR MEMBER


- Join Date
- Oct 2007
- Location
- Poland
- Age
- 67
- Posts
- 805
-
10th May 2012 04:34 AM # ADSGoogle Adsense Advertisement
- Join Date
- Always
- Location
- Advertising world
- Age
- 2010
- Posts
- Many
-
11th May 2012, 09:43 AM #17
Novice
- Join Date
- Apr 2011
- Location
- Mount George, SA
- Posts
- 17

After a painstaking day drawing up a bar for a surf club I finally got out into the shed! Made the skeg and fitted it. I am following Daddles thread from when he built his boat and am going with his idea of fitting the skeg first and then running the capping all the way.
My reasoning is that I know this boat is going to get smashed, so I am keen to make sure that the bottom is robust and I feel that if I have the hardwood centre runner in one piece as the most outside bit then there arent any bits sticking out. I am also going to plane the centre runner down from its full thickness to nothing on the hull, so it will be full thickness to 3650mm then taper from there.
Hopefully this isnt a problem.....im too scared to email MIK about it because he might already be offended by my offer to help copyright his plans!
Anyway today is the day for actually fitting the runner, then might cut up inwale spacers etc and try and do some other jobs around the place!
-
11th May 2012, 12:52 PM #18
Happily receives emails.
- Join Date
- Jul 2005
- Location
- 'Delaide, Australia
- Age
- 65
- Posts
- 8,138
All three seas run it ALMOST a straight line. It is OK to tweak the front up a little ... but that was the standard for the bulkhead heights of the rowboat.
You can tweak things how you like. As long as the seat heights look right and are based on the bulkhead heights ... there won't be any problems structurally.
MIK
-
12th May 2012, 07:08 PM #19
Novice
- Join Date
- Apr 2011
- Location
- Mount George, SA
- Posts
- 17
Sweet, thanks for that MIK. I did just that in the end. Will post later on with the photos from todays efforts!
Thanks for the quick response, I wasnt expecting anything until Monday!
-
13th May 2012, 11:50 AM #20
Novice
- Join Date
- Apr 2011
- Location
- Mount George, SA
- Posts
- 17
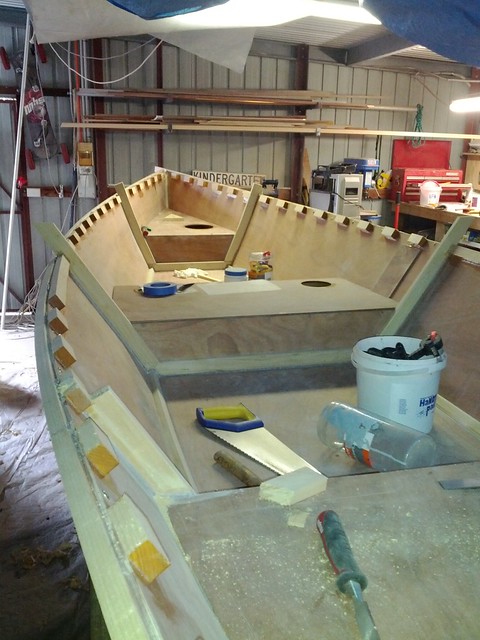
So! With the skeg and skeg cap on the boat was flipped back upright again for the fitting out of the seat cleats, seat supports and a bucket load of sanding all my cove work ready for some epoxy coating of the uncoated timber.
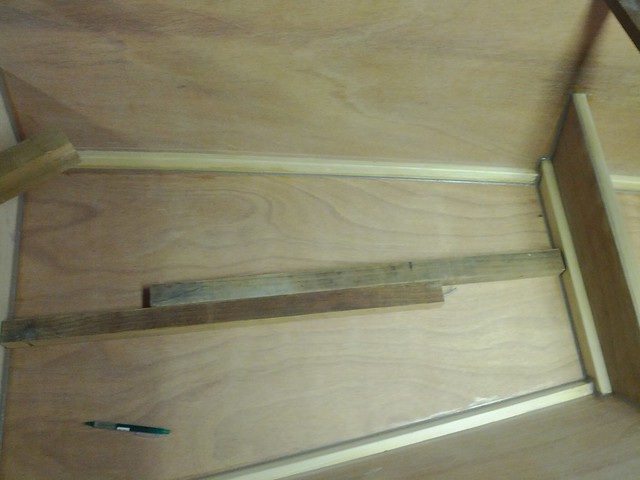
I created one problem for myself when I was putting the bottom on. I moved the bow end off to one side so that I had a nice even overhang all round. At the time I thought this was no big deal. Then the day after I realised that my centre line, so carefully marked on the bottom was no longer in the right place! My solution to remarking these lines on the bottom without having to cut a bit of timber to use as a straight edge was this;
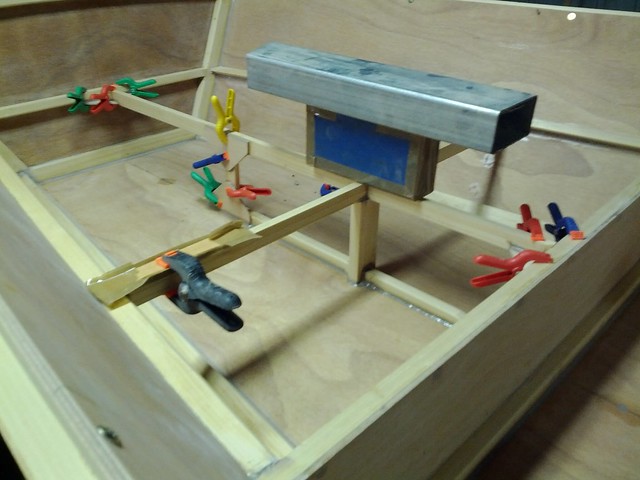
I went into the shed yesterday morning with high hopes of glueing all the timber in and epoxy coating the under seat areas so that the next job would be painting them then installing the tank tops. By the time I had cut and dry fitted all the timber it was 1pm! So I convinced myself that with all the clips and clamps in place it would be difficult to epoxy coat anyway and so I just did the glueing.
While I have total faith in MIK's design allowances you will see I added some extra bits of timber in the aft seat as I know this boat is going to have kids jumping around on it and the span between the support and the side of the hull at the forward end of the tank is quite large, and I figured that a bit of extra support wasnt going to hurt. Hurt in terms of
A: The extra weight being put in at the ends of the boat (negligible so shouldnt noticably change the trim)
B: The extra overall weight...as above I decided.

-
13th May 2012, 03:59 PM #21
Happily receives emails.
- Join Date
- Jul 2005
- Location
- 'Delaide, Australia
- Age
- 65
- Posts
- 8,138
Hi Jason,
Did it work out at very roughly 225 down the stem from the plywood edge?
MIK
-
13th May 2012, 10:36 PM #22
Member
- Join Date
- Jun 2009
- Location
- Brisbane
- Posts
- 79
Hi Jackson
I Looked in the forum a week ago and you were just starting. Now you are halfway.
Well done.
I checked the measurments on my boat this afternoon for the bow tank you mentioned. I dont remember problems about it but I have had a few sleeps since then.
So 250mm back from bow along the side it is 247 down to the top of the bulkhead. For comparison the top of the tank at bulkhead 1 is 209 from the side. My measurements are from the glued on inwhale to the tank beside the fillet, not directly off the side plywood, I hope this gives a guide.
I used 1/4 ply but camt remember if I bevelled the tank side risers or just bogged it.
It looks OK from where I sit so it must be good.
Bye for now,
Tom
-
16th May 2012, 09:05 PM #23
Novice
- Join Date
- Apr 2011
- Location
- Mount George, SA
- Posts
- 17
Wow, I have been busy, so busy I havent done any posting. IN short since last time, I have
- Put the skeg on
- Put the capping on (I did it over the skeg like Daddles has?)
- Made and fitted all the bits for the seats and done a bunch of resin coating
- fitted the seats!
I have come across some issues. One of which is a stuff up I have made.
 I have done some dodgy sanding with the belt sander or something has happened, I know I marked the line and sanded to it correctly so I'm thinking somewhere else I may have screwed up. If its not obvious in the photo (I can see it, but I have seen it in RL but looking at the photo now I can see how it may not be so obvious) there is a "woof" in the chine line which bends up! I checked where the skeg is and that is a nice convex curve, rather than the concave one on the chine.
My plan is that when I flip the boat over i will glue a piece of timber on the chine, plane it down till the chine line is restored and then fill with a long batten on top of the timber and touching the hull near the skeg. My other option is what I did with the sabre when i screwed up the sheer, which was drilling some little holes (enough to get a jigsaw blade in) and cut along the bottom panel to seperate it from the chinelog, then get it straight and re-glue.
I dont know if anyone is actually reading this, but I would appreciate any ideas about this one!
My other decision time is the method of assembly for the inwales and spacers...I'm not up to that yet, but I am thinking long and hard about it as I go. Eventually the whole boat will be painted, so I'm trying to work out the best order in which to do the epoxy coating and fitting of these, and if anyone has had any experience with a GIS or an MSD with spraying the topcoat and working with the gaps in the inwales? Im really excited about how its going too look but not 100% on my method!
MSD Rowboat Build - a set on Flickr
-
16th May 2012, 11:12 PM #24
SENIOR MEMBER
- Join Date
- Aug 2010
- Location
- New Jersey, USA
- Posts
- 767
This photo is starboard stern, correct? Is the port chine similar? Part of MIK's secret formula with the GIS is a complex shape right about where your photo is (or so I've read). Could it be that you've done everything right and just don't realize it? The skeg and the chine should probably match, but don't convict the chine just yet. The designer might weigh in here (during a break from his 12' design chores...) but you might also take a close look at the plans to determine if the side panel's chine mark is indeed a convex, or is it more complex. True, the flat mark and the 3D shape will be different, but I suspect you may have built as intended.
Dave
StorerBoat Builder, Sailor, Enthusiast
Dave's GIS Chronicles | Dave's Lugs'l Chronicles | Dave's StorerBoat Forum Thread
-
17th May 2012, 03:06 AM #25
SENIOR MEMBER
- Join Date
- Aug 2010
- Location
- New Jersey, USA
- Posts
- 767
re: spacers, here's what I did. I attached the spacers to the hulls way early, before going 3D. I after hull assembly, I screwed through the spacers into the gunn'ls (I still haven't glued the gunn'ls yet). You can still jump in at that stage. You could "clamp" the gunn'ls in place at the same time as you glue the spacers down. Alternatively, I would suggest gluing spacers to the inn'ls, but it makes lining up the bulkhead arms tricky.
Dave
StorerBoat Builder, Sailor, Enthusiast
Dave's GIS Chronicles | Dave's Lugs'l Chronicles | Dave's StorerBoat Forum Thread
-
17th May 2012, 09:15 AM #26
Novice
- Join Date
- Apr 2011
- Location
- Mount George, SA
- Posts
- 17
davlafont - good point, I have learned that MIK is a very wiley designer. I mean I know that I was in there sharpening my pencil to a needle point for every mark and I am lucky in that I am already a carpenter so I'm confident that I did in fact sand to the lines and no more, and part of me did initially think "I wonder if this would really affect the outcome" but then I got all funny about the aesthetic and people going "that looks dodgy".
I cant have that!!
I will leave it for now, I still have to do the side arms, gunwales, inwales and paint some primer on the inside before I flip the hull and do the glassing and coating work on the bottom so theres still time to find out from MIK about the chine line aft.
Putting the inwale spacers on first is a fantastic idea, the tricky bit (at least in my head) is the pre-coating of the side bits of the spacer (the side of the spacer that faces the gap they make. Just because its narrow and fiddly, but I reckon that it would be very easy to do that if they were glued to the hull. I actually still have the gunwales screwed to the sides from when i put them on for the hull assembly so it would help me get it all lined up correctly.
I better have a good read ahead in the instructions before I progress to much further! Its only 5 degrees outside at the moment and before I do anything I need a coffee!
Thanks heaps for your feedback!
-
17th May 2012, 02:17 PM #27
Novice
- Join Date
- Apr 2011
- Location
- Mount George, SA
- Posts
- 17
You know, MIK is a pretty clever bloke.....I actually read ahead in the instructions, turns out putting the inwale spacers onto the hull first is THE WAY its done! Dumb ass!! Should have probably read the destructions before I commented about it!
-
19th May 2012, 12:02 PM #28
Novice
- Join Date
- Apr 2011
- Location
- Mount George, SA
- Posts
- 17
Hi Tom!
I got so busy building the boat, I didnt even see your reply! Which is a bummer because it would have been helpful. I think mine is a bit lower than that, but I will check, the tops are in now and this weekend is gunwales, spacers and inwales.
Progress has been quick for two reasons;
1. I tend to get very task focused when I start a project (I come from the instanteneous gratification generation, so once I start the boat I want it finished to enjoy it!)
2. I am a builder (houses, decks, carports bathrooms etc) and for the first time in a very long time I have been completely quiet work wise. So I have had plenty of time on my hands!
3. Dad is doing work around my house for me while I build the boat for him (where a bit of a building family). So in a way I should be dragging my feet!!
-
21st May 2012, 11:09 AM #29
Happily receives emails.
- Join Date
- Jul 2005
- Location
- 'Delaide, Australia
- Age
- 65
- Posts
- 8,138
Great news to see it going so well Jackson!
Also nice to see TomTre again!
MIK
-
27th May 2012, 10:12 AM #30
Novice
- Join Date
- Apr 2011
- Location
- Mount George, SA
- Posts
- 17
I know its been long time no post, thats not because of a lack of work on the boat, its because of a very hectic amount of carports, pergolas and decks that all of a sudden people went ahead with (which was great I might add) and building boat work and being a dad and all that, there wasnt any time to write about the work being done.
I put the gunwales on using a similar method to when i did the chinelogs. I put glue along the hull based on the line you draw on the hull side. Then I put the gunwale on from the middle using my screw holes from when I had the gunwale on temporarily to line everything up. Then I worked my way forward and backward in equal measure to get the gunwale screwed on.
I did the spacers next, then did the shaping of the gunwales. I noticed in the plans it says do the shaping on the gunwale then put the spacers on. By the time I noticed that order of procedure (my reading of the instructions is usually done in blocks, which is probably bad because sometimes I dont remember the order in the way its written, rather in the way I think I should do it!!) I had already glued the spacers on. It was a fair bit harder doing the shaping with the spacers, but part of me thinks it wasnt such a bad way of it happening.
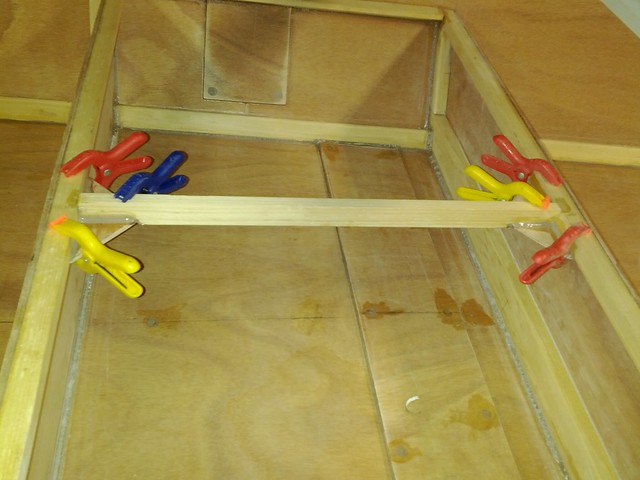
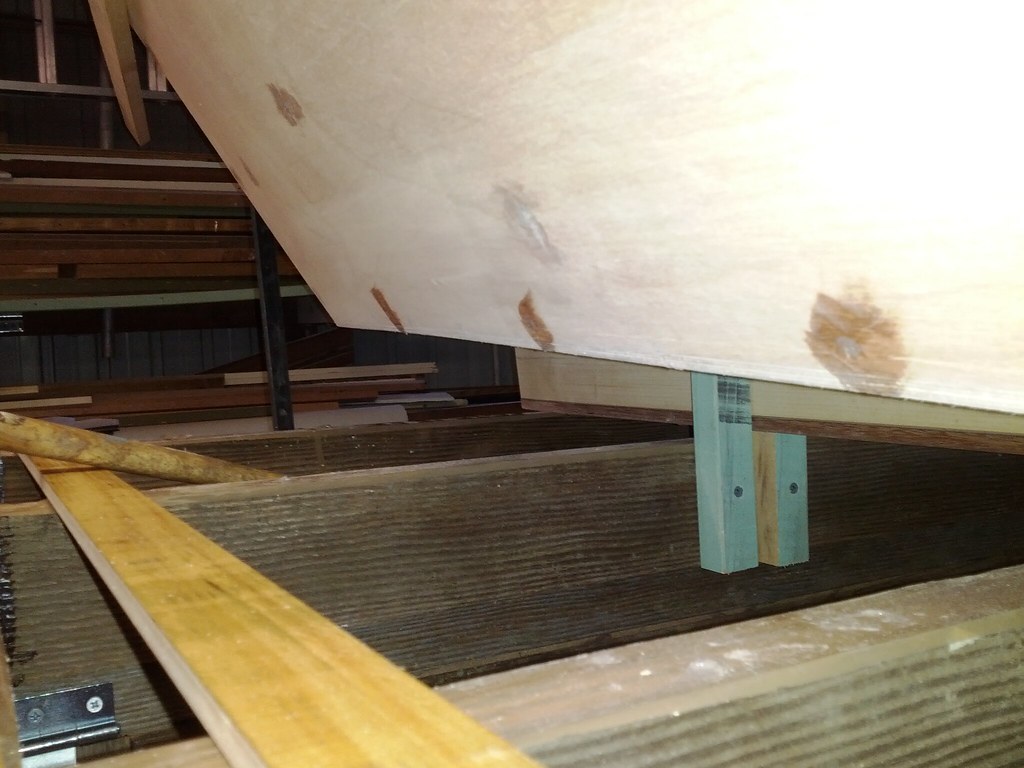
When I did the spacers I made a block, as below;
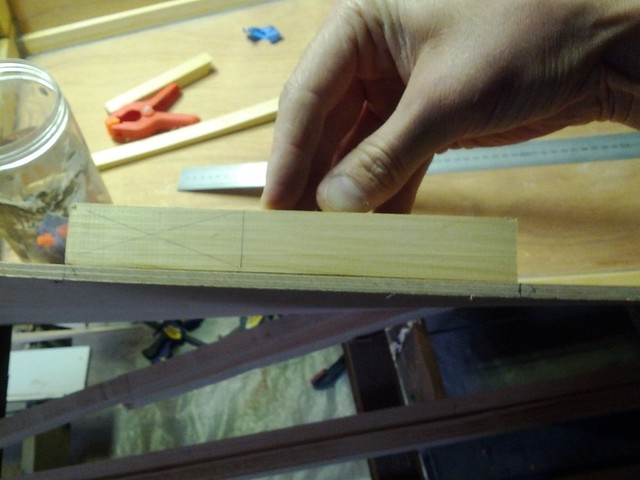 so that I could lay out the spacers and work out how things would work around the side arms. I found it useful so thought I would show it incase anyone else does. I realise you could also measure it out and divide it all, but I figured I would be able to make any alterations if I needed. As it was the spacing in the book works out perfectly.
 The spacers in, prior to doing the shaping.
 Post shaping, bad pic, sorry!
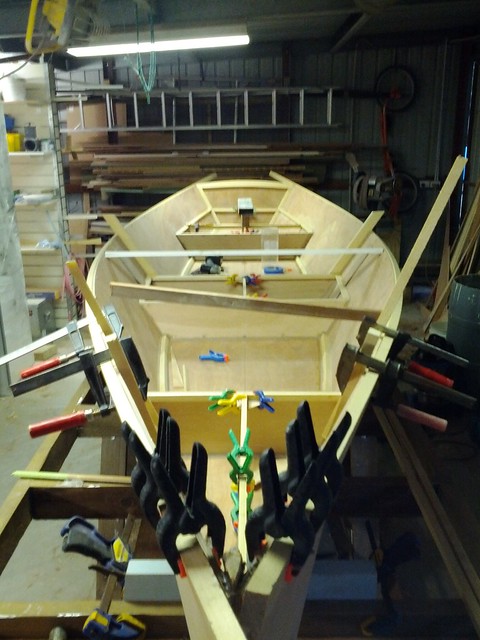
So as I write, I have one inwale on. I dont own enough suitable clamps to do both sides at the same time, which was a bummer, but anyway. Today will get out there and do the other inwale and then cut the notches in the knees I made last week to work out the starting point for the spacers, then hopefully put the knees in at the same time as the other inwale.
Then is just some epoxy coating on the bits I missed, then flip her over and do the easy jobs of glassing and coating on the outside of the hull. Then paint!
No doubt my lack of free time will mean that perhaps the next post might be a bunch of progress pictures!


 Reply With Quote

Similar Threads
-
Herreshoff Rowboat
By keyhavenpotter in forum Michael Storer Wooden Boat PlansReplies: 23Last Post: 27th May 2012, 10:32 PM -
3 men in a rowboat
By duncang in forum MISC BOAT RELATED STUFFReplies: 0Last Post: 30th April 2011, 07:22 PM -
MSD Rowboat in Brisbane
By tomtre in forum Michael Storer Wooden Boat PlansReplies: 113Last Post: 22nd March 2010, 09:01 PM -
New Rowboat Project
By bitingmidge in forum BOAT DESIGNS / PLANSReplies: 0Last Post: 8th November 2005, 07:30 PM
