

 Thanks:
  Likes:
  Needs Pictures: 0
 Picture(s) thanks:
Results 1,531 to 1,545 of 3347
-
1st April 2010, 08:22 AM #1531
 SENIOR MEMBER


- Join Date
- Oct 2007
- Location
- Poland
- Age
- 67
- Posts
- 805
-
1st April 2010 08:22 AM # ADSGoogle Adsense Advertisement
- Join Date
- Always
- Location
- Advertising world
- Age
- 2010
- Posts
- Many
-
1st April 2010, 09:20 AM #1532
Senior Member
- Join Date
- Mar 2008
- Location
- Rockhampton, Australia
- Posts
- 227

Very nice work there Alex!
Can I send you a section of tarp to make into a LUG?
Cheers.Nick
Fair Winds and Following Seas
------------------------------------------------------------
PD Racer #276 - "Duck's Nuts" - Oz MkII with Lug rig
Storer Eureka 155 - unnamed
-
1st April 2010, 12:56 PM #1533
GOLD MEMBER
- Join Date
- Jan 2009
- Location
- Blaxland, Australia
- Age
- 65
- Posts
- 2,551
Hi Robert! Originally Posted by robhosailor

Thanks for the kind words :). The hull is looking better for the primer, I think - I can't see all the glue-filled scars and scratches now!
Cheers,
Alex
-
1st April 2010, 12:58 PM #1534
GOLD MEMBER
- Join Date
- Jan 2009
- Location
- Blaxland, Australia
- Age
- 65
- Posts
- 2,551
Hi Nick, Originally Posted by nickpullen
Thank you for your kind words, too :). I assume that you mean the hull in the first sentence, and that you are joking in the second ;). I don't even trust me to sew up the sail!
Cheers,
Alex.
-
1st April 2010, 01:06 PM #1535
GOLD MEMBER
- Join Date
- Jan 2009
- Location
- Blaxland, Australia
- Age
- 65
- Posts
- 2,551
I've updated post 1529 above in this thread (near the bottom of page 102) with an additional photo - taken this morning - comparing a used and "broken" "Unipro" white foam roller with a new one. AquaCote high-build primer - and, I suspect, any other resin product (epoxy, polyester, PU, etc.) - doesn't do these cheapies any good. I'll try it the white roller on the undercoats to see what happens (I've still got nine of them in the box). I have a big bag o' DF rollers anyway :).
That's all I've done so far today, and won't get anything more done until later, if that, as I have a doctor's appointment in the mid afternoon...
-
1st April 2010, 10:33 PM #1536
GOLD MEMBER
- Join Date
- Jan 2009
- Location
- Blaxland, Australia
- Age
- 65
- Posts
- 2,551
This is the next group (well, pair) of snaps relating to the deck colour scheme of the 'Duck. Said schem is "natural" - i.e., clear - finish up to around half way between carlins and gunwales; the region between the dividing line and the gunwales will be in the hull colur, i.e., International "Brightside" one-pack polyurethane Yellow "with added Teflon(R)", as seen in a photo in a previous post (# 1498). That's the intentioon at the moment, at any rate. I may of course decide, "blow it, I'll do the lot in clear" - but then again, possibly not ;).
The photos, then:
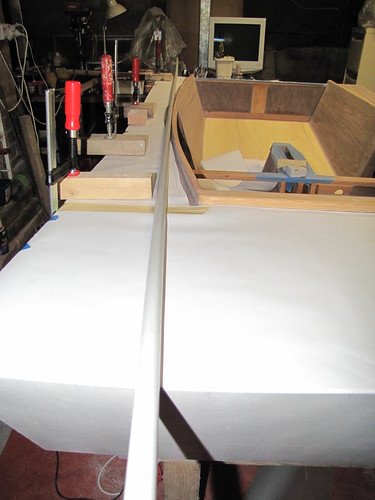
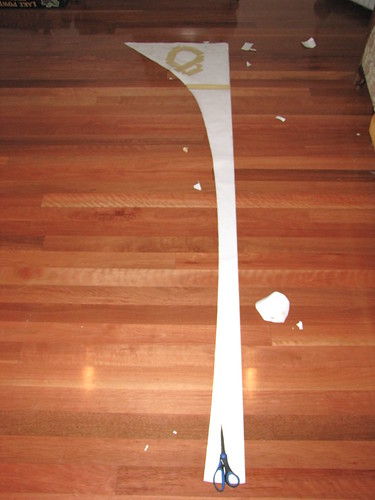
1. Paper colour-line template, photo 1. The long piece running down the side deck was an offcut from the lugs'l luff patch template - waste not, want not... (I vacuumed the decks and the worst of the cockpit before embarking on this stage)
2. Paper colour-line template, photo 2. The idea is to tape the two pieces of paper together, make a rough cutout for the carlin and coaming, clamp the pipe on top of the paper at a nice fair curve that pleases me, draw a pencilled register-line for the gunwale and the bow onto the paper, then a pencil-line along the side of the pipe that looks the better - i.e., more balanced - of the two, and cut out the pattern
Follow this link to my Flickr account, wherein lie rare and marvellous treasures (caveat: beauty, so the saying goes, is in the eye of the beholder, so you can't say that you haven't been warned...)
The pattern will then be used to draw the colour demarcation line (very slowly and carefully ;) on both decks and foredeck, using the outer register marks to get the lines in the correct positions on both sides of the hull. Then, mask on the inboard sides of the lines with 25 mm-wide blue tape, and start painting, high-build primer first :). Before all the drawing on decks, taping and painting happen, however, I need to put one final coat of 2:1 BoteCote to cover a few places where I've gone too close to the wood below and even the whole thing up a bit. Once I've done colour coats, I'll do the varnishing of the inner portions of the decks when I do the cockpit (I think I'm going to need to get another tin of varnish, now I come to think of it - one litre isn't going to be enough for all this plus the mast, spars, foils and rudder-box/tiller assembly. Hmm...maybe another two extra tins, or one two-litre tin, depending on what's about. Or go the whole hog and get a four-litre tin - it will be used up on the Eureka or the Goat (still vacillating slightly there, notice ;) ...
-
2nd April 2010, 11:36 PM #1537
GOLD MEMBER
- Join Date
- Jan 2009
- Location
- Blaxland, Australia
- Age
- 65
- Posts
- 2,551
Once again, very little done on the boat today: I was out of bed for a good deal of it, although when I was on my feet it was mostly helping tidy the place for the daughter's impending birthday party. A lot of the mess was the aftermath of my "sewing" attempts - that's been sorted and the sail is currently banished to the workshop, albeit carefully rolled up into a nice neat tube.
What I did get done, boatwise, was a few more steps along the path to getting the deck-template made. Some photos should give the general idea:
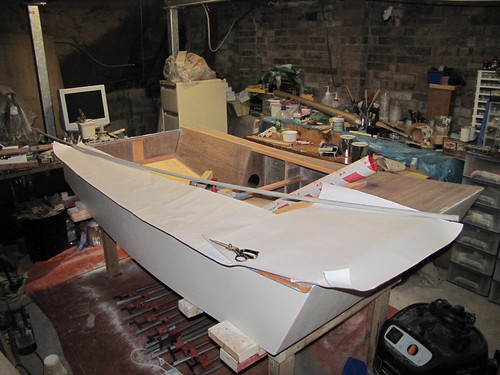
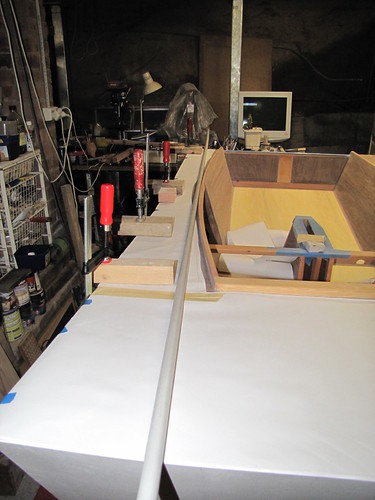
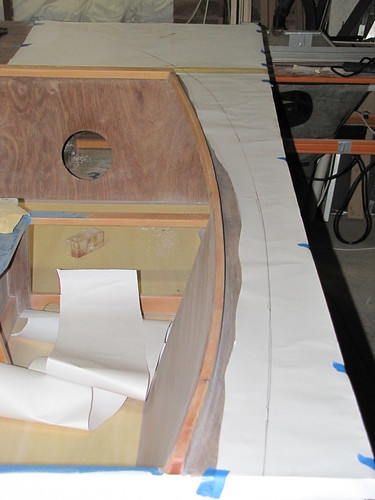
1. Paper taped to gunwale and bow top edge. Since the roll-edge is perfectly straight, I lined it up with the gunwale and taped it down at a few points, trying to be careful not to let it move. The paper wanted to skate around a fair bit, and the thing had to be re-taped in a couple of spots. I'd previously hacked along the carlin line very roughly with a pair of scissors. The foredeck part of the template was actually tape in place first, and the side deck panel taped down over the top of it with masking tap once its outer edge had been fixed in place. An index mark of the middle of the hull at the bow edge was measured and marked on the paper: the inboard side pipe will be aligned with the mark to complete the curve
2. Batten (pipe) stations clamped in place over the paper. The next trick will be to to a pencil along the pipe in the inboard side. This will be a two person job, as clamping the bow end of the pipe isn't very practicable - that is to say, I haven't been able to work out how to do it effectively. There will be probably too much tension on the pipe for a weight to be used, but I might try it and see - there are some nice heavy lumps of steel in my metalworking stocks that may suffice, including the cast iron pulleys that starred somewhat ignominiously as part of the infamous Wobbly Weight Tower Mk II (the one that fell on the hull side and fractured it in several places, almost a year ago now)
3. Looking down along the batten stations up against which the pipe will be flexed. I spent about five minutes playing about with positions, but an still not completely convinced. More trial and error yet...
4. Slightly higher angle of view of the batten stations than in the previous photo. A mentioned in the caption to the previous photo, the batten will be held flexed against the stops under its own tension - if I can find a sufficiently dense object to hold the bow-end of the pipe down with. Otherwise, I will have to hold the end of the pipe in position while someone else draws the line on the paper. The Boss is currently blissfully unaware of the task that lies in wait for her ;). I may, of course, find that some lumps of steel will do the trick
Follow this link to my Flickr account for these and more photos of the boat (and keep Flickr's lawyers happy, besides).
I'll play around with this setup some more until I'm happier with the curve. Once that's set, I'll coat the decks and then decide what to do while the epoxy cures so that I can sand it off a bit and draw in the lines on both sides of the with the nice new template.
-
3rd April 2010, 01:05 PM #1538
Grumpy old Bugga
- Join Date
- May 2003
- Location
- South Oz, the big smokey bit in the middle
- Age
- 67
- Posts
- 4,377
. Originally Posted by AlexN
I can think of one ...
Ahh, I see you thought of it tooOtherwise, I will have to hold the end of the pipe in position .
Richard
-
3rd April 2010, 01:38 PM #1539
GOLD MEMBER
- Join Date
- Jan 2009
- Location
- Blaxland, Australia
- Age
- 65
- Posts
- 2,551
Sadly, yes...such a lot of effort for such a trivial item <sigh>. Originally Posted by Daddles
Of course, Forum Rules forbid me from replying with the words that are really going though my head ;).
But I found some even denser objects lying about under foot, and have pressed them into service :). Some photos thereof, later.
What on earth is that grey haze outside, and a strange rushing noise on the roof? Surely not r-a-i-n? Goodness me. Fink I'm gunna pass out...
-
3rd April 2010, 02:00 PM #1540
GOLD MEMBER
- Join Date
- Jan 2009
- Location
- Blaxland, Australia
- Age
- 65
- Posts
- 2,551
Hmm... I have very belatedly been studying the help on "linkbacks", which I have hitherto ignored.
I have, up till now, been merely putting links to other peoples' pages and posts in a format suitably designed to attract attention and creating the minimum of annoyance (well, that's the intention!), but not explicitly "installing" "linkbacks" in the Forum definition of the term (see link above ;).
My apologies to all those whom I've "ripped off", as it were. I am going to put some effort into trying to work out exactly how to apply them, and do so from the moment that I have (I would have experimented here on the "linkback help" page, but it doesn't publish linkbacks ;).
Cheers,
Alex.
PS - it looks as though what I have been doing so far might come under the sub-categories of "pingbacks" and "refbacks", but not "trackbacks", and it is the last that looks the most useful and friendly...
-
3rd April 2010, 03:56 PM #1541
GOLD MEMBER
- Join Date
- Jan 2009
- Location
- Blaxland, Australia
- Age
- 65
- Posts
- 2,551
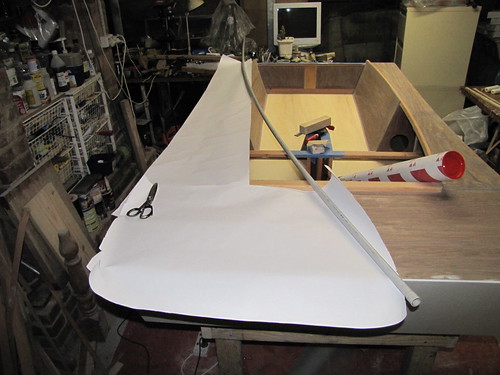
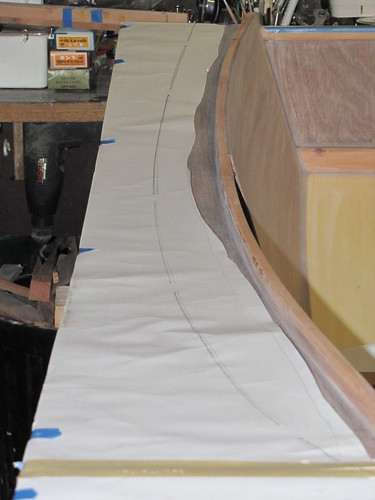
Here are some more snaps of the colour-line set up:
1. Overview of the line-marking setup. The inboard side of the pipe is over the bow's/foredeck's centre-mark
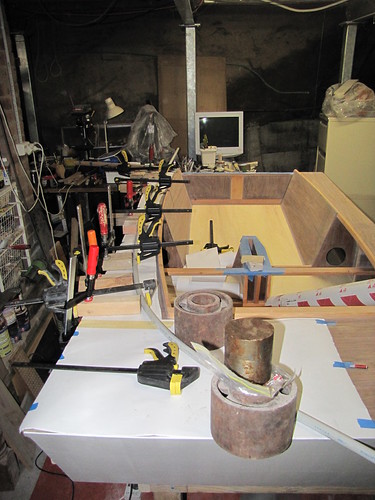
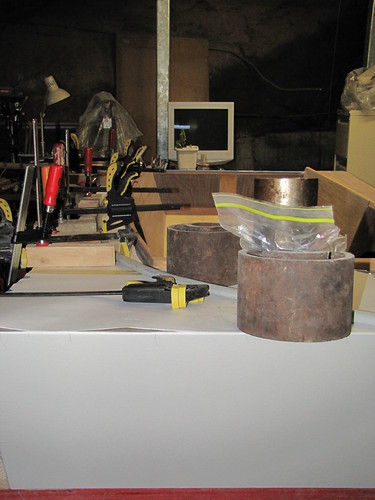
2. Close-up of the cast iron pulleys. Remember them? I do. Aaaaarrrrrrggggghhhhh!
3. Better view of the pipe batten along most of its length
4. Side view of the marking set-up
5. View of colour-line from stern, looking forward
6. Another stern-view of colour line, camera shifted towards the centre of the boat a bit more

Follow this link to my Flickr account for lots and lots of photos of 'Ducks...
I've since tweaked the pipe's position a bit, and drawn in two lines: one half-a-pencil's width from the pipe, the other more-or-less on the actual vertical tangent to the side of the pipe. Well, yes, more or less... I'll go aback and look at it in a bit, and see what I think of it then.
-
3rd April 2010, 05:57 PM #1542
GOLD MEMBER
- Join Date
- Jan 2009
- Location
- Blaxland, Australia
- Age
- 65
- Posts
- 2,551
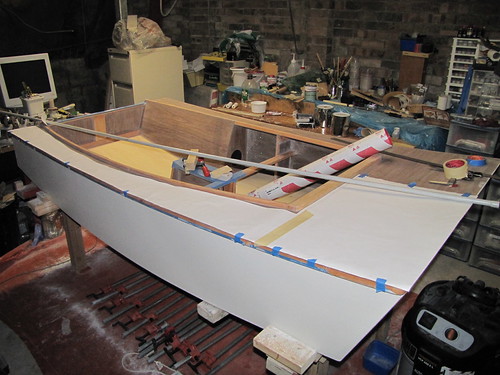
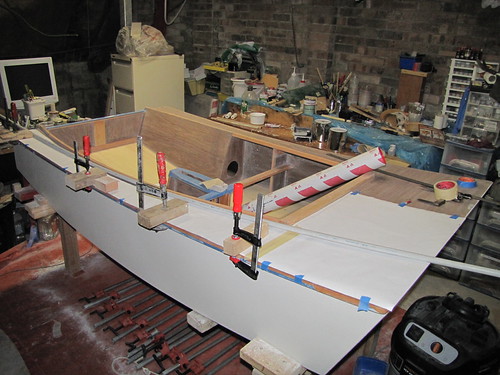
This batch of photos wraps up the template production, bar the snipping with the scissors, the tracing with the pencil, the taping with the tape and the painting with the paint...
1. Overview of pencilled colour-line
2. Close-up of side deck segment of line. Note the gaps where the clamps were: these were (rather shakily) pencilled in later. The leftmost line is the one that will be cut to
3. Close-up of foredeck segment of line; most of the dirty marks are rust from the pulleys - but the circular one is grease from the lump of steel sitting on the bow pulley seen in the previous post. That will have to be dealt with before the template can be used! I may even just surgically remove it with the scissors
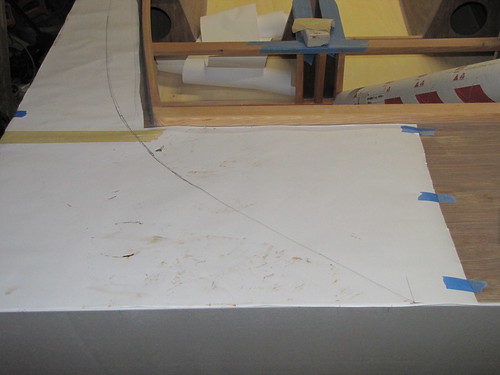
4. Pencilled line looking forward: the clamp-gaps in the line have been drawn in at this point
5. Closer-up view of pencil line, viewed from the stern
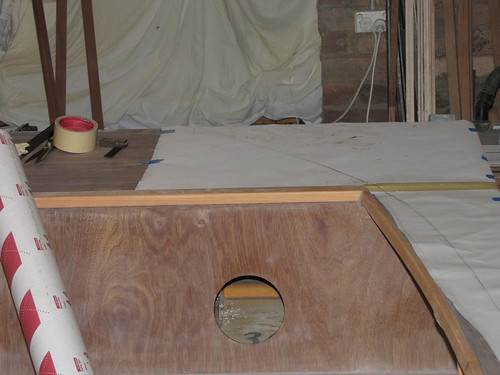
OK, I couldn't help myself: here's another copule of snaps of the "finished" template:
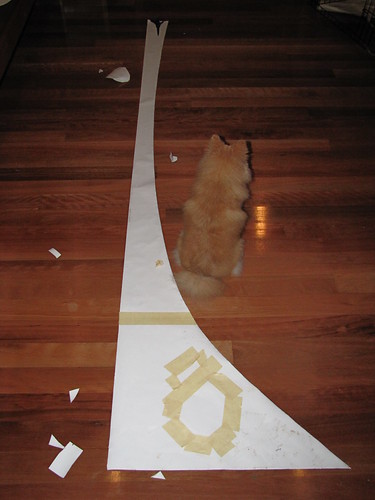
6. Stern-to-bow view of the cut-out template. The circular piece of paper on the floor to the right of the template is the largest piece with grease-spots on it. I'm not entirely happy with the shape - at least off the boat - as there is a sort of "lump" at the side-deck/foredeck join. This is a result of the shape of the cockpit at that point, and the rather extreme foredeck curve relative to that of the side-deck's. I may tinker with this once the tape is down on the deck And measure out any new offsets), but for the moment, I'm not going to touch it any more
7. Bow-to-stern view of the degreased and cut-out template. That strange fawn-coloured circular thingy is masking tape, holding down some patches of clean, *grease-free* paper. Dog is trying to look innocently in the other direction, have only just tried seconds before to remove that lovely chewy masking tape from the paper. What, little me? Yes, you, you Dreadful Dog
Follow this link to see these in a wide variety of sizes on my Flickr account (and keep Flickr's lawyers happy)
Right, well that sorts that, although I need to get at that bit of paper with the grease on it quick smart, before it soaks into other bits and renders the template unusable. What next? Dunno - it was going to be putting 'pox on the decks, but we've just had a lot of rain (well, a bit, anyway), and it looks as though it's about to start again, so that's knocked on the head. But I'll think of something. But right at the moment, grease-proofing the template then more house-tidying (for my sins)...
-
3rd April 2010, 06:26 PM #1543
Grumpy old Bugga
- Join Date
- May 2003
- Location
- South Oz, the big smokey bit in the middle
- Age
- 67
- Posts
- 4,377
Why are you going to all this trouble Alex? (genuine question, I'm not trying to be rude)
I can understand it if you're planning to spray the paint and want all that paper to catch the overspray. Having said that, I would have just laid some tape along the line then taped newspaper down to cover the bits you don't want sprayed - done this for years on them toy aeroplanes.
At least by going onto epoxy, you won't have to worry about the tape/template glue pulling off the undercoat
If hand painting, I wouldn't bother with a template at all, just do the line free hand. Yes, I know, there'll be shrieks of 'I'm not steady enough' etc, but experience has shown me that this really isn't an issue. It's easy to get a pretty good line with a brush and seeing you're painting onto poxy, you can easily wipe off mistakes. You do NOT need a perfect line but can fairly simply get one that fools people into thinking it is.
The other issue with painting is edge bleeding and other such issues ... even down to cutting the template properly. My experience has been that you'll need to do some touching up ... by hand (so you're back with the hand painted business above). Any 'errors' in the template will leap out at you and are likely to be more obvious that a 'wiggly hand line' which will average itself out to follow the correct line.
On balance, unless you're very very good, the hand painted option has a single disadvantage - thick paint vs that thin, evenly sprayed coat.
Am I causing problems? Not trying to, honest.
Richard
I guess one should also remember that I believe most people over build boats
-
3rd April 2010, 06:55 PM #1544
GOLD MEMBER
- Join Date
- Jan 2009
- Location
- Blaxland, Australia
- Age
- 65
- Posts
- 2,551
Hi Richard,
Very, very good points! I have to remind myself frequently why I'm doing it in this Heath Robinson way! And even then I'm not convinced!
It's actually quite simple: the template is going to be used to draw an almost-identical line on both sides of the boat, wich will then have a tape mask run along so that when I hand paint the thing (I have a real aversion to spray-painting (see below) the lines will look the same. Or as mcuh the same as I can make them. That always pre-supposes that the two halves of the boat are identical, ha ha.
This is, of course, symptomatic of my insane obsessiveness with every tiny flipping detail. When (yeah, right ) I get to build the Eureka, I'm just going to slap it together. All right, I probably won't - but I probably should - just for the experience.
Perhaps I will, and use the PM ply that I got for the Goat, then flog the thing and build a decent one out of gaboon (after paying MIK for royalties on the second boat, of course!)
You're not being rude at all - just sensible. I'm the twister here!
Just playing about with the emoticons for a bit o' fun and getting them out of my system - will fall back to my text-based ones in the next post...


-
3rd April 2010, 06:58 PM #1545
Grumpy old Bugga
- Join Date
- May 2003
- Location
- South Oz, the big smokey bit in the middle
- Age
- 67
- Posts
- 4,377
Ah ha, I hadn't considered using the template to get an identical curve - good thinking.
I'd have gone with using a batten to draw a pencil line on the boat and then, while the paint was drying, dream up with four or five good excuses for why the two sides don't match
Richard


 Reply With Quote


Similar Threads
-
New Queensland PDRacer Build
By duncang in forum Michael Storer Wooden Boat PlansReplies: 71Last Post: 26th April 2012, 08:30 AM -
Oz PDR build in Adelaide - sexy black PDRacer
By m2c1Iw in forum Michael Storer Wooden Boat PlansReplies: 39Last Post: 27th April 2009, 06:30 PM -
OZ PDRacer - Dylan's build in the Philippines
By Boatmik in forum Michael Storer Wooden Boat PlansReplies: 16Last Post: 23rd February 2009, 05:50 PM -
Brisbane Timber and Working with Wood. Boatmik/PDRacer
By Boatmik in forum Michael Storer Wooden Boat PlansReplies: 1Last Post: 11th April 2007, 08:06 PM -
Flawed wood on the TS --DUCK!
By Robert WA in forum WOODWORK - GENERALReplies: 7Last Post: 19th February 2004, 11:42 AM
Tags for this Thread
balanced lug,
boatmik,
build,
dacron(tm),
douglas fir,
duck,
enamel,
epoxy resin,
fibreglass,
hoop pine,
interminable,
lug,
machinery,
materials,
michael,
oregon,
oz racer mk 2,
ozracer,
paint,
paulownia,
paulownia/glass mast,
pdracer,
plywood,
polytarp,
primers,
really simple sails,
sail-making,
sailmakers thread,
sanding,
storer,
sydney,
timber,
tools,
varnish,
verbose,
western red cedar,
wood,
wood duck,
wrc
