

 Thanks:
  Likes:
  Needs Pictures: 0
 Picture(s) thanks:
Results 1,576 to 1,590 of 3347
-
11th April 2010, 11:56 AM #1576
 Grumpy old Bugga


- Join Date
- May 2003
- Location
- South Oz, the big smokey bit in the middle
- Age
- 67
- Posts
- 4,377

Oi Alex, the stave third from the left is in BACK TO FRONT

Sorry mate, you'll have to pull the lot apart and do it again.
With regards to the glue, get in there with a mallet and chisel and clean up the worst of it before feeding the board to planes (powered or otherwise). You'll find you'll knock the worst of it off really quickly without having to resharpen your planes.
This is why I have chisels for joinery and the 'roughie' for jobs like this - my current roughie cost me $15 from Mitre10 and is used for cleaning up poxy, scraping poxy, scraping pencil lines off timber, cleaning fingernails, threatening the cat, etc. A worthwhile investment and a heavily used tool.
Richard
-
11th April 2010 11:56 AM # ADSGoogle Adsense Advertisement
- Join Date
- Always
- Location
- Advertising world
- Age
- 2010
- Posts
- Many
-
11th April 2010, 01:02 PM #1577
GOLD MEMBER
- Join Date
- Jan 2009
- Location
- Blaxland, Australia
- Age
- 65
- Posts
- 2,551
Oh no! I thought it looked odd! Nuffin' for it but to pull the 'ole fing ter bits... Originally Posted by Daddles

I have a couple of junk chisels acquired from the wabbit wawwen years ago - I'll press 'em into the service you suggest. I was going to re-do their cutting edges at some point, but I have better chisels anyway, so the el cheapos' fate is sealed .
.
Cheers,
Alex.
-
11th April 2010, 01:18 PM #1578
Grumpy old Bugga
- Join Date
- May 2003
- Location
- South Oz, the big smokey bit in the middle
- Age
- 67
- Posts
- 4,377
Make sure they're sharp because you're cutting the epoxy, not bludgeoning it, but it's a different sort of sharp to something you're using to take transparent wafers off hardwood. The sort of 'sharp' your average school boy manages in ten minutes with the oil stone will do - get a burr and rub it off, that's all. The sharper it is, the better it works on wood but you'll know when it's time to retouch it (not that often). Originally Posted by AlexN
To remove pencil lines, hold the chisel at 90 degrees to the timber and scrape.
You can scrape off epoxy this way too - it's particularly good on precoated surfaces that have had some extra poxy added (say while gluing another bit on), though I now use a dedicated scraper for that.
You can shape fillets with it - just drive the chisel by hand across the surface of the fillet and you'll find you'll carve a nice, smooth curve into the surface which is an excellent step before sanding rough fillets.
Keep a really sharp, good chisel for joinery (ie, fine cutting in timber) and do the rest with your roughie.
Richard
-
11th April 2010, 04:21 PM #1579
GOLD MEMBER
- Join Date
- Jan 2009
- Location
- Blaxland, Australia
- Age
- 65
- Posts
- 2,551
Hi Richard,
Thanks for the advice. Also to David regarding the plane: similar methods. I tried the chisel - porbably too blunt; all my planes except my long-suffering (and blunt ;) block plane are dismantled for sharpening and tuning; even the Perma-Grit block made heavy weather of the glue, and that usually snorts through anything. That "soft" glue is a hard as nails - I am truly surprised that such a mixture - BoteCote 2:1 and Q-Cels - should be so tough. The thing that seems to be most effective is the ROS with an 80-grit black:Stone disc on it. That rips through the stuff, although I have to be really careful not to dig too far into the WRC. And I also just tripped the workshop's fuse because I went on too long. Odd, because the PEX 400-AE ROS should have cut out first (it was tryng to I think, but the fuseboard stepped in and ended the party first).
That leaves the glue in the trenches between the WRC staves, created by the paulownia strips slipping about, even with the cross clamps in place. That glue will have to be winkled out with a chisel - and which I'm going to have to sharpen before I go any further along that road. I still have the other side of board to go, once the ROS has recovered (the circuit breaker was easily fixed ;). So I'm having a cup of tea and dealing with the guinea pig cages while I wait. Some photos later, once I've excavated the camera bag from under a blanket of dust...
-
11th April 2010, 04:32 PM #1580
GOLD MEMBER
- Join Date
- Jan 2009
- Location
- Blaxland, Australia
- Age
- 65
- Posts
- 2,551
It's looking quite nice after ROS-ing it, too :). The one "operational" plane that I have (i.e., the one that is in one piece) is rather blunt, and it didn't take kindly to the glue at all - even with the blade down a bit and the throat-plate (at the front) wound out. As in my reply to Richard just above, the ROS made relatively short work of it; but as it's the first time that I've overloaded that tool, even it was suffering. Originally Posted by dkirtley
I must not have used enough micro-balloons, or there is some sort of synergistic effect, cf. the epoxy/wood complex that makes the end result much tougher than one might predict. In fact, the Q-cels/epoxy glue makes the BoteCote high-strength glue filler/epoxy combination that is holding the boat together look like pumice!
-
11th April 2010, 06:33 PM #1581
GOLD MEMBER
- Join Date
- Jan 2009
- Location
- Blaxland, Australia
- Age
- 65
- Posts
- 2,551
I've finally finished sanding the foils blank, ending up with the belt sander to try and reduce some of the "reverse-hungry-horse effect" of using the ROS.
The thickness of the board around the edgesis now at roughly 24.9 mm, with some bits about 24.4 mm or so. The depth of the remaining trenches is around 0.9 mm, some dropping down to o.4, some up to 1.4, with one outlier of 2 mm at one end of the board only, which will get filled with some epoxy/Q-cels mixture once the thing has been thicknessed. I just need to winkle the remaining glue out of the trenches and it will be set to go though a thicknesser.
The nett result is that the dire predictions that I was making about the thing are not entirely valid: almost all the trenches will be removed by the thicknessing process (bar the one deep outlier), with the "fail-safe" of the foil-shaping not being needed (although it won't take care of the deep tench since it is near the leading edge - but near enough to be removed by shaping.
The blank weighs approx. 5 kg using the bathroom-scales/subtraction method. I also weighed the mast with its final, unsanded pre-varnish coat of epoxy while I was at it, and that is around 4 kg, as previously reported, so perhaps the scales aren't so bad at the low end of their range as I suspected.
Pictures when I've sifted through them.
-
11th April 2010, 07:24 PM #1582
Grumpy old Bugga
- Join Date
- May 2003
- Location
- South Oz, the big smokey bit in the middle
- Age
- 67
- Posts
- 4,377
Hope you didn't make your foils back to front - the blunt bit is supposed to be at the front

Richard
-
11th April 2010, 11:21 PM #1583
GOLD MEMBER
- Join Date
- Jan 2009
- Location
- Blaxland, Australia
- Age
- 65
- Posts
- 2,551
Hah! Can't fool me Originally Posted by Daddles
 . I know that the sharp end goes at the front like a rocket nose cone!
<snigger, snigger ;>
Alex.
-
12th April 2010, 12:02 AM #1584
GOLD MEMBER
- Join Date
- Jan 2009
- Location
- Blaxland, Australia
- Age
- 65
- Posts
- 2,551
Here are some more pictures, taken before and after the sanding off of the glue blobs. That still leaves the glue in the "trenches" to deal with, but I have a cunning plan for that :). All shall be revealed shortly...
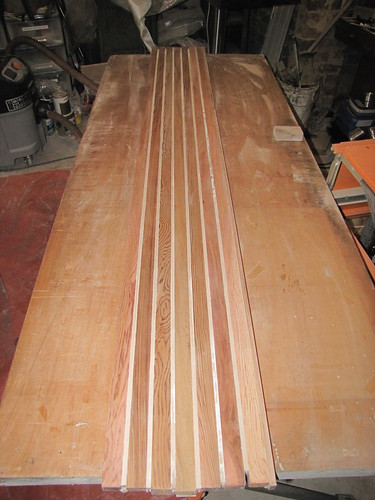
1. Side of foils blank before sanding off excess glue. I've already had a go at this side with 60-grit sandpaper and the coarse side of the Perma-Grit block. The dust sheet covering the lathe bench appears pink in this photo because of the pink mixture of glue- and WRC-sanding dust that escaped from the ROS' usually-reliable dust-box: I hadn't done up one of the corners properly and it sprang a leak. Luckily I was wearing the Heavy Duty Snout Protector. Note also that I have moved the door off the boat and onto the Triton Multi-stands so that I could actually get over the board and see what I was doing. Also a lot more comfortable!

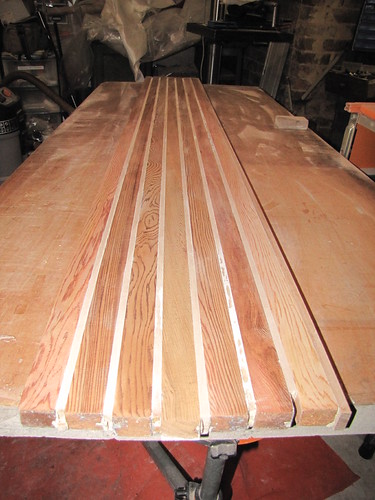
2. Foils blank after sanding with the ROS and belt-sander (BS in bottom left of photo). This is the starboard side of the blank (or port side if viewed from the other end ;). I mixed up the two aft-most WRC staves when putting the thing together: the darker one was meant to be on next to the hardwood trailing edge (far left of the board), for aesthetic reasons. Hopefully the lighter stave will get a bit darker after glassing the shaped board! I'm not going to try staining it, however - far too fraught with mishap...

3. Port (or starboard ;) side of the foils blank after ROS-ing off the glue. Trailing edge is on the RHS of the board now
4. Another view of the port side of the board. It could be the starboard side if the board were to be turned end over end, of course ;)
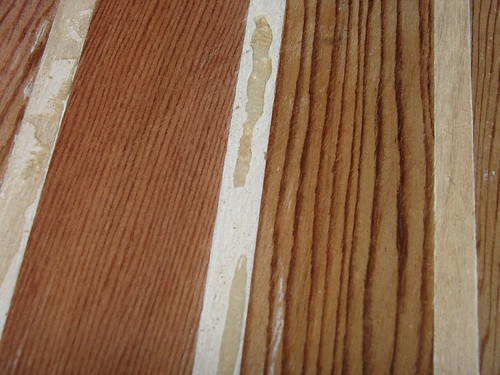
5. One of the paulownia strip "trenches". This will disappear when the board is put through a thicknesser, along with the diagonal scratches from the coarse belt on the belt sander

6. Another paulownia strip "trench". Well, two, in fact
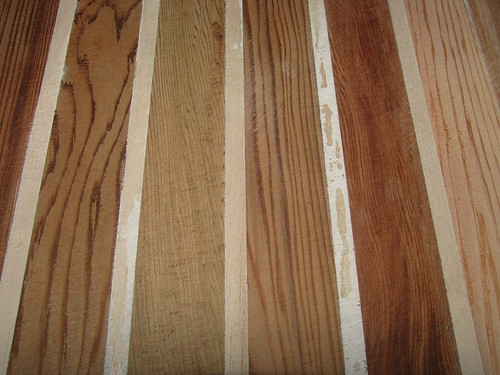
7. Yet another bunch of paulownia strip "trenches"...
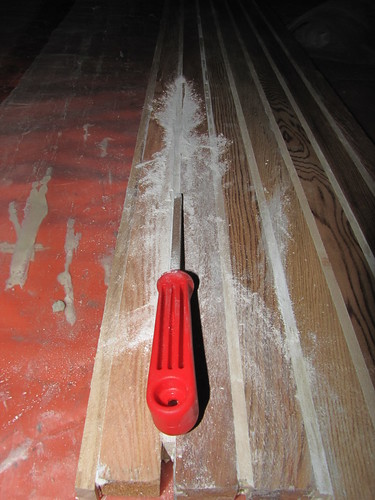
8. Getting rid of the glue in the "trenches": this is my cunning plan, d'you see. The 6 mm square Perm-Grit hand file is just the thing :). Once most of the glue has been scratched out using the file, I will then remove the last bits using a sharp (spare) chisel. That's the theory, anyway ;)
Follow this link tosideshowslideshow alley where every player wins a prizewhere there are more of these boat-related photos than you could poke a stick at...
The whole thing is appearing in a whole new and much more satisfactory light. The previous Squawking and Clucking(TM) was the result of an unfortunate but, with me far too frequently occurring, combination of panic and perfectionism. I have a horrible tendency to panic when using any sort of glue: it is something that I have a great deal of difficulty controlling. I don't know why it happens (it also occurs when glueing up aircraft parts and furniture), but it's something that I should try and vanquish.
The really hard part is next <shudder shudder> - shaping the board. I still haven't got the template stuck on some plywood yet. That's actually the next foils-related task ;). That will be followed by some serious plane-blade sharpening - unless I decide to use the BS <gasp>.
-
12th April 2010, 12:21 AM #1585
Grumpy old Bugga
- Join Date
- May 2003
- Location
- South Oz, the big smokey bit in the middle
- Age
- 67
- Posts
- 4,377
The foils are disgustingly easy to shape ... especially if you use Rob's cunning ploy (see his Navigator thread).
I dunno that I'd be phaffing around with your file in the trenches either, but then again, I've always had good results with my my chisel **shrugs**
Perfectionisn is okay ... as long as it's not in your spouse
Richard
-
12th April 2010, 12:37 PM #1586
GOLD MEMBER
- Join Date
- Jan 2009
- Location
- Blaxland, Australia
- Age
- 65
- Posts
- 2,551
What you really mean is it's disgustingly easy to take too much off! Originally Posted by Daddles
I found with the chisel that I was chipping out lumps of WRC at the same time as removing the glue, but maybe it'll be better now that I've got the glue down to the timber level: less of a moment arm/tyre lever .
.
BTW, i assume that you mean robhosailor...I couldn't find anything on tthis forum or on his blog. But maybe I wasn't looking cleverly enough (I was in a bit of a hurry).
Cheers,
Alex.
-
12th April 2010, 01:03 PM #1587
Moderate Moderater
- Join Date
- Feb 2006
- Location
- Lindfield N.S.W.
- Age
- 62
- Posts
- 5,643
I think this is the thread that Daddles was referring to, Alex
Cheers
Jeremy
If it were done when 'tis done, then 'twere well it were done quickly
-
12th April 2010, 03:40 PM #1588
GOLD MEMBER
- Join Date
- Jan 2009
- Location
- Blaxland, Australia
- Age
- 65
- Posts
- 2,551
Thanks Jeremy,
That looks like it. And my humble apologies to Rob540: as I said, I was in rather a hurry!
Cheers,
Alex.
-
12th April 2010, 10:43 PM #1589
GOLD MEMBER
- Join Date
- Jan 2009
- Location
- Blaxland, Australia
- Age
- 65
- Posts
- 2,551
OK, have read through Rob540's Navigator thread and found the snaps of his router jig: very neat and simple - and snaffleable
.
Not sure that I'd do the same - I'm still recovering from the fun of glueing it together - but will give it some thought at any rate. It could be a good thing to use the little palm router on, though. Hmm...
-
17th April 2010, 02:45 PM #1590
GOLD MEMBER
- Join Date
- Jan 2009
- Location
- Blaxland, Australia
- Age
- 65
- Posts
- 2,551
Right, well, I'm back! My absence has been as a result of our being over in Adelaide for most of last week, visiting family and friends, including Duck Flat, Mr Storer, Daddles and m2c1Iw. Plus an airfield full of light aircraft including two Tiger Moths and a Chipmunk (latter of which I went up in, was allowed to take the controls for a few minutes, and got horribly airsick). Tok way too many photos as usual ;).
I'll be back at the boat once we've unpacked and collected Dog from he kennels.
Don't forget Dr Who on iView, or Sunday on ABC1/HD at 7:30 pm :). Should be good, judging from the critical response so far in the UK :))).


 Reply With Quote

Similar Threads
-
New Queensland PDRacer Build
By duncang in forum Michael Storer Wooden Boat PlansReplies: 71Last Post: 26th April 2012, 08:30 AM -
Oz PDR build in Adelaide - sexy black PDRacer
By m2c1Iw in forum Michael Storer Wooden Boat PlansReplies: 39Last Post: 27th April 2009, 06:30 PM -
OZ PDRacer - Dylan's build in the Philippines
By Boatmik in forum Michael Storer Wooden Boat PlansReplies: 16Last Post: 23rd February 2009, 05:50 PM -
Brisbane Timber and Working with Wood. Boatmik/PDRacer
By Boatmik in forum Michael Storer Wooden Boat PlansReplies: 1Last Post: 11th April 2007, 08:06 PM -
Flawed wood on the TS --DUCK!
By Robert WA in forum WOODWORK - GENERALReplies: 7Last Post: 19th February 2004, 11:42 AM
Tags for this Thread
balanced lug,
boatmik,
build,
dacron(tm),
douglas fir,
duck,
enamel,
epoxy resin,
fibreglass,
hoop pine,
interminable,
lug,
machinery,
materials,
michael,
oregon,
oz racer mk 2,
ozracer,
paint,
paulownia,
paulownia/glass mast,
pdracer,
plywood,
polytarp,
primers,
really simple sails,
sail-making,
sailmakers thread,
sanding,
storer,
sydney,
timber,
tools,
varnish,
verbose,
western red cedar,
wood,
wood duck,
wrc
