

 Thanks:
  Likes:
  Needs Pictures: 0
 Picture(s) thanks:
Results 1,636 to 1,650 of 3347
-
28th April 2010, 09:25 PM #1636

 Deceased


- Join Date
- Nov 2008
- Location
- Maylands, Perth, Western Australia
- Age
- 58
- Posts
- 218

Hi Alex.
Just glad to be able to help, it just seemed so obvious a way to deal with the problem, you made some usefull comments about cutting clearances in the router guide base blocks as well, and mentioning using the router guide plate will help me when I get that far ( I have a new 'Ozito' router so far ).
It's great to hear your oil spill isn't going to be a problem for your foils too.
Last edited by dhgomm; 28th April 2010 at 09:29 PM. Reason: added more details
-
28th April 2010 09:25 PM # ADSGoogle Adsense Advertisement
- Join Date
- Always
- Location
- Advertising world
- Age
- 2010
- Posts
- Many
-
28th April 2010, 09:57 PM #1637
GOLD MEMBER
- Join Date
- Jan 2009
- Location
- Blaxland, Australia
- Age
- 65
- Posts
- 2,551

I did as David suggested and ran the router perpendicular to the curving taper edge, but didn't do the longitudinal taper - the plans don't require it, I think - and then routered the "centreboard" part of the blank. One side is in fact now no longer a blank :). I've attacked the LE with my No. 4 plane, but am considering tracking down the No. 7 blade, sharpening and polishing it, and using that - for the TE at least. I haven't screwed the blank down to the bench: using F-clamps to do the job instead.
In a few spots it looks as though I have screwed it down - but that's because I slipped with the router on a number of occasions, and jagged rather deeply into the blank. I'll fill the holes with some WRC offcuts later, when most of the work is done. I'm going to bulk out the guides with some scraps of 6 mm balsa CA-ed to the plywood, to reduce the chance of the the router base slipping into the board again. Won't cure it entirely, but hopefully sill lessen it. I made the spacer blocks too wide: would have been OK for the Elu, but that's too heavy for me to wield with precision.
Most of the LE is shaved down now, and I've got to the slowing-down stage. Which means that I need to get the ply template flanged up - that will get done tomorrow morning, before I go plane-blade hunting.
Photos in a bit, they are currently uploading to the computer.
-
29th April 2010, 12:33 AM #1638
GOLD MEMBER
- Join Date
- Jan 2009
- Location
- Blaxland, Australia
- Age
- 65
- Posts
- 2,551
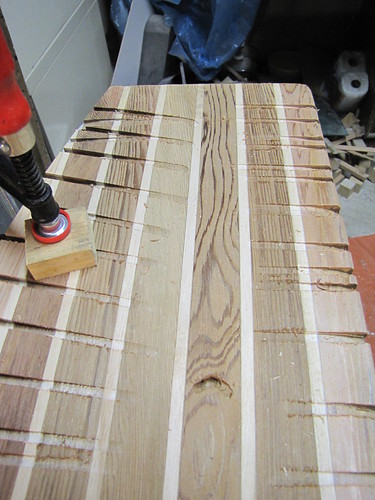
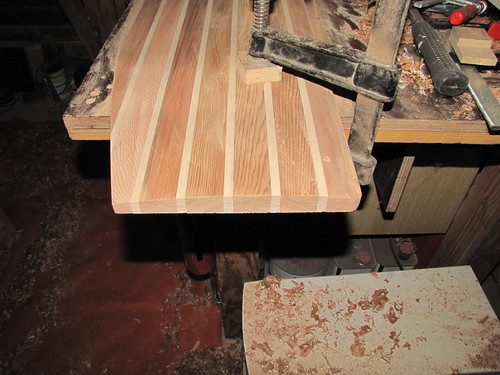
Here are some photos of the board-shaping in progress:
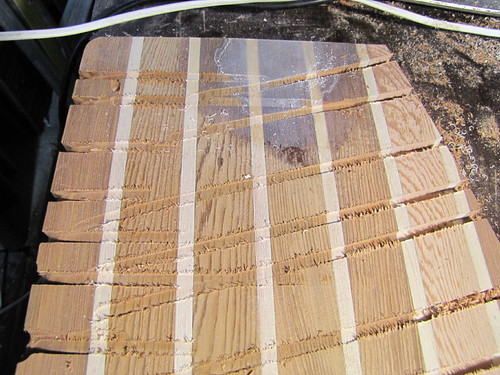
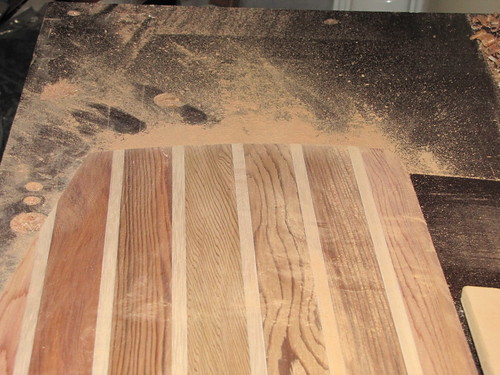
1. Test router cuts in the "oiled"section of the foils blank. The photo was taken the morning after the incident, and shows no sign of the oil's presence either on the surface or within the cuts' walls. The kinks in the router bit's path at the trailing edge are a result of the bit suddenly hitting a much denser timber - I subsequently learnt to slow down a bit when reaching the TE

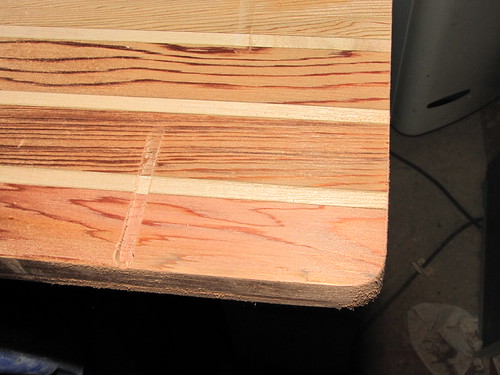
2. The "dinged" end of the board, with the taper cut, filed and sanded into the trailing edge. Note the glass-resin patch: more on that later...

3. The "oiled" end of the board with the TE taper cut roughly to shape with the jigsaw in the background

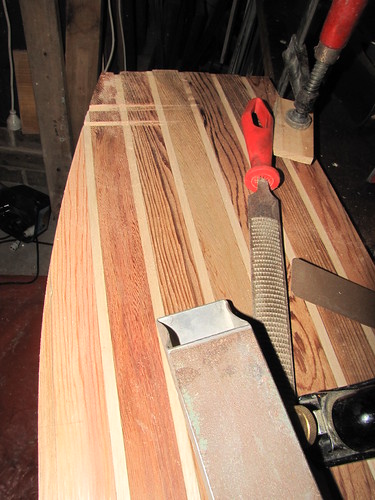
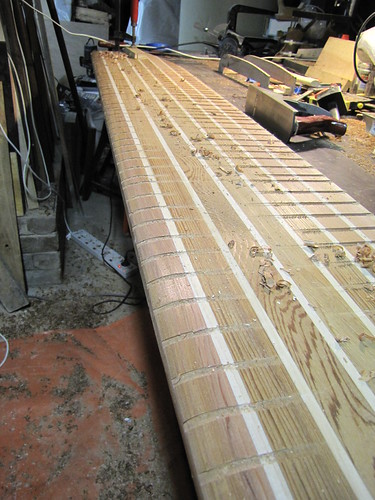
4. Board shifted and re-clamped in order to better get at the curve with various tools. I moved it several times, in fact. All the tools that I used in the shaping process appear in this photo, with the exception of the sanding block and paper, which were used right at the end. The most-used and most effective tool in this little array was the Perma-Grit strip middle-RHS of photo. Coarser than the block, it was useful in getting the TE square to the side faces of the board
5. Patched end of board, shaping of TE and tip of LE complete; Perma-Grit and sanding blocks used to shape the LE radius
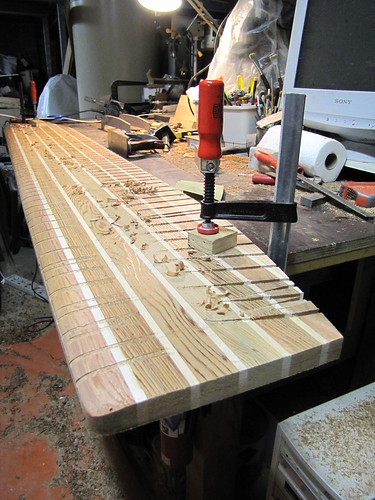
6. Overview of board, with close-up of the patched end. It looks a little bit like the wing of a Cessna Skyhawk in this photo, if you squint from a distance ;)
7. "Oiled" end of board after shaping the TE and trimming the end to length, more or less

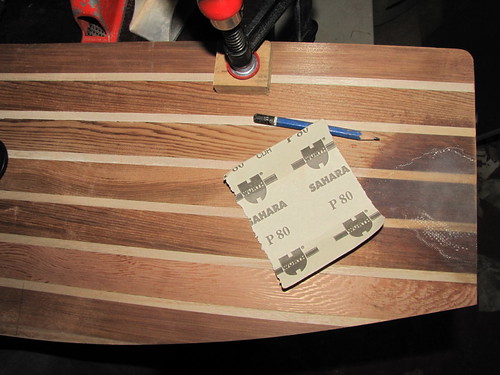
8. Close-up of "oiled" end of board with tip-radius just formed in LE using the Perma-Grit block plus cork block/sandpaper. After finishing all the tip shaping (for the present), I ran a marking gauge set at 11 mm around the entire circumference of the board to mark in the centreline
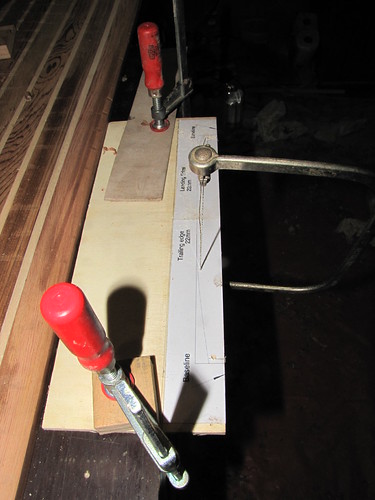
9. Router guide in place, just to the left of the measured line 'twixt centreboard and rudder. Rudder to the left, centreboard to the right in this photo. My usual higgledy-piggledy jumble of tools in the background...
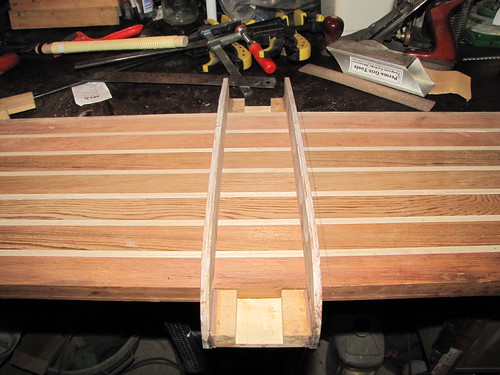
10. Rudder portion of board has had most of its router cuts done. A few at the LE near the tip, and of course the TE taper need to be made yet. Note the round holes towards the front of the photo, where I slipped a couple of times with the router. Note also the somewhat random length of the router-bit tracks: I had to fiddle a bit with the bit depth on the router of the guide not being pushed down completely onto the board, slight board thickness variation as a result of pre-thicknessing heavy-handed used of the belt sander, etc., etc., etc.
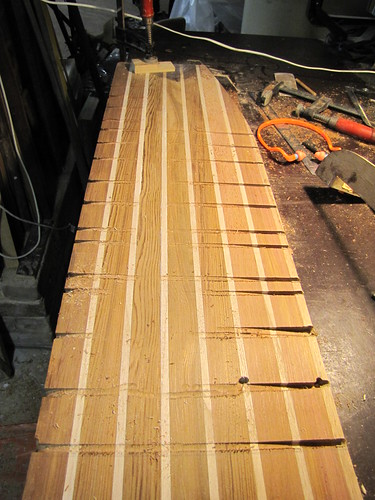
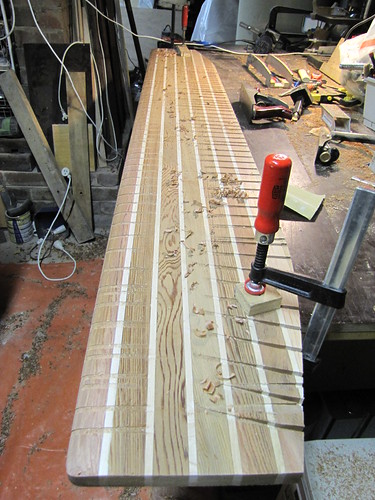
11. Board fully routered on this side. Note the angles of the cuts at the tip LE - perpendicular to the LE at each point that the router was run from, per the very useful advice from Mr Gomm. Thanks, David! Looks even more like a wing here! Some of my aeromodelling tools look on from their jars and boxes. That CMT spiral bit produces nice clean cuts...
12. Close-up of the patched end of the board. MIK is fully entitled to say "I told you so", although I expect t that he won't, gentleman that he is :). His advice was to do the patching after the shaping: if you look closely, you'll see that he was right. The router-bit grooves undercut the patch at its deepest points, so the whole exercise was a waste of time, glass, resin and money...
Follow this link to my Flickr account and be amazed by the number of photos that all look exactly the same
There are more photos, of course...
-
29th April 2010, 12:46 AM #1639
GOLD MEMBER
- Join Date
- Jan 2009
- Location
- Blaxland, Australia
- Age
- 65
- Posts
- 2,551
And here they are:
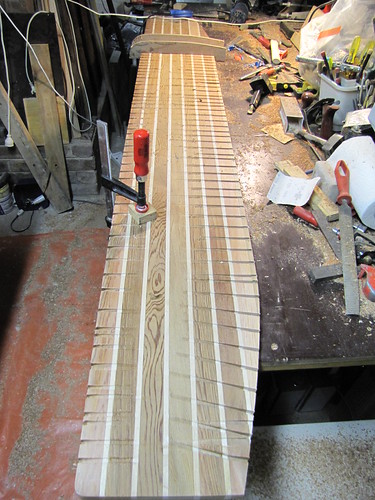
1. Planing just begun on the LE of the board. The sharp corner of the board from thicknessing has been removed: No 4 plane used here and in the rest of the planing shown in this post. Another horrible gouge caused by slipping is visible here
2. Considerably more wood removed by this stage. The board is looking even more like a wing than ever. Look, Richard! I've been using a plane!
3. Closer-up view of the partially-shaped LE. Time to throttle back on the wood-removal at this point, and also time to make up the foil template. Lots of WRC and paulownia shavings on the floor by now, too. Never put your plane down flat on its sole: either prop its nose up or preferably rest it on its side as here: it's much kinder on that carefully-sharpened blade (well, the blade in this photo isn't as sharp as it could be, but that's beside the point: who wants to grind out the nicks in the blade?)
4. Close-up of one end of the board showing the rounded corner, plus unshaped and partially shaped regions of the board
Follow this link to my Flickr account, where you can bore yourself silly looking at these and thousands of other similar photos
That's enough for today: tomorrow is getting the foils template made, the No. 7 plane blade unearthed and sharpened (I may even do the No. 4 and block plane blades as well, gasp!), the rest of the LE done, and possibly some or all of the TE, time permitting.
-
29th April 2010, 08:33 AM #1640
Grumpy old Bugga
- Join Date
- May 2003
- Location
- South Oz, the big smokey bit in the middle
- Age
- 67
- Posts
- 4,377
And Alex has just made ... the biggest paint stirrer in history

Looks good mate. Should be stunning when varnished and some sun glinting off it, the sort of thing you leave casually leaning against the boat rather than just dumped inside
Richard
-
29th April 2010, 01:51 PM #1641
GOLD MEMBER
- Join Date
- Jan 2009
- Location
- Blaxland, Australia
- Age
- 65
- Posts
- 2,551
Now I just need to find the biggest paint tin in history Originally Posted by Daddles

 . Thanks for the compliments
  . Coming from you, they are compliments indeed
 .
.
I'm spending the morning - probably most of the day, in fact - slowly working up the plane blades: two need their backs polishing, which is partly why I've been putting the sharpening off for so long. That is a boring, boring task, especially when you can't find your coarser oilstones (victims of the recent study demolition - goodness knows where they are). Still, the back-polishing only realy needs to be done extensively once, as long as gouges (ahem) and rust (ahem, ahem) are kept off...
-
29th April 2010, 05:07 PM #1642
GOLD MEMBER
- Join Date
- Jan 2009
- Location
- Blaxland, Australia
- Age
- 65
- Posts
- 2,551
Been having an interesting time trying to get the back of the plane blades flat. I know that the No. 4 was dished already from previous attempts to flatten it, and as I suspected of the other two, the same applied. They are all pretty bad. The coarsest stone that I have to hand is an 800-grit - nowhere near coarse enough to make a suitable/lasting impression on the backs of the blades - frustratingly, I have four coarse oilstones somewhere but they are not with the rest of the oboe reed-making kit so that means that they are in on (or more) of around 40 boxes scattered high and low around the house. And I haven't a clue which one. About fifteen are more likely candidates than the rest as they are "closer to the surface": the most likely of these so far haven't delivered the goods. So I have been persisting in using the wrong tools for the job: parts of each blade back are near-mirrror finish two at least along the cutting edge.
I'm not going to waste any more time and stone on this until I can find the coarse stones: I have at least made a start on the back-flattening, I know that it needs to be done for best results, but I'm not going to flog a dead horse and will put up with such cutting edge as I can get on the three blades without such finesse and luxury. No doubt I will be chastised by proper plane-fettlers for this approach, but it is a practical one for my current conditions, and I don't need a mirror finish on the timber cuts as final finishing will be done wit saning blocks anyway. And what I will end up with edge-wise will be many times better than I've ever had. So there.
I will, however keep looking for the coarse stones - unless I've tossed the lot out in a blind moment...
On the other hand, I have found working with a graded series of stones a satisfying if messy process within the limitations (I had to put some plastic down to protect a bench, and that had the effect of allowing the rubber-footed "slip-free" stomne holder to skate about a bit in the slurry).
Anyway, enough of this - back to my cup of tea and stones hunting...
-
29th April 2010, 07:09 PM #1643
GOLD MEMBER
- Join Date
- Jan 2009
- Location
- Blaxland, Australia
- Age
- 65
- Posts
- 2,551
Very odd - there seems to have been a reply to this thread that didn't show up, regarding wood duck (Nth American type) characteristics. Author must have had second thoughts and deleted it, because I can't see it anywhere.
<scratches head>...
Anyway, I chucked the No. 4 plane back together again (that's yet another thing I can't do at all well: re-assemble planes). Seems to cut better than before, although because it's not put together properly, I can't get it fine enough. Will have to dig out the instructions <gasp> and see how it's supposed to be done ;).
Additional note: it helps if you put the cap iron back on ;).
Once I've got that sorted I'll deal the No. 7. Or get to work on the foils template...
-
30th April 2010, 08:22 AM #1644
GOLD MEMBER
- Join Date
- Jan 2009
- Location
- Blaxland, Australia
- Age
- 65
- Posts
- 2,551
Foils template glued on to some scrap Eurolite ply, and awaits trimming. despite all the rude things that I've said about that plywood - which have arisen entirely from its mis-application - it is a very good product. It is beautifully made, with no voids, both sides of equal quality, no voids, good thick plies - and flat. Which last attribute makes it entirely suitable for the task in had (although it will be interesting to see how it reacts to one side only being smothered with spray-on contact cement ;).
The No. 4 plane is now cutting much better than previously, I am happy to report, so all that assiduous sharpening yesterday paid off :). Following up on some encouragement from Rob540 on his Navigator Yawl thread (thanks, Rob :), I used my honing guide this time, with good effect when sharpening the cutting edge - of the No. 4 blade, at least :). And that was one of the blades that had a problem at the cutting edge, the No. 7 (ex. Carbatec) being the only one so far that ended up with a shiny bevel right the way across. The No. 4 is fine for what I'm doing, so I'm not going to fuss, although if I ever find the coarse stones, I'll make another attempt at some proper back-flattening.
You never know - being able to repeatably and efficiently form decent cutting edges on plane blades may in fact tempt me to use them more often, and even become a bit more proficient with them. That would be good :).
-
30th April 2010, 01:38 PM #1645
GOLD MEMBER
- Join Date
- Jan 2009
- Location
- Blaxland, Australia
- Age
- 65
- Posts
- 2,551
used a number of my recently-acquired Perma-Grit files to do the shaping of the folis template after rough-hacking the bulk of the wate out with the coping saw, hack hack, mince mince. This is precisely the sort of job for which the Perma-Grit stuff was actually designed: shaping streamline (including aerofoil) curves in composite materials (plywood is also a composite material) in model, ultra-light and larger aircraft construction. Once I've uploaded some snaps I'll demonstrate this assertion (well, it is in fact a fact, as it says on the Perma-Grit websites ;).
Having got that sorted, sliced in half and applied to the leading edge, I suddenly decided that it was time to tackle the TE with the No. 7 plane. Those experienced with my typical behaviour will note the warning signs: yes indeed, I wen slightly too far with the plane on it. But to be fair, I hadn't got to the bottom of most of the router runs - so what's the problem? I haven't quite worked it out yet, but have my suspicions, which I have partly verified - or at least found corroborating evidence. Back to this in a bit.
Cleaned off the protective grease from the as yet unused No. 7 "Groz" plane body that I acquired last year, put the cap-iron back on the newly-sharpened blade and set the thing up. The aft section of the board is a lot of hard work even with the fairly sharp blade - mostly because of the Tasmanian oak TE, but also because the surface is relatively flat. Some scrubbing with the Perma-Grit block removed the remaining bits of glass patch to protect the various plane blades from it. The Perma-Grit tools work best on amorphous or pseudo-crystalline substrates such as resin composites, end-grain of wood (where the Perma-Grit "sees the end-on fibres as the above) or end-grain plywood. Where it isn't as effective is running along the garin of timber, where it tends to skate along the fibres. A cross-grain tool such as a plane blade is much more useful in this instance.
Aaaargh! The Dreaful Dog has found ye roll of sail-tape! Aaaargh! Oh well, I was going to order some more rolls next week, and he has left me most of it: only because I found him in the process of happily demolishing it before he had got too far. Dreadful Dog.
I digress...
I'm upstairs have a rest from my labours and considering lunch while I tap away at this - and also ponder the apparent problem with the router guide. The guide and the template both came from printouts of the same file, so discounting difference in humidity and paper (assumed minor but may not be) there should be negligible differences as long as I kept to the lines when shaping the reference tools - which I did. One problem may be the bench while I had careful straightened it out with wedges and screws, the wedges shifted, allowing the top to sag again. If I did the routering in the sagged state, this could explain the variation in depth of the cuts, as the curve of the benchtop was irregular; the bit-length and guide can be assumed constant, as long as the rear of the board was cleared of chips before moving the guide along (which it was). That still doesn't account for some of the missing wood, which is probably accurately summarised as "the alex going too far as usual". I will consider how to rectify this - probably a strip of 6 oz. cloth and resin, thus adding extra weight to one side of the board. On the other hand, I have slightly reduce the weight by the removal of the heavy glass patch. Won't be as much as the length along the board, though...
At any rate, I chocked up the benchtop again before attacking the aft part of the board with the No. 7, and will check the benchtop's status often from now on. Note that I checked the LE with the template after re-chocking the benchtop. Note to self: check router guide heights next. Another note to self: consider glueing pieces of credit card or similar under the guide spacers to raise the guide's operational height a bit. Yet more notes to self: consider using the Elu on the other side of the board, as it will be a bit more stable on the guide's relatively wide rails, but don't forget to locate and install the router's fence! And the router's 1/4 " ER collet...
Still, this is a "learn-as you-go" building (er, "hack"-as-you-go", more like ;) excercise - what an excuse - so I shouldn't be too upset. Yes I should! It's alway down to my impatience to start, and impatience to finish, a task. As the old saw says, "haste makes waste"... If I finally really learn that one as a result of this project - not very likely, sadly - then I really will have achieved something. You never know, though: stranger things have happened.
-
30th April 2010, 05:43 PM #1646
Moderate Moderater
- Join Date
- Feb 2006
- Location
- Lindfield N.S.W.
- Age
- 62
- Posts
- 5,643
No. The moderators deleted that post, Alex because the post made no sense in itself and the link in the signature was to promote the poster's own business (which is against the rules) Originally Posted by AlexN
Cheers
Jeremy
If it were done when 'tis done, then 'twere well it were done quickly
-
30th April 2010, 06:18 PM #1647
GOLD MEMBER
- Join Date
- Jan 2009
- Location
- Blaxland, Australia
- Age
- 65
- Posts
- 2,551
Ah, that would be why. Thanks Jeremy. Originally Posted by jmk89
Cheers,
Alex.
-
30th April 2010, 08:01 PM #1648
GOLD MEMBER
- Join Date
- Jan 2009
- Location
- Blaxland, Australia
- Age
- 65
- Posts
- 2,551
Well, after several tins of elbow grease, quite a bit of planing and some sanding, that's the first of the aft foils sections more of less done.#It conforms with the template much better than the LE part of the fore section does. That is still not satisfactorily explained to my mind (maybe I need to think a bit harder), but I think that the dips in the benchtop are the most likely explanation, especially seeing that the aft section came up fine when planed on the levelled bench surface.
I've gathered together the bits and pieces to use the large router; but I will use it on a piece of scrap P. radiata first just to get a feel for the brute under these conditions, and to do some test runs on the LE end of the guide to try and find out what is going on. Another thing that has occurred to me is that I may have been allowing to router to swing off the tangent (i.e., to a not-90-degree angle) with respect to the curve (easy to do) and thus the outer diameter of the bit has cut lower than it should have. The TE part of the curve is much flatter and didn't allow the router to sway about longitudinally nearly as much as it did at the front. That, however, still doesn't quite explain the irregular tail-offs as the router reached the (supposedly) flat part of the curve. So maybe it's a bit of router misalignment at the front, compounded with the dips in the benchtop. The way to find out, apart from ensuring that the bench is straight, may be to stop the router before it gets to the steep part of the curve at the LE on the test piece, saw off an uncut side, and check with the template. If the shallower part of the curve in the test matches that of the template (ignoring the steeper part), then the answer will probably be to lift the router before the steep fall-off, and do that bit "by hand" using plane and template. There will be a photo in the following post showing the discrepancy between the real and the ideal...
So it looks as though Daddles, had he been doing shaping the 'Duck foils using his (and the plan's) method, he would have come out with a better-shaped board. Well, I've no doubt that he would have come out with a better-shaped board anyway (crawl, crawl ;).
Got the test-bed set up for the Elu (it's about time I got used to handling that beast) using some 19 mm P. radiata, some 6 mm ply offcuts (to jack up the pine so that the guide sits flat) and a couple of clamps. Plus set up the router with the bit and fence, so it will be ready to spin up and chew the pine to pieces...
Photos:
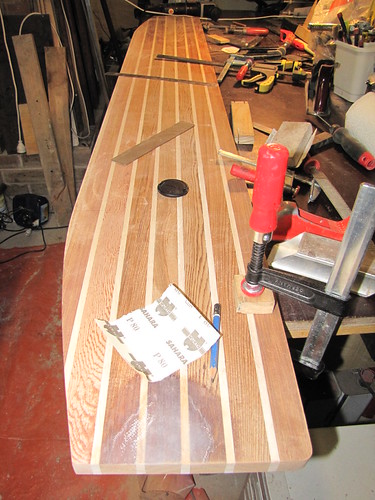
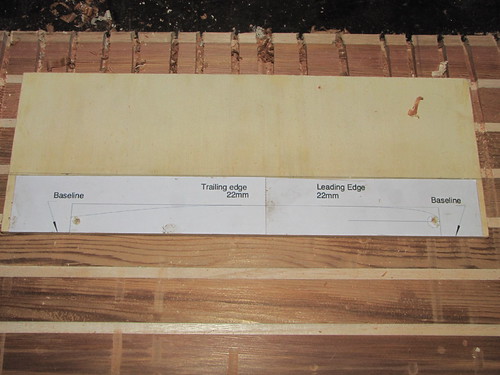
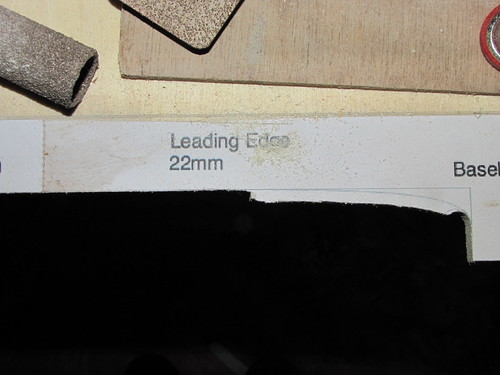
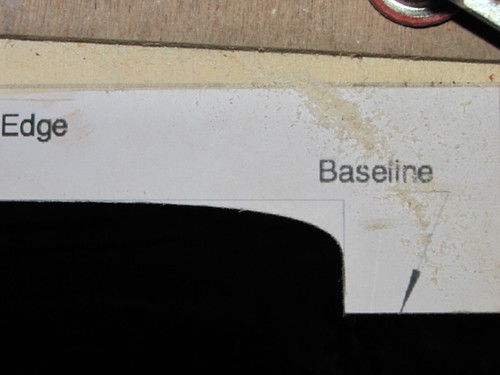
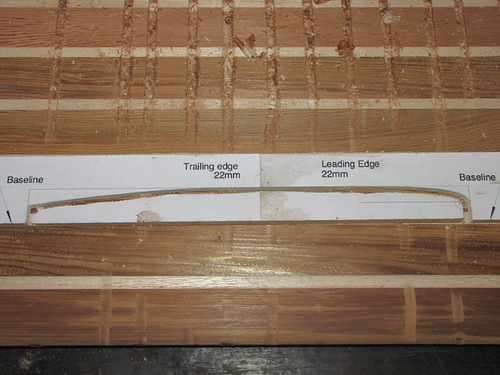
1. Glued template - cut down copy of the router guide template. Holes drilled at each end to ease turn the coping saw around. Note the 11 mm mark at the LE of the template...
2. Coping saw cutting out the waste block from the foils template all by itself, clever little thing...
3. Waste removed from foils template and ready for final shaping
4. Some of the Perma-Grit tools used to shape the foils template; just the forward section remaining to finish off
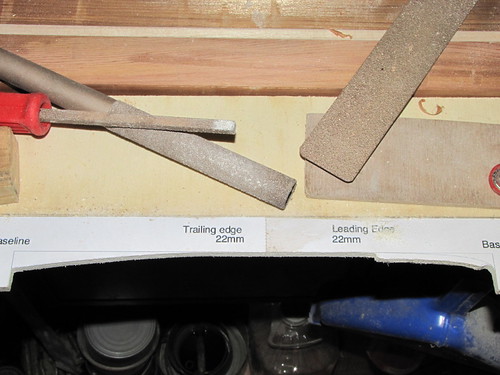
5. Close-up of shaped aft section template. The coarse Perma-Grit tools make a remarkably fine finish - compare with the sawcut in the next photo...

6. Close-up of forward section template; still needs sanding to final shape
7. Template fully shaped: round-sectioned Perma-Grit tools used here

8. Close up of two rounded Perma-Grit tools. The ancestry of these tools is apparent from the curved tool: they were made originally by aeromodellers for aeromodelling purposes, mainly for dealing with epoxy composites
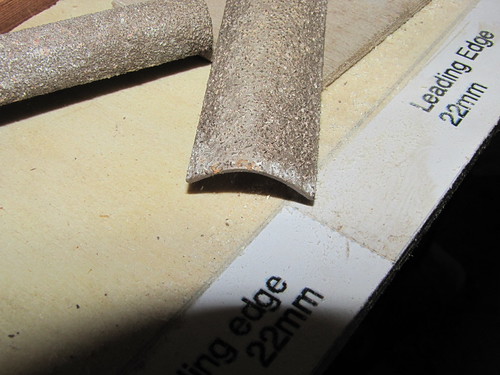
9. Close-up of completed forward section template. The Perma-Grit tools do a good job on plywood too: even the coarse tools. No tearout...
10. Completed template and waste cutout - overview. Aft section of board awaiting the about-to-be-newly-commissioned No. 7 plane
11. Wing-tip: one end of half-shaped board. Board has been sanded with a long 120-grit sanding block. Circular area near LE is where I slipped with the router - one of a number of spots. Note that this end had the glass/resin patch: now totally disappeared!
12. The other wing-tip. Sanding dust evident
Follow this link to my Flickr account, and keep Flickr and hangers-on happy
Ah ha, there's more...
-
30th April 2010, 09:45 PM #1649
Grumpy old Bugga
- Join Date
- May 2003
- Location
- South Oz, the big smokey bit in the middle
- Age
- 67
- Posts
- 4,377
Dunno about better shaped, but IT'D BE FINISHED BY NOW! Originally Posted by AlexN

Richard
-
30th April 2010, 10:53 PM #1650
GOLD MEMBER
- Join Date
- Jan 2009
- Location
- Blaxland, Australia
- Age
- 65
- Posts
- 2,551
Yeah, I know

") ...
...

 Reply With Quote


Similar Threads
-
New Queensland PDRacer Build
By duncang in forum Michael Storer Wooden Boat PlansReplies: 71Last Post: 26th April 2012, 08:30 AM -
Oz PDR build in Adelaide - sexy black PDRacer
By m2c1Iw in forum Michael Storer Wooden Boat PlansReplies: 39Last Post: 27th April 2009, 06:30 PM -
OZ PDRacer - Dylan's build in the Philippines
By Boatmik in forum Michael Storer Wooden Boat PlansReplies: 16Last Post: 23rd February 2009, 05:50 PM -
Brisbane Timber and Working with Wood. Boatmik/PDRacer
By Boatmik in forum Michael Storer Wooden Boat PlansReplies: 1Last Post: 11th April 2007, 08:06 PM -
Flawed wood on the TS --DUCK!
By Robert WA in forum WOODWORK - GENERALReplies: 7Last Post: 19th February 2004, 11:42 AM
Tags for this Thread
balanced lug,
boatmik,
build,
dacron(tm),
douglas fir,
duck,
enamel,
epoxy resin,
fibreglass,
hoop pine,
interminable,
lug,
machinery,
materials,
michael,
oregon,
oz racer mk 2,
ozracer,
paint,
paulownia,
paulownia/glass mast,
pdracer,
plywood,
polytarp,
primers,
really simple sails,
sail-making,
sailmakers thread,
sanding,
storer,
sydney,
timber,
tools,
varnish,
verbose,
western red cedar,
wood,
wood duck,
wrc
