

 Thanks:
  Likes:
  Needs Pictures: 0
 Picture(s) thanks:
Results 1,771 to 1,785 of 3347
-
2nd June 2010, 05:32 PM #1771
 GOLD MEMBER


- Join Date
- Jan 2009
- Location
- Blaxland, Australia
- Age
- 65
- Posts
- 2,551

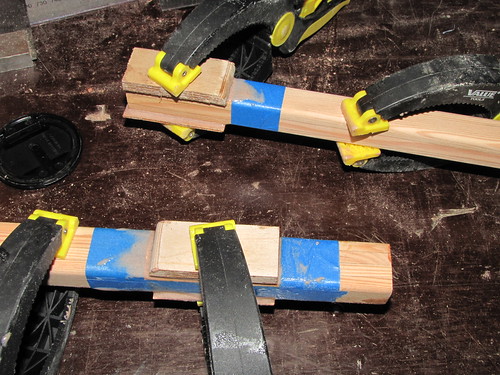
Today's work blocks on the boat will again be somewhat widely separated, on account of waiting for glue to set. Plus I have some domestic things to take care of ;). I glued up the ply pads on the tiller and extension: the tiller pads ended up at the 880 mm end-position, as it occurred to me that the extra 50 mm might get in the way when going about, etc. As the extension is overlength as well, if anything needs to be pruned, it would be easier to do it to that item rather than the tiller.
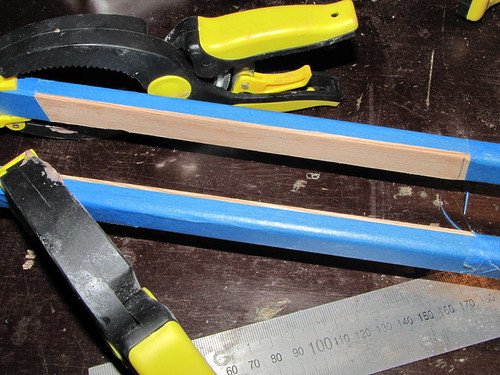
While I was at it, I trimmed the filleting regions on the tiller arms (see photo 9 and caption in previous post). The centrecase cleats and the F1 centre-part got a bit more work done on them with sandpaper, followed by some hole-filling and general joint filleting where needed. The latter was done using some of the left-over glue used on the ply tiller pads.
Three photos:
1. Blue tape cut from the tiller-arm filleting regions using a new No. 11 scalpel blade (on handle ;) and the steel ruler visible in the foreground; whiskers of cut-off tape on the right, between the arms. The pencil-marks on the tiller arm indicate the rudder-box end-positions: aft end is to the left
2. Over-width ply pads glued in place on tiller handle and extension and very lightly clamped, to prevent the pads skating about on the rather fluid glue mix. Extra clamps were added to other spots on both items to keep them as level as possible: again, because of the rather fluid glue
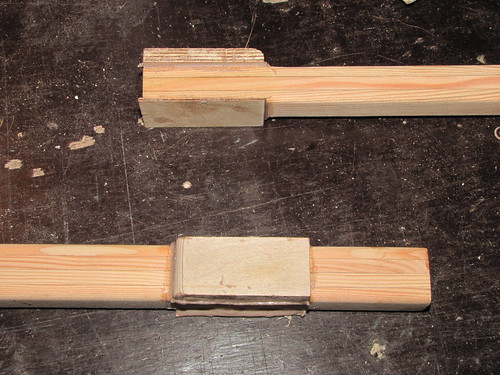
3. Pad glue-up, continued: masking tape removed and some of the excess glue removed or re-distributed. The excess tiller-handle will be cut off once the glue has fully set. Also once the glue has set up, I'll sand off the excess ply and glue with the Perma-Grit block and 120-grit sandpaper, drill the rope holes and fair over the hole-edges using - to begin with - a sharp counter-sink bit in the drill press. Once these things have been done, I'll round off the tiller handle and extension ends, and glue the tiller onto the rudder-box
Follow this link to my Flickr account to see these enlarged hugely, or reduced minutely - as takes your fancy...
If the glue hasn't gone off sufficiently this evening, which it probably won't have, I'll do the hole-drilling and shaping, etc., tomorrow.
-
2nd June 2010 05:32 PM # ADSGoogle Adsense Advertisement
- Join Date
- Always
- Location
- Advertising world
- Age
- 2010
- Posts
- Many
-
3rd June 2010, 12:53 PM #1772
GOLD MEMBER
- Join Date
- Jan 2009
- Location
- Blaxland, Australia
- Age
- 65
- Posts
- 2,551
I've had quite a busy and productive morning. At the Boss's suggestion I left the tiller and extension in the computer room overnight - in fact with the glued-up pad ends hanging over the back where all the hot air comes out ;) - to speed the cure. Everything was set nicely, although it probably would have been anyway. After some flush-cut-sawing (hacking ;) I got most of the excess ply off, then sanded the sides flat with the Perma-Grit tools. Quick trim and measure, drilled the holes for the rope, reamed out the tiller hole because it was a shade narrow for the rope, then rounded the tiller end into a semi-circle, then rounded that off. Looks reasonable - will post photos later as have to zip off to Carbatec to pick up the new 300-grit water stone. Flat plane-blades, here I come :).
Also applied a sealing resin coat to the rudder-box's stained ply areas, using the new resin. Since I found out that the resin dissolves the stain very quickly, I wanted to lock it down so that the stain didn't diffuse/get brushed onto the oregon parts. Just as well: after re-masking the oregon strips, I brushed on the resin, and lo and behold, the brush went pink. Some recently-sanded parts that consequently lost their stain stained up again - almost to the original density. So guess what wopuld have happened to the oregon had I not taken this step? The sealing coat will be allowed to cure fully before I go on to the next step (glueing on the tiller), after which point I will probably seal the oregon strips separately, before the whole thing gets the triple resin coat.
Photos tomorrow.
-
4th June 2010, 04:28 AM #1773
 Deceased
- Join Date
- Nov 2008
- Location
- Maylands, Perth, Western Australia
- Age
- 58
- Posts
- 218
 Tiller attached to rudder box with a bolt, not glue !!!.
Hi Alex,
The plans call for the tiller to be attached to the top edge of the rudder box by a single bolt through the front spacer of the rudder box, not glued on as you have stated you intend doing.
Everything else is looking first class as usual, keep up the great work.
-
4th June 2010, 10:27 AM #1774
Happily receives emails.
- Join Date
- Jul 2005
- Location
- 'Delaide, Australia
- Age
- 65
- Posts
- 8,138
Yes ... that is the most important single design ingredient of storer boats! Learned through sad experience!
MIK
-
4th June 2010, 10:40 AM #1775
GOLD MEMBER
- Join Date
- Jan 2009
- Location
- Blaxland, Australia
- Age
- 65
- Posts
- 2,551
Hi David,
My interpretation, on re-reading the instructions and looking agin at the pictures - and ditto for the Goat - is that the tiller is glued to the rudder box and the bolt is a safety measure to prevent the tiller parting company from its glue join under stress.
If it's not glued on, then it will pivot up and down on the rudder-box (being held by a single bolt) - and I don't think this would lead to control of the steering or a reasonable service-life for the steering gear.
BUT: It seems that MIK agrees with you. I'm really puzzled by this, as the Goat instructions say "glue the tiller on the rudder box..." ; as you have observed, the 'Duck instructions don't mention it, one way or the other.
I'm confused.
Cheers,
Alex.
-
4th June 2010, 10:49 AM #1776
Happily receives emails.
- Join Date
- Jul 2005
- Location
- 'Delaide, Australia
- Age
- 65
- Posts
- 8,138
Oh ... yes ... it is glued - and like alex says the bolt is to prevent the whole thing from breaking at that point. I didn't read carefully enough.
MIK
-
4th June 2010, 10:59 AM #1777
GOLD MEMBER
- Join Date
- Jan 2009
- Location
- Blaxland, Australia
- Age
- 65
- Posts
- 2,551
Phew! Thanks for that MIK. I thought I was going battier than usual! Not that that means that I'm throwing nasturtiums at David Originally Posted by Boatmik

 . The instructions aren't clear on that point - in fact, they ignore it completely! So David's "misinterpretation" (if it can be called that) is an easy one to make (I'd already read the Goat manual before starting on the 'Duck
  ).
).
Thanks also to David for bringing this up.
Cheers,
Alex.
-
4th June 2010, 11:26 AM #1778
GOLD MEMBER
- Join Date
- Jan 2009
- Location
- Blaxland, Australia
- Age
- 65
- Posts
- 2,551
Hey, we're having some serious rain here in Sydney! Amazing (even if it is coming through the roof again a bit - not as bad as before
). Fantastic! I just hope that it's not the coastal rind, and that it is falling on the water catchment too  .
.
-
4th June 2010, 11:39 AM #1779
Moderate Moderater
- Join Date
- Feb 2006
- Location
- Lindfield N.S.W.
- Age
- 62
- Posts
- 5,643
'Fraid it looks like the rain is mainly on the plain and not in the hills where the dams are..... Originally Posted by AlexN
Cheers
Jeremy
If it were done when 'tis done, then 'twere well it were done quickly
-
4th June 2010, 01:10 PM #1780
GOLD MEMBER
- Join Date
- Jan 2009
- Location
- Blaxland, Australia
- Age
- 65
- Posts
- 2,551
Hi Jeremy,
Yes, it looks as though the rain is just drying up as soon as it hist the first tier of the Blue Mountains. Weird - I would have expected it to be even heavier there. But then, I'm not a climatological expert for the BMs ;). The rain is getting through into some hitherto-unsuspected spots in the workshop, and I'm having to buzz about shifting piles of junk onto other piles of junk, making even bigger piles of junk, and some spaces...
The tiller got glued up before I found this, luckily - otherwise I would have felt compelled to wait until I'd done the shifting, and that would probably hjave meant deferring the task until Sunday (I've got other things on tomorrow).
-
4th June 2010, 11:51 PM #1781
GOLD MEMBER
- Join Date
- Jan 2009
- Location
- Blaxland, Australia
- Age
- 65
- Posts
- 2,551
The tiller-glueing was the only boat-related thing that I did today, unless you count (I do ;) reading through a bit of MIK's Flickr set on rigging the 'Duck which I'm doing in between bouts of tapping away at this post. I've been looking particularly at the position on the transom gudgeons and the height at which the rudder-box sits - on OZ 'Ducks 1a and 1b, at any rate ;). The Other Boss is demanding that the end of the tiller extension be wrapped in rubber. I remember reading somewhere recently about using squash-racket-handle covering. It was one of MIK's comments somewhere, but I can't remember where exactly.
Anyway, that is the last of the main glueing steps on the boat, hooray! Apart, that is, from sundry hole-filling, plus using resin to coat various fittings bolts, etc.
I've kept promising photos then squibbing on said promises: I'll try to get up to date over the next few days!
-
5th June 2010, 04:26 PM #1782
SENIOR MEMBER
- Join Date
- Oct 2008
- Location
- Gold Coast
- Age
- 49
- Posts
- 591
hi alexn.
i have been browsing through some of your previous posts in this thread (page 24) and i noticed that you purchased the protool vcp 450e vacuum.
i am considering buying this model very soon for general construction work.
i am sick to death of coughing and spluttering when cutting fibre cement sheets for cladding and soffits!
so its time for me to splash out and get a decent vac for site work.
i would like to know your'e opinion on this protool vac?
is it as good as you could hope for?
is there anything that you dont like about it?
i own the festool ct-22 vac which i keep in my workshop/single garage and is used solely for furniture making. (wood dust only!)
i also bought the long life filter bag which was a severe blow to my wallet!
but i am now happy that it was a good investment instead of the throw away bags.
its a lot of money to fork out and i just want to make sure its the right vac for me...
any help would be greatly appreciated.
btw, apologies to everyone for hijacking this great thread.
regards, justin.
-
5th June 2010, 07:59 PM #1783
GOLD MEMBER
- Join Date
- Jan 2009
- Location
- Blaxland, Australia
- Age
- 65
- Posts
- 2,551
Hi Justin,
Welcome to this thread :). You don't have to apologise to me at any rate - I rabbit on summink shockin' about tools ;).
I've been thinking about the Protool a bit since reading your query. It's a very good vacuum cleaner, but the cost of bags is horrific (as you found out with its Festo sibling - or cousin, or whatever it is). I also got a long-life bag, but haven't been able to work out how to fit it, as were you would expect the hole for dust entry to be is sewn over. My feeble brain hasn't worked out what to do with it, but then again i haven't exactly admitted defeat over it - yet. Another simple way around the paper bag problem is to hook the hose up to the Triton dust bucket - which I have done - for hoovering up sawdust, etc. In theory, at any rate. I catch myself sucking up sanding dust without the bucket attached <gasp> more often than I should. On the other hand, the bag is quite big and takes a while to fill up ;).
Overall the machine is pretty good, if you can put up with it going "clunk clunk clunk" (that's three clunks in a row) every sixty seconds (or is it thirty, I'll have to check). The clunkiung is the auto-filter-cleaning whacker which knocks any wayward dust off the cardboard motor filter. It also decreases the suction while it's whacking (on second thoughts I think it's sixty seconds but I will still check).
As the "anti-static" hoses are expensive, I only got the 37(?) mm hose, which was a mistake: that diameter fits the Protool jigsaw OK, but not the rest of my tools (mostly Bosch) which are something like 29 mm. As I don't use the Protool jigsaw very much, the hose was a bit of a bad choice. And I haven't made up an adapter yet either.
I seem to be weaseling around the question of would I recommend it. Let me do some more weaseling first ;).
It's very big, concomitant with it having a large volume, so that's only a problem if your space is small (ahem ;). It also costs a lot - as much as a reasonable bandsaw or tablesaw, a fully-tricked-up Triton (yes folks, they are available again, I saw the router at Carbatec the othyer day and was told that practaically everything is available except the yet-to-be-released cirular saw :), etc., etc.
I decided to acquire such an expensive item because of being pelased with Protools stuff, the volume of the cleaner, made in Europe, and the auto-clean feature.
Would I recommend it? For your purpose I think it would certainly measure up - I killed my old protool vacuum cleaner (the old 300 VCP) probably as a result of attacking it with too much cement dust. The 450 would be far more robust in htat respect. As I still haven't finished my concreting project(s) yet, it time is probably still to come. For the boat work it is probably overkill and I might have been better off with a proper dust-extraction system as used by many woodworkers. But as I've still got a lot of damp-remediation work to go yet, I wouldn't be using a wood-dust extraction system on that!
I'm sorry to have not been so definite, but I am still pondering this, and will probably update and edit this response later.
Cheers,
Alex.
-
5th June 2010, 08:30 PM #1784
Happily receives emails.
- Join Date
- Jul 2005
- Location
- 'Delaide, Australia
- Age
- 65
- Posts
- 8,138
Hi Alex,
Duckflat use the festools and have found them to be highly reliable. They have a couple of the vacuums that must be getting on toward 15 years old.
Also the reps, in Adelaide at least, are highly helpful.
I would suggest asking them about the lung life bag (couldn't resist) and also see if a rubber nozzle is available for the hose. They have a nozzle that is a conical shape that can be wedged in a number of different brand tool outlets - ask about the specific size you need.
Best wishes
Michael
-
5th June 2010, 09:55 PM #1785
SENIOR MEMBER
- Join Date
- Oct 2008
- Location
- Gold Coast
- Age
- 49
- Posts
- 591
thanks for the fast reply alex.
the 36mm festool/protool anti static hose are great for routers, electric hand planers and the large circular saws.
i would highly recommend the 27mm anti static hoses for jigsaws, sanding etc.
the 27mm hose just seems to have that little bit extra flex which is needed for the more delicate power tools.
i have a good collection of both sizes, so i can leave tools hooked up to a hose permanently.
i was not aware of the "clunk, clunk, clunk" noise from the auto clean feature.
thanks for pointing it out, this is exactly the kind of observations i am looking for.
it certainly would not prevent me from buying it as it will be used on construction sites.
the large size and weight would not be a deal breaker either. if anything that suits my needs better.
i am sure the protool vac will serve me well.
when i eventually buy it, i will be happy to help you figure out how the long life bag is attached.
cheers, justin.


 Reply With Quote

Similar Threads
-
New Queensland PDRacer Build
By duncang in forum Michael Storer Wooden Boat PlansReplies: 71Last Post: 26th April 2012, 08:30 AM -
Oz PDR build in Adelaide - sexy black PDRacer
By m2c1Iw in forum Michael Storer Wooden Boat PlansReplies: 39Last Post: 27th April 2009, 06:30 PM -
OZ PDRacer - Dylan's build in the Philippines
By Boatmik in forum Michael Storer Wooden Boat PlansReplies: 16Last Post: 23rd February 2009, 05:50 PM -
Brisbane Timber and Working with Wood. Boatmik/PDRacer
By Boatmik in forum Michael Storer Wooden Boat PlansReplies: 1Last Post: 11th April 2007, 08:06 PM -
Flawed wood on the TS --DUCK!
By Robert WA in forum WOODWORK - GENERALReplies: 7Last Post: 19th February 2004, 11:42 AM
Tags for this Thread
balanced lug,
boatmik,
build,
dacron(tm),
douglas fir,
duck,
enamel,
epoxy resin,
fibreglass,
hoop pine,
interminable,
lug,
machinery,
materials,
michael,
oregon,
oz racer mk 2,
ozracer,
paint,
paulownia,
paulownia/glass mast,
pdracer,
plywood,
polytarp,
primers,
really simple sails,
sail-making,
sailmakers thread,
sanding,
storer,
sydney,
timber,
tools,
varnish,
verbose,
western red cedar,
wood,
wood duck,
wrc
