

 Thanks:
  Likes:
  Needs Pictures: 0
 Picture(s) thanks:
Results 1,831 to 1,845 of 3347
-
19th June 2010, 09:51 PM #1831
 GOLD MEMBER


- Join Date
- Jan 2009
- Location
- Blaxland, Australia
- Age
- 65
- Posts
- 2,551

I helped out on the Woodwork Forum's stand at the Sydney woodworking show today, after spotting the other side of the foils board. I drove in - and back again - with jmk89, which was nice. Didn't do very much except drink a bit of coffee and chat with a number of fellow Forum members - and pondered to myself how one could squeeze a boat in. I reckon a Eureka canoe would be a good fit, in fact, especially if it were to be leant up in a corner (and securely chained to something ;). It was good to meet people in real life - including Neil, (ubeaut), wheelinround, jaguarrh, Pat (again), Ashore, Aaron from Oz-owned and made Torque Workcentres across the aisle, David, and others. And I didn't feel compelled to buy anything (the pain in the mouth from my fanging of various bits helped me in that respect). And there was no spar-grade oregon in sight at the various timber merchants...
1. The Forum's stand at the 2010 Sydney woodworking show. That's jmk89 lurking behind the computer screen, getting the slideshow showing aspects of the forum fixed up
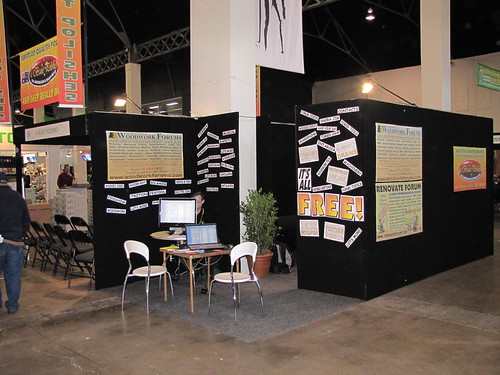
2. Forum stand's "lounge"
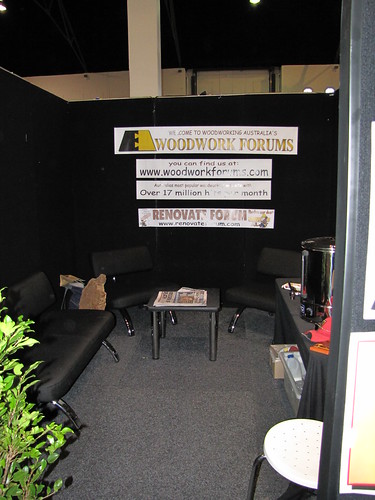
Follow this link to my Flickr account, but watch out for the mad picture editor, who can strike without warning and rendered a perfectly good snap invisible in the twinkling of an eye...
I thought that I had spotted the hard side of the foils the other night, but I was wrong (of course). The second side had far more holes and dips, and took a lot longer. The tape will come off the TE tomorrow and I'll evaluate how successful my attempt to build up sections of the TE was. But I won't really know that until I've sanded the thing back in a few days' time.
By the way, MIK edited the post where I'd totalled the ID of the image of the car with its brand new RAK roof racks, so that picture is now visible again. Thanks, MIK :). The racks are made here in Sydney by an Oz company...
-
19th June 2010 09:51 PM # ADSGoogle Adsense Advertisement
- Join Date
- Always
- Location
- Advertising world
- Age
- 2010
- Posts
- Many
-
21st June 2010, 08:35 PM #1832
Happily receives emails.
- Join Date
- Jul 2005
- Location
- 'Delaide, Australia
- Age
- 65
- Posts
- 8,138
-
21st June 2010, 11:37 PM #1833
GOLD MEMBER
- Join Date
- Jan 2009
- Location
- Blaxland, Australia
- Age
- 65
- Posts
- 2,551
Today was devoted entirely to picking up the gaboon plywood for myself and jmk89 from down near Bankstown airport. The hardest part of the retrieval exercise was finding the freight company's depot, tucked away as it was in a veritable warren of sheds.
Anyway, the plywood - which was beautifully packaged in tough white plastic (polyethylene?) sheet - has been got under cover and will be squirrelled away properly tomorrow. I had to pull the sheets out of the packaging so that I could get it up in batches of two sheets at a time up into the workshop without doing to much mischief to my back in the process. I dropped jmk89's batch off to him this evening after dinner.
The plywood is nice looking stuff, and individual boards are really light (although they soon add up for more than two sheets being carried at once - with my pathetic build, that is). The new roof racks stood up to the load quite well, although the manufacturer forgot to included a couple of truss rods in the package and I'll need to harass them a bit about that before trusting the racks to carrying a boat and trimmings ;).
I also obtained some 360-grit "paint" sanding discs from the local Rabbit Warren this morning on the way down to get the plywood - I'm going to try them out on the grey primer, at least on the hull bottom, otherwise I'll be hand-sanding forever. Unless I find that the ROS is too tough on the primer - in which case I'll be hand-sanding forever...
-
22nd June 2010, 08:08 PM #1834
i-Sails Australia
- Join Date
- Apr 2009
- Location
- Hunter Valley NSW
- Age
- 69
- Posts
- 1,759
Means Hakuna Matata Originally Posted by Boatmik


-
22nd June 2010, 10:07 PM #1835
GOLD MEMBER
- Join Date
- Jan 2009
- Location
- Blaxland, Australia
- Age
- 65
- Posts
- 2,551
Nothing much today, either. I tried out the ROS/360-grit combo, and had to junk the air-hose as it was sucking the machine down too close to the surface and making the ROS gnaw right through the grey primer. uUing the ROS without the hose was fine, although it did, of course, take a bit longer. I stepped back to block-sanding with 240-grit paper and a light touch for the bow and stern transoms and the hull-bottom radii. I'll use the block on the sides as well. Pulling some intercostal muscles juggling the plywood packs on my own yesterday also contributed to today's slow progress. I will have some photos when there is something n to present: at the moment it is merely the same old same old, etc.
On a bright note, dhgomm has completed the instructions for his PDRacer (and other boat) car racks and loader/launcher. David has done a magnificent job on the design of these useful - indispensable - items, and in the instruction manual for their construction and use :). The download link for the instructions is, as David says, about 3/4 of the way down the page.
-
22nd June 2010, 10:29 PM #1836
GOLD MEMBER
- Join Date
- Jan 2009
- Location
- Blaxland, Australia
- Age
- 65
- Posts
- 2,551
"That reminds me of a song"... Originally Posted by woodeneye

-
23rd June 2010, 01:31 PM #1837
Happily receives emails.
- Join Date
- Jul 2005
- Location
- 'Delaide, Australia
- Age
- 65
- Posts
- 8,138
I think i know the tune.
-
23rd June 2010, 10:13 PM #1838
GOLD MEMBER
- Join Date
- Jan 2009
- Location
- Blaxland, Australia
- Age
- 65
- Posts
- 2,551
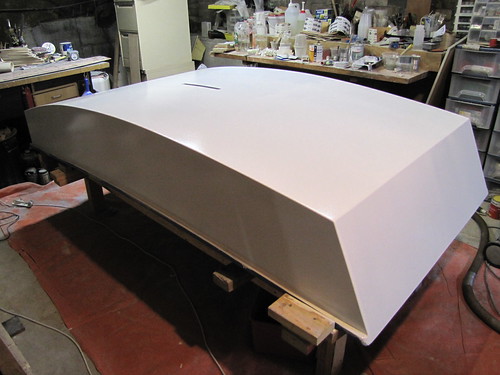
Finished the sanding of the grey primer third coat today, and cleaned up with a couple of damp microfibre cloths followed by some final dust-mopping with paper towel. Although it probably should have been t'other way round. I ended up giving the hull another swab with the rinsed microfibre cloths, being the fusspot that I am.
The International "Prekote" is the final undercoat, and the hull will get two and maybe three coats of that, as there are still some "orange-peel" patches in the paintwork.
Photos:
1. Fully-sanded third primer coat
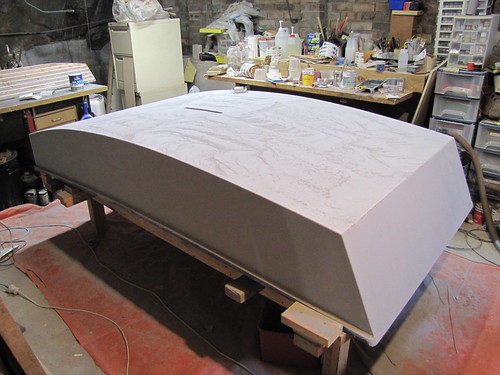
2. Sanded hull from the other side. I went over the hull bottom again with block and sandpaper, using a circular sanding motion much like the ROS used initially, although not nearly as fast. I find this the easiest way to sand opaque or grain-filled resin-coated surfaces. The surface of the hull bottom was found to be rather lumpy after the ROS-ing, so I had another go by hand. Not perfect either, but a step further forward...
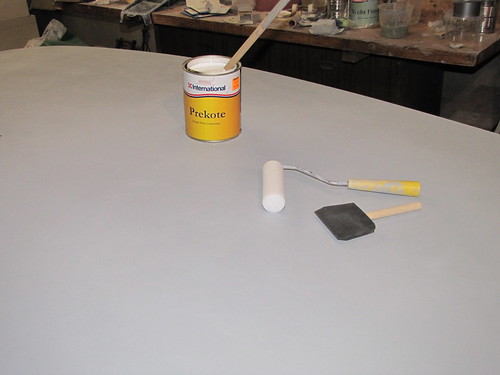
3. 1-litre tin of "Prekote" (undercoat), roller and foam brush. The foam brush was in fact abandoned when it didn't perform too well in smoothing the roller stipple: it left a whole lot of deep streaks instead
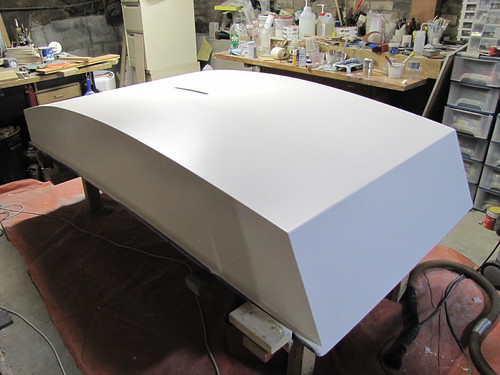
4. First coat of Prekote on the hull. The paint did a remarkably good job of masking the grey primer colour for a first coat, but it still needs at least one more coat - probably two - to deal with that, and to build up sufficient thickness to sand off the roller stipple. The texture is semi-gloss, unlike the dead-flat (before sanding) grey primer preceding it. Because the temperature is hovering around 15 degC in the workshop at the moment, the next coat won't go on for another 24 hours, per the tin's instructions; a third coat the day after that. Once the final (second or third) coat goes on, I will live it to harden off for a few days before sanding down for the coloured topcoats (International "Brightside" Yellow). Note that the different "densities" showing up on the port side of the boat are in fact due to a light shining on the bow of the boat, not anything to do with the paint (happily :)
Follow this link to my Flickr account, where you can amuse yourself by seeing whether or by how much I change my captions 'twixt here and there. If you can be bothered...
Speaking of amusement, I have much of that to come with even more sanding - in this particular instance the foils, plus some stuff under the boat (i.e., in the cockpit). More anon.
-
25th June 2010, 12:12 AM #1839
GOLD MEMBER
- Join Date
- Jan 2009
- Location
- Blaxland, Australia
- Age
- 65
- Posts
- 2,551
Did a bit of work on making a new, "proper" torture board out of some nice thick "Orstrilian white cypress" floorboard that my father-in-law gave me a few weeks ago. I gave up after my ribs ordered me to stop, cranky things (not that I blame them). I did put the second coat of Prekote on the boat late this afternoon, though:
1. Second coat of Prekote on the hull. The paint density is a lot better: not much sign of the underlying grey primer at this point (although it is amost impossible to tell, comparing this photo with the one directly above in the previous post)

Follow this link to my Flickr account, to see this photo and many others. Watch out, though, Flickr are about to "improve" the site, so you may have trouble finding things in future, "improvements" to computer software being what they are (i.e., usually breakages of some sort). The "improvements" affect me so far by adding yet another step to get at the photo IDs that I use for this thread. Thanks Flickr. Thanks very much indeed. I would investigate Picasa, except that they don't do a version for PowerPC-based Macs, so that knocks that on the head. Fantastic.
I will put the third coat o' Prekote on tomorrow evening, and probably start sanding it around the middle of next week, once the paint layers have hardened off sufficiently in the quite cool temperatures that we are currently enjoying (it being winter here).
-
25th June 2010, 11:48 PM #1840
GOLD MEMBER
- Join Date
- Jan 2009
- Location
- Blaxland, Australia
- Age
- 65
- Posts
- 2,551
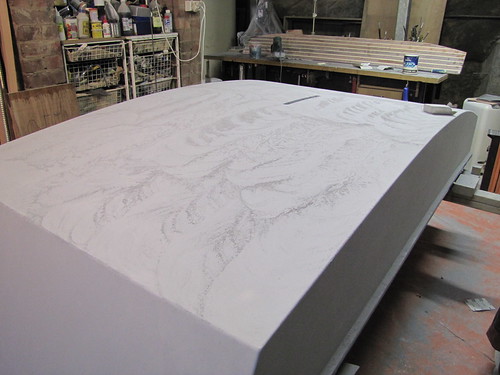
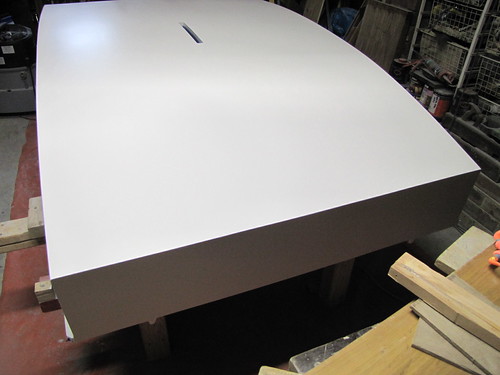
I did some quiet sanding today, sitting - quite comfortably, in fact - under the boat, scratching away at bits of the centreboard case that needed it. And put a third coat of Prekote undercoat on the hull late this afternoon.
1. Third coat of Prekote on the hull. Looks a lot different from the previous two photos, dunnit ;)
2. Triple-Prekote-coated hull, viewed from the stern. The surface will be sanded using a block and 240-grit Sahara paper, followed by 320-grit wet-and-dry (possibly wet if I get the centreboard case top cleats sealed up again beforehand) until perfectly smooth (i.e., no roller-stipple left). This is why I put on the extra thickness of a third coat
Follow this link to my Flickr account, where you can bore yourself silly looking at these photos all over again. And again. And again.
The "Brightside" instructions recommend tipping off with a brush...we'll see. The undercoat didn't take too kindly to that, but maybe the topcoat will be a completely different bucket o' snakes. Next up, though, is to get the new torture board/sanding block finished, which will mean fishing about for drill bits and screws in all the mess. That will take the most time, no doubt: the actual work on the rest of the thing shouldn't take that long at all. Then I can get stuck into sanding back the spots on the foils and give the board its final smoothing coat of resin. A fine-sand of the board and that will be that, bar the cutting in half and the shouting (if I cut it in the wrong place ;). There is still some sanding and re-coating to be done in the cockpit before I can consider it ready for varnishing, but the latter is still some way away anyway.Hopefully the ribs will start feeling a bit better soon and I can get on with things at a faster pace.
-
26th June 2010, 06:50 AM #1841
Moderate Moderater
- Join Date
- Feb 2006
- Location
- Lindfield N.S.W.
- Age
- 62
- Posts
- 5,643
Really sorry that handling the plywood packs (including mine) has injured you and is slowing down your progress. Thanks for picking up my pack and delivering it.
The hull is loking great.Cheers
Jeremy
If it were done when 'tis done, then 'twere well it were done quickly
-
26th June 2010, 11:15 AM #1842
GOLD MEMBER
- Join Date
- Jan 2009
- Location
- Blaxland, Australia
- Age
- 65
- Posts
- 2,551
Hi Jeremy,
Thank you for your kind words of concern. The fault is all mine though (you ought to hear The Boss on the subject - she knows me of old). I was - and am - only too happy to help, my own stupidity in materials-handling regardless. And it didn't really start to become a noticeable problem until later the next day. I'm reminded of a similar incident twelve months ago when I did my back in clambering about in the sub-structure under the house and losing my footing... In some respects it doesn't matter as the paint I'm using takes a while to dry off and harden at current temperatures, and the ribs are feeling slightly improved this morning, too. This incident is an example of where  dhgomm's loader/rack would have been a great help. That's one of the next items on the list of things to do, in fact .
Yet another chapter heading in "How Not to Build a Boat"...


Cheers,
Alex.
-
26th June 2010, 01:01 PM #1843
GOLD MEMBER
- Join Date
- Jan 2009
- Location
- Blaxland, Australia
- Age
- 65
- Posts
- 2,551
I lurk on the Michalak boats Yahoo group/mailing list, and this link to Andrew Linn's "slideshow" on sail-making popped up this morning. There is also a slideshow on the same site from the same author on sewing sails, including photos. Those of you who remember my sail-making conniptions from the beginning of the year (around the time that Andrew was writing these pages) will no doubt roll their eyes and mutter to themselves, "Now why didn't that idiot read these pages first?". The simple answer is that I only just found them.
There's a lot of great advice, drawings and photos in these two "slideshows" - typical of Mr Linn's work, I should add - and he gives MIK a nod at at least one point (regarding sail patches) plus links :). I've added some trackbacks to the "waderwebs" site with this post. There's no doubt that Andrew's advice would have been of use earlier this year - and also will be when I get around to finishing sewing up that sail. Note that he uses a thread colour that blends in with the poytarp material that he's using - unlike my decision to do the opposite on the professional sailmaker's advice (viz., you can tell more easily when the stitching starts to fray). Who's right? Both of them :). As I have a whole spool of relatively expensive dark blue sail-making thread, that's what I'll be using.
-
26th June 2010, 11:27 PM #1844
Happily receives emails.
- Join Date
- Jul 2005
- Location
- 'Delaide, Australia
- Age
- 65
- Posts
- 8,138
The brightside doesn't need tipping off if you use the foam rollers I've been suggesting. Originally Posted by AlexN
I am of the old school which is quite oriented towards tipping off.
But the previous coats do have to be smooth ... or the brightside will neatly layer up over the bumpy surface perfectly preserving the lumps and bumps.
The mostly likely problem you will have is that the roller will leave a squillion little bubbles in the Brightside. This means there is too much paint in the roller. So just keep rolling out and extending the area and the bubbles will disappear.
It is well worth not wetting the roller too much for the first rollerful you apply to the surface. Don't be tempted to thin or play with the paint at all. Just spread it out until the bubbles stop appearing and keep working. With the second rollerfull the bubbles are less likely.
MIK
-
27th June 2010, 10:40 PM #1845
GOLD MEMBER
- Join Date
- Jan 2009
- Location
- Blaxland, Australia
- Age
- 65
- Posts
- 2,551
Hi MIK,
Many thanks for the sage advice :). I've printed it out and will nail it to the boat - figuratively speaking for the latter of course ;). I am - I think! - using your recommended rollers - see photo 3 in post 1838 above. If that's not the right type, please let me know!
I did a small amount of sanding on some of the thicker bits around the stern transom edges to allow the paint at the bottom better access to the air. The paint is still rather soft even where it's thin, so the start of the sanding may get deferred to later in the week from the current estimate of Wednesday. Or until I deem the paint (undercoat) to be sufficiently hard. And I'm leaning much more towards wet-sanding than previously, since I can get a much better finish that way.
Cheers,
Alex.


 Reply With Quote


 . There is still some sanding and re-coating to be done in the cockpit before I can consider it ready for varnishing, but the latter is still some way away anyway.Hopefully the ribs will start feeling a bit better soon and I can get on with things at a faster pace.
Similar Threads
-
New Queensland PDRacer Build
By duncang in forum Michael Storer Wooden Boat PlansReplies: 71Last Post: 26th April 2012, 08:30 AM -
Oz PDR build in Adelaide - sexy black PDRacer
By m2c1Iw in forum Michael Storer Wooden Boat PlansReplies: 39Last Post: 27th April 2009, 06:30 PM -
OZ PDRacer - Dylan's build in the Philippines
By Boatmik in forum Michael Storer Wooden Boat PlansReplies: 16Last Post: 23rd February 2009, 05:50 PM -
Brisbane Timber and Working with Wood. Boatmik/PDRacer
By Boatmik in forum Michael Storer Wooden Boat PlansReplies: 1Last Post: 11th April 2007, 08:06 PM -
Flawed wood on the TS --DUCK!
By Robert WA in forum WOODWORK - GENERALReplies: 7Last Post: 19th February 2004, 11:42 AM
Tags for this Thread
balanced lug,
boatmik,
build,
dacron(tm),
douglas fir,
duck,
enamel,
epoxy resin,
fibreglass,
hoop pine,
interminable,
lug,
machinery,
materials,
michael,
oregon,
oz racer mk 2,
ozracer,
paint,
paulownia,
paulownia/glass mast,
pdracer,
plywood,
polytarp,
primers,
really simple sails,
sail-making,
sailmakers thread,
sanding,
storer,
sydney,
timber,
tools,
varnish,
verbose,
western red cedar,
wood,
wood duck,
wrc
