

 Thanks:
  Likes:
  Needs Pictures: 0
 Picture(s) thanks:
Results 166 to 180 of 3347
-
24th March 2009, 09:32 PM #166
 GOLD MEMBER


- Join Date
- Mar 2007
- Location
- Adelaide
- Posts
- 2,139
 Not exactly sure what you are after but read Michaels site here may answer your questions re lug rigs.
 Originally Posted by Herco

Cheers
Mike
-
24th March 2009 09:32 PM # ADSGoogle Adsense Advertisement
- Join Date
- Always
- Location
- Advertising world
- Posts
- Many
-
24th March 2009, 09:44 PM #167
Senior Member
- Join Date
- Mar 2008
- Location
- Rockhampton, Australia
- Posts
- 227
No, another YELLOW duck is great!!! Its got to be the official PDR colour. I love it! you going to do any finishing touches to it at all?
Nick
Fair Winds and Following Seas
------------------------------------------------------------
PD Racer #276 - "Duck's Nuts" - Oz MkII with Lug rig
Storer Eureka 155 - unnamed
-
24th March 2009, 09:45 PM #168
GOLD MEMBER
- Join Date
- Jan 2009
- Location
- Blaxland, Australia
- Age
- 65
- Posts
- 2,551
Hi Herco,
Try emailing MIK direct - if you have the plans, then you are entitled to the lug-rig instructions. They have most of the items - certainly all the cloth bits. And check out Mike's link too...
Good luck (and with getting to 3D too - I just shot myself in both feet).
-
24th March 2009, 09:46 PM #169
GOLD MEMBER
- Join Date
- Mar 2007
- Location
- Adelaide
- Posts
- 2,139
I think it will need a dab of black some place Originally Posted by nickpullen

-
24th March 2009, 09:59 PM #170
GOLD MEMBER
- Join Date
- Jan 2009
- Location
- Blaxland, Australia
- Age
- 65
- Posts
- 2,551
My almost 12 y.o. daughter likes the yellow ;). If I'd chosen pink I would have been throttled!
At this stage, the interior will be resin/varnish, the gunwale strips (a.k.a. sheer clamps) will be resin/varnish, and most of the decks will be resin/varnish as well - not like (or too much like) Mike's sexy black pdracer(tm). The sails (sprit and lug) are DF's lightish beige colour, what they call "white". Eh?
The foils will be a straight copy of Mike's laminated boards - I can't help myself - but lighter in colour overall, I think, given that I'll be using WRC & Paulownia.
The "secret" colour weapon will be the interior bottom of the boat: since I'm using Eurolite ply for it, the natural colour will be almost white - it's a poplar ply. Seems pretty tough, for all that. I'm using the non-yellowing BoteCote hardener (which is partly why I was so cross at pouring it over the floor and otherwise wasting it), so it will stay white, depending on what the varnish does to it (probably will add a slightly yellow cast, I would think).
Other "touches" will be a relatively small outline drawing of some sort on one side of the sail, and the class symbol on t'other. Most visible cleating/framing is in oregon, and I'm keeping it all natural timber (see also above).
Lug mast will be a light colour as it is in Paulownia (see further back for details as to why this happened...), all spars, sprit and lug, will be (scarfed) oregon.
That's about it, but as they say, "contents may differ from illustration on the box" or similar.
-
24th March 2009, 10:22 PM #171
GOLD MEMBER
- Join Date
- Jan 2009
- Location
- Blaxland, Australia
- Age
- 65
- Posts
- 2,551
Well, I did chicken out on any glueing today.
Here's why (any excuse ;) - I'm not going through the process of sanding back the stern transom cleats again. So I taken steps :).
1. And here they are: lots of brown packaging tape, hand cut with a new No. 11 scalpel blade (in handle)
2. Everything more or less assembled: doesn't look all that different from photo above, but it is (spot the differences ;)
All oregon that is exposed to glue on its visible faces is masked, as are the glueing faces of the Paulownia cleats (the tank formers and parts that glue to the aft edge of the side panels). I left a bit of resin on the bottom of the bottom cleat when doing the cleaning up on this piece this morning - that bit's going to get attacked by a (hand)plane at some time in the future. You can also see three packets of glass cloth (different weights) in the background - waiting for the mast. One of them, any way (6 oz).
So, will I get to glue these things up any time soon? Possibly, since I've reduced the possibilty of spreading glue far and wide to at least a small extent...
-
24th March 2009, 10:27 PM #172
Happily receives emails.
- Join Date
- Jul 2005
- Location
- 'Delaide, Australia
- Age
- 65
- Posts
- 8,138
Don't you mean the box might differ from the illustrations!
MIK
-
24th March 2009, 10:29 PM #173
GOLD MEMBER
- Join Date
- Jan 2009
- Location
- Blaxland, Australia
- Age
- 65
- Posts
- 2,551
Yes indeed...although in this case maybe some red and green - wood ducks are basically red, green and grey (a light brownish-grey rather like that of the DF sail material). Originally Posted by m2c1Iw
So why am I painting it yellow? Good question, and I can't really give a rational answer to that one :). So I won't!
-
24th March 2009, 10:31 PM #174
GOLD MEMBER
- Join Date
- Jan 2009
- Location
- Blaxland, Australia
- Age
- 65
- Posts
- 2,551
Aha, yes :). Points to you! Originally Posted by Boatmik
Cheers,
Alex.
-
25th March 2009, 06:47 PM #175
GOLD MEMBER
- Join Date
- Jan 2009
- Location
- Blaxland, Australia
- Age
- 65
- Posts
- 2,551
Probably need a warmer pair of socks...might help with the cold feet. The main problem appears to be incorrigable impatience.
Doesn't help that half the time my snout is getting in the way, not to mention the side-effects of the antibiotics. Whatever it is, ths infection is pretty nasty.
I've just coughed up $$ to upgrade my Flickr account to "pro" status, which means being able to post more photos therefrom without running into a monthly bottleneck - which I reached in about a fortnight, I think. There is also a way around the photo album limit in the Forum: make another album! I haven't found out how many albums one's allowed to have, though. here is also the question of problematic access to the photos for some people. It seems to be a browser/OS combination that's doing it - which means an un-trapped bug in the particular browser-vendor's OS-specific code. Or a Forum CSS that I haven't been able to locate yet. I might even get around to reporting it one day to the relevant organisations, er, soon!
Having taken steps to avoid too much glue where I don't want it (which is what the glue bag is meant to prevent!), I am going to be faced, of course, with having to remove the bits of tape adhesive that are going to decide that they want to stay snuggled up to the timber. Swings and roundabouts - on balance, however, I think I'd rather be removing the gum using a small amout of meths, than scratching things up still further with sandpaper. This will no doubt become apparent one way or the other shortly...
-
25th March 2009, 06:56 PM #176
Happily receives emails.
- Join Date
- Jul 2005
- Location
- 'Delaide, Australia
- Age
- 65
- Posts
- 8,138
When you finish the wet on wet epoxy or the gluing ... wait about 15 minutes and clean up any ooze and then pull up the tape.
Don't let it sit overnight or it will be firmly stuck down.
If the glue is coming off change over to the blue paper tape ... it is much better.
Here it is reminding me that those pieces are broken (crap plywood)

MIK
-
25th March 2009, 07:07 PM #177
GOLD MEMBER
- Join Date
- Jan 2009
- Location
- Blaxland, Australia
- Age
- 65
- Posts
- 2,551
Two more bulkheads - now there are three!
The socks must have helped ;).
Whew! All three main bulkhead now glued up! Just finished cleaning up the stern transom and removing the tape from it (successfully :).
Started off by running a strip of resin around the gluing areas of both bulkheads, then dry-brushed the strip(s) into areas where I could, and used the toilet roll technique for the bits surrounding the exposed stern areas. This is a flying model aircraft technique for producing the lightest possible (ding-proof) glass-on-balsa surface for a model (PVA and airframe tissue on balsa is another - and even lighter - one, but I haven't used it). The technique is covered on one of MIK's pages - it was mentioned to him by two aeromodellers :).
After leaving the thin resin strips to go off, I did the bow transom first, since it's a bit simpler. Used a couple of spring clamps to anchor the unwieldy bottom cleat - over half of which hangs out in mid air - the screwed it down, followed by the top then the side cleats. This time I managed to get the glue quantity (half of that mixed for the CB!) about right, having enough fluid glue left over to do the bottom cleat for the ster.
I got another approximately right mixture of glue made up and did the rest of the stern, then looped back around and cleaned up the bow, following which back to the stern and cleaned that up. Once clean, I removed the no-longer-required tape.
Note to MIK, just having read your post - it all came off very nicely indeed: i was pleasantly suprised! But what is this blue paper tape of which you speak? What does it do? How does it work? Can you eat it? ;).
I've started on the side panels - coarse sanding along the bottom curve with forefinger as a sanding guide, but will probably do these tomorrow.
Pictures later after tea.
All in all, a great success :)))))))).
Cheers,
Alex :).
-
25th March 2009, 10:52 PM #178
GOLD MEMBER
- Join Date
- Jan 2009
- Location
- Blaxland, Australia
- Age
- 65
- Posts
- 2,551
By the time I'd removed the screws, done some final clean-up on the two transom bulkheads, cleaned the side panels and taken a few more photos, I'd had enough. I'll tackle the side panels tomorrow. If things go well I'll add the sheer clamps as well as the chinelogs, but we'll see. Less is more, as they say.
OK, some pics. First off, my apologies for still not being able to get the "light-table" photo pop-up feature to work on my set-up. I can see what the html code look like in the final formatted web page, but there is no way that I've found (so far) to insert that explicitly - the forum scripts take care of that in the background and don't let the user do it. Like other people's links, I suspect that it has something to do with a CSS setup that I haven't located (yet). If/when I do find out what the problem is, I will contact the webmasters of the forum site. I'll make up one or more photosets on Flickr by and by, and post the link(s).
I'm finding that its becoming easier to pick up the camera during the work and take a snap, without interrupting the flow - seems more natural now.
1. Resin mould from the other day: I got this out of the mixing tub without breaking it. Plain BoteCote is highly thixotropic

2. Yes! It's the right cleat this time! Woo hoo! Glue spread out and ready to clamp and screw down. The mast step runner registration line is visible in this photo:

3. First two cleats in place: unwieldy bottom cleat is clamped in place while I get the two end-screws in to secure it.
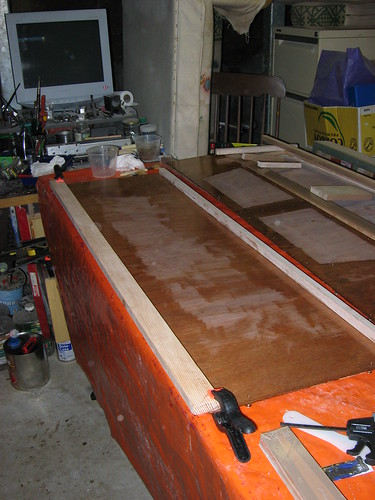
4. Finished bow transom: all nailed down!

5. Stern transom top cleat glue bead: like a welding joint but a with lot less sizzle ;). The bottom cleat is already in place and attached with a few screws.

6. Stern transom top cleat glue bead: close up

7. Glue bag # 2. I don't recommend this type of toilet paper for removing excess resin - it leaves ridges!

8. Stern transom assembly complete! All in position and nailed down: just the cleanup and tape and screw removal to go...

9. Two used glue bags, not much glue left :). Note the screw next to the drill-driver: nearly a very nasty accident there! A fingertip of the glove that I was wearing got caught in the thread and wrapped around the crew within a very small fraction of a seond. This could have resulted in a very nasty injury to the finger concerned (and made a mess of the work, too!). Moral - take the latex gloves off before using the drill!

10. Outer (water) sides of transoms, screws out. As I said before, there's going to have to be a lot of filling, using the lightweight filler powder.

11. Two finished bulkheads! Yay! Note that the tape is off already: I took it off as soon as I'd tidied up the beads of extruded glue. Looks much nicer :).

12. Side panels roughed up by hand using 120-grit paper. This is to make keys for the resin strips that will help glue the chinelogs in place along with the fortified resin mix. The shiny patches are where I used up a bit of excess resin from the transom strips to fill in where I went a bit too deep with the sander. The sanding block was part of a half-hearted attempt to skim the top of these little puddles. Even though hard, the resin was still too green for the paper, though.

That's enough for one day! Not as many photos next time, promise :).
-
25th March 2009, 10:57 PM #179
GOLD MEMBER
- Join Date
- Jan 2009
- Location
- Blaxland, Australia
- Age
- 65
- Posts
- 2,551
Query to MIK: What is this blue paper tape? Where can you obtain it? (Presumably not a blue touch paper that you light and do not hold in hand, betting back to those firework thingies again. ;) Originally Posted by Boatmik
-
25th March 2009, 11:16 PM #180
New Member
- Join Date
- Mar 2009
- Location
- Rockhampton
- Posts
- 1
Google 3m blue tape, it's a medium strenght painters tape, great stuff


 Reply With Quote


Similar Threads
-
New Queensland PDRacer Build
By duncang in forum Michael Storer Wooden Boat PlansReplies: 71Last Post: 26th April 2012, 08:30 AM -
Oz PDR build in Adelaide - sexy black PDRacer
By m2c1Iw in forum Michael Storer Wooden Boat PlansReplies: 39Last Post: 27th April 2009, 06:30 PM -
OZ PDRacer - Dylan's build in the Philippines
By Boatmik in forum Michael Storer Wooden Boat PlansReplies: 16Last Post: 23rd February 2009, 05:50 PM -
Brisbane Timber and Working with Wood. Boatmik/PDRacer
By Boatmik in forum Michael Storer Wooden Boat PlansReplies: 1Last Post: 11th April 2007, 08:06 PM -
Flawed wood on the TS --DUCK!
By Robert WA in forum WOODWORK - GENERALReplies: 7Last Post: 19th February 2004, 11:42 AM
Tags for this Thread
balanced lug,
boatmik,
build,
dacron(tm),
douglas fir,
duck,
enamel,
epoxy resin,
fibreglass,
hoop pine,
interminable,
lug,
machinery,
materials,
michael,
oregon,
oz racer mk 2,
ozracer,
paint,
paulownia,
paulownia/glass mast,
pdracer,
plywood,
polytarp,
primers,
really simple sails,
sail-making,
sailmakers thread,
sanding,
storer,
sydney,
timber,
tools,
varnish,
verbose,
western red cedar,
wood,
wood duck,
wrc
