

 Thanks:
  Likes:
  Needs Pictures: 0
 Picture(s) thanks:
Results 211 to 225 of 3347
-
2nd April 2009, 10:16 AM #211
 Happily receives emails.


- Join Date
- Jul 2005
- Location
- 'Delaide, Australia
- Age
- 65
- Posts
- 8,138

This is a fantastic collection of useful stuff.
Keep up the good work!
MIK
-
2nd April 2009 10:16 AM # ADSGoogle Adsense Advertisement
- Join Date
- Always
- Location
- Advertising world
- Age
- 2010
- Posts
- Many
-
2nd April 2009, 12:41 PM #212
GOLD MEMBER
- Join Date
- Jan 2009
- Location
- Blaxland, Australia
- Age
- 65
- Posts
- 2,551
Howdy MIK,
Thank you for the kind remarks! I'll try!
I encountered this this morning:
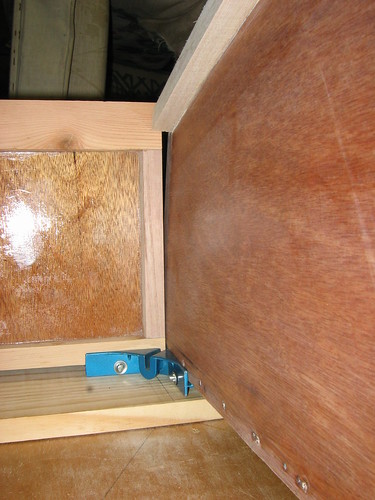
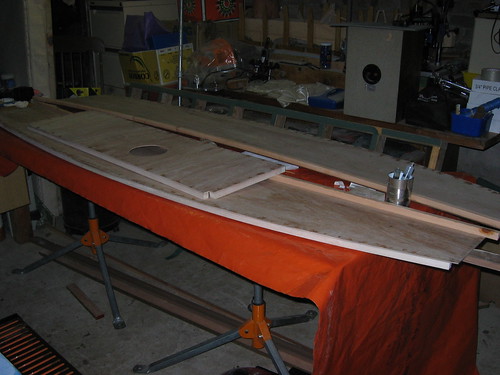
The side panel has an obvious bend in it, but as to the casue, I'm not sure. If the uncoated ply were to be absorbing moisture, you would be expecting the curvature to be the opposite direction, especially with an immobile phase (the epoxy coating) situated where it is. This isn't just the effects of gravity, as can bee seen in the next photo...
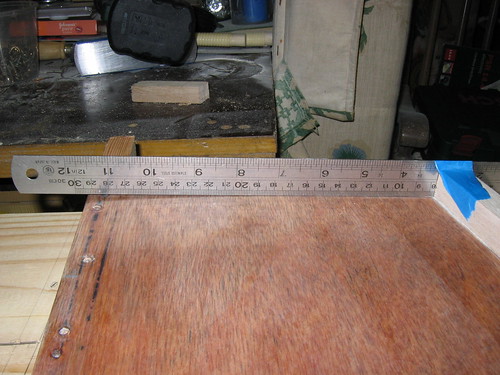
...viewed with the panel lying flat and supported on the chinelog edge.
If it were the resin contracting, the curve should also be the other way. And I can't see that the resin would be differentially more than the wood - it shouldn't be absorbing moisture at all!
Maybe something wrong with the ply? Or is this just normal?
Weird.
Cheers,
Alex.
-
2nd April 2009, 01:07 PM #213
Senior Member
- Join Date
- Mar 2008
- Location
- Rockhampton, Australia
- Posts
- 227
Looking good there Alex!
You really are cutting very accuratly.. I can honestly say I had 5mm gaps in the joins between the cockpit bulkhead and the side panel cleats. the glue fills it, and it looks fine...
Ill take some pics for you of the gaps that is had...
I am concerned that you may be cutting it to close, ie, leaving no space for the glue. You have to remember with the 'pox, its not like PVA, you dont want to squeeze it too tight, or you may end up with a dry joint, just enough, very light pressure so that there is a little bit of ooooze... Where as the PVA (Foil laminations) you do need to have high clamping forces.
But I am very imporessed with your attention to details, this is going to be one fine looking vessel!!!
Oh, and dont worry about the bend in the panel, once all the bulkheads go into place and you have glued it up, you then allign everything before the glue sets... and then once its straight, you put the bottom on, then its becomes really stiff!Nick
Fair Winds and Following Seas
------------------------------------------------------------
PD Racer #276 - "Duck's Nuts" - Oz MkII with Lug rig
Storer Eureka 155 - unnamed
-
2nd April 2009, 01:42 PM #214
GOLD MEMBER
- Join Date
- Jan 2009
- Location
- Blaxland, Australia
- Age
- 65
- Posts
- 2,551
Hi Nick,
Thanks for your kind remarks too! I've taken the bit about the joint width on board - I'll probably have to open most of them up a bit.
It occurred to me that the bend maybe be as a result of torsion differences between the sheer clamp and the chinelog - they're from timbers with quite different stiffnesses: Paulownia and oregon. Their grain orientations are quite different, too..
Cheers,
Alex.
-
2nd April 2009, 01:46 PM #215
Senior Member
- Join Date
- Jul 2006
- Location
- Portland, Oregon, USA
- Posts
- 334
Alex, Originally Posted by AlexN

Could easily be. Hard to diagnose long distance. You probably have the best read on it. This is gonna make another lovely tutorial for future builders.
-
2nd April 2009, 10:13 PM #216
GOLD MEMBER
- Join Date
- Jan 2009
- Location
- Blaxland, Australia
- Age
- 65
- Posts
- 2,551
Hi Dave, Originally Posted by arbordg
At any rate, the bend at this point will vanish when I screw it down at lue-time, maybe three or four screws in this section ;). And as Nick said, once the bottom goes on and the frames go in, plus the decking, things will straighten up more anyway. But I'm still puzzled. Differential torsion still seems to be the most likely answer at this point.
Cheers,
Alex.
-
2nd April 2009, 11:46 PM #217
GOLD MEMBER
- Join Date
- Jan 2009
- Location
- Blaxland, Australia
- Age
- 65
- Posts
- 2,551
Seemed as though nothing got done today, although that really wasn't the case...
Sanded back the sheer clamps by hand (no block) using the very edge of the paper, which is, of course, straight, thus avoiding scratching up the side panels too much. It would have been better to sand the clamps before glueing to the hull. but that's water under the bridge now. Having got that done, I decided to round over the clamp bottom edge with the Elu and the 0.25 " bit. This was quite a risky operation, as the router base was sitting on only 19 mm of timber and not terribly stable. As it was, I took a chunk out of the clamp just before the end of a side panel (of course) when I ran out of support and wasn't looking where I was going. Grrr.
I scooped up some of the quite finely powdered oregon from the hand-sanding of the sheer clamps, mixed it up with a very small amount resin just prior to hole-filling, and patched the hole with the resulting putty. I'm curious to see what it will look like - the hope is that it won't be noticeable ;). That bit will be clear-finished, so it had better not be!
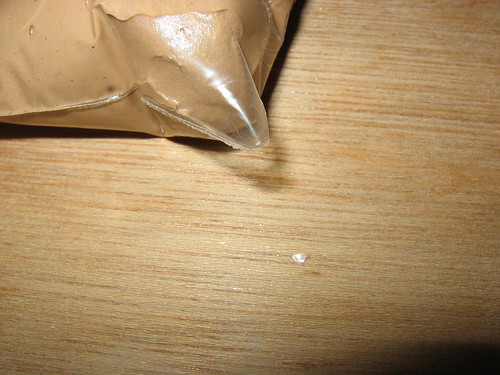
What else? Ah yes, the hole patching. Yes indeed. I got all the potentially visible holes in the cockpit filled, using MIK's suggestion of light-weight filler and resin, using a very small hole cut out in the bag tip (see photos). I added some Prooftint to the mixture, although possibly not enough for where I actually used it. This time I sucked up the Prooftint from the bottle into a 3 ml syringe - another of my aero-modelling tools, usually used for delivering small quantites of resin/hardener, or (much more rarely ;) for mixing paints. And more usually I use 20 or 50 ml syringes.
This allowed a much more controlled and also repeatable way of adding the tint, and something which I can use to calibrate various colour densities over a range.
I made the mix too dry as usual, which made the process somewhat more laborious than I was anticipating (see also below at the end of the post for comments about the light-weight filler powder). At one point I had to scoop as much the mixture out of the bag as I could and put it in a new bag, after the original burst (or rather, oozed, fortunately) in two places.
Supermarket bamboo kebab skewers of about 3 mm diameter were useful for twirling the stiff filler mix into the holes: fill, twirl, top up, twirl, top up, etc. Left a small excess to allow for shrinkage. All right, a large excess - this stuff is supposed to sand easily, according to the label!
And that's really about it, apart from clamping both side panels to the stern transom earlier on, just to see what it looked like :).
Photos suddenly stopped at the glue-bag stage, when the batteries ran out. Partially attributable to the 60-odd flash photos that I took the other day, and it was too late to go and get fresh batteries off the charger, conveniently located upstairs next to the computer...
1. Side panels corner-clamped to the stern transom: ST not visible. Not the most brilliant photo, I must admit...

2. Sheer clamp immediately after being attacked with the router. The finish is noticeably uneven: possibly the speed wasn't high enough, or the feed rate was too slow and/or I wobbled. I fixed this with some sandpaper
3. Rounded-over and sanded sheer clamp. Ended up with a much nicer effect than the rather uneven one imparted by the router, although that could have been my inexperience in handling the router manually. I usually use the router as a spindle moulder, installed in the Triton 2000 Workcentre (table saw). Excuses, excuses ;)
4. Another view of sanded sheer clamp, trying to show the difference between the treated and untreated edges. This is rather hard with the harsh light from the flash: a softer light at a more oblique angle would have given a better effect, but also resulted in an unacceptably shaky picture. Before the "digital revolution" I would have used a bounce flash - and been waiting a couple of days to get the films back!

5. Filler mix: BoteCote with "Sanding filler powder", also known as the "light-weight filler powder". 3 ml syringe at right contains Feast Watson "maple" Prooftint. Note that the syringe is resting on plastic, not the timber!

6. The filler after about 10 drops of tinter added. You can tell more-or-less how much tinter was used by comparing with previous photo

7. Bagged up and ready to go, with tip cut off. Cut-off tip in foreground. The colour isn't too bad for the un-epoxied wood, but when placed on the coated timber, it shows up much more: and epoxying the filler isn't going to darken it!
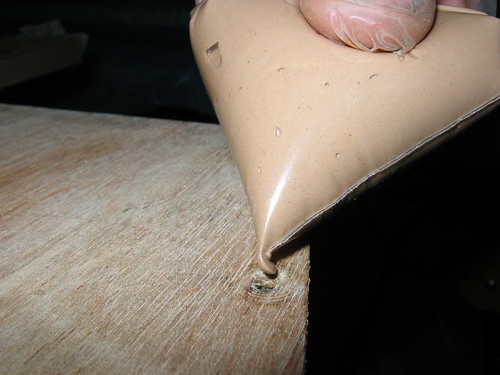
8. Resultant bead of filler extruding from bag. The filler was a bit too light in colour for the epoxy-treated side of the plywood, but in this instance (the untreated side) was OK. The other side of this panel went particularly dark when coated. At this point, the camera's batteries went flat: probably too much messing about trying to take the photo with the left hand...
Had hoped to get a bit further today, but what with doctor's appointments and getting slightly distracted with cheer clamp sanding, I didn't. Tomorrow will include making up a less thick filler for the rest of the holes, and maybe some sanding of tiday's efforts. The light-weight filler powder didn't produce as light a mixture as I was expecting, although it certainly flew about the place happily when mixing - thank goodness for the mask! To be fair though, it appeared to fall out of the air quite quickly, being relatively dense - much denser than Q-Cels. The mixture certainly wasn't as "fluffy" an end result as I've had with WEST 105 and Q-Cels. The proof of the pudding will be in - well, not the eating, exactly - the sanding. After filling the remaining holes it will be time to dismantle the table and set up for crawling about on the (suitably vacuumed and protected) floor!
-
3rd April 2009, 11:06 PM #218
GOLD MEMBER
- Join Date
- Jan 2009
- Location
- Blaxland, Australia
- Age
- 65
- Posts
- 2,551
Well, today I've been poking a stick at more holes than you could poke a stick at. So I have more holes to poke a stick at tomorrw. In fact I spent the entire day and evening at it - over 10 hours... See below ;).
This morning marked a significant improvement in icing - I mean glue-bagging - technique. Two reasons for this: 1. a more fluid filler mixture, and 2. a much better holding technique, i.e., grabbing the throat of the bag behind the glue with the left hand (I'm right-handed) and squeezing the nozzle side of the bag with the right hand. Obvious, common-sense icing technique that I hitherto had - for some bizarre reason - not used. Note written much later: the holding technique seems to be determined by the fluidity of the mixture. The stiffer the mixture, the more pressure required and therefore more hands, etc.
Oh, and a third: I've taken to wiping the nozzle of the bag relatively frequently to stop the extruding filler strean getting caught on the build-up and (randomly) changing direction and shape. This has improved the neatness of my work a good deal (see photos below), although it is still hard yards (I can alternately hear MIK sniggering, and muttering "yeah, well I warned you" ;). I have increased the hole-filling time by 4 times. Note also written much later: the bigger the hole the less need to wipe the nozzle as the momentum (mass) of the extruding glue ribbon isn't as easy to deflect.
Still, the nice neat blobs are quite quick and easy to do - until the filler starts to go off, of course.
Speaking of which, after having wasted over 50 % of this morning's mixture, I have biiten the bullet, climbed over the mountain of junk and retrieved a couple of syringes from the stack of draweres on the lathe bench. These are 20 ml for the resin and 10 ml for the hardener, and are filled up from the pumps with the syringe plungers out. I know know definitively how much each stroke delivers, i.e., mls. Another useful piece of info for a(nother) rainy day.
The filler blobs from last night sanded straight off with minimal pressure and no paper-clogging: nice, smooth and fair. I only had to patch a couple of holes where I missed the edge of a dip. Excellent!
Not quite as excellent is the resulting and highly noticeable row of polka dots along the sheer - even with the tinting they show up quite markedly; and even when swabbed down with meths for cleaning and an attempt to see what they might look like under a resin coat. The sheer lines of the side panels on the inside are going to get a few coats of clear resin followed by sanding right back, to fill in the depressions made by the screws (naughty, naughty) and fully seal off the filler dots. The full length will be done with the sealing in mind - the cosmetic part only pertains to the visible areas.
Later note: spotted the screwhead dings with clear resin this evening, before filling in yet more holes. But wait, there are even more holes for tomorrow! I didn't use the screw-head timber protecting squares, as I had some inital trouble with the said squares spinning at the end of the screws' travel, and didn't quite get around to finding a way around this. But I will before the decks go on! Probably by drilling out to screw clearance, and throttling back the drill towards the end of travel - or wind down the torque setting on the drill's clutch! Unless someone else has a nice neat ready-made suggetsion :).
Maybe some photos tomorrow, once I've uploaded them.
-
4th April 2009, 02:02 AM #219
AJ
- Join Date
- Jun 2007
- Location
- Aberfoyle Park SA
- Age
- 63
- Posts
- 1,787
G'day Alex. Originally Posted by AlexN
If the uncoated side were to release moisture into a low humidity atmosphere, you'd
get concave curve like this. I get quite a lot of change of shape in my kayak decks &
hulls due to this. There can be 1/2" difference in width in a 24" wide structure between
morning & afternoon. Am I right in thinking that Sydney's summer humidity is
dropping a little now ?
cheers
AJ
-
4th April 2009, 09:20 AM #220
GOLD MEMBER
- Join Date
- Jan 2009
- Location
- Blaxland, Australia
- Age
- 65
- Posts
- 2,551
Hello AJ,
Of course - the converse! I didn't think of that! But I don't think it's the case either. The weather is very wet at the moment: it has been raining for about a week (which is a good thing, although I don't know how much has actually reached Sydney's water storage). I still continue to empty the dehumidifier's 4-litre reservoir on a less-than-daily basis.
Thanks for the input :).
Cheers,
Alex.
-
4th April 2009, 10:35 AM #221
Happily receives emails.
- Join Date
- Jul 2005
- Location
- 'Delaide, Australia
- Age
- 65
- Posts
- 8,138
Geez, you guys are too good!
MIK
-
4th April 2009, 11:25 PM #222
GOLD MEMBER
- Join Date
- Jan 2009
- Location
- Blaxland, Australia
- Age
- 65
- Posts
- 2,551
Blink blink... Finished 'em! You win, MIK - parsimonious approach to screws from now on! It really was a rod for my back - it is rather sore from standing over the bench for so long.
Hah! I think I'll call "Wood Duck" "Holey" for short... My daughter wanted to paint the hull with different coloured polka dots over the yellow >eeeeeek!> - sort of fits ;). Nah, gunna stick to plain yellow.
I spent the afternoon sanding back the resin spots, ending up using the TOS with one of the black Bosch 120 grt "stone" discs that I acquired the other day. Got the stuff off like anything :). Didn't take too much of the wood away with it either <gasp>. I'm going to have to give the side panels another coat of resin in the end, though: but not until the boat's together and the side tanks and centrecase/frames are in. Putting those spots on was probably not a good idea: I wouldn't do it a second time. The surface is nice and smooth, though - flat with not dips, which was the intention. Just a rather risky process, and the way around it would be to be more careful with the screws in future (see previous post).
Also sanded back the filler that I poked into all the chinelog holes, and rounded off the chinelogs in the cockpit region from the 1.5 mm radius out to 3 or 4 mm. Looks nicer, and will be slightly less susceptible to damage from flying feet, etc. The bogged-up hole at the end of one of the sheer clamps got sanded back as well. At this stage, it looks like resin full of some sort of muck, not a patch of dark-grained oregon. But I live in hope that once the resin and varnish go on, it will disappear. It is also a reasonalby small blemish, so I'm probably chooking and clucking uneccesarily. Waaark.
Photos from yesterday(?) and today:
1. Lots and lots of little dots... Lots of 'em... The result of poking the holes with a sharp stick, and a large amount of BoteCote + sanding filler + Prooftint "maple", a good deal too much of the mixture actually ending up being wasted (over-estimating quantities and the bag-life when being heated up in my hand: see below for a way around this)

2. 8 hours later, and it just dusts off, with a bit of help from some 120 grit sandpaper and almost no pressure on the sanding block. Tough to the touch, though...

3. Sanded right down...
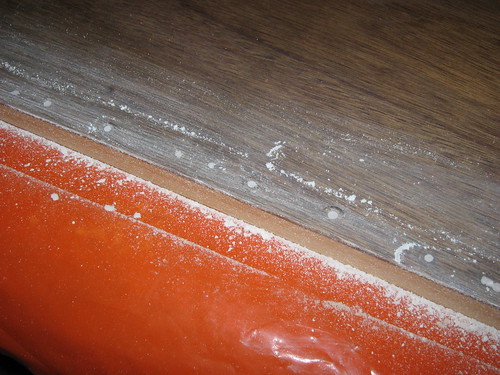
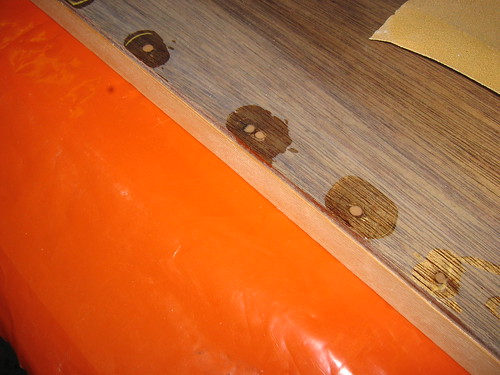
4. And swabbed clean with a piece of paper towel soaked in meths. They're going to be quite visible when resined/varnished...

5. Oops! Too little support at the end for the heavy router - should have clamped another guide onto the sheer clamp - or kept an eye out! Patched with a mixture of clear BoteCote and very fine oregon powder saved from sanding the round-over on the clamp

6. Bote Cote resin and hardener, stored in 20 & 10 mL syringes, respectively: for mixing up small quantities of, e.g., filler mix. The syringes are stored upright not just to keep the resin from leaking out a bit, but also to allow any air bubbles to rise up to the top so that I can expel them before using the epoxy parts. This hopefully means that the measured quantities are going to be just that little bit more accurate :). Using the syringes allowed me to save a reasonable amount of resin, but I was still ending up with too much going off on me. One of the mixes was as small as 1.5 mls of A+B together!

7. Resin filler spots: attempting to make fair the surface after damaging it with the screw heads, although nothing much can be done about the marks (and the polka dots - yes, they do show up, don't they? - I'm going to have to get some darker stains ;)... I'm also hoping that the dots in the cockpit region will be hidden mostly by the side decks!
8. All the holes filled in in these parts: it took around 8 hours (non-contiguous!), includes both sides of both side panels; another couple of hours got soaked up on half each of the bow and stern transoms
As alluded to above, I finished off the holes in the two remaining halves of the bow and stern transoms this morning (another 2 hours odd), bringing the total time spent filling in the jolly things to 12 hours, plus or minus. Maybe I'll use bricks to hold the decks down when I glue 'em on! Which reminds me, my cache of bricks has unaccountably vanished. I wonder where they went?
-
5th April 2009, 02:12 AM #223
Senior Member
- Join Date
- Jul 2006
- Location
- Portland, Oregon, USA
- Posts
- 334
Alex - for future reference for any filled holes in a surface that will be bright finished... for whatever reason, our brain notices blemishes that are lighter than the background/field far more than it does blemishes that are darker. So, I always color my filler material to be a bit darker that the field it's going to patch.
-
5th April 2009, 10:08 AM #224
GOLD MEMBER
- Join Date
- Jan 2009
- Location
- Blaxland, Australia
- Age
- 65
- Posts
- 2,551
Something of a milestone reached this evening (pictures later, when I've selected and uploaded them - and why my internet connect isn't working) - I finally got everything ready to start putting Wood Duck together for the real dry run and then for real!
Well...unless I decide to triple-coat the bare (visible) side of the cockpit bulkhead with resin first. I'm agonising a bit over this one. It could be done just as easily with the boat chocked up on its nose, or even after the bottom has gone on. I think I'll sleep on it (the idea, that is). If I don't, it will be the only interior piece ply that I've worked on so far that hasn't been resin-coated before assembly. The "forecastle" side of the bulkhead has of course been quadruple-coated already - the last coat being and inadvertent glue coat, and which was hurriedly sanded back off again, too! I'm currently inclined to go the extra distance and coat the thing, and add the cap strip on the some Paulownia will do fine here, especially with the high-strength powder sticking it down.
I also struck camp, as it were, dismantling the temporary bench and moving it to one side, and finally gave the floor a really good vacuuming. I'm probably going to have enough space to walk and/or crawl around the nascent boat in, which is good. I'll put the piece of orange plastic down on the floor tomorrow. Having the plastic down will also be useful if I really do decide to coat the "other" side of the CB. Hmm...
-
5th April 2009, 10:10 AM #225
GOLD MEMBER
- Join Date
- Jan 2009
- Location
- Blaxland, Australia
- Age
- 65
- Posts
- 2,551
Many thanks Dave! Noted! I'll get a darker stain. e.g., mahogany: the one I'm using is quite a light colour.
Cheers,
Alex.


 Reply With Quote


Similar Threads
-
New Queensland PDRacer Build
By duncang in forum Michael Storer Wooden Boat PlansReplies: 71Last Post: 26th April 2012, 08:30 AM -
Oz PDR build in Adelaide - sexy black PDRacer
By m2c1Iw in forum Michael Storer Wooden Boat PlansReplies: 39Last Post: 27th April 2009, 06:30 PM -
OZ PDRacer - Dylan's build in the Philippines
By Boatmik in forum Michael Storer Wooden Boat PlansReplies: 16Last Post: 23rd February 2009, 05:50 PM -
Brisbane Timber and Working with Wood. Boatmik/PDRacer
By Boatmik in forum Michael Storer Wooden Boat PlansReplies: 1Last Post: 11th April 2007, 08:06 PM -
Flawed wood on the TS --DUCK!
By Robert WA in forum WOODWORK - GENERALReplies: 7Last Post: 19th February 2004, 11:42 AM
Tags for this Thread
balanced lug,
boatmik,
build,
dacron(tm),
douglas fir,
duck,
enamel,
epoxy resin,
fibreglass,
hoop pine,
interminable,
lug,
machinery,
materials,
michael,
oregon,
oz racer mk 2,
ozracer,
paint,
paulownia,
paulownia/glass mast,
pdracer,
plywood,
polytarp,
primers,
really simple sails,
sail-making,
sailmakers thread,
sanding,
storer,
sydney,
timber,
tools,
varnish,
verbose,
western red cedar,
wood,
wood duck,
wrc
