

 Thanks:
  Likes:
  Needs Pictures: 0
 Picture(s) thanks:
Results 226 to 240 of 3347
-
5th April 2009, 11:12 PM #226
 GOLD MEMBER


- Join Date
- Jan 2009
- Location
- Blaxland, Australia
- Age
- 65
- Posts
- 2,551

I'm slipping back in my schedule yet again - haven't done yesterday's (or today's) photos, and haven't even started to put the boat together, dry or wet run.
It was our daughter's birthday and birthday party today, so most of the day was devoted to her. I did get a resin triple-coat onto the cockpit bulkhead in between things, having decided to go that route overnight. I also glued the cap strip on the top cleat for later planing down to clamp the fordeck. I used a piece of the 19 x 45 that I'll be using for the foils - hope I've got enough spare! If not, I can always glue up a couple of pieces of 19 mm sq., which I have an excess of.
I really don't like slumming it down on the floor, but it's the flattest area in two dimensions available, so that's that. Still having trouble with air bubbles in the resin, even when attempting to use the locked roller to slick 'em out. It's beginning to look a bit like a magic trick to me!
Got the filler sanded off the bow and stern transoms just before dinner - a quick and easy job, as the sanding filler almost seems to dust itself off.
I was working on Mk 1 of this post earlier just after lunch, when I inadvertently knocked my tomato (only!) juice over the keyboard, with predictable results. I've scrounged a spare and have since banned me from food and drink anywhere near the study. That will be the third keyboard that has expired after unexpectedly consuming a beverage.
One of our friends brought his daughter around for the party and had a butcher's at "Wood Duck" - he's an engineer - and his very first remark was "You've used twice as many screws there as you needed to use" and his second was "I would have spaced them 20 cm apart". Spooky! He was quoting MIK pretty well word for word - but hadn't seen what MIK had written...
Photos tomorrow, I hope. And even more importantly, I also hope to get onto putting the boat together!
-
5th April 2009 11:12 PM # ADSGoogle Adsense Advertisement
- Join Date
- Always
- Location
- Advertising world
- Age
- 2010
- Posts
- Many
-
6th April 2009, 10:21 PM #227
GOLD MEMBER
- Join Date
- Jan 2009
- Location
- Blaxland, Australia
- Age
- 65
- Posts
- 2,551
Today marks another sifgnificant milestone - the completion of the 3D dry run/setup :).
After a quick sand of the CB with the non-clogging black disc, I started on the task of setting up the hull sides. The stern transom/side angles were dead easy, just whack the parts into the corner clamps, a few whacks (light taps ;) with the rubber mallet, and a nice fit with the 6 " engineer's square resulted. OK so far. The fitting of the CB was a bit more problematic, but I let the side panels and gravity, with the aid of the hull stiffeners pieces, do the work of holding the thing in place while I tapped each side into position with the rubber whacker. Corner clamps then check - both sides seemd OK, (wow, miracle!) so on to the bow transom.
The bow transom seemed to be considerably out of whack compared with the other two bulkheads, so I had a break and thought about it, made some measurements of the stern, and went back and checked the vertical alignment of stern and side panels with the magnifiers and headlamp, then re-clamped and screwed the ST into poisition. Then worked back forward again, making a sort of jig for the CB by taping the hull stiffener parts together with masking tape, covering the long axis with tape to help reducing slippage (the stifferers are still coated with brown packaging tape), then taped the whole lot down onto the orange plastic. This setup ended up being much more stable and the boat stayed put.
Lined up the port side of the CB with the bule tape marker, clamped and screwed the CB, checking alignment between each screw. Over to starboard, repeated process, all seemed OK. Forward to the BT: the top edge of the bulkhead (the boat is upside down at this stage) slotted in between the sheer clamps very nicely, with no slop and no obvious outward movement either, so that worked. Amazing. The curve in the stern end of the side panels that I reported a few days ago travels the whole way along each panel - the forward end of the chinelog part of the bow was curved away from the BT the same distance on each side. The amount of curvature therefore appears to be the same for either panel.
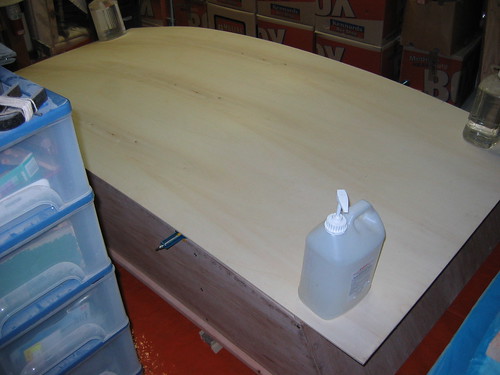
Lined up the BT's bottom edge with the right spot on the bottom corner of the bow and chocked the BT with scraps of ply since the clamps wouldn't work here, screwed it, checked, then added two more screws and repeated for the other side. The square showed everything to be lining up pretty well square, and checks on all six corners showed that nothing had shifted - which I had kept a stingent eye on throughout, but wanted a final confirmation. I was so pleased that things had worked out so well, that I decided to pop the bottom ply on over the hull and CB clamps - for some reason it didn't occur to me to take them off as they were redundand by then. Weighted the ends down with a number of 4 litre containers, and took more pictures. It really is starting to look like the real thing :).
I stopped for the day at that point - the glueing can wait until I've recovered from today's efforts. All in all, today was very slow and painstaking, but it was more than worth it, as I was able to capitalise on my obsessive initial measuring and cutting.
I am now three days behind with photos - maybe tomorrow morning if I can stay away from the glue pot long enough ;). The photos will go up in three separate posts, one each to a day.
-
7th April 2009, 11:38 AM #228
GOLD MEMBER
- Join Date
- Jan 2009
- Location
- Blaxland, Australia
- Age
- 65
- Posts
- 2,551
Apropos photos, I found why the flash wasn't operating quite as I wished it to - I had it set on red-eye. Once I'd switched that off, the camera started producing pictures that didn't look as though they'd been take with an infra-red camera. This won't show up until pictures from Sunday.
This lot is from the 4th, Saturday, where I woked on the resin spots, cleaned up the patheced ding at the stern end of one of the sheer clamps, rounded off the chinelogs in the cockpit area a lot more, sanded back the cockpit bulkhead filler spots, and dismantled the workbench (somewhat prematurely as it turned out).
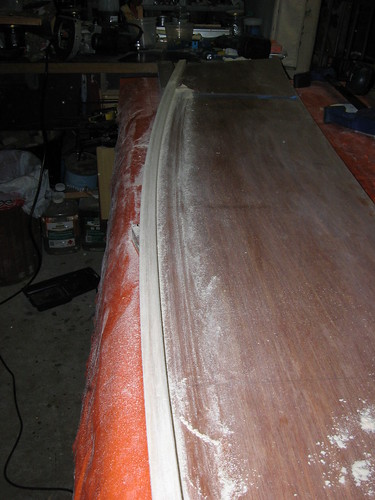
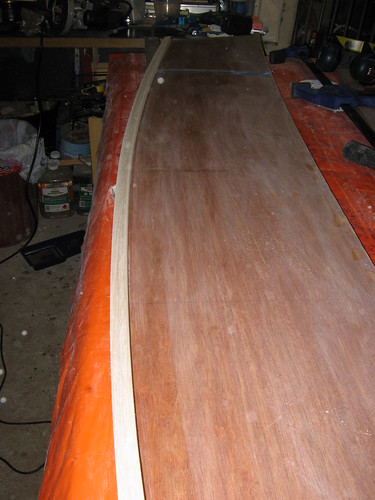
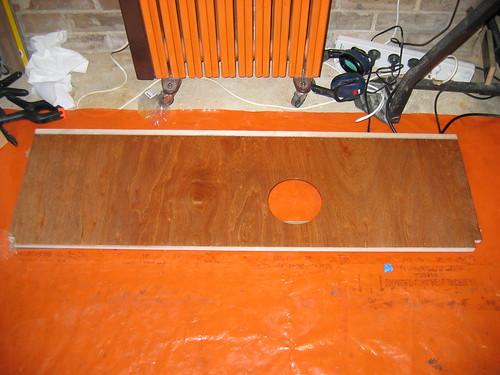
1. Resin spots along the sheer being very slowly and carefully sanded back. In the end I used the ROS with the black "stone" sanding discs, which are also flagged for use with fibreglass. Got a nice flat surface that way. For some strange reason I didn't take a photo of the finished surface. Odd.
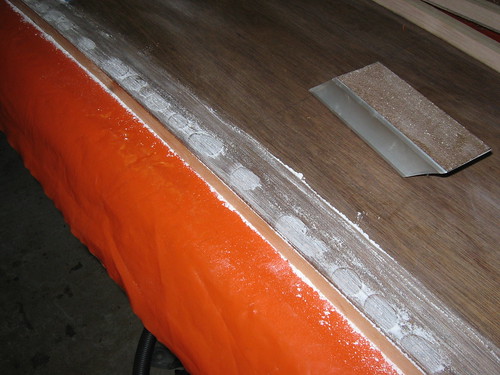
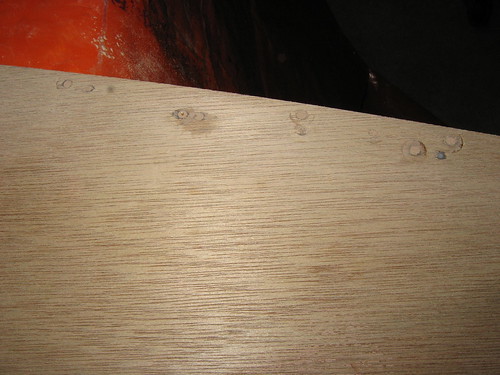
2. Filler spots on chinelog sanded back. Note where there was an air bubble that I didn't pop! The final filling prior to resin coating once the boat is nearing completion will take care of that.
3. Router ding patch sanded back. Not a very nice colour - would have been better off using resin, filler powder and "maple" Prooftint.
4. Underside of the damaged area - urk! Won't be visible most of the time,, and the rear third will be sliced off when the sheer clamp is trimmed in any case.
5. A somewhat more flattering photo of the patch job...

6. Sanding back the chinelog roundover in the cockpit area. Done by hand - no block. Not hard - just need to work slowly and systematically
7. Rounding over finished and cleaned up
8. Cockpit bulkhead sanded clean prior to its resin coat. The filler spots don't stand out too badly at this stage...
9. Dismantling the bench part 1. The Triton work supports get centre stage...

10. Dismantling the bench part 2. Area also vacuumed. The remaining piece of my old shop vac is in the top of the photo - now used as a handy mobile kerosene ("paraffin") bath for tools needing renovation
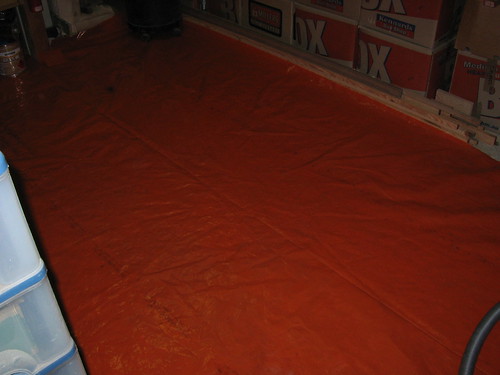
11. Dismantling the bench part 3. The orange plastic underlay is down again to catch glue drips
That's Saturday sorted. Now on to Sunday, where I get trapped by the decision to resin-coat the cockpit bulkhead...
-
7th April 2009, 12:12 PM #229
GOLD MEMBER
- Join Date
- Jan 2009
- Location
- Blaxland, Australia
- Age
- 65
- Posts
- 2,551
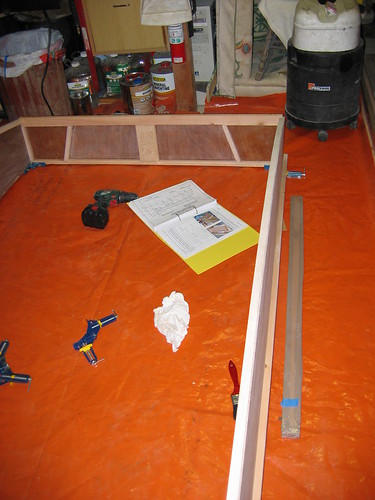
Sunday, 5 April '09. As I mentioned in my previous post, I should have left the "working" bench set up. Applying resin to the cockpit bulkhead on the floor was no fun at all, and I didn't get around to setting up for 3D until the following day, anyway.
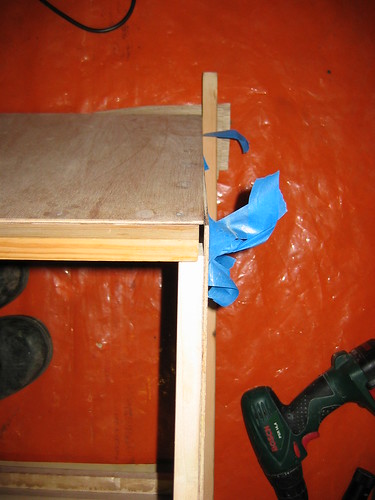
1. The now-ubiquitous blue tape, masking sensitive areas from resin and glue :). Just as well, too...
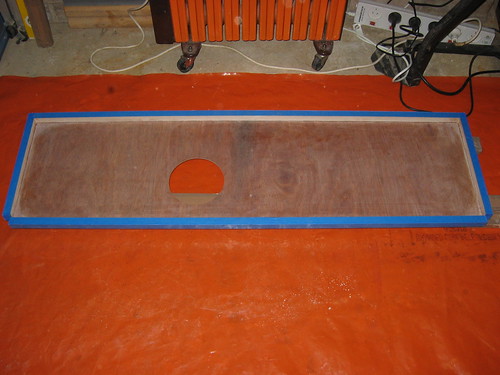
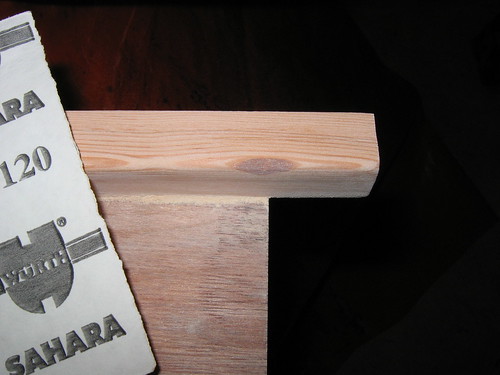
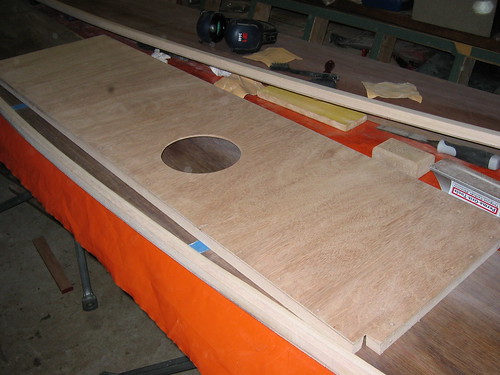
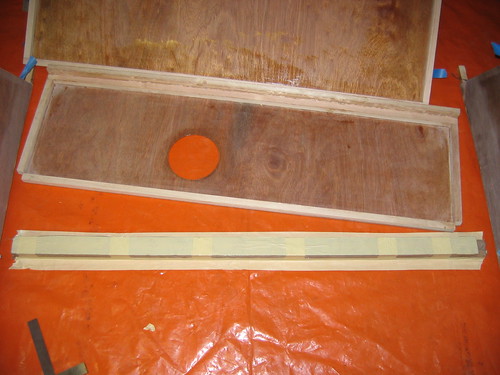
2. The cap strip for the cockpit bulkhead cut to length. The necessity for this appear to have been as a result of a mis-meaurement on my part...

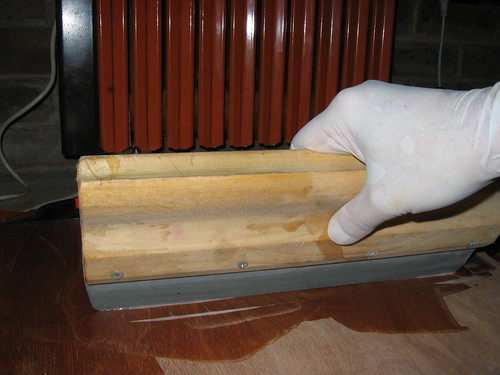
3. Using a squeegee to move resin about on raw ply. This is the first time I've seriously used it on this project. Much better than the roller for swishing the resin about on uncoated plywood. Note that the CB is not sitting directly on the floor, but is sitting on the (also ubiquitous) tape-covered hull stiffener parts; these are visible peeking out from under the CB at the bottom of previous photo
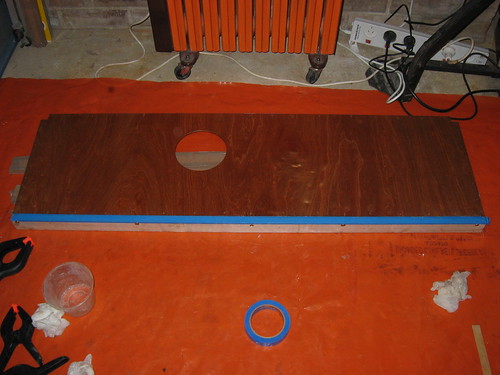
4. First coat of resin complete, slicked by the locked roller after squeegee-ing and rolling. The cap strip was glued on after applying this coat of resin but before the next (I used up what was left in the pot to mix up the glue - had just enough). Last photo before turning off the red-eye flash function on the camera. See the next photo for the difference!
5. Wow! The flash actually does work! Note the lack of "graininess" in the heater, compared with the last shot. Difference is almost literally like that between night and day ;)
6. Third coat on, tape off. Note all the air bubbles, even after slicking back with the roller locked: they are bubbles, not sanding dust. The CB was thoroughly cleaned before the resin was applied. I've also cleared a space on the "storage" bench to get the bulkhead up off the floor. Reason I didn't do this in the first place? Not enough light and I would have been working in my own shadow as well - not a good combination either. And where I was was also closer to the operating heater!

Apart from sanding back the filler-blobbed stern and bow transom parts, that was the sum total of Sunday's work. Now I'm only a day behind on the photo updates...
-
7th April 2009, 02:00 PM #230
GOLD MEMBER
- Join Date
- Jan 2009
- Location
- Blaxland, Australia
- Age
- 65
- Posts
- 2,551
Monday 6 April '09: almost up to date!
Yesterday was A Big Day (see yesterday's post ;). Having started off quite happily, I hit a snag at the bow end, so I took some time out to think about things, check measurements and start again from the stern. This time I screwed things down as I went. Glad I did that, too: the BT more or less dropped into place the second time around! As, of course, it should have done if the measurements were per the designer's specs ;).
1. Stern, first attempt. Apropos of nothing, the white 20 litre drum base stuck on top of the vacuum cleaner base in the background is to stop the kero inside from evaporating too quickly.
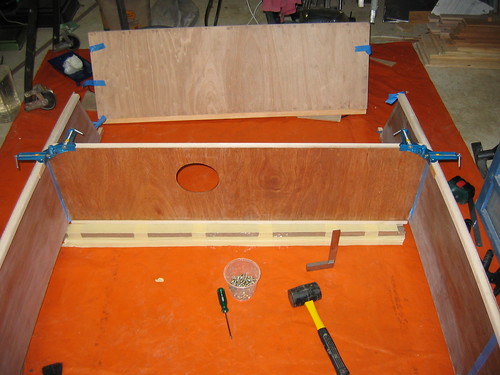
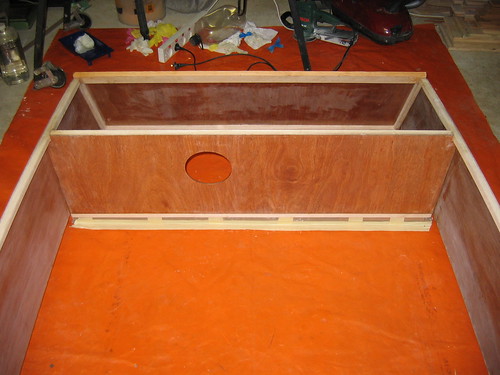
2. Cockpit bulkhead in position, first attempt. Note the rather ricketty and unstable CB support (this will get fixed...)
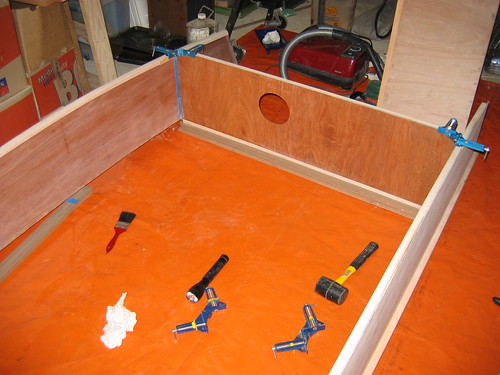
3. Bow, first attempt. Note the blue tape! Corner clamps weren't at their best here...
4. Stern closeup, starboard side. Took a bit of fiddling to get these bits lined up. Some would call the effort involved excessive - I call it neat :)
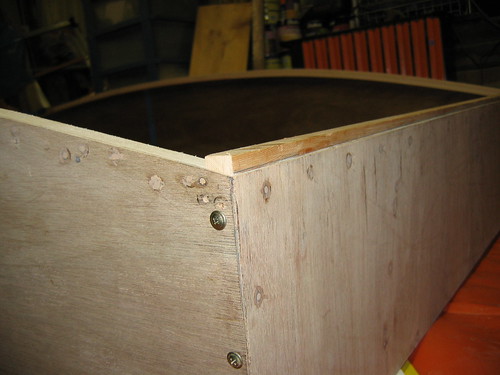
5. Stern closeup, port side. Look, a significant lack of screws!

6. The modified CB support jig taped down, ready for the second attempt
7. Cockpit bulkhead clamped then screwed in place with my cobbled-up "non-slip" (sort of) CB support jig sitting underneath. The jig was much better than the ultra-slippery packing-tape-covered individual pieces of wood! Blue tape on BT from the first and puzzling attempt to fit it. The tape made it really easy (with magnifiers and headlight ;) to get the CB lined up exactly
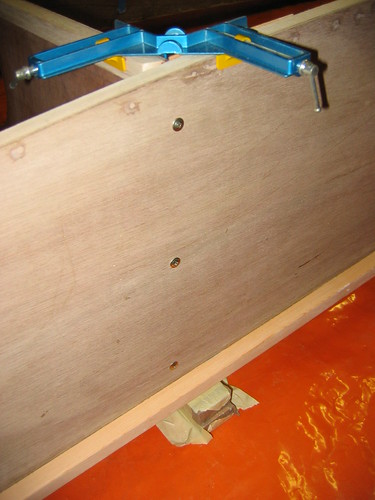
8. Cockpit bulkhead closeup, starboard side. There is a tongue depressor offcut in between the clamp and the soft Paulownia chinelog (just visible here, peeping up over the chinelog to the right of the corner clamp), to help reduce damage while clamping up. Another one was also used on the port side :)
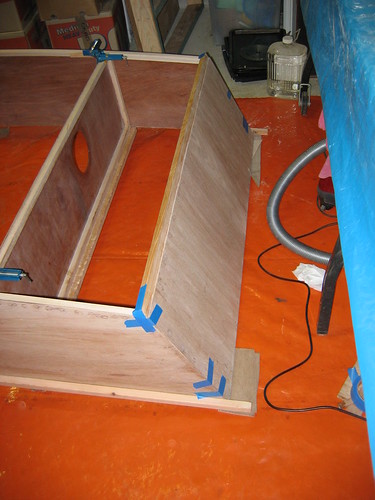
9. Demonstrating the curvature of the side panels, starboard side. Feet somehow got in on the act, the exhibitionists! Naughty feet!

10. Demonstrating the curvature of the side panels, port side. The curvature of the side panels was more or less the same - they did, after all, come from the same sheet of ply. The bulkhead was a close, clean, but easy drop fit between the side panels with room for glue once I'd backed off the screws a bit by hand so that the panel corners lined up - same for all other corners :)
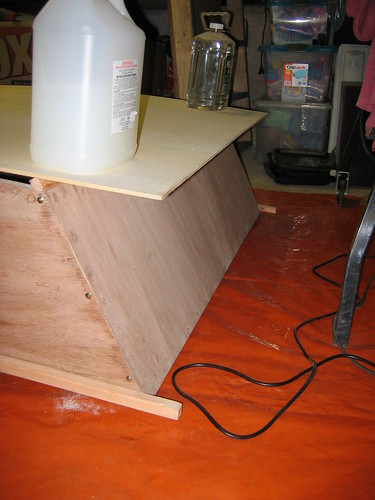
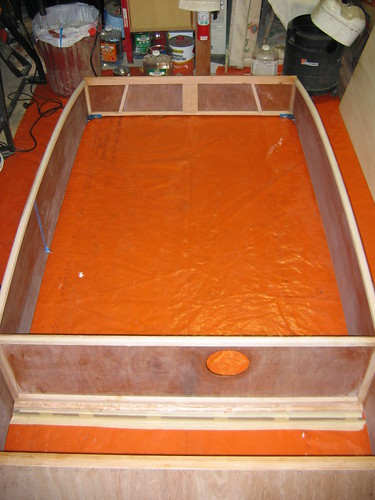
11. Hull bottom posing for the camera. Bit of a cheat, really - there's quite a bit of glueing and planing work to do before I actually reach this stage. Leaving the clamps in place actually gives a more accurate curvature since the stern and bow bottom cleats are waving about in the breeze as well
12. Bow end - again - only three screws, and no tape! Ready for glue, now :).
Whew! That's it - up to date! I'll be attempting to glue Wood Duck up this arvo, if I can pluck up the courage to do so! Time for lunch now :)
-
7th April 2009, 07:28 PM #231
GOLD MEMBER
- Join Date
- Jan 2009
- Location
- Blaxland, Australia
- Age
- 65
- Posts
- 2,551
Well, I had quite a happy time yesterday, getting the boat set up for future glueing - a great sense of achievement, especially after the apparent early hiccup. This was caused by lack of stability in varous joints, and was fixed by the sparing (!) use of screws (only 18 total :).
After this afternoon's efforts, I have now achieved an irreverisble 3D-ness - at least, I will have once the glue has completely set. If I really wanted to, I could pull it to bits right now (eek!), but I don't, of course :). After dinner, it will have pretty well set and that will be that. Everything's cleaned up, including the two corner clamps at the stern (and which got put back once the clamps and the corners were clean) and the two tape markers for the cockpit bulkhead removed. There's one tape marker left, on the port side for the changed registration line for frame 1 (for that side only).
I'll whip out the screws before bedtime, and leave the whole thing to sit untouched for 24 hours.
I left the boat set up in its dry-assembly positions from yesterday, then udnid one clamp at a time at the stern, glue and reclamped, then repeated for the other stern clamp. Since the two forward bulkheads were so close together I undid them both at once but on one side at a time, applied glue and screwed them back together.
The squareness is almost the same as yesterday's setup, but not quite as good: even with my careful attempts to keep everything as stable as possible, some error has crept in, although I don't think it waas the addition of the glue, as I had allowed for that. I'll check the hull again after dinner; and I'll get another go at it when adding various other bits and pieces, so I'm not very worried at this stage. Well, only a bit. Well...
The next step of course is to plane down the transom bottom cleats to hull level, and check the top of the cockpit bulkhead. I have a suspicion which I can't confirm quite because the boat is upside down on the floor, that the cap strip for the CB may not have been necessary after all, but I won't check that until the glue has cured and I can move the hull without things coming unstuck or breaking.
Tonight's photos are minimal (for me ;), as there is no practical change in things other than two clamps are not there any more. I've also finally (!) established the program dial setting that the camera is happiest with in the workshop, so there should be absolutely no more 0 lux pics! The red-eye function was only part of it.
1. Cockpit
2. Bow flotation tank

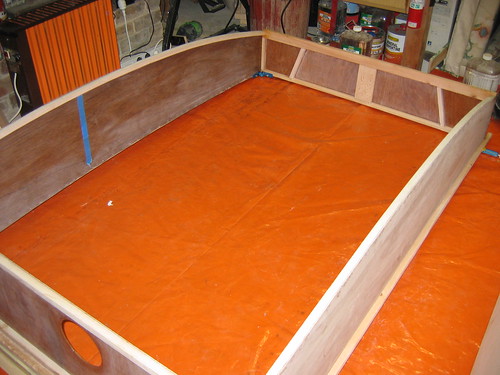
3. Most of the boat, looking aft. The hull is still resting on its two sets of jigs (fore and aft). The apparent skewness in the hull is not real, merely a result of not holding the camera level and square enough to the subject!
4. The rest of the boat, looking forward
More later, when I have something new to add :).
Actually, I do have something to add! I just went and had another chook I mean look over the boat, with the 150 mm engineer's square. It's better than I thought - one bit that looked drook wasn't as it was a piece of ply that had had it's edge somewhat thinned while sanding - the actual (starboard bow) corner was in fact square, and a bit of filler will fix the small depression. As it's on the outside the area will disappear under, amongst other things, glossy yellow paint. The other part of concern was the port (clamped) transom corner. It was in fact fine right at the clamp, but the side panel bows in a bit along its length (making it somewhat dish-shaped with the vertical bend added in), proably as a result (as I still think) of torsion created mostly by the sheer clamp and its odd (diagonal between one pair of corners) grain direction. As Nick reminded me a few days ago, the frames and other bits and pieces will sort this out.
-
7th April 2009, 10:44 PM #232
GOLD MEMBER
- Join Date
- Jan 2009
- Location
- Blaxland, Australia
- Age
- 65
- Posts
- 2,551
As a sort of coda to today's work, I decided to leave the screws in overnght, as the glue hadn't set, and the torsion applied by the sheer clamps looked as though it might pull the sides off the bulkheads if not held in place. I did, however, replaced the screws with clean ones that had not been used for glueing before, to reduce the likelihood of them sticking fast in place before I can get them out again. Note that I say "reduce", not eliminate...
I also tried to get a view of the top of the cockpit bulkhead, to see if I really do need to have the cap strip - it was almost impossible to tell for sure, but from my awkward and partially blocked viewpoint, it does look as though it will be necessary after all, albeit with a lot of trimming. Given that it's Paulownia, that should be quick and easy to do.
A final check around the corners with the 150 mm square showed everything to be the same as it was before dinner, so I packed up for the evening. I've now finally got past page 16 in the instructions - I've been hovering around pp. 14 - 16 for weeks now! Hooray! More importantly, it means that I've now passed a really signifcant milestone in the build, and am quite pleased as a result :). I might allow myself a bit of a treat and have a good look at recent developments regarding Trim. But probably tomorrow.
-
8th April 2009, 04:21 PM #233
GOLD MEMBER
- Join Date
- Jan 2009
- Location
- Blaxland, Australia
- Age
- 65
- Posts
- 2,551
As I'm in a sort of maintenance mode mode today (tidying up ;), I thought I'd summarise a few thoughts that I've had about my approach to the build so far:
* If I were building the boat again, another 'Duck, or when it comes to build the Goat, I probably might not triple precoat, unless I did both sides of all sheets of ply after drawing out the parts but before cutting out;
* I would probably only use Pauwlonia for the foils, not the cleating and chinelogs, because of its susceptibility to dents and dings. Another issue is also related directly to the softness of the timber: relocating screws in the dry-fit holes when gluing up is fraught, since it's very easy to miss the hole, and because the wood is so soft, the drag made by the glue masks the screw making a new hole (!) - even using the hand screwdriver - resulting in mis-alignment. I had to re-fasten one of the corners after the first alignment check because of this. Precoating the Paulownia with resin to harden up the surface and make it more resistant to accidental hole-making, and/or registration marks would help here of course. The saving in weight is a consideration when using Paulownia, but in my case I will be thinking twice unless the design allowed me to get away with using a lot of hidden cleating to make it worthwhile;
* On the other hand, in my experience decent Paulownia has been easier to obtain and cheaper than decent (i.e., clear, straight-grained) oregon, and that in itself is not to be sneezed at;
* I would be much more careful drawing, cutting out and sanding the parts, and go much more slowly, and plan to do less at a time;
* Be more discriminating about the oregon that I purchase, and not just get the first lot that "looks all right", when in fact it is going to increase the work load by additional joint scarfing. If the cost is too high, of course, then "the best that I can afford" is the rule, even if scarfing is required;
* Save up for expensive materials such as resin, paint, timber and the appropriate plywood: which, of course, requires curbing my marked tendency/failing towards impatience;
* The project has once again impressed on me, although I haven't been able to achieve, a tidy and organised workhop with tools to hand and no trip hazards.
-
8th April 2009, 05:07 PM #234
Happily receives emails.
- Join Date
- Jul 2005
- Location
- 'Delaide, Australia
- Age
- 65
- Posts
- 8,138
The way I normally do it is to leave the outside of the hull uncoated as it is so easy to do the glass taping and coating at the same time. As the goat has curved sides it is much less susceptible to panels becoming convex and concave ... it WILL be all convex on the outside by the time it is finished. Originally Posted by AlexN

I actually do this bit visually, because I am used to working with Cedar. First ... I don't use many holes when prefitting pieces ... maybe only one each 300mm and then add more when the actual gluing happens.* I would probably only use Pauwlonia for the foils, not the cleating and chinelogs, because of its susceptibility to dents and dings. Another issue is also related directly to the softness of the timber: relocating screws in the dry-fit holes when gluing up is fraught, since it's very easy to miss the hole, and because the wood is so soft, the drag made by the glue masks the screw making a new hole (!) -
So
- Do your prefit with only a few screws - remove the piece
- You lay the glue down with the bag method quickly
- Spread it with a stirring stick - same action as spreading jam .. you will be all day if you use the end of the stick.
- Any critical holes that you want to re-use (in the chinelog for example .. find them with a hand held screw and scrape the epoxy out of them. It only takes 4 mins.
- Put some screws through the ply piece going on and make sure their noses drop into the revealed holes before driving them in.
Otherwise ... everything is great!
MIK
-
8th April 2009, 09:35 PM #235
GOLD MEMBER
- Join Date
- Jan 2009
- Location
- Blaxland, Australia
- Age
- 65
- Posts
- 2,551
The hull was feeling much more solid and stiff this morning when I checked it. I cracked the screws with the Stanley screwdriver to prevent them completely locking in place, then screwed tehm back in again. Same with the corner clamps and the CB jig.
I'll leave it a while longer before disturbing its peaceful rest.
Now I'm laughing on the other side of my face...
See next post :(
-
8th April 2009, 09:53 PM #236
Happily receives emails.
- Join Date
- Jul 2005
- Location
- 'Delaide, Australia
- Age
- 65
- Posts
- 8,138
Once the glue sets up, but the hull has not interior ... it is very fragile in the corners ... a good idea can be to fit the foredeck first... just temporarily screwed. This can also help remove any twists out of the boat.
MIK
-
8th April 2009, 09:56 PM #237
GOLD MEMBER
- Join Date
- Jan 2009
- Location
- Blaxland, Australia
- Age
- 65
- Posts
- 2,551
Well, good evening ladies and gentlemen, boys and girls...
That'll teach me to get confident. Then again, it wouldn't be an Alex project without one of my signature and catastrophic blunders. This one makes the cockpit bulkhead mess look like - gathering buds in Spring? And as for pontificating on about how much I've learnt, well...
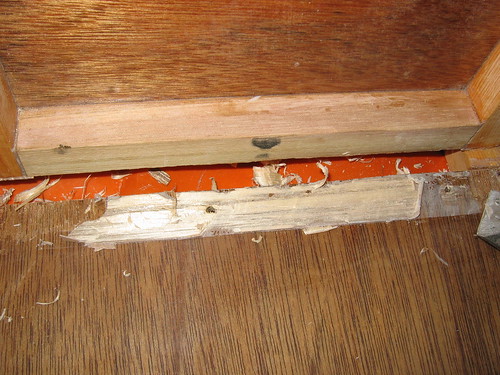
You will all no doubt laugh yer heads off to find that after all my finicking with measuring, etc., I may just as well, to quote the old saw, "measured with a micrometer, drawn out in crayon, and cut with an axe". Which, skipping the bit about the crayon, is almost exact.
I got the screws out this evening, carefully lifted the boat onto its side, and started checking my nice joints. Nice joints be stuffed! The starboard stern joint had slipped by a millimetre. I was a bit peeved at this, until I got to the bow and found out what had happened there. This one was 10 mm out. Not 1 mm: 10 mm. It must have happened when I undid the screws last night - I lined up the port side carefully and refastened; but because the starboard side had appeared not to have moved, I screwed it back up. I'll say I did.
So what to do? The only thing possible: attempt to separate the offending parts as cleanly as possible. Hah! I did use a bit of acetone to try to soften the blows, but the glue was by now quite, quite set. A lot of whacking with a hammer and sharp chisel, accompanied by rending and splintering noises as the ply came away from the Paulownia, and the ply delaminated, resulted in separate starboard bow and transom pieces. I trimmed away the bits of glue asn timber where that was needed, and sanded away what I couldn't clean up that way. The delaminated ply will get an epoxy and high-pressure clamping fix - at least in the first instance - in situ. If this doesn't work, I will have to get another sheet of ply and make a whole new side - all over again.
In for a penny, in for a pound, I thugh that having made such a mess of the bow, I might as well try to remedy the stern: after all, there isn't really all that much left to lose at this stage. I got out the rubber mallet, and gave the stern end of the side panel two controlled but determinded whacks, and the side panel popped off: well, the Paulownia gave way and popped off, the glue joint being stronger than the wood and a bit of the plywood, but neither panel appeared to delaminated internally (I didn't look, though). Another 10 mintues' of chiselling and sanding saw the joint cleaned up and ready for simple re-glueing.
At that point I gave up for the evening in disgust and something like despair, and retired to the computer to write up my confessions, for which there cannot really be any absolution...
Now for the real comedy bit folks, the photos:
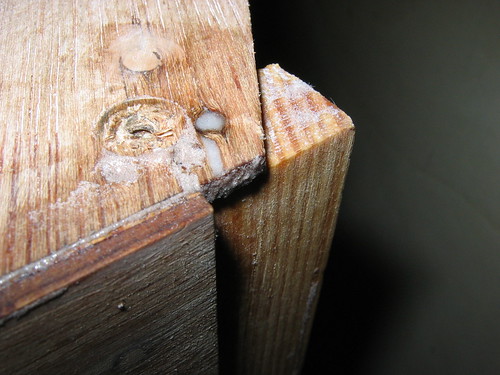
1. 2 mm slip of the stern end of the starboard side panel

2. I really overdid it with the amount needed for the cap strip...but that's the least of your worries, mate, because...
3. ...Hmmm... There's quite a bit of glue run out of that joint... Wait a minute, what's that...Oh no....
4. Oh yes. And this is what it looks like at the other end. Good, innit?
5. This one's OK. Well, it's better than the other side, anyway. That wouldn't be hard...
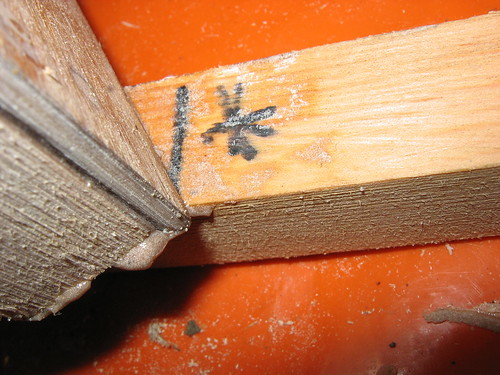
6. Surgery with a chisel and hammer...
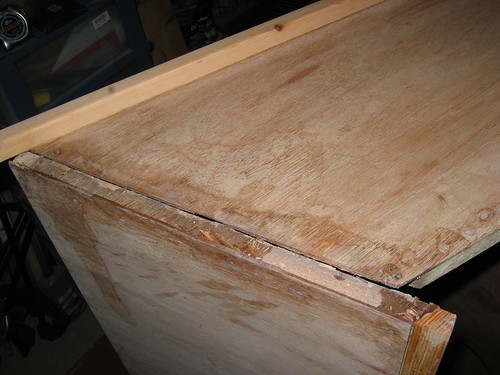
7. Viewed from the other side (boat turned over)

8. "You'd never notice the difference..." Ha ha
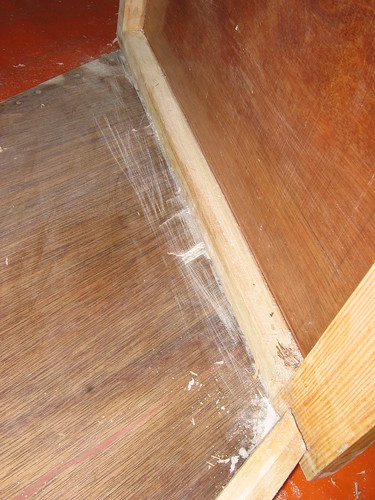
9. The stern didn't escape either...
10. Yumm-o
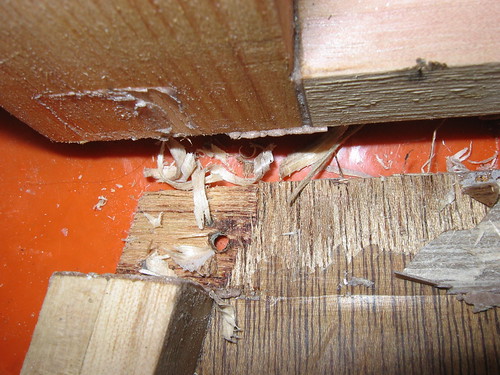
11. Chisel & Permagrit. I'd be lost without the Permagrit...

12. Evidence hidden - well, a bit...
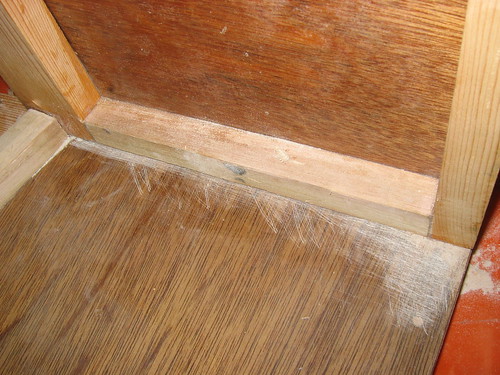
Barrel o' laughs, wannit? No doubt more side-splitting humour from "Boat Wrecking Enterprises Inc." coming soon to this thread. The term "hiding the mistakes in the pot belly stove" also springs to mind - although 1. I don't have one, 2. backyard burning is now no longer allowed (fortunately), and 3. you've all seen it so I can't very well try and hide the evidence now, can I?
-
8th April 2009, 10:29 PM #238
AJ
- Join Date
- Jun 2007
- Location
- Aberfoyle Park SA
- Age
- 63
- Posts
- 1,787
Chant after me Alex...
"Nothing that can't be hidden with cunning and a bit of epoxy !!"
The worst bit is realizing you've made a blue.


The second worst bit is taking the decision to fix it.
Fixing it is just something you do.
Fixing it unobtrusively is cause for celebration.
These corners are inside buoyancy boxes. No-one will ever see
them & they'll be just as strong for a bit of extra pox. Maybe stronger.
Break out the champers cobber !
cheers
AJ
-
8th April 2009, 10:34 PM #239
GOLD MEMBER
- Join Date
- Mar 2007
- Location
- Adelaide
- Posts
- 2,139
Commiserations Alex,
The bit I have learnt about using epoxy is when one has managed to get the goop on a joint and screwed up one
DOES NOT TOUCH IT.................................till the next day at least.
So endeth the first lesson on pox
Sorry, I do feel your pain....... really
Mike
-
8th April 2009, 10:46 PM #240
GOLD MEMBER
- Join Date
- Jan 2009
- Location
- Blaxland, Australia
- Age
- 65
- Posts
- 2,551
Hi MIK, Originally Posted by Boatmik
Thanks for the advice. Well, I won't be screwing down the foredeck for a while now...


 Reply With Quote


Similar Threads
-
New Queensland PDRacer Build
By duncang in forum Michael Storer Wooden Boat PlansReplies: 71Last Post: 26th April 2012, 08:30 AM -
Oz PDR build in Adelaide - sexy black PDRacer
By m2c1Iw in forum Michael Storer Wooden Boat PlansReplies: 39Last Post: 27th April 2009, 06:30 PM -
OZ PDRacer - Dylan's build in the Philippines
By Boatmik in forum Michael Storer Wooden Boat PlansReplies: 16Last Post: 23rd February 2009, 05:50 PM -
Brisbane Timber and Working with Wood. Boatmik/PDRacer
By Boatmik in forum Michael Storer Wooden Boat PlansReplies: 1Last Post: 11th April 2007, 08:06 PM -
Flawed wood on the TS --DUCK!
By Robert WA in forum WOODWORK - GENERALReplies: 7Last Post: 19th February 2004, 11:42 AM
Tags for this Thread
balanced lug,
boatmik,
build,
dacron(tm),
douglas fir,
duck,
enamel,
epoxy resin,
fibreglass,
hoop pine,
interminable,
lug,
machinery,
materials,
michael,
oregon,
oz racer mk 2,
ozracer,
paint,
paulownia,
paulownia/glass mast,
pdracer,
plywood,
polytarp,
primers,
really simple sails,
sail-making,
sailmakers thread,
sanding,
storer,
sydney,
timber,
tools,
varnish,
verbose,
western red cedar,
wood,
wood duck,
wrc
