

 Thanks:
  Likes:
  Needs Pictures: 0
 Picture(s) thanks:
Results 3,091 to 3,105 of 3347
-
11th March 2013, 04:37 PM #3091
 GOLD MEMBER


- Join Date
- Jan 2009
- Location
- Blaxland, Australia
- Age
- 65
- Posts
- 2,551

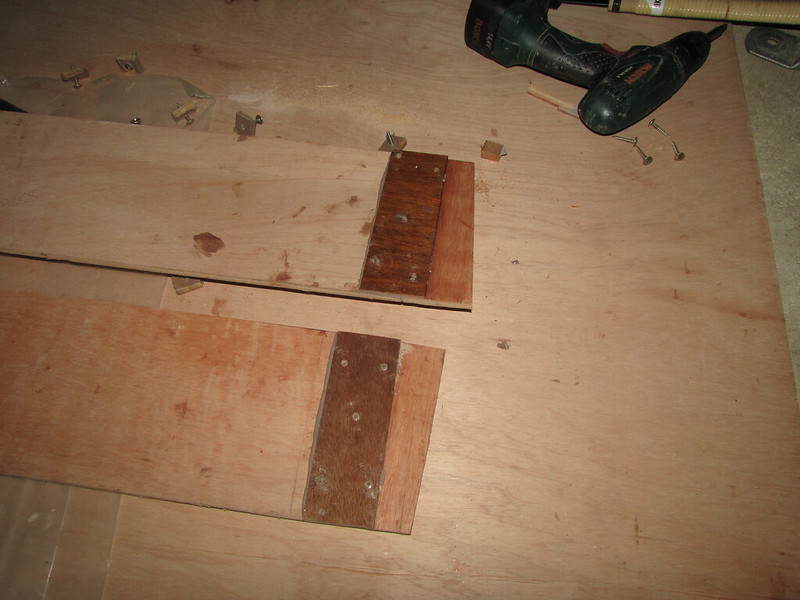
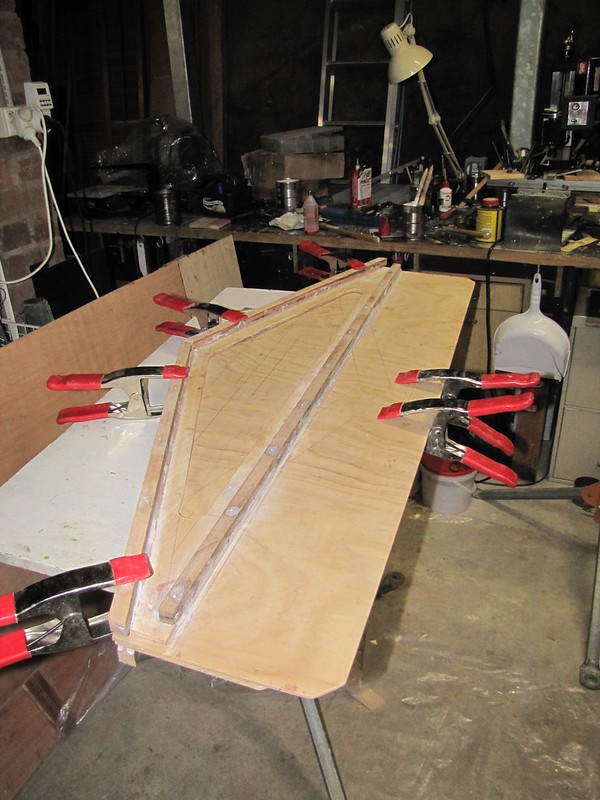
1. Newly-installed roof panel butt-strap: not as much glue-ooze this time - and not as much bare timber area to be affected, either ;)

2. Fillet on the roof extension join, panel 2. I went for a slightly more fluid mixture compared with last time, in order to get a smoother finish. Sings and roundabouts: while the finish is glossier, the fillets have had a greater tendency to slump or tear, being quite a bit less viscous. Most likely caused by sheer stresses at the upper plywood corner. I'll probably need to revisit this when it is more gelid

3. More fillet - another view of the "slump"/"tear"

4. Overview of the completed join, panel 2. Complete except for removal of screws, filling in of screw holes, and some edge-profiling, that is. No matter how hard I try, I still seem to make a right mess and get glue everywhere. I guess the only real solution is to tape some newspaper to the tape boundaries

Follow this link to my Flickr account
Edge-profiling? What is this? I'm pondering whether to run the roof panels through the Carbatec table saw to put a mitre on the peak-edges of the roof panels. This would mean using much less glue on the roof join, and make the roof panels very slightly less wide. Whether I do this or not depends on how much effort I think unearthing and setting up the second table saw - and more importantly how much swing-room I can muster - are. Currently the glue is looking much the easier of the two options.
I might even get one of the remaining coats of varnish on the cockpit panel this evening, if I can get the sanding done. I may actually put another coat on the rest of it as I scratched the last coat up rather badly when using too coarse a grade of peer in too much of a hurry. The weather is currently in my favour here, so I should make the most of it while I can.
Given the current rate of progress on the boat, it will probably be ready to drop in the drink on the coming, i.e., this, weekend. The progress on the roof, however, is going to delay things until the following weekend, I suspect, unless I suddenly get a real move on with it. The rate-limiting steps are going to be wet varnish and the glueing-together of the pre-fabricated kit of components (I've still got to remember to glue up the aft ends of the frame's side panels - maybe this evening) and trim to final shape.
-
11th March 2013 04:37 PM # ADSGoogle Adsense Advertisement
- Join Date
- Always
- Location
- Advertising world
- Age
- 2010
- Posts
- Many
-
11th March 2013, 07:45 PM #3092
AJ
- Join Date
- Jun 2007
- Location
- Aberfoyle Park SA
- Age
- 63
- Posts
- 1,787
G'day Alex
Another option for the peak is to leave the edges square & drop a bit of moulding in the gap.
That would save quite a lot of pox.
Or, if you can live with one side being a few mm shorter than the other, just overlap the sheets?
At any rate, I'd probably go the moulding.
cheers
Alan J
-
11th March 2013, 09:16 PM #3093
GOLD MEMBER
- Join Date
- Jan 2009
- Location
- Blaxland, Australia
- Age
- 65
- Posts
- 2,551
Hi AJ,
Thanks for the input - good ideas :). I'll give them some thought, although the trick with the moulding will be to find something with a small-enough radius and at the right angle (about 40 degrees). A rummage through my stocks might yield something useful, or failing something immediately applicable appearing, I can run something through the Carbatec saw: in fact, I've just remembered that I've got a length of WRC with a right-anlge triangle cross section left over from the chopping up of the shelving upright to make the roof formers. All I have to do with that is run it straight through the currently-set-up jig-scroll-saw in the Triton and Bob's yer uncle :)))).
This will give me two pieces with a 45 degree angle which will mean a slight increase in glue at the bottom of the trench, but nothing major; plane it down one side once installed, and run some of the 50 metre roll of 38 mm glass tape that I've got set aside for the kayak (2.6 metres isn't going to be missed) to form a "ridge capping". I've just got to remember to switch the table's fence around so that the timber is running along the lower (6-ish mm) side of the fence or the fence will come up against the jigsaw blade support arm and I won't be able to get the fence close enough to guide the wood through properly. Sorted! Thanks once again for that :).
Here's another snap:
1. Second roof panel butt-strap divested of its buffered screws and masking tape. It's a bit cleaner than its predecessor, although I still have a chance with the sanding filler. A lot more resin had flowed out from between the boards underneath this time around - perhaps I'd made the glue even runnier, or used more pressure screwing them down, or something. More interestingly, there was some glue seepage though a few of the the screw holes, where I'd come out through the bottom with the drill-brad, despite having the depth stop set - it may have shifted, or I may have been more heavy-handed with the drill this time, or both

Follow this link to you-know-where...
I didn't do very much to the fillets other than run the forming tool - a wooden tongue depressor (gagging-reflex stick ;) "chisel" - down them quickly and smooth over the results with a finger regularly dipped in meths. It should be well cured by morning. Having "switched" ends for the butt-straps: each one will be at the opposite end to the other (in the process the short length of butt-strap will be at the ridge end of things, causing less strain on it as a result (T = rF), not that that will really matter, but it's nicer) and I won't have to bevel the ridge-ends of the straps in order for them to avoid obstructing each other, thus saving a bit of trauma to a plane blade (I almost dislike sharpening plane blades more than I dislike sharpening oboe reed-scraping knives - but not quite).
Having set a tentative date for getting the boat wet again - legitimately - has provided me with something to work towards and maybe even beat, which latter occurrence would be better than good. The Boss has some things wanting made very soon, and the more space I've got to scratch my head in over them the better ;).
-
12th March 2013, 09:34 PM #3094
GOLD MEMBER
- Join Date
- Jan 2009
- Location
- Blaxland, Australia
- Age
- 65
- Posts
- 2,551
Today's snaps:
1. Getting ready to drill the locating-screw holes for the roof former locators. Double-sided tape used to stick 'em on. The blue tape is so that I don't get glue all over the glue channels and have to clean them out with great difficulty and annoyance. Instead, all I'll have to do is remove the masks with great difficulty and annoyance ;), The sheet of plywood leaning against the boat isn't to hide the fact traht I haven't done any varnishing lately - it's going to be used as facing panels on the end-frames

2. Fiddling about with masking tape, version #1. I'd carefully cut strips of bule tape (and me) using a scalpel, but decided that the double-sided sail-makers tape would do the trick better. For a start, it allows for glue layers either side of the frames...

3. Fiddling about with masking tape, version #2. Taped suppports installed, ready for drilling; the frames at the ends of the roof structre just fit onto a single support; the ends will be faced with 4 mm ply, with screen-covered ventilation holes

4. Frame sides drilled and the supports screwed in place. The forward ends of the sides are too narrow for the buffers, so I removed the buffers and put the screws in slowly, by hand

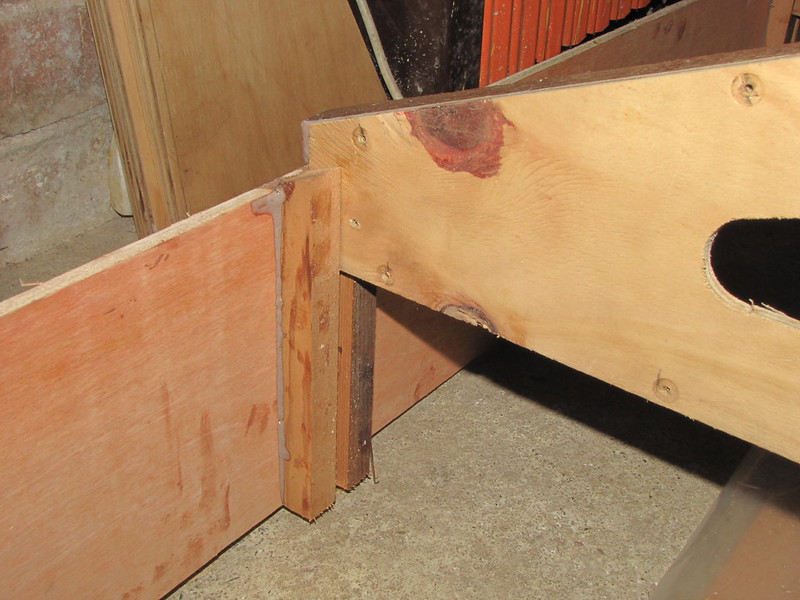
5. Frame side extension pieces installed. The butt-strap on the left is the piece of Wood Duck "salvage"; the darker one on the right is a piece of gaboon plywood from the Wood Duck repair patch

6. Overview of the frame sides, before glueing. Note the plastic sheeting underneath - the extensions will be glued where they are, resting on the roof-panel butt-strap

Follow this link to my Flickr account.
Next steps are sanding and varnishing (ha ha), and glueing the parts of the sides together. I've decided that the best way to assemble the frame is to do it in situ on the boat itself, similar to the way that I am planning to do the frame's bendy-ply "feet". With plastic sheeting over the boat, of course. With the frame locators firmly installed, the structure should be reasonably self-jigging - at least, that's what I'm hoping. I will, of course, do a dry running before waving the glue pot any where near it.
I also decided to raise the frames up about 3 mm or so higher than was intended: instead of filing notches in the side panels for the frame members, the frame members will sit on the sides and the voids filled with a stiff glue mix. Not only will that save time, but it will increase the ventilation area a bit.
-
13th March 2013, 03:44 PM #3095
GOLD MEMBER
- Join Date
- Jan 2009
- Location
- Blaxland, Australia
- Age
- 65
- Posts
- 2,551
No snaps at all this time :). The former supports are glued in place now, as are the frame's side-extensions. The masking on the frame-glueing area worked a treat, especially the vinyl(?) tape-covers of the double-sided tape. The still-sticky glue just slid straight off the white vinyl, although there was a slight tendency to grab at the blue tape. Removing the double-sided tape with extra stick is going to interesting, though. I'd forgotten to undo the screwed-down former locators yesterday, and the double-sided tape was extremely hard to remove this morning. Hopefully part of its tenacity was a result of its having been impact-adhered by the screws/locators. Even if the doble-sided tape is tricky to remove, it will be easier to get rid of than hardened glue. The blue tape, however, comes off without any trouble, even if it's been on for several weeks (depending on the surface that it's stuck to, of course).
Once the screws are out (this evening) and the glue is set (tomorrow), I'll trim off the overhanging bits of the former locators (except for the former-seats, of course) and the side extensions, and dry-fit the sides and formers on the boat. If I get time (unlikely) I'll glue the frame up, but that's more likely to be Friday at this stage.
-
14th March 2013, 09:33 PM #3096
GOLD MEMBER
- Join Date
- Jan 2009
- Location
- Blaxland, Australia
- Age
- 65
- Posts
- 2,551
Some snaps of today's shenanigans:
1. The frame sides have had the roof former locators trimmed to length. The Japanese cross-cut saw was used - and it is probably less sharp now, after cruelly being made to cut through several centimetres (vertically, that is) of high-strength epoxy glue. The tape at the bottom of the "trenches" was eventually removed with the chisel on the right - and then the gum from the tape had to be removed from the chisel - it's very sticky stuff

2. The side-panel extensions were also trimmed, except for the very ends - I'll do them when the frame is all glued up and set. These also still need a final bit of shaping along the tops and bottoms, then the former locators for the aft-most former can be glued on (they abutt against the aft edges of the extension butt-straps). Note that the aft edge of the lower of the two butt-straps is crooked with respect to the straight top edge of the side panel. This was dealt with a bit later using the Japanese cross-cut saw, part of the blade and handle of which can be seen in the top RH corner of the photo
3. Side panel extensions taped ready for glueing the aft-end roof former in place. The screws have been wound through slightly above the service to act as guides for the correct positioning of the former locators. The crookedly-installed butt-strap on the right has been trimmed more-or-less square to the upper edge of the side panel at this point

4. Glued in place - the aft-end former supports have been installed. I could use the excuse that I used the sail-making tape to check that I had enough room at the ends for the ply thickness of the former - but that is only partly true since I could have use the plywood itself. The main reason is that I forgot that I could use the blue tape in that spot. Having said that, using the tape did alert me to the fact that the butt-strap was on crooked, which I checked with the square. I used the latter the draw in the correct edge before cutting the offending wedge off very carefully

5. First look! First dry assembly of the roof frame :). I didn't want to waste the time clearing the decks and turning the boat the right way up!

6. View of the frame from a lower angle. It will be interesting to see how undulating the roof panels are once installed - or whether I got the formers all the same size and the locators all at the same height. I suspect that differences are going to be marginal, and, if any, unnoticeable. In any case, all I really need is for water to shed from the roof expeditiously, which I am expecting it to do :)

7. Roof former nestling snugly in its slot. There is a bit of wiggle-room built in for squaring alignment, and to leave room for the glue

8. The same former at rest on the port side of the frame. That glue really was quite runny
9. A roof former upper glueing-member seated on its side-frame support. There is a quite a good reason - in my own mind at least - for making the locators the full depth pof the side panels. I'll add gussets that fit into the locator slots between the bottom edge of the roof formers and the bottom edge of the side panels/top face of the bendy-ply "skids". tis will allow a bit more of the load from the quite heavy(!) roof panels to be distributed over a wider area. Not a lot, but the more that there is the happier I'll be about it. The gussest pairs will need to be "hand-fitted" as each pair of "slots" is a different height

10. Yet another view of the roof frame

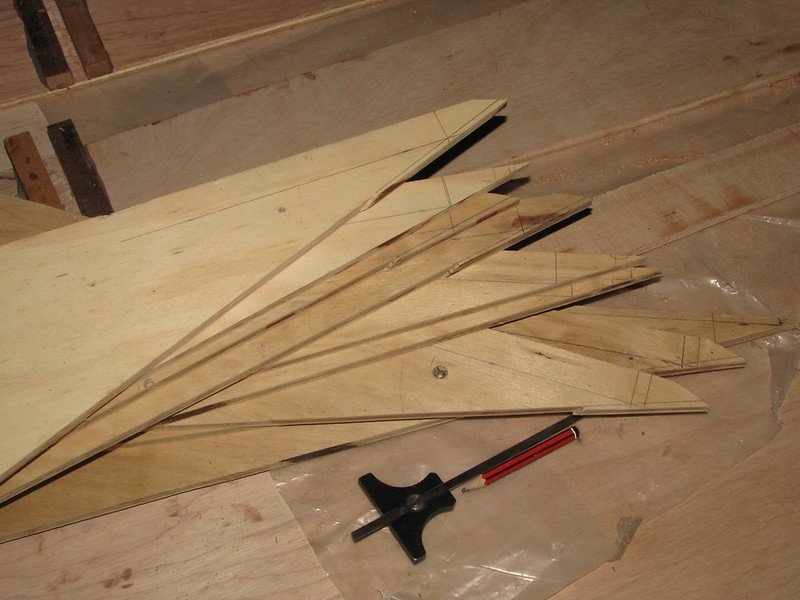
11. Some of the offcuts from making the roof formers. The sharp ends will be used to make the support gussets for the roof formers (see caption to photo 9 above)

12. First stage in gusset preparation. I've marked out the width of the gussets where they meet the bendy-ply skid - the width of the skid minus the width of the side panel thickness, divided in two (21.5-ish mm). Having drawn the line 21.5 mm line intersecting with the "sloping edge" of the offcut, I simply used a square to mark it off. Handy little thing, the depth gauge: it simplified marking out nine items. Some of the "points" need trimming as they weren't put through the table saw quite right
Follow this link to my Flickr account, where you can see them in larger (or smaller) sizes...
I actually got quite a bit more done that I was expecting to have time to do today, including the first dry-assembly of the roof's framework. If I'd stopped to put the boat down that wouldn't have happened, and as it was it seemed to work out fine - which it was expected to do, everything having lined up before glueing, etc. It is gratifying to see things work out successfully, especially when it's ones owndesignconstruction.
There will be a bit more time available tomorrow for the boat/roof, and I hope to have made more progress with it by tomorrow evening. One thing that needs to be done is to fill some screw holes in various items, but probably not all of the holes - the roof formers may get skipped, but we'll se how my patience holds out. You never know, I could have the whole thing glued up and painted (well, undercoat) by the end of the weekend <gasp>. To that end I need to dig out sufficient plastic sheeting to cover the boat and protect it from glue drips. I have a nasty feeling that I through almost all of it out a few weeks ago, in one of my semi-futile attempts at tidying up: the useful stuff gets chucked, and I'm still tripping up over the rubbish.
-
15th March 2013, 12:55 PM #3097
GOLD MEMBER
- Join Date
- Jan 2009
- Location
- Blaxland, Australia
- Age
- 65
- Posts
- 2,551
The glue was pretty well set under the side-extension butt-straps this morning: not rock hard, but enough to let me take all the screws out. I then started filling the holes in various objects using a BoteCote resin/sanding filler mixture - at first, using a cocktail stick:
1. Hole-filling. Lots and lots of hole filling. I started here, using a cocktail stick. By the time that I got to the end of filling the holes in the butt-strap, the glue was starting to go off. The large glue-blob at the bottom of the photo is long-set, and has flaked off the plastic drop-sheet

2. Final use of the cocktail stick to fill holes with. The glue was really going off like a packet of crackers - or a bucket of prawns left out in the sun - by this satge, so I abanonded the fiddle-stick for the glue stirrer - and used that as a spatula. in fact, in this snap you can see where I started to push the stuff on with a finger

3. Throttling up. I got salt put on my tail by the rapid acceleration of the large lump of mixture in the pot, so I sped things up a lot by aplying the filler with the mixing stick used as a spatula. Speedy Gonazles :). Done in a twinkling....

4. Just to prove that I can "unfinick" when necessary - more hastily applied filler ;)

5. Since I was applying the stuff like ordinary wood filler, I filled in a split in the plywood top veneer, and a munch-hole where I slipped with the board on the router table (the large furry blob on the lower edge of the side panel)

6. More hasty filler-slapping: I was getting along like a scalded cat at this point :). This was a case where haste did not make waste - if I'd dawdled any further the whole mix would have hardened in the pot on me. As it was there was a hard lump of a nucleus already, and it was rapidly getting bigger

7. Nail- and screw-holes in roof formers all filled, at a blistering pace, too (well, blistering for me, probably not anyone else ;). After the first two frames the filler had become too hard to work, so I had to stop and mix a new, slightly more fluid batch

8. Closer-up view of filled frames. I had just enough filler to do everything - but had to crib a bit here and there from over-filled spots to complete the filling-in of a large knot hole (not shown here)

9. Even closer view of the glue (filler). This stuff is really easy to sand :). At the rate that things have gone off I might be able to do the sanding this evening. that would be very good indeed :). I'll probably rub off the wood-stain on the former locaters with some 80- or 120-grit sandpaper too, at this point. I might as well: that's probably all the sanding that this roof structure is going to get!

Follow this link to my Flickr account. Watch out for all that sticky filler (that goes for you too, Mr Snappy!)
Once this is done, the facing pieces will be glued to the outer roof formers, the frame will be assembled, the aft-ends of the side panels trimmed, the roof put on, and some paint slapped rapidly over it, starting with the undercoat (Norglass PRi-COAT primer/undercoat, bought especially for this little project). Rapid process, hopefully! I'll glue the outer formers straight onto the plywood sheet, weigh them down with bricks, then cut the frames from the sheet once the glue has set. Buzz, buzz, buzz.
-
15th March 2013, 08:30 PM #3098
GOLD MEMBER
- Join Date
- Jan 2009
- Location
- Blaxland, Australia
- Age
- 65
- Posts
- 2,551
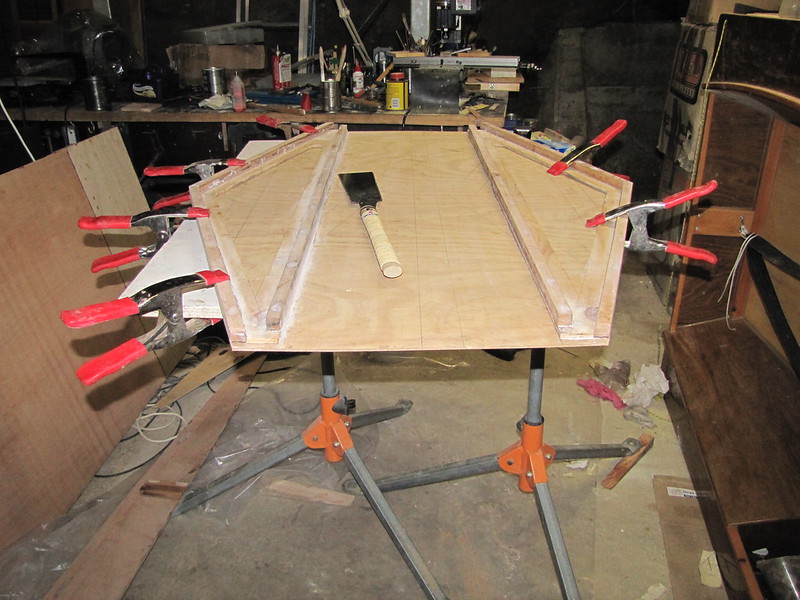
I wasn't expecting to be making this pot, or at least not until tomorrow, but having finished glueing the facing plates for the end roof formers, I thought that I might as well post them now as later - I won't be doing any further work on the boat or roof today as most of the working room has been soaked up:
1. Roof frame end-plates: arranging the shapes. The other sides of the frames have been sanded flat - although, of course, I needn't have filled them in the first place since they are going to be smothered in glue...

2. Array of clamps to be used in the glueing operation. You can never have enough clamps ;)

3. Check to see if we have enough plastic sheet. We have enough plastic sheet

4. Reference outlines drawn around the roof formers in pencil

5. Last minute change to layout - literally. The glue was mixed, and I decided that it would be better to have the peaks on the outside so that I could tweak the length of the overhanging rain/dust "skirts". The reference lines are now the two tram-lines stretching right across the board, and are for the bases of the roof formers

6. One roof former with glue spread out, the other with glue applied using a zip-lock sandwich bag - prior to being flattened with the (very useful) plastic paint scraper. They look a bit like coat-hangers here...

7. Both formers glued and clamped in postion. They'll stay that way until morning now. These are probably the Mk 4 Wobbly Weight Towers by now ;)

Follow this link to my Flickr account, but watch out for falling bricks...
Even if the bricks aren't sufficient to flatten the glue layers out completely, it probably doesn't matter a lot since the end-plates will be carrying no load whatsoever, being partly to prevent ingress of some water and dust; and partly (mostly) cosmetic. More tomorrow when the glue has set.
-
16th March 2013, 09:18 PM #3099
GOLD MEMBER
- Join Date
- Jan 2009
- Location
- Blaxland, Australia
- Age
- 65
- Posts
- 2,551
Whew! I spent most of the day chopping up the end-plates that I glued up and clamped yesterday evening, and sanding off the various parts of the roof frame (epoxy filler, and general cleaning off of whiskers of timber). I also turned the glued-up endplates into parts for my new plywood dovecote - a secret project that I have been incubating ;). Well, not really, but the parts do remind me a little of such things...
1. End plates for the portable boat-shed - roof formers glued onto 4 mm plywood sheet :). The plywood looks like hoop pine plywood to me

2. Chopping off the corners of the plywood sheet back to the edges of the roof formers

3. The Japanese saw was too flexible for corner+glue removal, so I used a "conventional" rip-saw

4. Drawing a cutting line to reduce grain-tearing by cutting down towards the frames (inner faces of the end formers)

5. Another view of the cutting-line. If you look closely you can see the rather furry nature of the previous cut

6. Two different cuts. The front one is relatively clean and sharp: cutting down towards the frame; the fuzzy rear cut was cutting from the frame side towards the outside. the front cut edge is fuzzy too, but at the bottom (inside) of the sheet, and in any case both were removed with the cork sanding block and 80-grit paper

7. All four corners removed. The roof former gusset pieces (still uncut) can be seen in the lower RH corner, patiently awaiting their 15 seconds o' fame ;)

8. Outer face of the plywood sheet sanded with 150-grit sandpaper to remove the accumulated layers of mould, (concrete) dust and dirt

9. End plate board flipped over for sanding off the epoxy filler. The "half-round" (and very coarse) Perma-Grit file seen here was sued to great effect to get at filler in the outer ends of the formers, and also to clean up glue ooze where the formers will eventually be glued to the side panel locators. Perma-Grit files come into their own when removing large amounts of epoxy very rapidly - which is precisely what they were invented for

Follow this link to my Flickr account
My arms (and back) are rather stiff from a number of somewhat - unaccustomedly - lengthy working sessions today, and I'm going to put the rest of the sessions' snaps up in another post; so you will have to wait until then to see my brand-new dovecote ;)
-
17th March 2013, 09:56 AM #3100
GOLD MEMBER
- Join Date
- Jan 2009
- Location
- Blaxland, Australia
- Age
- 65
- Posts
- 2,551
Right, here's the second half of yesterday's snaps:
1. Marking the separation lines, with one thin strip left in the middle: allowance had to be made for the fact that the frame on the left unfortunately slipped from the reference line on one side of the board (the other three sides happily stayed where they were put)
2. End-formers separated; the offcut strip can be seen on the floor. The bow skirt was alloted 125 mm below the bottom frame; the stern skirt 180 mm beolw the bottom frame. The latter distance allows for the fact that the frame sides at that point are 160 mm deep. It's fortunate that I decided to rearrange the formers on the sheet as the stern former's skirt would have been way to short, greatly reducing its effectiveness...

3. Longish Perma-Girt block: there's a size even longer than this! This one is twice the length of my usual Perma-grit block; the longer one three times the length. The block was used to even out the rather wobbly cut for the bow former; the second (stern former) cut was much neater and much need less treatment

4. Hole centres centre-popped in one end plate. This appears to be the one former where I made a half-hearted attempt at filleting the glue-ooze

5. Both end formers clamped together, face to face. Using the very useful spring clamps, of which you can never have too many :). I really wish I had more of these. Note that I have mitred off the corners of the skirt(s) to protect them (and other objects!) from damage when handling. I realised when writing the previous sentence that I've neglected to take putting the heavy roof down to rest on these flimsy plywood ends...I'm going to have to supply some reinforcing strips to the outer faces in an attempt to beef them up
6. Six holes cut with one of the saws from my cheap spring-steel hole-saw set. I later sanded off the furry edges that the saw made when exiting the plywood. Both formers are still clamped together here

7. The holes were cut in both formers at the same time, of course. Being clamped together, this meant only having to do one set of measurements! And also more likely that the two panels would end up looking a little bit similar ;)

8. Dovecote parts! For exceedingly small doves. And maybe wrens, pardalotes, wee-bills or other small birds ;).These are actually ventilation holes to allow air to be pushed in or out of the roof. The holes will be covered from inside with insect mesh, either brass or nylon, epoxied onto the former at strategic areas. That plywood really does look like hoop pine... It seems a shame to paint over it but I am NOT putting a clear finish on them!

9. A couple of sanded roof formers. Standing in front of the sanded side panels and the second roof panel. The "dovecote" parts are leaning against my leg in this photo

Follow this link to my Flickr account, bring a pair of binoculars to see the wee birdies
I'm off to see if I can dig up a suitable sheet of plastic, now - after having thrown out almost all of the suitable material recently :(. I think I know where some might be, cross fingers and toes. More later.
-
18th March 2013, 05:49 PM #3101
GOLD MEMBER
- Join Date
- Jan 2009
- Location
- Blaxland, Australia
- Age
- 65
- Posts
- 2,551
I'm trying to remember what I did yesterday (Sunday) - I know that I spent some time at it, but things got into a bit of a blur. I possibly, therefore, did too much. I know that I took a ridiculous number of snaps for the amount of work actually done, so maybe that was all I did...
Ah yes...a quick squizz at last night's (stupidly large number of) Flickr uploads suggests that apart from fossicking out a suitably-sized sheet of relatively thin plastic (so as not to disrupt the bendy-plies' curves following those of the decks), it appears that I spent most of the time dry-fitting things. I know that I was scratching my head a lot over the mismatch in side-panel lengths, a result of not checking carefully enough when trimming/squaring up the aft ends of said panels. Measure twice, cut once, etc. Actually, measure even just once would have done the trick in this case. And I filleted the gaps between the end-frames and their cover-plates, not having screwed them together when glueing (I relied on yet another of my Wobbly Weight Towers(TM)).
Today was spent largely continuing the dry-fit and working out how to extend the short side panel - and once that was sorted out, extending both of the side panels by about 6 mm still further for getting extra clearance when putting the roof on the boat - and taking it off again, too.
So, a selection of snaps from yesterday, culled from my Flickr upload (they are all lurking in my Flickr "Wood Duck Repairs" set) -
1. Plastic sheet. I think that that's probably enough ;). There is actually some more plastic around, rolled up on the former painting-tent frames, but this will do

2. Milliput to the rescue! I didn't want to mix up a batch of epoxy/filler, so I used a bit of terracotta-coloured Milliput to fill a number of bits that I'd missed on the roof formers. Milliput is itself an epoxy putty, usually used for modelling figures and so forth, but it also has a wide range of other uses - including marine/boat-building (as it indicates in its packet leaflet)

3. The terracotta-coloured Milliput after sanding flush with 80-grit paper and block. Where is it?

4. Haven't seen this for a while: the boat back on an even keel! I still reckon that I prefer the white to the yellow - it contrasts more/better with the wood :). That unvarnished patch on the foredeck really stands out, doesn't it? Well, all in good time...

5. Plastic-coated boat, ready for setting up the roof frame. The plastic will also help prevent the uncoated bendy-ply from scratching up my beautiful "mirror" (ha ha) finish, as well as catching glue drips

6. How to undo a figure-8 knot ;). Use a nail! The mole-grips provided extra leverage - such that the nail bent. I needed to get the traveller rope undone in order to seat the bency ply over the rope holes - there will be a gap in the final version. The other knot was unfortunately coated in "PRi-COAT", which was dealt with by whacking the knot repeatedly with a small hammer, using the end of an upright brick as an anvil ;). I then used the nail to ease the knot open... It's probable that I will replace the old traveller rope with some of the shiny new stuff - the "old" one is looking a bit dowdy, especially where I whacked the paint with the hammer...

7. Tape markers. These are for aligning the centre-lines of the bendy-ply strips (there's a corresponding pair on the side decks at the stern). Note the completely detached traveller rope sitting on the plastic, awaiting banishment to the box o' bits - eventually. Also note Sid Snake, the famous bendy-ply ribbon snake...

8. Mr Snappy had to move. Mr Snappy says something unrepeatable. Watch your jaw, Mr Snappy, there's the duct tape right in front of you ;). Mr S looks as though he could do with a good bath and a scrub with an old toothbrush

9. Bendy-ply "runners/"feet" in place

10. Both side-panels in postion over the (pseudo-)centre-lines of the bendy-ply strips

11. Inside face of the starboard side panel. The roof former locators are allowing the side panels to stand upright on their own :)

12. The front former in position in its side panel "rebates". I put "rebates" in quotes as they were made by glueing things together, not chopping them out of a single piece of wood...

Follow this link to my Flickr account, where you could get lost amongst the photos (there are way too many)
With the various snags that I have been encountering (albeit not unexpectedly), I've given up the idea that I had of launching the boat this coming weekend: I am - or rather the roof is - not going to be ready in time. The weekend after that is Easter, so that's out too. I'm going to reschedule it for the weekend after Easter.
Some more snaps in the next post (of course).
-
18th March 2013, 06:12 PM #3102
GOLD MEMBER
- Join Date
- Jan 2009
- Location
- Blaxland, Australia
- Age
- 65
- Posts
- 2,551
More of what I got up to yesterday:
1. Stern roof former, sitting high - on the upper rudder gudgeon - waiting for the gudgeon hole to be cut

2. Gudgeon hole marked out, awaiting the saw. Measure twice, cut once: I got the top of the gudgeon wrong - that's more like the top of the transom!

3. Aft former's end-plate sitting on the upper gudgeon

4. Gudgeon clearance hole roughly cut out: I rather butchered this one, but it was cleaned up later. You can see from the gap how much I got themeasurementsestimates wrong - by between 15 and 20 mm. The end-plate should be covering the top of the stern transom all the way across. This can be fixed either with a rubber flap or a piece of plywood glued over or in the "slot"

5. I'd not realised that the tow-rope deadeye on the foredeck was in the way, so I had to make a cutout in the front former's lower frame

6. How thin can we go? Not too thin in some spots ;)

7. The remaining blocks just lifted out with a slight bit of pressure from thewide-blade screwdrivercheapy chisel

8. Hardened glue removed using the cylindrical-section coarse Perma-Grit file. A lot of the glue was epoxy-wood complex, so it took a while to shift - relatively speaking; the process is still under way here

9. One slight problem: one side panel is shorter than the other. While this mightn't seem much over four feet or so, it will matter when it comes to putting the cover over the boat: what little clearance there is would be reduced on one side and make the manipulation of the cover that much more difficult

10. The nearest frame locators are (more or less) in alignment. The noses of the side-panels are clamped together, level

11. Gaps between the roof former and its end-plate: wide enough to slide a piece of 80-grit sandpaper into very easily. Both of the end-formers were like this: where the brick-clamps weren't, or possibly weren't heavy enough, etc...

12. Pencil lines show depth(s) of void(s). What to do?

Follow this link to my Flickr account, etc., etc., etc.
More to follow, when I've had a break...
-
18th March 2013, 10:51 PM #3103
GOLD MEMBER
- Join Date
- Jan 2009
- Location
- Blaxland, Australia
- Age
- 65
- Posts
- 2,551
Well, what to do with the frame/end-plate voids?
1. Cover them up with some fillets, of course! Any excuse for a fillet ;)

2. Fillet installed, shaped and the area generally cleaned up: I used the unaltered end of a tongue-depressor stirring stick and a tongue-depressor "chisel" for these tasks

3. Formed fillet. Hmm...race-track fillet... O.K., this is the last of yesterday's snaps...

4. This is the first of today's: It's the two side panels clamped together to check their respective lengths, not a mould for a lead keel-insert for a Bolger Micro. Well, not yet, anyway ;). And in any case, for such a mould, the blocks inside would be outside, the plywood would be >= 20 mm, the bottom wouldn't be bendy-ply, the top edges would have the Micro's bottom profile, etc., etc.

5. Long view of the two side-panels clamped together. That traveller rope is still there...

6. The two frame locators really are out of line with each other. In actual fact, the problem gets worse from bottom to top, as the port locator was glued on skew. I did a bit of head-scratching over this one, and decided to make up the wedge-difference with glue, rather than muck about trying to shape ply wedges, etc. Note that port side panel has had a bit of plywood stuck onto the end of it to bring it into line with the other one. Well, almost...

7. Fillet and tow-rope deadeye cutout, front roof former

8. The return of the race-track fillet ;). The fillets were smoothed down with water then meths on one frame; and just meths on the other. The one doen with both water and meths turned out the shinier of the two sets of fillets, but that may just be because the water+meths one got twice as much rubbing down

9. 3D! This is a dry-fit only. Interesting: the traveller rope seems to have been relocated - finally

10. Roof frame from the aft end. Strictly speaking, the mill-table ("X-axis") handle on the RH corner of the photo should have been replace with a motor by now. Guess why it hasn't been?

11. Frame again: just before the glue was applied to the front end

Follow this link to my Flickr account, but don't trip over all the tools that some fool has left lying all over the floor :(...
I got the first of the joints of the frame glued up this arvo, after the photos above were taken. I "only" did those between the first (front) roof-former as I wanted to get them set and stable before doing any of the others. The "only" is because I also had a whole lot of "fun" with the extensions to the side panel extensions, which involved a lot of glue, and a whole slippery mess of same plus plywood strips cut so as to get the ends identical plus more "wriggle-room" when handling the roof (which will be quite a heavy structure) over the boat. I didn't use any form of clamps although I had earlier thought of using blue tape to hold things on. I dropped that idea like a hot potato when I found out just how difficult that was going to be, and took the risk of the glue/plywood mess setting up as I want it, on its own. I've got all fingers and toes crossed, but when I checked about half an hour ago things looked surprisingly OK. I did take a lot of time aligning things, though. Some photos of that, tomorrow.
After checking that all my glueing efforts were OK this evening, I started cutting up a piece of 30 mm x 30 mm Meranti that had been used as a wall bottom-weight for my only-partially-successful painting tent (remember that?) which I had found this morning while stripping up over various obstacles while trying to look along my my wood pile for something useful for what I wanted (I didn't find it because I tripped, however ;). What I wanted was some sturdy but light timber for reinforcing the skirts on the end-plates.
I've cut a base length, and three short uprights: two of the latter will be glued onto the plywood between the ends of the base element and the plywood roof (and also glued to these, of course), thus - in the "theory" inside my own head, at least - transferring the load on the skirts from sitting on the ground, into the roof. The roof will have a quite large glued area. The third short element will also be glued to the base element, and will act as a stiffener for the middle of the plate, and stops about 10 mm below the lowest centre ventilation hole. As a result the centre stiffener crosses over the 19 mm base frame element on the inside of the first roof former, and will also help with the stiffening. Pictures will help visualise this a lot more clearly than my verbose and wobbly prose, but I currently don't have any to show.
A similar affair will be made for the aft end-plate, but I'm waiting until I've got the side panel extensions finally finished off and the aft roof former properly test-fitted. I'm also going to fill in a bit of the gudgeon cutout in the aft skirt with a small piece from the hoop pine(?) ply off-cut from 'twixt the two end formers - and a quantity of glue! I want to cover up that bit of "daylight" that I can see between that skirt cutout and the stern transom.
That's enough for tonight: tomorrow will hopefully see some more glueing-in-place of diverse frame elements :). Note to self - don't forget the support gussets!
-
19th March 2013, 12:51 AM #3104
Senior Member
- Join Date
- Dec 2008
- Location
- McAllen, Texas, USA
- Age
- 64
- Posts
- 154
Just an idea to even draw things out more...
Ok, I am looking at this lovely shed roof that you have made to fit and I think that if you make up some poles and a bit of polytarp, it would make a perfect beach cabana for sailing days. Leave to top on while trailering and when you get to the shore, pop in some legs and drape some tarp walls and a few lounge chairs and you are all set.
-
19th March 2013, 10:17 AM #3105
Sawing hack
- Join Date
- Oct 2007
- Location
- Sydney
- Posts
- 178
Now that I see the OzRacer "roof" coming together in 3D, I am now wondering if you'll be able to get it through the front door. I expect the door is big enough to fit the boat through. The roof seems a bit wider/taller than the boat.
otherwise it's looking great. Ofc I'm looking forward to seeing the boat in the water!


 Reply With Quote

Similar Threads
-
New Queensland PDRacer Build
By duncang in forum Michael Storer Wooden Boat PlansReplies: 71Last Post: 26th April 2012, 08:30 AM -
Oz PDR build in Adelaide - sexy black PDRacer
By m2c1Iw in forum Michael Storer Wooden Boat PlansReplies: 39Last Post: 27th April 2009, 06:30 PM -
OZ PDRacer - Dylan's build in the Philippines
By Boatmik in forum Michael Storer Wooden Boat PlansReplies: 16Last Post: 23rd February 2009, 05:50 PM -
Brisbane Timber and Working with Wood. Boatmik/PDRacer
By Boatmik in forum Michael Storer Wooden Boat PlansReplies: 1Last Post: 11th April 2007, 08:06 PM -
Flawed wood on the TS --DUCK!
By Robert WA in forum WOODWORK - GENERALReplies: 7Last Post: 19th February 2004, 11:42 AM
Tags for this Thread
balanced lug,
boatmik,
build,
dacron(tm),
douglas fir,
duck,
enamel,
epoxy resin,
fibreglass,
hoop pine,
interminable,
lug,
machinery,
materials,
michael,
oregon,
oz racer mk 2,
ozracer,
paint,
paulownia,
paulownia/glass mast,
pdracer,
plywood,
polytarp,
primers,
really simple sails,
sail-making,
sailmakers thread,
sanding,
storer,
sydney,
timber,
tools,
varnish,
verbose,
western red cedar,
wood,
wood duck,
wrc
