

 Thanks:
  Likes:
  Needs Pictures: 0
 Picture(s) thanks:
Results 286 to 300 of 3347
-
17th April 2009, 10:56 PM #286
 GOLD MEMBER


- Join Date
- Jan 2009
- Location
- Blaxland, Australia
- Age
- 65
- Posts
- 2,551

Today's time - such as it was - was spent on the mast step runners. I screwed them together via the holes that I marked out and drilled for the step unit's cross-piece screw-locators: I changed my mind about using screws though the waste notch material, and changed the positions. This because I only wanted to hake sure that the top edges were aligned before making the notch cuts. The necessity for drilling accuracy wasn't too high, as the area is 19 x 19 mm, and I did it by hand <gasp> :).
The marked notches were compared with the distances from registration marks and cleats, and were happily found to be spot on :). I added about 0.5 - 1 mm for glue, and cut the notches with the big Z-saw (I got two saws, a medium and a large, while I was at it). One of my engineer mates gave me some good advice about sawing: don't press down, let the saw do the work. This is the same chap who made his own comments about the plethora of holes. Took his advice, and it is working :). Just have to practice not pressing too hard now. Removed the bottom, turned the boat on its "back" (topside), and did a trial fit of the runners to the hull. Seemed OK, but was feeling woozy again and was having a bit of trouble locating the centrelines (I know they're there - they're under the resin!) so packed up for the evening and came inside.
Photos: even less today than yesterday: only three! Cool!
1. Step runners with stainless steel mast foot locating bolt inserted for fun, and the notches cut with allowances for a good amount of HS glue! Hmmm...the Flickr uploader crashed while uploading. It's never done that before. Only one out of three photos got up there. 2nd attempt is OK :)... The lines and hatching that can be seen at the bottom of the top runner are the waste as marked out by holding the runner up against the chinelog on that side and running a pencil along the chinelog (see my comments about this in a previous post). That's a $20 bolt, by the way!
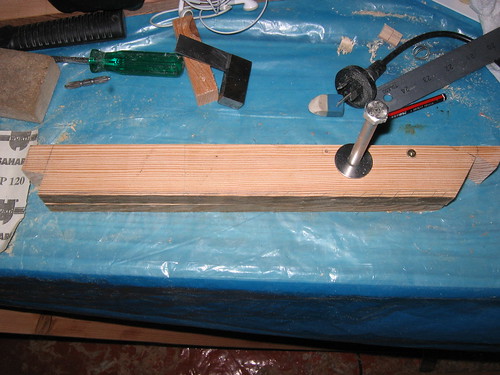
2. Better view of the front notch. Btw, that's NOT the way to treat a good square! It should be in its case, or placed well away from other things, and DEFINITELY NOT have something leaning on it (even if it is relatively light)! I told you I was woozy: didn't even see this until I viewed the photo in GraphicConverter before I uploaded it. The bottom edges of the runners don't match: but the top edges, the notches and the bolt holes do! As you can see, the shaping of the runner bottoms will take care of this :)

3. The temporarily-paired runners resting more or less over the centreline. I'd better not drop anything on the front end - the "ears will snap right off withoug much persuasion at all. I'm still not very happy about that grain orientation, but at least there will be lots of glue around the joint(s) ;). The foredeck has made quite a difference to the overall stiffness of the hull when handling. Got to vacuum out the compartment so that I can find the lines under all the fine dust that's in there!

That's it! Once again, I had intended to do more, but that's all that I had time to do without pushing and breaking something. I'm going to use 3 mm 7-ply birch A/C ply for the spacer caps. I'm also toying with the idea of using Tasmanian oak instead of oregon for the runner spacers that fit under the ply at the step edges. Anyone got any comments? I bet MIK has ;).
So 303 Wood Duck has had a sort of birthday today, although I forgot to sing "Happy Birthday" to her - maybe we can have a party for her on the weekend with cakes and lemonade :).
-
17th April 2009 10:56 PM # ADSGoogle Adsense Advertisement
- Join Date
- Always
- Location
- Advertising world
- Age
- 2010
- Posts
- Many
-
18th April 2009, 10:55 PM #287
GOLD MEMBER
- Join Date
- Jan 2009
- Location
- Blaxland, Australia
- Age
- 65
- Posts
- 2,551
Nothing really exciting today, but some reasonable progress anyway. Bit of a clean-up hoovering the dust, sanded back the excess glue - there was a lot of it! - from the side panel patches, and reassembled the work bench in a slightly different configuration, for supporting the hull. I also halted work on the mast step runners when I discovered that the fit wasn't too good - I had way overdone the glue allowance, and for some reason the distance between the bow and cockpit bulkheads is somewhat too long. I think.
I am going to fit a thick card template to the actual geometry and compare it with what I have already cut out. If it turns out that the runners are too short, I wlll make a new set with the tempaltes that I've trial-fitted: but I will be taking very careful steps to check this, and will probably make up a 10 mm balsa test part first (balsa being somewhat cheaper than the oregon that I'm using!).
Just as well I didn't sign up for the Duck's Autumn School - I have to have day surgery on my upper sinuses next Friday, which I am NOT looking forward to :(.
A few photos showing the new "building jig", etc.:
1. The cleaned-up port bouyancy tank side: there was more glue there than I thought! And the Permagrit block made fairly heavy weather of it - or I did - as keeping the block level and not gouging off-target areas was hard. As you can see, I wasn't successful there. The whole side got a going over with the ROS and the black 120 grit disc after I'd got the glue down to the ply level. The whole area is going to get another coat of resin, with the bare wood and glue bits getting a couple of coats first. There was also a large air bubble - just visible in the bottom right corner as a darker spot - which will need filling. I'm debating whether to use neat resin for that, since it can simply flow into the hole and fill it up, or go the whole hog and stuff it full of glue mix when I do the mast step assembly.

2. Wood Duck's new perch: the original building frame supported by the Triton multi stands :). I clamped a length of 4 x 2 at each end after checking that each piece was straight along the supporting edge. Because of the logistics enforced by lack of room, I had to put the hull on the frame somewhat crooked first, then carefully slide the 4 x 2s between hull and frame, and finally add the clamps, three to each end. The clamps went on after I took this photo. I must sand the resin off the bow while she's up on blocks! Btw, that resin was mixed with approx. 15 % TPRDA - and it's as hard as nails.
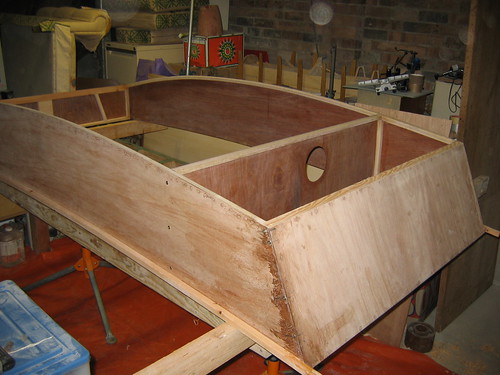
3. Look! She's sprouted a snowplough! Or a cow-catcher :). That's a severe identity crisis you have there, Wood Duck ;). In actual fact, the piece of 25 mm angle iron is screwed onto the bow transom to force the sternwards curve out of it: see next photo...
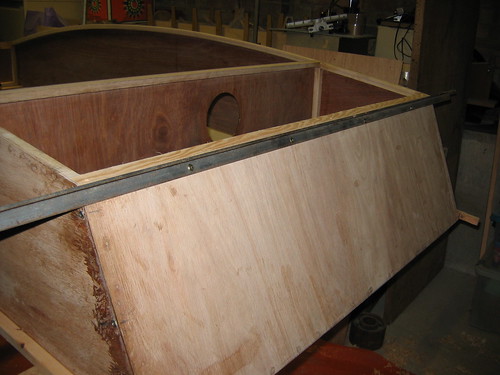
4. Straightened BT bottom cleat. I may even keep the angle iron on there until I've glued the bottom on and screwed it down, to enforce the nice straightness that otherwise probably won't be possible. I will also try the same trick on the cockpit bulkhead, which also has a curve in the same direction. Before I do this, however, I'm going to have to cut the hull bottom exactly to line at this point, or redrill the angle iron and drop it a 6 mm or so: whichever is the easier ;)

5. The three rear support clamps. These prevent the piece of 4 x 2 - and the boat! - falling off the frame! Level in centre of photo used to get things - well, nice and level. The frame was made from pieces scavenged from the supports for the formwork used in the recent structural and water-proofing bit of concreting that we did last year (hence the "floor" labels). A sort of concrete boat/dam ;). As a stuctural piece of work, it is working well; as a waterproofing exercise, not 100 %, but better than it was (probably 90 %).
Note that the hull is merely resting on the supports at this point - it is not clamped down, as I haven't got it squared up yet. I'm thinking of using some "Lion" brand ratchet clamps here - $20/pair from the Rabbit Warren up the road.

Most of today's work really revolved around thinking about the next steps, which include the apparently-problematic mast step runners. Tomorrow will hopefully reveal whether there really is a problem or not. This is particularly why the hull is up on blocks: so that I can get a really good look at what is going on!
With respect to Wood Duck's "birthday", it's probably more a "birth" - or hatching ;) - than an actual birthday. But it's still a good excuse for cake and lemonade :).
-
19th April 2009, 11:04 AM #288
Happily receives emails.
- Join Date
- Jul 2005
- Location
- 'Delaide, Australia
- Age
- 65
- Posts
- 8,138
Howdy Alex,
The epoxy with the high strength powder can bridge gaps of 6mm with no problems at all.
Even a bit more.
So as long as you can get epoxy into the join area and work out how to hold the piece in the correct position the structure will be fine.
Michael
-
19th April 2009, 11:44 AM #289
GOLD MEMBER
- Join Date
- Jan 2009
- Location
- Blaxland, Australia
- Age
- 65
- Posts
- 2,551
Howdy MIK,
Ah...OK. Thanks for that, especially since you are no doubt quite busy, being in the middle of the "school term" as it were! As I think I've remarked before, using such a different glue is causing me conceptual difficulties! But given the nature of the beast(s) (epoxy + HS powder), I really should know better...
I'll revisit the situation and attempt to look at it with fresh eyes. Clamping is going to be the trick, as you say. Pre-location with screws through the ply and cleat regions would seem to be the best from this distance. Blue tape will come in handy as a dam for the glue, I think.
Also, would Tas oak be a good or better substitute for oregon in the ply supports? I know that the load is spread, so maybe I'm fussing too much as usual.
Cheers,
Alex.
-
19th April 2009, 10:56 PM #290
GOLD MEMBER
- Join Date
- Jan 2009
- Location
- Blaxland, Australia
- Age
- 65
- Posts
- 2,551
I'm having 2nd thoughts about the Europly, light as it is. Or because it's light - and fragile. It has already sustained some significant "hangar rash" to borrow an aero-modelling term. Test-coating piece with resin triple-coat at the same time that I do the mast glassing mock-up test should indicate whether I should scotch the Eurolit eand get in some gaboon or PM instead, rather than finding out too late that I should have.
I hacked up a rough sort-of "half cross-section" of mast by sawing out some wide-stave scrap that I had marked out on a length, cutting the piece into three, roughly sanding a radius on one piece to mimic the real thing, then stuck the bits together into a U-shape with CA (see photos below). Allowed it to cure for a while, glued on some stiffener "feet", sanded the CA excess off with 120 grit paper, and finally cut off a scrap of 200 gsm cloth. I'll mix up some BoteCote and coat the mock-up and cloth in the usual fashion; and will also apply some resin to an offcut cut off from the hull bottom offcut.
Also did a test run using the ratchet straps aus the Rabbit Warren: I think they're going to work quite nicely to hold the boat onto the frame. Thanks, wabbits...they weren't the cheapest items, though. The tension will have to be just enough to make the hull secure, without bending the parts under the straps away from where they should be. Light pressure balanced around/across the hull so that the slack is just taken up will be enough. Still have yet to measure and chock to get the structure properly square before investigating the mysterious behaviour of the supposedly correctly-cut-to-length step runners...
1. Mast mock-up: hastily thrown together, roughly radiussed, stuck together with superglue and sanded again. It would make a nice percussion instrument, finely sanded and oiled and struck with nice dense-headed mallets - but it wouldn't last very long, though. Paulownia is used, amongst other things, for making the soundboards of the Japanese plucked-string instrument, the koto...

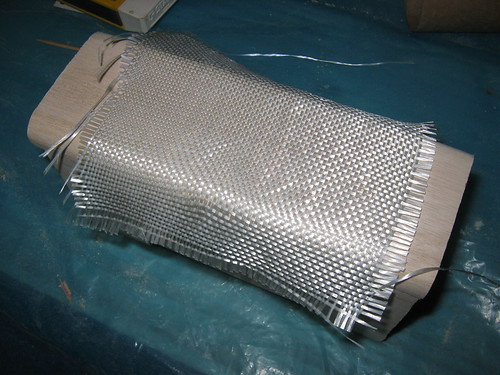
2. End-view of the mast "half cross-section". It's in fact deeper than it is wide, but the piece of glass cloth only drapes about half the maximum mast width down the sides. I glued some "feet" on the "bottom" to give the structure greater strength while being handled

3. Ready to add resin. The raw 200 gsm (6 oz) cloth looks very crude against the fine-grained timber. The aim of the experiment is find out how much extra width and weight the epoxy-glass sheath is going to add to the mast after the weave has been completely filled and sanded smooth (and the cloth has hopefully vanished!). Which reminds me, I need to measure (bits of) and weigh the thing before before applying the sticky stuff!
4. One of the four 25 mm 270 kg load ratchet straps that I purchased today. Light pressure on the strap will be enough to stabilise the boat sufficiently to work on it after I have squared it up, without the thing shifting either slowly or suddenly. At least, that's the idea.... The inspection port opening also got a quick sanding today to clean up the untidy resin around the edge

5. The mechanical end of the strapping device. Being 4.57 m long (that's what the label says), there's quite a bit of loose strap lurking about, waiting to trip me up! On the other hand, the straps are going to be useful for tying Wood Duck down onto (as-yet-un-acquired) car roof racks

6. Close-up of the ratchet: shiny and new . There is great capacity to do a lot of damage very easily by cranking the ratchet too hard in a few short strokes: so very easily does it!

Resin will be added to my two experimental set-ups tomorrow, when I will have sufficient time to let the resin go tacky multiple times - no opportunity to do that today. I also need to measure, cut and drill a piece of steel angle to fit inside the hull temporarily, for straightening out the cockpit bulkhead. I'll need to get this installed before squaring the hull, too.
On a side note, MIK's photo-sets seem to have an unerring effect of making me horribly homesick! Aaaargh! Lovely 'Duck, Robin!
-
20th April 2009, 02:06 AM #291
SENIOR MEMBER
- Join Date
- Sep 2007
- Location
- Savannah GA USA
- Posts
- 583
A strip of wood screwed edge-wise will straighten out bent ply as well as angle iron, IMO. Look for a scrap with a little curvature and use that to oppose the curve in the ply.
I assume when you say you are thinking about using gaboon instead of europly you are talking about for the bottom. I think it would be a good move.
-
20th April 2009, 10:37 AM #292
GOLD MEMBER
- Join Date
- Jan 2009
- Location
- Blaxland, Australia
- Age
- 65
- Posts
- 2,551
Hi MAM,
Thanks for the advice: I'll see what I've got lying about. And yes, the gaboon's for the bottom. I'm about to coat the offcut: the resin's currently warming up. When it's cured - maybe several days - I'll kick the piece around the workshop a bit, jump on it. etc., and seee how long it takes to get dinged! If it fails too soon - it's the gaboon. In the meantime, I'd better check the sources of supply - may have to go for Pacific maple (but too heavy).
Cheers,
Alex.
-
20th April 2009, 11:33 PM #293
GOLD MEMBER
- Join Date
- Jan 2009
- Location
- Blaxland, Australia
- Age
- 65
- Posts
- 2,551
I can't seem to help myself when I spot a new sort of clamp. I found another type of ratchet clamp in the Warren yesterday, $8.00 for 5 clamps, so bought a set to try out. I liked them so much I went and got another 3 sets. See photos below...
So, on to the mast mock-up. I measured the before-glassing timber thickness, and forgot to weigh it! I'll do another piece without all the fiddling and weigh that one before and after. One thin coat of resin to prime, let it settle in for 5 ', added more resin and popped the glass on top. Dabbed at the glass with the coarse 25 mm paint brush, tap, tap, tap, until the glass was almost "clear". Mopped up the excess resin with toilet paper and left it to go tacky, then put on another coat: I may only need to do two coats, as the second not only filled the weave but appears to have enough over the glass for sanding. I'm really expecting the weave to show up as the resin starts to go off. Probably ought to do 3 for safety though, and sand back thoroughly rather than do two and hack through into the weave at the first swipe of the sandpaper. Unfortunately, "Twilight" was released on DVD today, so any chance I might have had of finding out more of her adventures got swallowed up (as it were).
I'm also not sure whether the 200 gsm glass isn't going to be too thick and rigid in the final analysis. It's a bit hard for me to tell without doing a sufficient length - whatever that might be - that will react to bending strain. It's what MIK advised though, so I will follow the instructions.
Multi-coated a test piece of Eurolite at the same time(s) as I did the mast "fragment", and glued together the two pieces of birch a/c ply for the mast step runner bolt cheeks. Once cured, I'll cut the block in half and true up to make one piece for each side. I'll attach them to the runners and drill out (using a dowelling jig for alignment) before assembling the mast step.
The building frame got lowered to its minimum height so that I can get a better view from the top - set it too high initially. Only trouble is that I keep braining myself on the "outrigger" supports even more now when I crawl underneath them! I am completely over buiilding boats in severely cramped conditions! Still, better than no space at all...
Added 25 mm steel angle to CB to flatten it out - I found a piece of steel almost exactly the right length - took 3 mm off one end, filed both ends clean and... Well, I might go hunting for the piece of timber that MAM suggested I use and that I couldn't find on the first pass (mostly because I found the angle first!). Not convinced that the CB was straight enough, I took some pohots and had a look on the computer: still not convinced. Because the steel is "floating" (the bow's "ice-breaker" pushes against the hull sides at the chinelogs), it doesn't have much except itself to react against. MAM's piece of slightly bowed wood would have that built in. Whatever material that I do end up using, it has to go on the aft side of the CB because of the mast step. Could always put one or other flattening element on the top of the CB on its forward side.
1. My new ratchet clamps: these came in blister packs of 5: 3 small, 2 large. The packaging suggested a Scandinavian origin, but the price suggests a much closer one ;). Could be a bit flimsy, but for clamping cleats onto plywood, they would seem to be ideal, as quite a fine degreee of pressure control can be attained

2. Brick press: glueing up the mast step runner cheek pads from two pieces of 3.6 mm a/c ply. This press is highly unlikely to fall over ;). Still using formply offcuts over and over again for all sorts of useful purposes

3. First coat of resin taken up by cloth: stippled with a coarse natural-hair brush to encourage uptake into the glass. Worked reasonably well. I warmed up the resin part before mixing. You can see why I cut this piece out as scrap!
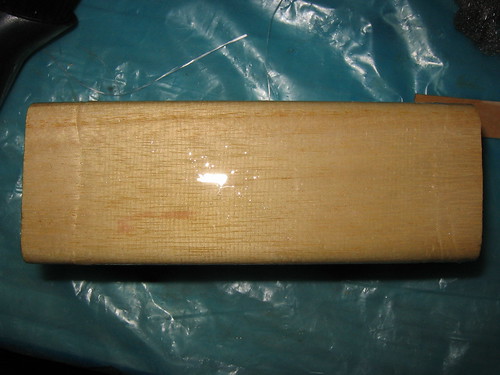
4. Top view of first coat: it looks a bit lumpy at this stage

5. 3-quarter view of first coat. The glass cloth is sitting nicely over the large edge radii

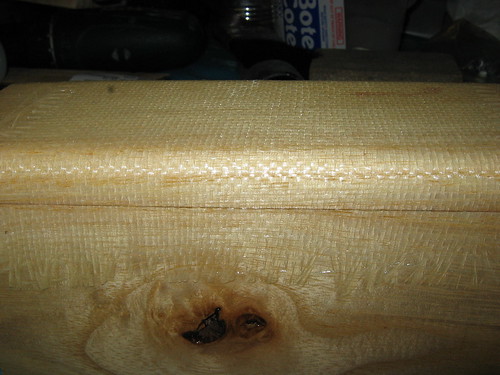
6. Second coat. The glass is still visible, but not quite as pronounced as the first coat. The resin reflecting the flashlight appears even, although that's not really an accurate guide: but looking at it with reflected overhead light the weave was pretty well filled. Come time to recoat, it had sunk slightly leaving small dimples
7. Third resin coat. Getting a bit thick - but plenty of room to sand down without lacerating the glass and thereby reducing its strength. Weave appears to be completely filled at this point (and then some ;). This will get a good but careful sanding once the resin has cured
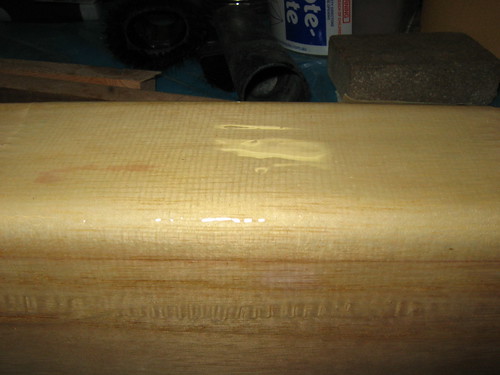
8. Top view of 3rd coat

This little experiment has served to indicate well in advance that the logistics of glassing the whole mast are going to be difficult. It will need some planning, careful cutting, and even more careful application if I want to get a seamless result. I can always put a seam overlap on the aft face of the mast, where it will be largely hidden by the sail :). I rather wish that I were building an oregon structure at this point! Still, nothing ventured, nothing gained - sort of. The extra width added by the sheath appears to my biased eye to be less than 0.5 mm even in the un-sanded state, if the above photo (no. 8) is any guide. But I will be attacking it with the micrometer once the surface is hard enough in order to find out what it is exactly. Of course.
I'm interested to see what the fragment looks like in real sunlight, from the points of view of colour and texture.
Our daughter's introduction to sailing today appears to have been rather challenging. It was blowing rather hard, and she was out with her friends and instructor in something between 12 and 16 feet - I don't think it was the advertised Laser. They capsized (par for the course), and also broke a rudder at some point (she didn't explain how, though). I'm hoping that it hasn't put her (and her friends) off sailing for life - they seemed to have been slightly traumatised by the experience. I will have to explain to her that the Puddleduck is a much more forgiving boat, and her landlubberish Dad wouldn't venture out in conditions such as they were today! At least not until she had a bit more experience.
-
21st April 2009, 12:00 AM #294
SENIOR MEMBER
- Join Date
- May 2008
- Location
- UK
- Posts
- 848
Hi Alex, when you mentioned keeping the glass overlap tidy it reminded me that you can buy carbon, kevlar and glass biaxial sleeving. It's like a tubular stocking, so no edges.
Possibly not available in Aus, but I thought you would be interested. You may have come across something similar from your model making.
http://www.solarcomposites.com/compo...20sleeves.html
Brian
-
21st April 2009, 11:35 AM #295
GOLD MEMBER
- Join Date
- Jan 2009
- Location
- Blaxland, Australia
- Age
- 65
- Posts
- 2,551
Hi Brian,
Thanks for the tip. This glass sock rings a vague bell somewhere... I'm not sure how a sock would go with the taper on the mast though - slitting it is one obvious option but then one is back with a seam. Unless the sock automagically shrinks to fit (unlikely ;)! They appear to ship internationally, so acquiring a bit of the stuff wouldn't be hard. And they offer a clear/transparent in glass, which might look better than some of the more day-glo colours. Then again...;).
As an aside, reading down their page, I haven't heard of "basalt" in relationship to composites, presumably this is analogous to ceramics, must do some digging :). On the other hand, I don't think the mast would be subject to 982 degC under normal sailing conditions!
Another option which occurred to me as I was falling asleep last night was using ordinary glass tape of sufficient width. While there is still the seam problem, the handling characteristics of the narrower tape might make it easier to deal with than cutting up glass cloth (especially in a straight line for a scissors-user like me ;), and might be less expensive in terms of immediate outlay on material, reduced width of fabric over a relatively large length, etc.
Thinking through it this morning, however, one snag that immediately presents itself is that the maximum width of available tape that I have found so far is 200 mm for biaxial and 150 for woven, so the base of the mast would have to be done with ordinary cloth until a suitable height was reached. A bit gets given back with the 6 mm radius: approximately 6 * pi/2 mm ((2*pi *r)/4) per corner. This is just over 9.4 mm, i.e., 37.7-ish mm total for the mast cross-section. The tape would therefore start where the circumference drops to 200 mm, at about at 2122 mm from the foot: a bit over half the height (or length) of the mast. This is somewhat useful BUT: that puts the "danger zone" of the break between cloths too high up the mast for my comfort. The cloths could be overlapped at that point, of course, resulting in an obvious bump, given that the cloth edges are going to flare upwards a bit and the effect is going to be doubled at least. And: the 200 mm cloth is biaxial, so is going to be a lot thicker and heavier than the the woven, and putting more weight up higher where it is even more of a liability. 150 mm cloth won't even do the tip of the mast!
Back to the drawing board again - or the scissors!
This is also distracting me slightly from the mast step, but does need to be solved: perhaps by biting the bullet and buying in suitable oregon...
-
21st April 2009, 04:43 PM #296
SENIOR MEMBER
- Join Date
- May 2008
- Location
- UK
- Posts
- 848
Hi Alex
the tubular wound glass, carbon or kevlar expands across a range of diameters. You choose the size that fits your range of diameters, in the same way a sock fits your thinner lower leg and your calf. Perhaps the range of PDR 's tapered mast might not fit across any one size range.
The other consideration might be to use uni-directional. Here we need MIK. I have made a couple of shaped ply centreboards, apologies to MIK, knowing they are not strong at the major bending axis and at the hull edge, so have glassed them with unidirectional glass. Both are heavy but have been very successful in racing.
Interestingly, the board I made for my black Lymington River Scow developed a lengthwise curve as I shaped it. Tried all the tricks, placing in on damp grass in the sun, yes it straightened it but everytime I went back to it there it was, sitting there curved. Used it bent in the end. It still just fitted the centreboard case and did not need any hold downs or brake as it held itself in the case.
That Scow was so fast and pointed so well upwind it was amazing! Figure that out.
Brian
-
21st April 2009, 06:02 PM #297
GOLD MEMBER
- Join Date
- Jan 2009
- Location
- Blaxland, Australia
- Age
- 65
- Posts
- 2,551
Hi Brian,
I am indeed hoping for MIK to weigh in with his advice on this, but as he is up to his eyeballs teaching lucky so-and-sos how to buld boats, live, I'm not expecting an early response. None of this would be a problem if I weren't such a cheapskate ;). The taper on the mast isn't what I'd call extreme (12.4 mm in 3528 mm), but I didn't look at the difference between ranges on the web site. The lightest uniaxial that I can get my hands on is 300 gsm - 50 % heavier that the current stuff: but with less transverse resistance (across the mast) it might bend as well as the 200 gsm conventional weave.
You must have hit on something - perhaps you should have bottled it (so to speak) and made a fortune!
Cheers,
Alex.
-
21st April 2009, 07:01 PM #298
GOLD MEMBER
- Join Date
- Jan 2009
- Location
- Blaxland, Australia
- Age
- 65
- Posts
- 2,551
I should have been a little less precipitate with applying resin to the mast mockup. Meaning that I should have soaked up the excess on the second and third coats and applied a fourth and possibly a fifth. Because of gravity and the wicking effect of the glass, I found that the resin had drained happily off the sides down the downwards-pointing fibre bundles, leaving the surfaces with much larger dimples than on the top (where there was a much larger reserve of resin). I should have thought of that. Oh well. It was the top that I was mainly focussed on anyway, and although some resin appears to have leaked off it leaving tiny dimples, I think it will be fine with sanding. But a caution for the future! If, that is, I stick with the Paulwonia mast...
I haven't made any conclusive measurements as I need to cut the ends off the model: the only mircometer that I could find doesn't have a wide enough throat to get over the glassed area. Goodness knows where the other two devices are: buried under piles of junk, no doubt. Along with my brain, I suspect!
-
21st April 2009, 08:20 PM #299
GOLD MEMBER
- Join Date
- Mar 2007
- Location
- Adelaide
- Posts
- 2,139
Alex,
Have a poke around your local bunnings in the radiata section............ I know I know but I have found some nice straight grain with minimal knots on occasions or a timber recycling yard might have some slow growth oregon off an old building demo for a reasonable sum.
You never know your luck.....actually I have just scored about 40m of PAR 40x195 in 5m lengths off a demolition site for $20 and the bloke threw in a couple of lengths of 30x240s as well. Sorry just a small gloat. It's not ideal for masts but great for general stuff.
FWIW I found poxing the mast the most difficult part of the build and I only glassed the bottom 1500 very messy business and as you notice getting to stay in place was almost impossible.
Mike
-
21st April 2009, 08:32 PM #300
GOLD MEMBER
- Join Date
- Jan 2009
- Location
- Blaxland, Australia
- Age
- 65
- Posts
- 2,551
Hi Mike,
Thanks for responding. That was a really, really good deal :). Half yer luck! I have had my eye on a semi-demolition site up the road in Hornsby for a while. They seem to have stopped short of tearing down the bit with porbably oregon rafter so far, which is why I say "semi". I'll try the yellow pages for timber recyclers, too.
I'll put up a few more photos of the mast model later this evening.
Cheers,
Alex.


 Reply With Quote

Similar Threads
-
New Queensland PDRacer Build
By duncang in forum Michael Storer Wooden Boat PlansReplies: 71Last Post: 26th April 2012, 08:30 AM -
Oz PDR build in Adelaide - sexy black PDRacer
By m2c1Iw in forum Michael Storer Wooden Boat PlansReplies: 39Last Post: 27th April 2009, 06:30 PM -
OZ PDRacer - Dylan's build in the Philippines
By Boatmik in forum Michael Storer Wooden Boat PlansReplies: 16Last Post: 23rd February 2009, 05:50 PM -
Brisbane Timber and Working with Wood. Boatmik/PDRacer
By Boatmik in forum Michael Storer Wooden Boat PlansReplies: 1Last Post: 11th April 2007, 08:06 PM -
Flawed wood on the TS --DUCK!
By Robert WA in forum WOODWORK - GENERALReplies: 7Last Post: 19th February 2004, 11:42 AM
Tags for this Thread
balanced lug,
boatmik,
build,
dacron(tm),
douglas fir,
duck,
enamel,
epoxy resin,
fibreglass,
hoop pine,
interminable,
lug,
machinery,
materials,
michael,
oregon,
oz racer mk 2,
ozracer,
paint,
paulownia,
paulownia/glass mast,
pdracer,
plywood,
polytarp,
primers,
really simple sails,
sail-making,
sailmakers thread,
sanding,
storer,
sydney,
timber,
tools,
varnish,
verbose,
western red cedar,
wood,
wood duck,
wrc
