

 Thanks:
  Likes:
  Needs Pictures: 0
 Picture(s) thanks:
Results 886 to 900 of 3347
-
15th October 2009, 09:39 PM #886
 GOLD MEMBER


- Join Date
- Jan 2009
- Location
- Blaxland, Australia
- Age
- 65
- Posts
- 2,551
 Ha ha - (almost) spot on ;). But not so much in general day-to-day stuff (just look at my workbenches in such photos as they appear in).
 Originally Posted by BobWes

Alex.
-
15th October 2009 09:39 PM # ADSGoogle Adsense Advertisement
- Join Date
- Always
- Location
- Advertising world
- Age
- 2010
- Posts
- Many
-
15th October 2009, 09:40 PM #887
GOLD MEMBER
- Join Date
- Mar 2007
- Location
- Adelaide
- Posts
- 2,139
Now that is cool Alex

I gave up after my first attempt at stenciling was a complete disaster, well done.
-
15th October 2009, 09:49 PM #888
GOLD MEMBER
- Join Date
- Jan 2009
- Location
- Blaxland, Australia
- Age
- 65
- Posts
- 2,551
I finished off the last work session of the day by scrubbing away at the aft partner block, so they are now both nice and flush with the runner tops. This was following an annoying session footling around with the hull number, bah humbug. There may be some photos to follow tomorrow.
Another thing I did this evening, after scrubbing at the second partner block, was draw the mast slot onto the underside of the foredeck prior to drilling the hole locater hole.
I'm going to sand parts of the tank that need it tomorrow, then start the coating and foredeck installation.
-
17th October 2009, 09:05 AM #889
GOLD MEMBER
- Join Date
- Jan 2009
- Location
- Blaxland, Australia
- Age
- 65
- Posts
- 2,551
Hi Mike, Originally Posted by m2c1Iw
It's a black art, that's for sure - I'm still removing glue...
The aeromodellers - in the UK at least - use a substance called "Frisket Film" or "Frisk Film", which they use to make stencils out of, e.g., for markings, camouflage, etc. It is a thin vinyl, much like "Contact", but with a "repositionable" (ha ha ha) non-disintegrating adhesive, designed specifically for airbrushing. I think this stuff is printable-on: there were a few articles on this in the late lamented Radio Control Scale Modeller (I still curse Traplet Publications for terminating the mag, it was really useful), but I never got around to sourcing the stuff in Oz (it is available) since most of the stuff that I was working on didn't have multi-coloured camo schemes.
I'm not sure if it can be put through an ink jet printer (certainly not through a laser printer!), but it because it's clear it can be placed over the original and that item traced by hand.
-
17th October 2009, 09:16 AM #890
GOLD MEMBER
- Join Date
- Jan 2009
- Location
- Blaxland, Australia
- Age
- 65
- Posts
- 2,551
Well, I'm still sanding the tank - of course. And I still haven't installed the towring block. I'll use the block that I didn't use as a mast stop, after trimming its nose to the bow top angle.
And I threatened some more photos...
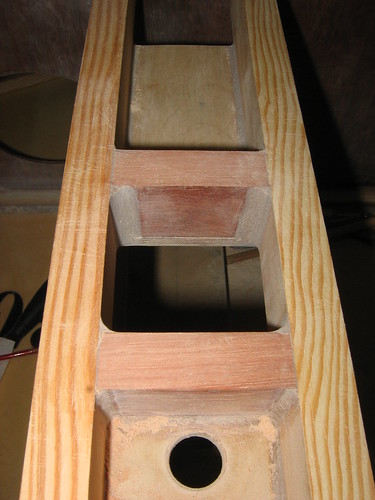
1. Forward partner mast block chewed down flush with the tops of the runners. I used the coarse side of the Permagrit block for this, scrubbing mostly at 90 degrees to the grain, until just above the runners, then switched to paper and sanded down carefully with 60- and 120-grit to finish. I hope the apparent not-squareness of the mast hole is an artefact of camera distortion!
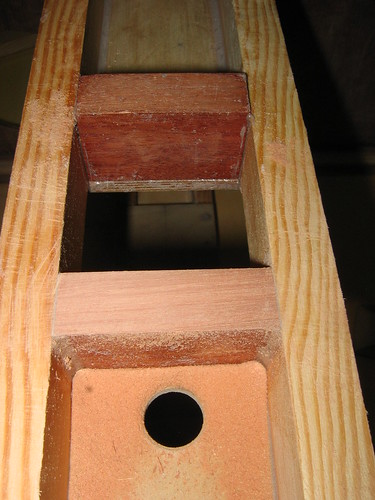
2. Side view of finished forward mast block; rear block is still awaiting its fate
3. Attacking the rear mast block, with the Permagrit block posing for the photo as well...
4. Close-up of rear mast block during sanding: cross-grain scratches from the Permagrit in clear evidence
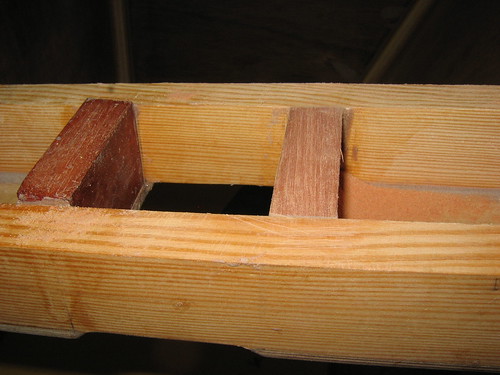
5. Both mast blocks flush with top runners, 60-grit stage. The blocks got a subsequent tickle with 120-grit to smooth things off a bit, and are now awaiting glue...and waiting...and waiting...and...
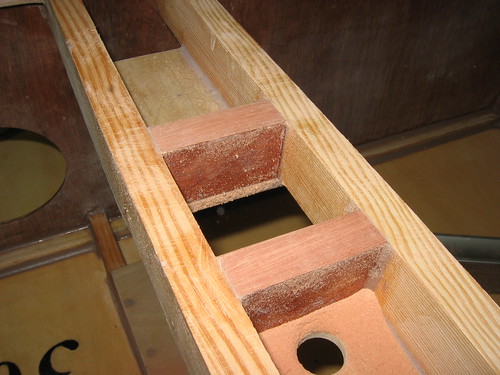
6. Side view of almost-finished partner: the tow-ring fairlead anchor block is yet to be machined and installed. I've started slicing up a lump of what is probably "river red gum" (Eucalyptus camaldulensis) from my wood heap for this, contrary to my assertion at the top of this post
I'm going to have to limit my updates of photos to this thread to mornings only, on account of the school holidays having used up almost all the monthly peak allocation - with 14 days to go to rollover! There's plenty of off-peak left, but if the bandwidth gets throttled, it will be for both periods, and the Boss will Get Very Cross(tm). Pity Optus doesn't just charge for the extra the way Exetel does - the latter of whom in fact rent their own bandwidth from Optus... I was keeping an eye on the Optus meter via the phone (handy little app that one), but yesterday was the day that brought us unexpectedly undone.
Then again, there probably won't be any appreciable difference, since I seem to do the pictorial editing in the mornings anywway...
-
18th October 2009, 11:59 AM #891
GOLD MEMBER
- Join Date
- Jan 2009
- Location
- Blaxland, Australia
- Age
- 65
- Posts
- 2,551
Towrope fairlead support block installation photos
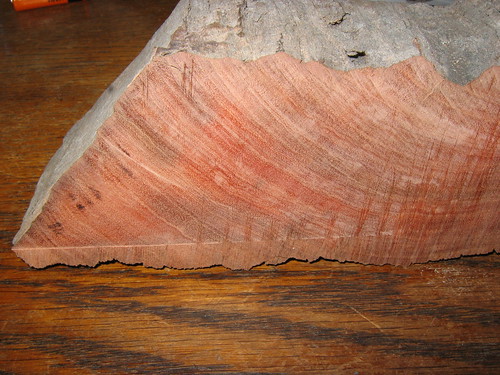
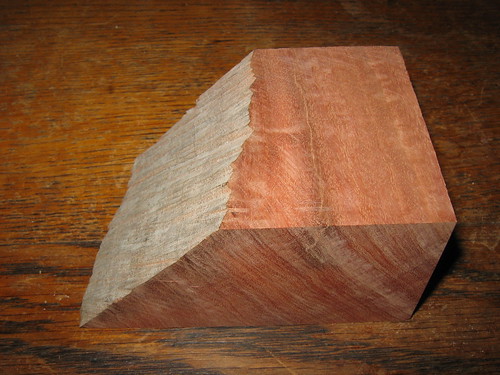
1. Lump of Jarrah sawn straight off a piece that I carried home form Adelaide the last time that we drove over there (2000/2001, I think - I was still doing field work for the thesis). Grey outer surface of the block is typical of weathered Eucalypt timber. I think it's Eucalyptus marginata; Jarrah being its Aboriginal name, often used for railway sleepers, its an extremely dense, heavy and stable timber. By the looks of the grain curvature, this piece came from somewhere towards the centre of the trunk
2. Another piece off the main lump, cut to roughly shape for the fairlead support block. I decided to use the Jarrah as I could get a bigger piece out of it, that would therefore have more glueing contact with the partner runners. Note the cracks - I cut off as much as I could, but didn't see that long one until I was viewing this photo - and the piece had been glued in
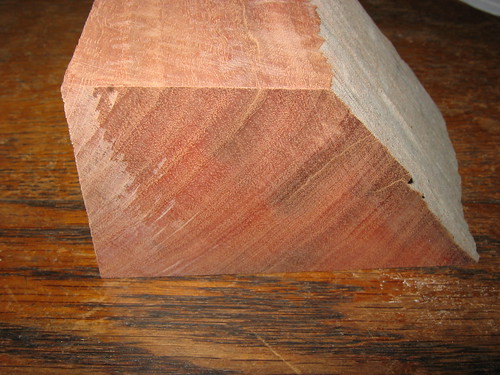
3. T'other side of the proto-support-block: very smooth cross-grain cuts from the CMT blade - with-grain cuts are almost as smooth
4. Support block shaped to fit into the maze at the bow: since there are lots of fillets where this block is going in, I had to allow for clearance...
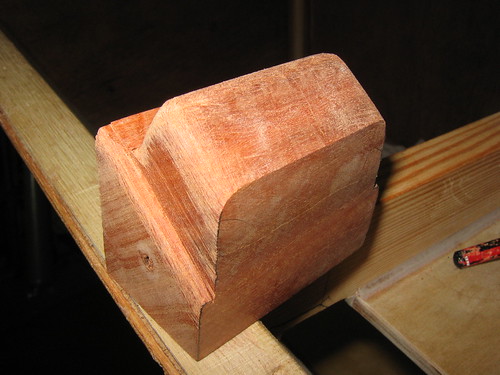
5. It's a bit rough, but it will do...the old adage "measure with a micrometer, draw with crayon and cut with an axe is almost true here, except that it was cut crooked with a Japanese saw, too deep in places, and sand with the coarse side of the Permagrit block

6. The slightly overdone fillet-clearance radii make the block look a bit blobby, but since it's a support structure that will be hidden very shortly (after glueing and final fairing of the top surface), that doesn't matter too much ;). Cuts are a bit wonky, too, see above comment
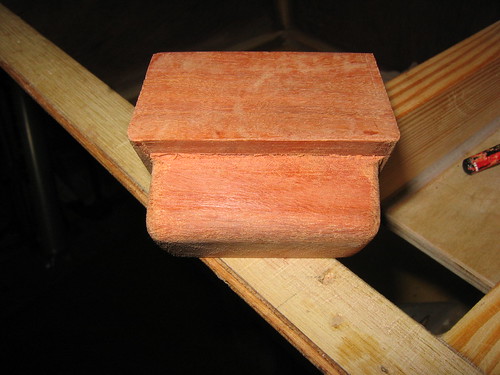
7. Shaped block clamped in position prior to adding screws. Since there is no supporting ply surface underneath, this block is definitely getting the screw treatment!

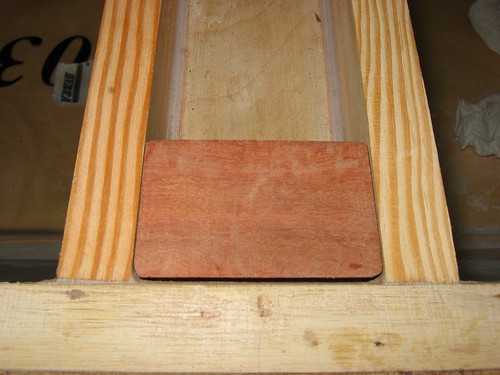
8. Support block from the front: bit of a gap for the glue. The block has been drilled and held in place by two 25 mm button-head screws, once through each partner runner. Looks nice and clean at the moment, dunnit? Just wait...
9. What's that! Glue-smeared block just about to be stuffed into position

10. I smeared the receiving area with hs-glue too. Yum...
11. Ventral surface of glued-in block, awaiting attention from the paddle-pop stick once the glue has firmed up a bit. I was actually expecting more of a mess under here - fortunately, it's not too bad
12. Glue-in block, top surface, with most of the mess cleaned up - it will get faired once the glue has set and cured (over 24 hours). Securing screw visible on the left
Cleaning up under the block was actually much harder than I was expecting: the light on the inspection mirror didn't cover what the mirror was pointing at, due to the very small target area. In fact, it took over a dozen photos to get a decent shot of the underside as the auto-focus seemed to be hitting the side of the image, not the target - camera too close. The filleting is probably a right mess - the last I saw of it it didn't look too good and will need a bit of attention with sand-paper.
I'm letting everything settle and harden up before continuing. As it's nearly 12 pm, there won't be anything much until tomorrow (see previous post's comments about our, ahem, recent internet usage).
-
18th October 2009, 10:57 PM #892
GOLD MEMBER
- Join Date
- Mar 2007
- Location
- Adelaide
- Posts
- 2,139
Alex I apologise in advance for this post but I just have to say your duck will have to be the most expansive thought out and detailed build of all time.
I commend your perseverance and attention to detail.
-
19th October 2009, 08:51 AM #893
GOLD MEMBER
- Join Date
- Jan 2009
- Location
- Blaxland, Australia
- Age
- 65
- Posts
- 2,551
Hi Mike, Originally Posted by m2c1Iw
That's a very kind and tactful way of saying that I'm completely obsessive ;). With which I would be the very first to agree!
Goodness knows what it's going to be like putting theracingfinish on the hull ;).
Cheers,
Alex.
-
19th October 2009, 09:36 AM #894
GOLD MEMBER
- Join Date
- Jan 2009
- Location
- Blaxland, Australia
- Age
- 65
- Posts
- 2,551
Here's a few photos from the fairlead block installation, showing the thing cleaned up and sanded flush:
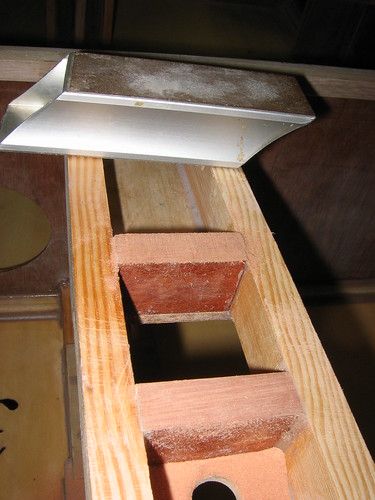
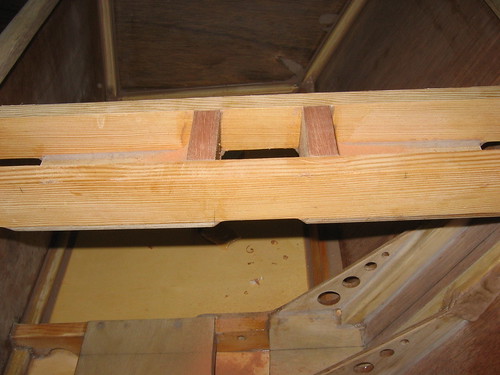
1. Towrope fairlead support block: glue has cured and the whole lot sanded flush with the partner runners. Got a bit heavy-handed with the Permagrit block, hence the lateral scratches on the runners - more keying for the foredeck glue ;)
2. View aft of the mast blocks with fillets: 3 mm radius for drainage, 10 mm radius for the mast hole. With the latter, the foredeck corners will have something to sit on - not necessary, but I find it neater ;)
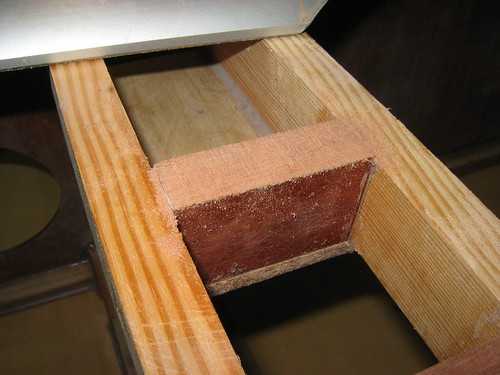
3. Another view of the mast hole. I need to hoover up the sanding dust!
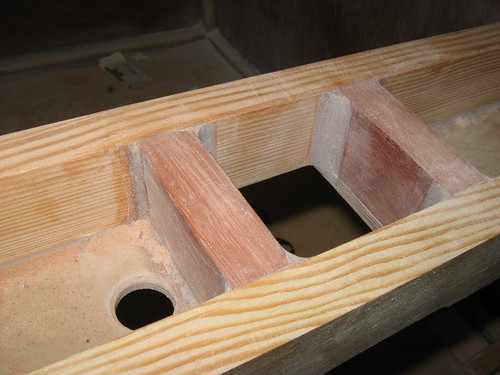
4. All partner blocks in place. The mast partner was incredibly solid even before the Jarrah nose block went in - now it's even more robust! Those screws need to come out now - I forgot about the screws into the partner through the bulkheads, and I think I'm going to have to get the soldering iron out - the rear screws are firmly glued in place! To use a common phrase amongst (some ;) aeromodellers - "It seems a pity to have to cover it all up" ;)
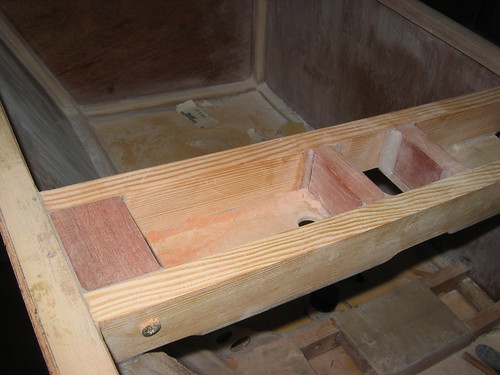
5. Just a small sample of the amount of timber and glue dust currently in the forward tank. The mast partner's not the only thing that's overdue for a vacuuming! The Goat will have far fewer fillets - I'm getting fed up with all the fiddly sanding in corners, and my fingertips are getting rather sore. Still, I can't say that I wasn't warned ;)
I probably won't have anything more ready to put up (photo-wise) until tomorrow, thanks to an over-use of YouTube and others during "peak" period. It's amazing how quickly it builds up when the Other Boss is watching online anime stories with large numbers of episodes...
-
19th October 2009, 09:23 PM #895
GOLD MEMBER
- Join Date
- Jan 2009
- Location
- Blaxland, Australia
- Age
- 65
- Posts
- 2,551
I hope to have one last, short and trivial sanding session on the forward tank tomorrow, then the resin coating and re-coating start, followed by the foredeck glue-on.
-
20th October 2009, 11:22 AM #896
GOLD MEMBER
- Join Date
- Jan 2009
- Location
- Blaxland, Australia
- Age
- 65
- Posts
- 2,551
The last bits of fillet-adjusting glue (my first attempts at fillets - on the mast step - were woeful, to put it mildly) are still too soft to sand, so I've been tidying up, taking delivery of more pipe clamp heads, touching up a few blips on the hull number. I'm not touching it again until I whack the resin over the top!
Ordered some 250 mm x 380 mm (10 " x 15 ") "Frisket Film" (test) sheets yesterday, prior to acquiring a larger roll for the aircraft. See here for more info on the substance in general, and a recent post of mine (#889).
Just remembered that I've got the fill the recent screw holes for the towrope fairlead block installation in the mast partner runner before or after coating, preferably before...
-
21st October 2009, 08:18 AM #897
GOLD MEMBER
- Join Date
- Jan 2009
- Location
- Blaxland, Australia
- Age
- 65
- Posts
- 2,551
I made the silly "mistake" of putting a bright light on the forward tank to check that there weren't any nasty surprises that might leap up and bit me later. Well, I shouldn't have been surprised or annoyed that there were several things that required attention, should I?
I've gone over the whole lot once more, and patched what needed it - this puts back my coating schedule back a bit, but it was slipping a bit with the need to fill the partner runner holes in any case. The way I'm viewing fillets at the moment, Setsuna (the Goat) won't have any at all!
Another thing I got started on while waiting for glue to cure today was hauling out the pieces of Paulownia for the lug-rig mast, and looking over them for the marks I'd made for cutting out knots, kinks and bends prior to scarfing. Which will be approx 7:1 or 8 degrees on the TS mitre gauge - 7:1 is 8.1 odd degrees but I'm not fussing about a tenth of a degree, as long as all the cuts are the same ;). I won't start on the mast just yet, but I've at least rounded up the bits, and also located the Paulownia that I'd earmarked for the 'foils.
-
21st October 2009, 07:04 PM #898
i-Sails Australia
- Join Date
- Apr 2009
- Location
- Hunter Valley NSW
- Age
- 69
- Posts
- 1,759
Hi Alex Originally Posted by AlexN
I for one will be interested in the use of Paulownia for your PDR mast and how it performs. I must say that it has crossed my mind a few times to maybe give it a try for my GIS mast. If I did though, I think I would glass the whole thing. While Paulownia is soft, it is very stiff, so maybe it could work OK! It would be super light
Are you planning on glassing your mast?
-
22nd October 2009, 09:35 AM #899
GOLD MEMBER
- Join Date
- Jan 2009
- Location
- Blaxland, Australia
- Age
- 65
- Posts
- 2,551
I gave up yesterday in almost-disgust, having found a couple of unexpected clusters of snags, one at each end of the mast partner. I'd spent somewhat of a trying time getting the aft end of the mast step cleaned up, and was Not Pleased at finding that I still had to do the partner. Don't know what sort of drugs I was taking when I was doing the mast step - actually I do, and they were not nice - the step itself was well done, but its installation was nothing short of shoddy :(.
Having been faced with this, overloading my fussiness with regard to fillets, I will be very carefully re-jigging my approach to the Goat once I get there...
-
22nd October 2009, 09:45 AM #900
GOLD MEMBER
- Join Date
- Jan 2009
- Location
- Blaxland, Australia
- Age
- 65
- Posts
- 2,551
Hi woodeneye, Originally Posted by woodeneye
Yes indeed! As soon as I found that I had mistakenly ordered paulownia for the mast, I contacted MIK, who gave me two pieces of advice - 1. glass the mast, and 2. make up the lug-rig mast using the paulownia. I think the Goat mast might be too big for paulownia, even with glass, but best to get the final word from MIK himself. I'm using hoop pine for the 'Duck sprit-rig and Goat lug-rig masts, as it has similar characteristcs to oregon - but is actually obtainable and affordable in clear, straight-grain form. Not as light as paulownia, though ;).
Hope that helps.
Cheers,
Alex.


 Reply With Quote

 . I won't start on the mast just yet, but I've at least rounded up the bits, and also located the Paulownia that I'd earmarked for the 'foils.
Similar Threads
-
New Queensland PDRacer Build
By duncang in forum Michael Storer Wooden Boat PlansReplies: 71Last Post: 26th April 2012, 08:30 AM -
Oz PDR build in Adelaide - sexy black PDRacer
By m2c1Iw in forum Michael Storer Wooden Boat PlansReplies: 39Last Post: 27th April 2009, 06:30 PM -
OZ PDRacer - Dylan's build in the Philippines
By Boatmik in forum Michael Storer Wooden Boat PlansReplies: 16Last Post: 23rd February 2009, 05:50 PM -
Brisbane Timber and Working with Wood. Boatmik/PDRacer
By Boatmik in forum Michael Storer Wooden Boat PlansReplies: 1Last Post: 11th April 2007, 08:06 PM -
Flawed wood on the TS --DUCK!
By Robert WA in forum WOODWORK - GENERALReplies: 7Last Post: 19th February 2004, 11:42 AM
Tags for this Thread
balanced lug,
boatmik,
build,
dacron(tm),
douglas fir,
duck,
enamel,
epoxy resin,
fibreglass,
hoop pine,
interminable,
lug,
machinery,
materials,
michael,
oregon,
oz racer mk 2,
ozracer,
paint,
paulownia,
paulownia/glass mast,
pdracer,
plywood,
polytarp,
primers,
really simple sails,
sail-making,
sailmakers thread,
sanding,
storer,
sydney,
timber,
tools,
varnish,
verbose,
western red cedar,
wood,
wood duck,
wrc
