

 Thanks: 0
 Likes: 0
 Needs Pictures: 0
 Picture(s) thanks: 0
Results 76 to 90 of 106
Thread: New OZ PDR in Florida
-
30th March 2010, 12:29 PM #76
 Senior Member


- Join Date
- Mar 2008
- Location
- Rockhampton, Australia
- Posts
- 227

Hmmm.... That LUG looks so nice... RIGHT, Im going to make a massive effort to convert mine over to LUG over the next week of school holidays.
great boat.Nick
Fair Winds and Following Seas
------------------------------------------------------------
PD Racer #276 - "Duck's Nuts" - Oz MkII with Lug rig
Storer Eureka 155 - unnamed
-
30th March 2010 12:29 PM # ADSGoogle Adsense Advertisement
- Join Date
- Always
- Location
- Advertising world
- Posts
- Many
-
30th March 2010, 01:26 PM #77
Member
- Join Date
- Dec 2009
- Location
- Jacksonville, FL, USA
- Posts
- 77
Thanks Originally Posted by nickpullen

The lug is quite easy to make. So no massive effort needed. The mast is shorter than the original though and you also have a yard that frames the top of the lug that you'd need to make.
(I purchased a round stave for the yard that was the proper diameter so all I needed to do was drill some holes.)
-
30th March 2010, 01:37 PM #78
Senior Member
- Join Date
- Mar 2008
- Location
- Rockhampton, Australia
- Posts
- 227
Hi,
Yeah, I already have mine setup with the spirit, so I just have to shorten the mast and boom, and make a yard. Then presude the Tresurer to sew up a new sail... I have been very lazy; the raw materials have been laying in the shed for months...Nick
Fair Winds and Following Seas
------------------------------------------------------------
PD Racer #276 - "Duck's Nuts" - Oz MkII with Lug rig
Storer Eureka 155 - unnamed
-
30th March 2010, 08:24 PM #79
Happily receives emails.
- Join Date
- Jul 2005
- Location
- 'Delaide, Australia
- Age
- 65
- Posts
- 8,138
If you don't want to commit completely to the lug you can just put a halyard fitting in the right place on the mast and leave it the original length.
MIK
-
30th March 2010, 08:55 PM #80
Senior Member
- Join Date
- Mar 2008
- Location
- Rockhampton, Australia
- Posts
- 227
Is there any reason to stay with the Spirit over the Lug?
Nick
Fair Winds and Following Seas
------------------------------------------------------------
PD Racer #276 - "Duck's Nuts" - Oz MkII with Lug rig
Storer Eureka 155 - unnamed
-
30th March 2010, 09:09 PM #81
Happily receives emails.
- Join Date
- Jul 2005
- Location
- 'Delaide, Australia
- Age
- 65
- Posts
- 8,138
I do like the sprit's simplicity - stick the mast up and thread and tighten the snotter. Thread the mainsheet.
The lug is almost as quick, but there is something about the simple directness of the sprit.
The lug is pretty quick in light and moderate winds (MIIIIIKE can you slow that black boat down for just a moment!) but I think the sprit might be better behaved in strong ones - but it is only thinking - I don't have any data.
But my real suggestion in the above is that it is easy to give the lug a try. The sails cost two thirds of nothing and you can have a real educational experience without committing one way or the other.
Best wishes
Michael
-
30th March 2010, 09:36 PM #82
Senior Member
- Join Date
- Mar 2008
- Location
- Rockhampton, Australia
- Posts
- 227
Ah.... So with the boom, i can just dill the extra hole so it is "short" enough ie, convert the spirit to boom...
Nick
Fair Winds and Following Seas
------------------------------------------------------------
PD Racer #276 - "Duck's Nuts" - Oz MkII with Lug rig
Storer Eureka 155 - unnamed
-
2nd April 2010, 10:47 AM #83
Happily receives emails.
- Join Date
- Jul 2005
- Location
- 'Delaide, Australia
- Age
- 65
- Posts
- 8,138
Some cool questions here Nick,
I would be disinclined to drill a hole. A thumb cleat might be a better choice. Which is a wooden bump glued and usually also screwed to the spar so that you can put a rope loop around the spar and know it won't be able to pass the thumb cleat.
MIK
-
2nd April 2010, 01:14 PM #84
Member
- Join Date
- Dec 2009
- Location
- Jacksonville, FL, USA
- Posts
- 77
Normally I upload pics but this "experience" needed to be told in succession so I linked to them instead.
---------------------------------------------------------------------------------------------------------------
Cross another boat building experience off the list. I now know how to fill and fiberglass a hole.
Yesterday I was getting the final coaming piece ready for installation while resin on the sides and some filler on the bow cured. The boat was tipped on its side and my table saw was across the garage. I just had to rip a 2.5 foot section and glue it in place. There was 6 inches left to cut and I decided it would behoove me to keep all 10 of my fingers. So as I pushed on the butt of the piece I reached to the end of the cut side and began to pull on the wood. 4500 rpms and 2.5hp doesn't like being told what to do and the saw shot both pieces off the saw. The smaller of the 2 hit the hull of the boat and fractured, then sailed over my full size truck into the road and finally came to rest 20 yds from the saw.
At least I still have all my fingers!
Now for the repair:Part 1
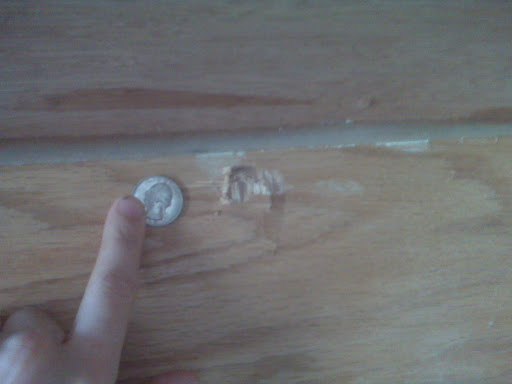
The original hole is smaller than a quarter. Not bad. However, the stress cracks extended out to form about 2.5 inches square that were no longer structurally sound.
Picasa Web Albums - Paul
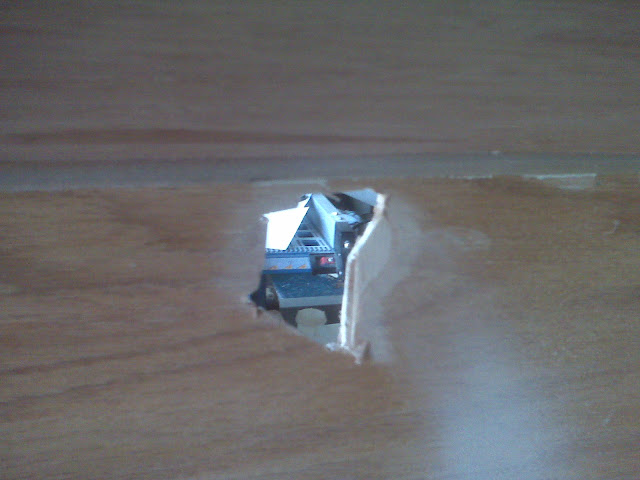
I drilled holes from the inside to mark the boundaries of how far I could cut out with my jigsaw. The damage was extremely close to the side buoyancy tank so that meant the repair needed to be done on the outside.
Picasa Web Albums - Paul
After cutting out the hole I sanded the area down in order to have a beveled edge for the fiberglass and filler to stick to. Then I took a file and gently squared off the inside edge.
Picasa Web Albums - Paul
Picasa Web Albums - Paul
Next, I put a backing piece of plastic (the plastic off of the back of the sanding disc fit perfectly) on the inside of the hull and reinforced it with cardboard and finally a scrap piece of wood.
Picasa Web Albums - Paul
Picasa Web Albums - Paul
I applied a little filler so the fiberglass threads couldn't be seen.
Picasa Web Albums - Paul
While the filler was curing I cut out 3 pieces of glass, each an inch wider than the first. The very first piece was an inch wider than the hole. Then I applied resin then the first piece of glass, wet it out and continued until all pieces were on. I put an extra thick coat of resin on the last piece and went back inside.
Picasa Web Albums - Paul
To be continued tomorrow...
-
2nd April 2010, 11:57 PM #85
SENIOR MEMBER
- Join Date
- Sep 2007
- Location
- Savannah GA USA
- Posts
- 583
It happens! That's one of the reasons to learn to love and live with a low horsepower table saw. 2 1/2 HP isn't enough to kill but it can throw some wood!
I worked in a shop in Ft. Lauderdale where they had 5 and 10 hp saws, 3 or 4 of each. A coworker took a panel in the gut, thrown there by one of the 10 HP beasts. He went to the emergency room where they stitched him up and sent him back to work. He didn't feel so good so he went home and stayed. About 3 days later he was dead from the internal injuries they didn't look for or find.The "Cosmos Mariner,"My Goat Island Skiff
http://s176.photobucket.com/albums/w168/MiddleAgesMan/
Starting the Simmons Sea Skiff 18
http://www.flickr.com/photos/37973275@N03/
-
3rd April 2010, 08:43 AM #86
Happily receives emails.
- Join Date
- Jul 2005
- Location
- 'Delaide, Australia
- Age
- 65
- Posts
- 8,138
Howdy Paul,
You can put the pics in your posts by right clicking (on a PC) the one on picasa you want to insert and choosing "copy image location".
Then go to the post where you want to add the pic. Put the cursor where you want to put the pic and click the little icon at the top called "insert image"
Then right click in the space for the link and select "paste". Click OK and it is done.
MIK
-
3rd April 2010, 04:38 PM #87
Member
- Join Date
- Dec 2009
- Location
- Jacksonville, FL, USA
- Posts
- 77
I'd love to fix my post but it's been too long it looks like. I started to fix it yesterday but have had some computer troubles lately so I didn't finish fixing it. Originally Posted by Boatmik
If you click on the the Picasa Web Albums - Paul text under each description it takes you to the pic.
-
3rd April 2010, 07:31 PM #88
Happily receives emails.
- Join Date
- Jul 2005
- Location
- 'Delaide, Australia
- Age
- 65
- Posts
- 8,138
Yep ... no worries. I only had the time and heart to change a couple of your pics to check the method worked.
No pressure at all - just so you know so you can do if you want.
Best wishes
MIK
-
7th April 2010, 03:37 AM #89
Member
- Join Date
- Dec 2009
- Location
- Jacksonville, FL, USA
- Posts
- 77
I've spent a large amount of time painting and priming and it's almost ready. I've also spent almost everyday working on the boat in the morning and going to work at night so I'm tired. I'm in the process of building a cart to transport the boat from truck to water. However, today I'm going to follow my both of my dogs' recommendations and lounge around the house doing nothing.
Here's an update pic.
-
7th April 2010, 07:04 PM #90
GOLD MEMBER
- Join Date
- Mar 2007
- Location
- Adelaide
- Posts
- 2,139
You know Paul I have gone back and read this thread from the start and I congratulate you on both the speed and quality of your build not to mention the odd recovery, well done.
However I must make comment about your work habits.
First why is it so many of you mericans get away with working in the living room. A remarkable degree of cleanliness is required which is something most uncommon down here.
Which brings me to the second point, you do realise you are in danger of violating the "Code" due to the state of your garage. For an explanation please refer to the most recent reference of the "Code" here.

Mike


 Reply With Quote

Similar Threads
-
G'Day from Florida
By johnnie52 in forum G'day mate - THE WELCOME WAGON -Introduce yourselfReplies: 7Last Post: 30th January 2009, 01:38 PM -
Hello Form Florida
By Jordy3738 in forum G'day mate - THE WELCOME WAGON -Introduce yourselfReplies: 14Last Post: 21st December 2008, 12:37 AM -
dovetail jig in florida area?
By timber715 in forum WOODWORK - GENERALReplies: 9Last Post: 12th May 2008, 03:18 PM
