

 Thanks: 0
 Likes: 0
 Needs Pictures: 0
 Picture(s) thanks: 0
Results 16 to 30 of 44
Thread: Paddle Plans quick question
-
6th April 2012, 10:59 AM #16
 SENIOR MEMBER


- Join Date
- Aug 2010
- Location
- New Jersey, USA
- Posts
- 767

Quickie update:
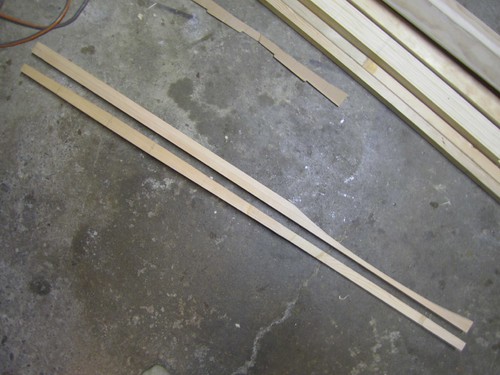
Shafts are scooped out.

IMG_1851 by davlafont, on Flickr
IMG_1860 by davlafont, on Flickr
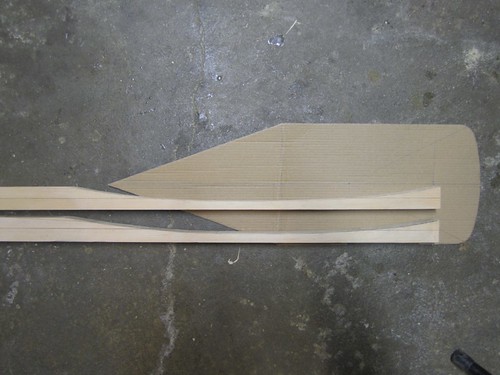
So I guess I didn't mark out the blade correctly because when it extends 72mm past the shaft per the plans, the other end falls short of the scoop. Good thing I did a practice blade first.
IMG_1863 by davlafont, on FlickrDave
StorerBoat Builder, Sailor, Enthusiast
Dave's GIS Chronicles | Dave's Lugs'l Chronicles | Dave's StorerBoat Forum Thread
-
6th April 2012 10:59 AM # ADSGoogle Adsense Advertisement
- Join Date
- Always
- Location
- Advertising world
- Posts
- Many
-
8th April 2012, 10:07 AM #17
SENIOR MEMBER
- Join Date
- Aug 2010
- Location
- New Jersey, USA
- Posts
- 767
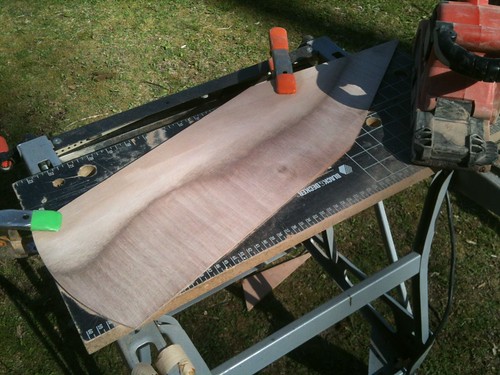
Here are my blades-to-be.
Scrap off-cuts of Joubert 6mm Okoume 5-ply from my GIS build. The stuff is pricey enough that if I can use every last bit of it somewhere I will.

IMG_0593 by davlafont, on Flickr
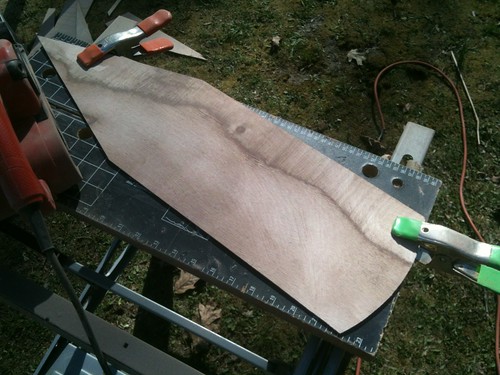
Once I cut and one blade shape, I transferred the pattern to another. Here I am planing the second one to match the first.

IMG_0594 by davlafont, on Flickr
My plan is the laminate two halves, so the outer half needs to be slightly proud of the inner. I think. Once the two are laminated I'll be feathering the edges slightly anyway.

IMG_0595 by davlafont, on Flickr
Reducing the thickness from 6mm down to 3/5ths using a belt sander and 50-grit paper. One ply going...
IMG_0596 by davlafont, on Flickr
Second ply going...
IMG_0597 by davlafont, on Flickr
I did two of these and have two more to go. Next step will be to glue the outer half onto the shaft. However, I think I want to shape the shaft a little bit first, just enough so that the pointy part of the blade can be rounded off to match. I won't do the other face of the shaft (i.e. the back that supports the blade) until after the blades are cured in place.Dave
StorerBoat Builder, Sailor, Enthusiast
Dave's GIS Chronicles | Dave's Lugs'l Chronicles | Dave's StorerBoat Forum Thread
-
9th April 2012, 02:50 PM #18
SENIOR MEMBER
- Join Date
- Aug 2010
- Location
- New Jersey, USA
- Posts
- 767
It may have been unnecessary, but I wanted to shape the shafts where the blade begins so that I can match the blade to the shaft nicely. Here's what little planing and sanding wrought:
IMG_0606 by davlafont, on Flickr

IMG_0605 by davlafont, on Flickr
I didn't bother making a spar gauge, I just hand drew some lines and planed off the corners. Then I used MIK's suggested technique of splitting open a sanding belt and curling it around 180* at angle to the axis of the shaft. 50 grit followed by 100 grit. There is nothing quite like the feel of freshly sanded wood. It's very satisfying.
I won't be gluing these together until I mix up glue for my GIS hull. I might do a dry run of the clamping set up soon though.Dave
StorerBoat Builder, Sailor, Enthusiast
Dave's GIS Chronicles | Dave's Lugs'l Chronicles | Dave's StorerBoat Forum Thread
-
10th April 2012, 03:13 AM #19
AJ
- Join Date
- Jun 2007
- Location
- Aberfoyle Park SA
- Age
- 63
- Posts
- 1,787
I admire your restraint !
Personally, I couldn't wait to mine glued up & into final shaping !
version 1 at left (my daughter's) and version 3 at right (for me).
I shaped the spoons in the shafts by cutting perpendiculars to the line
& chiselling out the waste between the cuts.
On v.1 I only rounded the shafts to the throat & left the blade section
square until after glueing. Then shaped the shaft on the back of the blade.
With v.3, I rounded the shaft to the tip before attaching the blades.
In both cases, I did the glue lay-up in one step for the blades onto the shaft.
Then planed the shaft on the back of the blades to shape when I removed the
'excess' material from the blade backs.
Then I added the fillets between blade backs & the shaft back, as much to
fair & profile the back profile as to strengthen the assembly...
-
10th April 2012, 05:54 AM #20
SENIOR MEMBER
- Join Date
- Aug 2010
- Location
- New Jersey, USA
- Posts
- 767
Restraint! Yes, I'm a model of restraint. Or... possibly I'm adept at stuffing a day's worth of work into a week!

In truth, I'm in no rush because this is a side project and the glue and epoxy coating will only happen as my GIS allows. BTW, you seem to have skipped or version numbers? Or did something go terribly wrong between 1 & 3? Frankenpaddle?
How about your handles? I'm thinking of cutting a slot (I know there's an actual woodworking term for that) to insert a one-piece, fan shaped handle seen on the floor in my last photo. I'm not sure if I want to use one 6mm part or maybe double it up to 12mm and shape it's edges. And how much of the shaft will remain versus tapering it away. I'm not a canoer, so I don't really know what right looks like!Dave
StorerBoat Builder, Sailor, Enthusiast
Dave's GIS Chronicles | Dave's Lugs'l Chronicles | Dave's StorerBoat Forum Thread
-
10th April 2012, 04:01 PM #21
AJ
- Join Date
- Jun 2007
- Location
- Aberfoyle Park SA
- Age
- 63
- Posts
- 1,787
With a single paddle handle, you tend to push on the top with your palm, as
well as side-ways force. So you need to bulk out the top to a comfortable
thickness. 12mm would be the thinnest I'd whittle the middle of the grip
down to. The top, I'd go at least 24mm, and preferably 30-32mm. Smaller
hands could use a narrower top. Shape the top to be comfortable in the
hands that will use it. That's the beauty of making your own - make it fit
YOU, rather than accept whatever the factory turns out...
Actually, these were versions 2 & 3. Version 1, I made very close to plan
for blade width & length, and only chamfered the edges, rather than taking
significant excess thickness off the back. Because I was using 4mm ply, it
came out somewhat over-weight, and the blade back doesn't look as interesting.
These are double paddles by the way, not singles. (Not that it makes any
difference to this conversation)
cheers
Alan
-
11th April 2012, 04:29 PM #22
Happily receives emails.
- Join Date
- Jul 2005
- Location
- 'Delaide, Australia
- Age
- 65
- Posts
- 8,138
-
12th April 2012, 09:30 AM #23
SENIOR MEMBER
- Join Date
- Aug 2010
- Location
- New Jersey, USA
- Posts
- 767
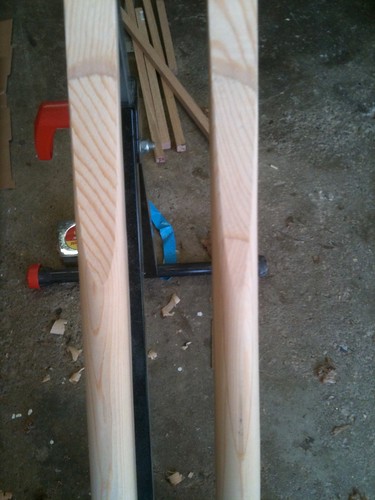
Marked the curve just to see what it looks like. I might taper it more, but that will be on-the-fly I think.

IMG_0649 by davlafont, on Flickr
Inspired by AJ's work and discussion:
IMG_0650 by davlafont, on Flickr

IMG_0651 by davlafont, on Flickr
Dry run of clamping:

IMG_0652 by davlafont, on Flickr
Then I promptly needed all these clamps for my hull...Dave
StorerBoat Builder, Sailor, Enthusiast
Dave's GIS Chronicles | Dave's Lugs'l Chronicles | Dave's StorerBoat Forum Thread
-
13th April 2012, 01:13 PM #24
AJ
- Join Date
- Jun 2007
- Location
- Aberfoyle Park SA
- Age
- 63
- Posts
- 1,787
Be a bit careful with how much you take off the shaft behind the blade.
I had the extra 2mm or so of blade thickness acting as extra 'spine', so could
lose a bit of shaft without compromising strength. Tapering to the tip as per
your lines is not unreasonable, but you have probably already realised it's best
to wait until after your laminate has set. Otherwise the spring back of the
blades will tend to straighten the curve of the shaft.
cheers
-
13th April 2012, 02:06 PM #25
SENIOR MEMBER
- Join Date
- Aug 2010
- Location
- New Jersey, USA
- Posts
- 767
Good point AJ. I'll avoid the temptation. Yes, I will wait 'til after the blades are laminated before whittling down the shaft. Both paddles have the first layer of blade glued up (so much for restraint!). I still need to thickness the remaining laminations, so progress will be slow for a bit.
Dave
StorerBoat Builder, Sailor, Enthusiast
Dave's GIS Chronicles | Dave's Lugs'l Chronicles | Dave's StorerBoat Forum Thread
-
14th April 2012, 04:55 AM #26
Senior Member
- Join Date
- Aug 2011
- Location
- Black Forest. Germany.
- Age
- 67
- Posts
- 219
I'm just tossing this around, but do you think it would work out OK to epoxy two pieces of 5mm 3 ply together for paddle blades. The reason I ask is I have two oval beech hoe hadles here and was thinking of making use of them as paddle handles. They would only be something to get us going with the Eureka. I'm definitely later going to build two paddles to Michaels plan as light as possible.
Kev.
-
14th April 2012, 02:32 PM #27
AJ
- Join Date
- Jun 2007
- Location
- Aberfoyle Park SA
- Age
- 63
- Posts
- 1,787
Thems as is building single paddles...
You might want to consider making a straight bladed paddle rather than spooned.
That way, there is no "bad" side when you change arms or want to use the reverse side of the paddle.
You can use the straight blade for a variety of different strokes that the spoon
blade is a bit "fussy" about. Including, but not limited to, bow rudders & off-side support strokes.
Watch canoe ballet videos for ideas of what I mean..
Especially ones where the paddler doesn't lift he blade out of the water during their routine.
cheers
AJ
-
16th April 2012, 04:10 AM #28
Senior Member
- Join Date
- Aug 2011
- Location
- Black Forest. Germany.
- Age
- 67
- Posts
- 219
Impresive stuff AJ. I've just been having a look-see on youtube. Now comes the question, what is the reason for "spooning" a paddle ? Looking at the videos, the paddlers have a fantastic amount of control with the flat paddles. I would like to see an underwater video of exactly how they do it.
Kev.
-
16th April 2012, 12:29 PM #29
AJ
- Join Date
- Jun 2007
- Location
- Aberfoyle Park SA
- Age
- 63
- Posts
- 1,787
How they does it is lots of feathering & sculling.
Spoon blade delivers more power on its concave side, especially if you can
generate a stroke that is part 'pull', part 'scull'.
Look at racing kayak paddles for the most extreme variant of this.
eg. Mako Paddles
They are deeply concaved, with a definite leading edge & trailing edge, like a
1910's aircraft wing. The stroke they are designed for starts next to the boat
& goes out to the side, away from the boat, perhaps more than backwards
alongside the boat. You can do this with MIK's kayak paddle, and be
astonished at how much more power is generated than a straight pull
backwards. Very tiring though, as might be expected. Gives a new
appreciation for the athletes who can sustain the stroke for 1,000m.
Or a marathon...
A large, straight blade has no weak or strong side, so you get the same
result, no matter which side you power up. Also very useful in water fights
with (big) kids in other canoes, and for building sand castles, etc... ;-)
-
18th April 2012, 02:17 AM #30
SENIOR MEMBER
- Join Date
- Aug 2010
- Location
- New Jersey, USA
- Posts
- 767
Sounds like you want this: Originally Posted by Flatdog

Becky Mason - Advanced Classic Solo Canoeing VideoDave
StorerBoat Builder, Sailor, Enthusiast
Dave's GIS Chronicles | Dave's Lugs'l Chronicles | Dave's StorerBoat Forum Thread


 Reply With Quote

Similar Threads
-
DIY Paddle Plans
By venice in forum KAYAK & CANOE BUILDINGReplies: 3Last Post: 13th January 2012, 07:58 AM -
Free Plans... Be Quick
By Chipman in forum WOODWORK - GENERALReplies: 0Last Post: 15th December 2010, 08:58 AM -
Free Paddle Plans
By CCBB in forum Michael Storer Wooden Boat PlansReplies: 5Last Post: 26th January 2010, 05:28 PM -
paddle plans
By pjarche in forum BOAT DESIGNS / PLANSReplies: 7Last Post: 23rd September 2006, 02:52 AM -
Canoe Paddle Plans
By bitingmidge in forum KAYAK & CANOE BUILDINGReplies: 1Last Post: 18th December 2005, 11:55 AM
