

 Thanks: 0
 Likes: 0
 Needs Pictures: 0
 Picture(s) thanks: 0
Results 16 to 26 of 26
-
17th January 2008, 05:30 PM #16
 Happily receives emails.


- Join Date
- Jul 2005
- Location
- 'Delaide, Australia
- Age
- 65
- Posts
- 8,138
 A Quick Maintenance and repaint of 2 x PDRacers
Howdy...
Remember how the BitingMidge and his partner Jo drove down to Adelaide to sail the PD Racers in the Goolwa Wooden Boat Festival?
They went the long hard way - after all they were on holiday ...

Well the two boats suffered more than slightly. Happily most of the damage was superficial - though some was quite deep in the ply.
Now, the boats have been stored outside on the trailer for a year without those grazes and dings being repaired. So as I am up here staying with Midge and Jo I am doing a quick two day repair and maintenance and patch repaint job on the boats.
The point is to get the timber all protected again with at least two coats of epoxy
- Fill any dents with epoxy and an easy to sand filling powder
- Sand smooth
- Patch undercoat (the purpose of undercoat is to make the piebald colours disappear under a coat of white
- Patch top coat with yellow so it matches
- If I was going on to do a really schmick job I would then sand the whole hull lightly and add one additional coat of yellow to bring everything up to the same colour. The result would be two "as new" boats.
I'm hoping I will get it all done today (right now the epoxy and coating is curing)
So I am photo-ing and posting some comments here to show my approach.
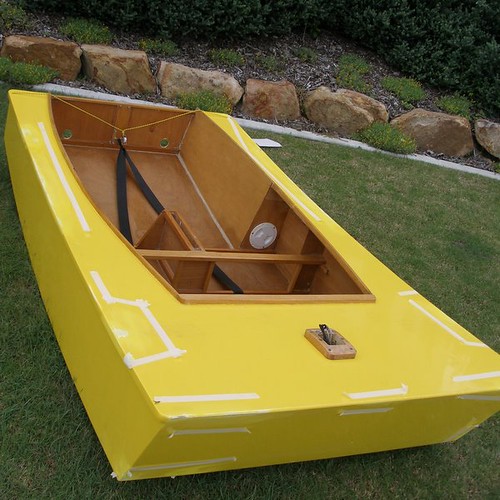
First of all - the pics below are of the damage - to set the scene.
1/ most of the bad damage were as stones got caught between the hull and the supports on the trailer - they wore their way through - only badly in a few places. The worst area is this one - the ply is worn through a couple of layers in one spot. Luckily there is a supporting gluing member so there is no structural problem.
If the timber was not behind I would be filling the hollow and putting a thin layer of glass over the affected area to give it more structural continuity.
This was how the boats were when Midge got to Goolwa - so we simply covered any damaged areas with duct tape or brown plastic packaging tape - this is the general form of these types of damage that people use in regattas if they need to sail the next day - cover it with tape!!! Which is what we did for our world PDRacer speed record.
The tape does leave an adhesive residue when it is on for a long period which is some of the brown colour. At this stage I am not sure what will remove it - but I will start with turps and then try some more vigourous thinners if that doesn't work - or maybe it will be thin enough to just sand off.
Attachment 64993
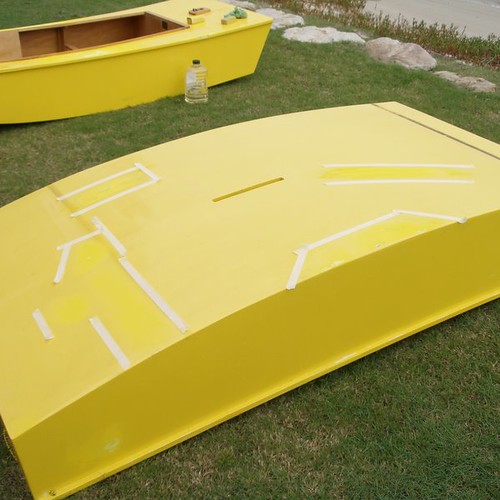
2/ The second one is of the stone chips on the decks. Midge put a whole sheet of ply over the top of the trailer chassis so stones were unlikely to hit the boat. Sadly he underestimated the number of stones that would be involved. The side decks proximal to the wheels were the worst hit - the stones were bouncing round inside the mudguards but some would bounce several times and then shoot out at strange angles.
Attachment 64986
3/ This is the bottom - which faced upwards - how it got chipped so badly ... we don't really know!!!
Attachment 64987
4/ First step is to sand any damaged areas. THE MOST IMPORTANT THING is not to go through the undercoat to the wood - so I will always stop sanding when I get to the white. If there is more damage below that I will fill up to the surface with the epoxy/filler mix.
Attachment 64988
5/ This is as far as I would ever sand for this type of repair.
Attachment 64989
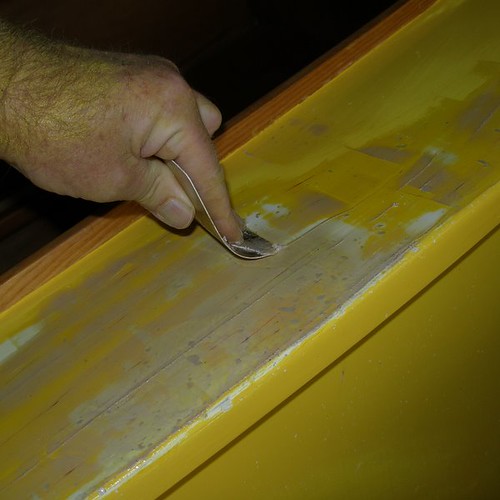
6/ Here is some packaging tape residue.
Attachment 64990
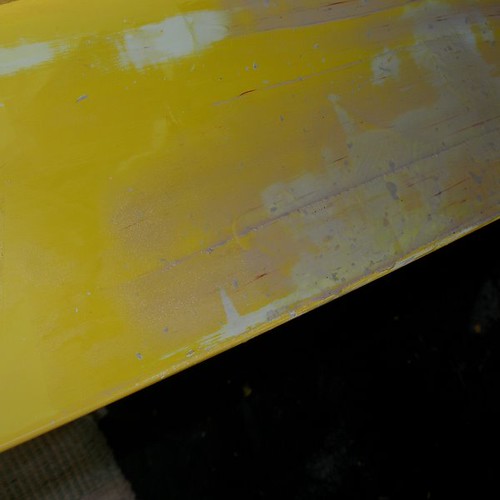
7/ Clean up with turpentine and elbow grease - it worked. You can use more powerful solvents like acetone etc - but only on older paintwork - new paintwork may blister instantly. Even with older paintwork I would make sure the acetone comes off the surface very quickly and check the paint for softening.
Attachment 64991
8/ This gives some idea of how much surface I am not painting - the more yellow parts are sanded.
Attachment 64992
That's it for now - I'll put more up later.
Michael Storer
(Michael realised that he did all the painting and took the photos and never finished this thread)Last edited by Boatmik; 26th September 2008 at 08:49 PM.
-
17th January 2008 05:30 PM # ADSGoogle Adsense Advertisement
- Join Date
- Always
- Location
- Advertising world
- Age
- 2010
- Posts
- Many
-
17th January 2008, 05:51 PM #17
Pretend my avatar moves!
- Join Date
- Nov 2003
- Location
- Australia and France
- Posts
- 8,175
I love it when Mik comes to stay!
P

-
26th September 2008, 11:48 PM #18
Happily receives emails.
- Join Date
- Jul 2005
- Location
- 'Delaide, Australia
- Age
- 65
- Posts
- 8,138
OVERVIEW
Now the secret of this paint job is that ... I DONT want to do lots of painting.
I have told you all that I am lazy .. so it is time you started believing me (the evidence is that the photos are almost 8 months old!!!!).
Before getting too involved have a really careful look at the photos above. Most boat owners would be horrified about these deep gouges all over the hulls. The outer veneer has been worn through in numerous places, some places the ply has been dented.
The really interesting thing is that there is nil, zero, zip, zilch structural damage indicating the right structure is in the right places.
So we just have to do a good job to keep water out of the structure in the long term, make it smooth and get it all the same colour.
So ... my intention is not to repaint the whole boats .. after all they were only painted 4 months before so I will
- Sand any bumps and to provide a key for epoxy/filler/paint to stick.
- Epoxy seal any bare timber with three coats
- Fill any dents with epoxy filler and sand smooth
- Undercoat and sand the epoxy or any bare undercoat in other areas and sand
- Patch gloss paint with the yellow to cover undercoat
- Do one coat over the whole boat to even everything up
1/ Sanding
So ... here we goes. The surface has been sanded only where needed here is the bottom view and the top view. The tape was only there to help me remember where to stop. This is not as unimportant as it seems. The trick is to minimise labour at every point
So I have been VERY careful not to sand any areas that are not damaged. I have sanded close to where any repairs will be needed or where different layers of paint have been worn through.
2/ The next step is to find any bare wood and coat it with epoxy.
I put the boats on their least damaged surfaces and made sure that no epoxyied areas would touch anything. this allowed me to do the epoxy coating in one go by doing the coats wet on wet.
Note how I minimise work by making sure the epoxy doesn't go where I don't need it.
Info on wet on wet epoxy application method is here
I seldom use masking tape for this type of work as it means that all the different coats finish at the edge of the tape leaving a high visible edge. Doing it my way means that the edges of the different coats will not line up so it reduces sanding at the next point.

Put one coat on and wait for it to go tacky, then do a second coat and wait for it to go tacky then the third coat. The coats DO NOT NEED TO BE THICK.
Here is the second coat ...
See how neat I am not to increase the area that is wetted with the epoxy.
If you are not planning to use epoxy then you could either use
- a bare timber primer from the paint system you are using (this is best if the boat is going to spend long periods in the water, or
- you can use some of the white undercoat but thin it about 25% with turps (this is OK if it is a small boat or canoe that will not be kept in the water).
3/ Filling with bog and sanding smooth.
I have just made this a little bit more complicated because I am now covering epoxy and non epoxy methods.
The difference is that with any epoxy process you can save heaps of time if you use wet on wet application. This means that if you want to save the maximum amount of time the filler has to go in while it is all wet. it is the same product but with lightweight thickening powder added (Q-cels or lightweight easy to sand filler from your supplier)
BUT
If you used primer or thinned undercoat ... now you have to wait until tomorrow when it is dry. Then give it a light sand ready for a polyester car bog (try to get one that is not too dark a colour when mixed) for boats that will be kept out of the water or if it is going
to be kept in the water you may as well fill with epoxy and the lighweight filler.
so back to the epoxy method ... mix the resin and hardener in the right ratio and then add the thickening powder.
When the right amount of powder is added the mix will not slump but it is quite pliable. In this next pic see how the swirls hold their form ... if the epoxy looks wet or slumps you need more powder. And exception might be if all the filling you have to do is on a horizontal surface ... then maybe it doesn't need to be this thick.

You can see that Peter's surplus of subway cups has come in quite useful.
You need something with a clean edge to do neat filling. The nice thing about quality epoxy systems is that the epoxy doesn't shrink as it cures as there are no solvents to evaporate. There will be no absorbtion by the wood in this method because of the coats that were done earlier.
(but if using the non epoxy car bog you need to overfill significantly as the bog will shrink)
Peter uses his AMEX Gold (GOD) card to show the US Financial system what he really thinks of it. This is one place where plastic is king ... plywood cannot be made smooth enough to leave a good surface .. so any piece of plastic with a smooth edge is fine.

This type of angle means that the area will not be overfilled. the result should look like

Remember the part with the really bad stone chips all very close together. Don't fill individually but fill in one swoop being very careful not ot overfill. A slightly more liquid mix can work better in this situation, but I have so much to do I don't want to make up several mixes. So I use a lot of pressure to make sure the minimum overfill is left in the pockmarks.
We lost some of the radius off the nose of the boat so a different filling strategy is required.
When you do flat fills like the above you need to minimise excess as the sandpaper and block will ride up over them and make the sanding VERY laborious.
However on the nose there is a narrow area much of the width of the foredeck. So we build up a good amount of bog just where it is needed. The small surface area and the radiussed area will make it easy to sand quickly with coarse paper on a block without damaging any of the surrounding area.

Now sanding the bog the next day must be done with a sanding block and probably a alumina paper of around 150grit.
I did not use a machine sander because they will cut too fast and remove too much paint from around the filled areas. If you are really sure you can do it with a sander then give it a try ... but promise me .. the first time you go through all the paint to bare wood that you will put the sander down and say "Michael was so right on this! Say it three times.
I have to apologise .... but I didn't take any photos of this section of the work so here is me using a sanding block in an earlier phase ... just so you know I can. DONT use water as is shown in this pic!!!! This type of sanding is best done dry.
So everything has to be nice and flat and DON'T sand any areas that dont need sanding at this point. Just the filled areas.
Next we will look at the undercoating!
Michael Storer
-
27th September 2008, 12:26 AM #19
Happily receives emails.
- Join Date
- Jul 2005
- Location
- 'Delaide, Australia
- Age
- 65
- Posts
- 8,138
4/ Undercoating and sanding.
OK Class! Who knows the purpose of undercoat?
Well .. seeing you were all so slow ... the purpose of undercoat is to turn the boat into a single opaque colour so you cannot see colour variations between bits that are timber, bog or paint.
Now just going back a step ... this is going to be a Patch Undercoat job. Remember I am trying to reduce the amount of effort for myself. So I am only going to put undercoat where the boat is not yellow!!!
There is no point in putting undercoat where the boat is already the final colour. If the boat is quite piebald then there is a good argument for as many coats of undercoat that are required to make the colour go even.
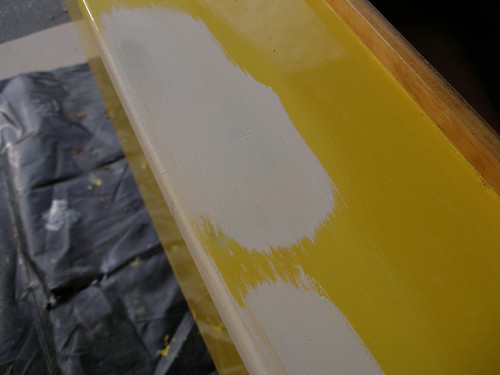
So this is what a patched undercoat section looks like.

Do you see something interesting. If you look carefully you will see that some of the yellow outside the undercoat is a lighter colour than the rest. That is the area that was sanded when the filler was smoothed down.
I am very careful only to place the undercoat where it is needed ... on bits that are not yellow. Sorry if I repeat this ... but I am saving you work! THINK before you put down the undercoat. Sometimes the undercoat might be dry enough to sand on the same day, but if it is not hot summer weather it is unlikely. If the first coat was dry and you needed a second coat a bit later to get the undercoat opaque then it definitely will not be ready until tomorrow.
Finer paper ... while I used 120 to 150 grit for sanding down the bog, now I am down to about 320 grit to sand the undercoat.
BUT keep the finer paper away from any corners ... it will go straight through all layers to the wood below in a moment.
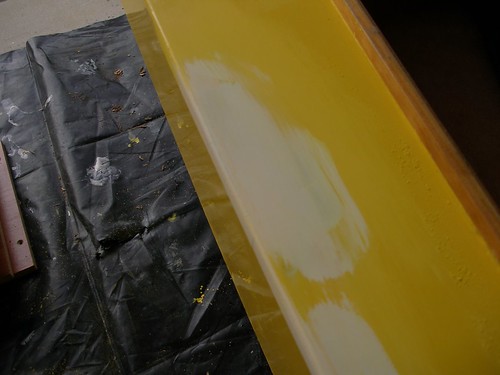
So lets see what happens as we do a section. This is before sanding.
This is after I have sanded the flat areas using the sandpaper and block. Note the light colour of some of the yellow which shows how I limit the amount of sanding.
Note too that I have not touched the corner of the deck or the narrow edge of the gunwale. I am waiting for the fresh sandpaper to go blunt.
Once I have done the flat area on top of the deck I then look at the narrow flat on the side of the gunwale. The area is narrow so it will sand too quickly .. so I have swapped to old sandpaper and have my head down low and close to the surface So I will stop if the undercoat starts looking thin and transparent. Timber will appear from below as a shadow.

Finally I will ditch the block of wood and use the blunt paper around the radius of the corner and try to stop before anything bad happens. I just do one light stroke and then look for bad signs and then another if it seems ok. Maybe it is just one light sweep with the paper to do the corner.
With this pic ... I have gone a little bit too far .. see how you can see a shadow of the timber underneath as a darker colour. Also note the limited extent of the sanding all the flat surface is done with a block.

I am being a good boy.
5/ Patch gloss paint
So it is all sanded ready to cover ONLY the undercoat with a first coat of gloss (yellow in this case).
It is the same method as with the undercoat except for two differences
a/ the gloss is much slower drying .. don't consider putting a second coat over the first coat on the same day.
b/ the gloss is much THINNER than undercoat so even more care with sanding this time.
When finished covering the white let the paint dry. Next day all the flat surface of the boat can be sanded ... by machine with find paper if you are REALLY careful. DON'T use the machine on gunwale edges or corners .. you will go through in a millisecond.
I have used bits of tape to remind myself to be careful in those areas.
And finally .. finally the last coat goes on. Remember I do vertical strokes on the vertical surfaces.
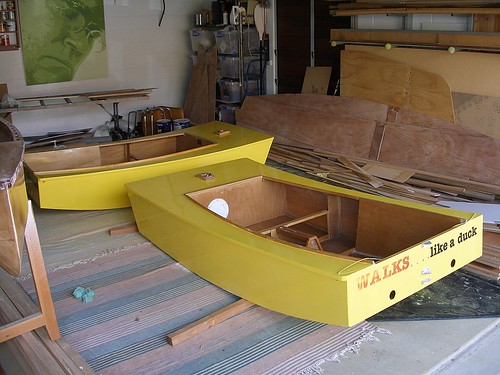
Finally two resplendent boats!!!!
I am lazy .. but I can do a nice job of painting!!!!
Best wishes
Michael Storer
Just compiled some links to useful boat repair articles ... mostly to do with plywood
-
28th September 2008, 08:50 PM #20
 Gone Sailing
- Join Date
- May 2000
- Location
- SOUTH AUSTRALIA
- Age
- 63
- Posts
- 147
You guys need more practice
Have just started sanding back , filling, sanding , etc the deck and cabin of my yacht Mik and Midge look like they could do with a bit of practice dont want those skills getting lost

 Constant Sinking Feeling
-
29th September 2008, 05:05 AM #21
SENIOR MEMBER
- Join Date
- Jul 2008
- Location
- Fenwick, Michigan
- Age
- 75
- Posts
- 908
Mik, excellent how-to tutorial! Thanks.
One of the subtle lessons for me is that - contrary to what I've been told - yellow is a viable color! Yes, while still in that mid-planning mode of mine, yellow is the current leading candidate for my GIS. What kind of paint did you use?
Bob
-
29th September 2008, 09:49 AM #22
Yacht Designer & Builder
- Join Date
- Feb 2008
- Location
- Eustis, FL, USA
- Posts
- 2,270
Has anyone tried the newer WR-LPU paints, like System Three's products? Cool stuff and much easier and cheaper to apply.
It likes humidity, unlike other paints, a humid day permits you to keep a wet edge longer. It dries fast, real fast so thin it according to temperature (and humidity). On a hot, dry day it can cure on the brush, before it gets to the surface. Thankfully, I'm in a humid area and this helps a lot.
It dries hard, like all LPU's, but it's about half the cost of the brand names, like AwlGrip and there's no solvents to fool with (or breath), no respirators, clean air supplies, etc. Cleans up with soap and water, etc. so saving a brush is easy.
I'm using System Three on a current project and this is my first go 'round with WR-LPU. It works great and I've been able to tint it with powered, water based tints. The manufacture says I'm not supposed to be able to do this, but, damn, it's water soluble, how tough can it be. Now, on their side of the coin, they're suggesting the LPU side of the formula requires special pigments, etc., but I did a few scratch tests and it's stuck good with a dissolved tint too.
It can go over an epoxy base without primer (cool) although again the manufacture says only over their epoxy as a base (please . . .), but I know they're re-formulators of bisphenol A, just like everyone else, so come on.
Michael, did you get my "Floom" email?
-
29th September 2008, 10:02 AM #23
Happily receives emails.
- Join Date
- Jul 2005
- Location
- 'Delaide, Australia
- Age
- 65
- Posts
- 8,138
Howdy Paul,
Yes ... got the email.
People here have had very variable results with water based paints. Even down to one side of the boat going really nicely and the other ending up quite rough.
Everything else you say about them is true in terms of toughness and long life.
And much better for health too.
Did you learn any tricks or have any advice after going through the process?
MIK
-
29th September 2008, 03:19 PM #24
Yacht Designer & Builder
- Join Date
- Feb 2008
- Location
- Eustis, FL, USA
- Posts
- 2,270
Yep, keep the humidity up, which isn't a problem here in Florida during the summer months. Some experience with other low viscosity paints is helpful as well.
Unlike most paints that have a substantial amount of body, the LPU's and WR-LPU's are thin naturally and get thinner when you cut it for the conditions (warmer temperatures require more solvent, etc.). Also be aware of the conditions, in relation to the "ideals" stated on the label. If you're painting in conditions 15% hotter then the drying times listed on the label, then you need to thin it additionally so it will "flow" for you. These paints also have "wetting" agents for hot weather and curing additives for cool temperatures. I'm nearly always using a wetting agent, but my friends in the great white north own nothing but accelerators.
Because these paints are thin and have such incredible surface tension (what makes them so shinny), every slight blemish, microscopic grain of dust, etc. will show up easily. Work super clean, "tacking" down just before painting, in a very clean area.
I use a home made paint booth, which is a fancy word for some clear plastic sheeting, tacked to 1x2's that I use to surround an area. One of these "walls" has a couple of A/C filters in it (just like the kind you use in your house). This is the only air source once I "close" up the booth for painting, so it's filtered. Another wall has a 30" box fan that I usually run on low or medium when painting, which draws air into the booth (through the filter) and then blows it out gently. I clean the area inside the enclosure as well as possible, wet down the floor, clean any equipment I bring into the booth and of course the project is clean too.
Work quickly with these LPU's (either type) and it's best if you employ a helper, who rolls while you quickly follow tipping off. You have to be able to do a 2 sq. ft. area (roll and tip) in less then 30 seconds to maintain a wet edge in 80 something degree weather. I'm a pretty experienced painter so I was able to do it solo, but I could see on a real hot day (90's) where I'd have trouble keeping a wet edge going.
Don't get greedy, work only an area large enough that you can manage the wet edge, because if you loose it, you're screwed.
As you're working, you'll notice that the paint is starting to "drag". It is and you need to add solvent as you go. It's literally curing in the can after you add the activator so adding an ounce or so of solvent every so often is necessary. This may be why some have done well on one side of the boat, just to have the other side come out like you painted over 40 grit. In the 80 degree weather we've had lately, I've added about an ounce of solvent (water in this case) every ten minutes. In 90 degree weather this may be every 5 minutes.
I found it was a "feel" thing to guess if the paint was trying to drag. I didn't want to wait for the paint to drag, as then it's to late and you're running a big risk of loosing the wet edge. I was able to feel the paint getting "heavier" as I tipped off and added thinner before it started to drag.
-
29th September 2008, 08:30 PM #25
Happily receives emails.
- Join Date
- Jul 2005
- Location
- 'Delaide, Australia
- Age
- 65
- Posts
- 8,138
Howdy Paul this is really interesting to me. I am in Adelaide where the humidity is usually VERY low there have been some probs with users getting a good result.
The processes you mention about are all familiar
- Working out what area you can do in one hit and not exceeding it.
- Applying with a roller for even-ness then tipping off lightly with a brush - using an extra person if necessary.
- Using the right additives to keep the paint flowing out of the brush and adding them if the brush starts to feel "grabby or sticky.
Can I ask some additional questions.
When the tipping off is done do you tip off vertically (to reduce the risk of "curtaining" - sections of paint slumping down because of gravity) or horizontally?
How smooth does the finish end up?
How easy is it to sand compared to normal two pot polyurethane (LPU) or turps based paints?
MIK
-
30th September 2008, 08:30 AM #26
Yacht Designer & Builder
- Join Date
- Feb 2008
- Location
- Eustis, FL, USA
- Posts
- 2,270
I tip vertically first, then horizontally. I find if horizontal marks remain, they are less objectionable then vertical.
If the paint goes down thin enough (well rolled out) then I haven't had much difficulty with sagging on vertical surfaces.
It's sands just like regular LPU and seems just as hard. The shine is comparable to LPU too as is the smoothness after a good roll and tip job. It lays down nicely, if you've thinned correctly for the current conditions.
I suspect your issues are surrounding the dryness of your area. Increase the humidity in the shop, use more solvent and or a wetting agent.
When you do get it "right" it feels right at the brush and the results show it. In dry conditions it can go all wrong pretty easily.
Our winters here are very dry and I haven't used it in the winter yet, but I'd imagine I'll have similar problems you've experienced then.
A couple of pots with boiling water around the work area may be all you need, though I might employ a store bought humidifier or two to make life easier then watching a boiling pot of water.


 Reply With Quote


Similar Threads
-
Duckflat Wooden Boats - Classic Boats and fittings auction
By Boatmik in forum MISC BOAT RELATED STUFFReplies: 30Last Post: 16th July 2012, 12:58 PM -
Bloody Labour
By Iain in forum NOTHING AT ALL TO DO WITH WOODWORKReplies: 13Last Post: 15th November 2006, 03:05 PM -
Slave Labour Wanted
By echnidna in forum NOTHING AT ALL TO DO WITH WOODWORKReplies: 2Last Post: 24th September 2006, 09:00 AM
