

 Thanks: 0
 Likes: 0
 Needs Pictures: 0
 Picture(s) thanks: 0
Results 16 to 30 of 65
Thread: New PDR build - Boston, MA USA
-
6th May 2009, 11:52 PM #16
 Happily receives emails.


- Join Date
- Jul 2005
- Location
- 'Delaide, Australia
- Age
- 65
- Posts
- 8,138

Hmm... probably go the lug rig which is reefable as the most easily adaptable solution.
Means the sail can be adult sized or kid sized - only one sail.
MIK
-
6th May 2009 11:52 PM # ADSGoogle Adsense Advertisement
- Join Date
- Always
- Location
- Advertising world
- Age
- 2010
- Posts
- Many
-
7th May 2009, 12:47 AM #17
Intermediate Member
- Join Date
- Dec 2008
- Location
- manchester, MA USA
- Posts
- 48
Oops - I was going to glue up the ladder frame tonight ... guess I
should have given the lug a little more thought ...
-
7th May 2009, 10:43 AM #18
Happily receives emails.
- Join Date
- Jul 2005
- Location
- 'Delaide, Australia
- Age
- 65
- Posts
- 8,138
The mast is the same, the lug rig version has lost the top end.
You could even build the sprit version and put a halyard deadeye at the right height for the lug along the mast - need an extra block inside the mast though.
If you found the lug satisfactory (no reason why not) you could lop off the mast at the right point.
MIK
-
8th May 2009, 07:56 AM #19
Intermediate Member
- Join Date
- Dec 2008
- Location
- manchester, MA USA
- Posts
- 48
MIK,
Might one have a look at the lug rig plans? I am ready to
close up the mast - now might be a good time for me
to glue in that extra block .
.
I'll send you an email.
Thank you,
Peter
-
8th May 2009, 10:13 AM #20
Happily receives emails.
- Join Date
- Jul 2005
- Location
- 'Delaide, Australia
- Age
- 65
- Posts
- 8,138
Howdy Peter,
Thanks for the email, I have sent them to you. Glue in the block and draw a pencil line at its top.
Of course you can always cut the mast and glue the block in after.
MIK
-
8th May 2009, 11:05 PM #21
Intermediate Member
- Join Date
- Dec 2008
- Location
- manchester, MA USA
- Posts
- 48
Thanks again MIK.
Cheers,
Peter
-
16th June 2009, 06:49 AM #22
Intermediate Member
- Join Date
- Dec 2008
- Location
- manchester, MA USA
- Posts
- 48
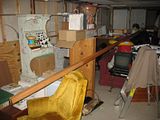
Hello all,
A brief update on "Dabbler", now officially hull number 315:
1) Bottom panel going on; the previously installed mast step
works nicely as a "bottom panel holder".

2) Bottom in place and edges lightly rounded.
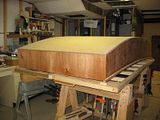
3) The mast awaits some sanding and varnish. This picture will serve
as a reminder for me to clean up the basement!
4) Glassed the blade tips too.

5) The official safety officer, with officially unplugged
drill press.

I should have the frames and centrecase dry fitted and ready for
installation in a few days (I hope!). The ocean surface temp here
has warmed up to a toasty 57 F and with the summer solstice
a few days away I want to get this project moving along.
Cheers,
Peter
-
16th June 2009, 01:30 PM #23
Happily receives emails.
- Join Date
- Jul 2005
- Location
- 'Delaide, Australia
- Age
- 65
- Posts
- 8,138
Caw .. that means we get to the winter solstice here soon .. brrrrr.
MIK
-
16th June 2009, 11:47 PM #24
Intermediate Member
- Join Date
- Dec 2008
- Location
- manchester, MA USA
- Posts
- 48
Sorry about that .. but at least your nights start getting shorter.
Our past winter was frigid (from what I remember ).
).
From Webster's:
'Caw: to utter the harsh raucous natural call of the crow or a similar cry' - indeed.
Warmly,
Peter
-
29th June 2009, 03:08 PM #25
Intermediate Member
- Join Date
- Dec 2008
- Location
- manchester, MA USA
- Posts
- 48
The latest news:
Frames and centrecase dry fitted and ready for gluing after a little cosmetic
work - filled nail holes need sanding and then the three coats of 'pox and then
sanding. Then, out comes the glue.


Which, MIK, brings up a question. The plans call for the centreboard slot
to be cut into the bottom at a much later stage. Is there anything wrong
with cutting the slot in the bottom now, before I glue in the centrecase and
the frames?
To me it seems easier to locate and cut the slot at this stage. I just wasn't
sure if I was overlooking something.
Cheers,
Peter
-
29th June 2009, 09:36 PM #26
SENIOR MEMBER
- Join Date
- Sep 2007
- Location
- Savannah GA USA
- Posts
- 583
I wouldn't try to cut the full sized slot in advance as it takes away your options if the final position of the centercase is slightly different.
To make cutting the slot easier, though, you could drill small holes along the centerline representing the fore and aft ends of the slot. When the centercase is installed use those holes as starting points for cutting the slot. I used a flush trim bit in a router to cut the slot in my GIS, enlarging one of the marker holes just enough to get the bit inserted. From there it was dead easy to rout out the slot with perfectly flush edges.The "Cosmos Mariner,"My Goat Island Skiff
http://s176.photobucket.com/albums/w168/MiddleAgesMan/
Starting the Simmons Sea Skiff 18
http://www.flickr.com/photos/37973275@N03/
-
30th June 2009, 02:09 PM #27
Intermediate Member
- Join Date
- Dec 2008
- Location
- manchester, MA USA
- Posts
- 48
Hi MAM,
Yeah, that's what I'll do. Thanks for the input.
Your Simmons Sea Skiff is looking good by the way.
Peter
-
30th June 2009, 02:13 PM #28
Happily receives emails.
- Join Date
- Jul 2005
- Location
- 'Delaide, Australia
- Age
- 65
- Posts
- 8,138
Howdy,
MAM has the exact reason! But you can mark the position the case will go into and put some guide holes in place on the centreline so you can cut it out later.
If you have a router it is breathtakingly easy - but the PDR plans do show a pic of using a drill, saw blade and a piece of sandpaper wrapped around a timber batten.
MIK
-
30th June 2009, 02:28 PM #29
Intermediate Member
- Join Date
- Dec 2008
- Location
- manchester, MA USA
- Posts
- 48
Thanks MIK,
I am pretty low tech tool-wise but I have half a mind to pick up a router
and flush trim bit just for the fun of it ...
Peter
-
30th June 2009, 02:40 PM #30
Happily receives emails.
- Join Date
- Jul 2005
- Location
- 'Delaide, Australia
- Age
- 65
- Posts
- 8,138
The router is almost as fun as a highly tuned belt sander!
MIK


 Reply With Quote
Similar Threads
-
CNC TTU Build
By John H in forum CNC MachinesReplies: 143Last Post: 30th January 2011, 07:32 PM -
Another first build
By Misterwippy in forum MUSICAL INSTRUMENTSReplies: 24Last Post: 6th January 2009, 12:01 PM -
How do they build them
By bark-hut in forum FURNITURE, JOINERY, CABINETMAKING - formerly BIG STUFFReplies: 27Last Post: 5th December 2008, 12:25 PM -
Another first build
By chrisb691 in forum CNC MachinesReplies: 56Last Post: 27th November 2008, 09:35 PM -
First build
By mickyp in forum MUSICAL INSTRUMENTSReplies: 10Last Post: 8th January 2008, 05:05 PM
