

 Thanks: 0
 Likes: 0
 Needs Pictures: 0
 Picture(s) thanks: 0
Results 1 to 15 of 20
Thread: PDR Rudderbox V2.
-
29th July 2009, 01:49 PM #1
 Senior Member


- Join Date
- Dec 2008
- Location
- McAllen, Texas, USA
- Age
- 64
- Posts
- 154
 PDR Rudderbox V2.
My rudder box is lousy. I don't even want to put it on the boat. Quite bluntly, it sucks.
No, MIK, it is not your fault.
I was trying to use some rudder fittings that I already had on hand. The fittings worked out to be so close that I have been having visions of ripping it right off the transom. Not a comforting thought. They ended up being so close that I would barely be able to fit the pintles into the gudgeons. I also made the tiller thinner than I was happy with right at the space in front of the rudder box. Again, using what I had on hand rather than following the plans. (See a trend forming here?)
I figure as long as I am doing this, I might as well try something interesting.
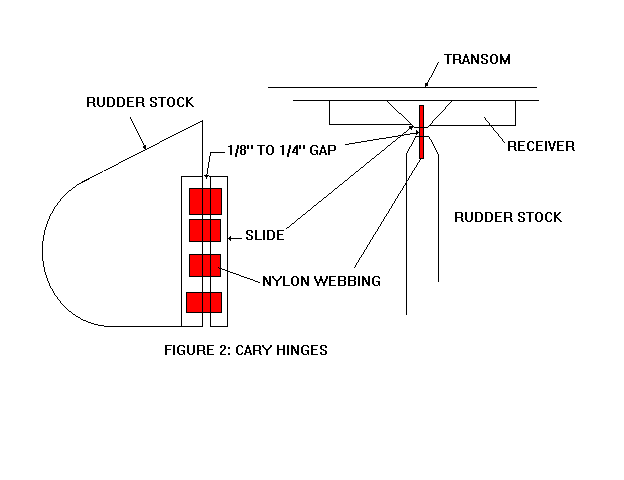
I think I am going to try to lace it on kind of like what Wharram does on his catamarans.
The general idea is this:

Where I will drill holes will be staggered so that they do not all line up and make a perforation. It will be laced with 3 sections of spectra in a figure eight pattern and with the cut out for the tensioning bungie cord. The facing edges are radiused to about the thickness of the spacer block. The transom backing block will be a 19mm or so block and will be glued and screwed to the block inside the transom. I am thinking of covering the radius and the block with either 3 or 4 layers of 4oz cloth followed by the external blocking and tiller more in line with the plans.
See any major flaws in the plan so far?
-
29th July 2009 01:49 PM # ADSGoogle Adsense Advertisement
- Join Date
- Always
- Location
- Advertising world
- Age
- 2010
- Posts
- Many
-
31st July 2009, 04:04 AM #2
Senior Member
- Join Date
- Dec 2008
- Location
- McAllen, Texas, USA
- Age
- 64
- Posts
- 154
Getting a little further
Well, last night I started working on the rudder box. I got the inside of the cheeks glassed with one layer of 4 oz cloth and the transom side post with 2 layers of 4 oz cloth. It came out suprisingly well. I just had to work really fast since It was about 95F in the garage. No time to dawdle with the epoxy. I stapled the glass to the back side of the post and gave it two tight wraps of cloth and wet out the epoxy. Then I wrapped the post with freezer paper then clamped it tight. I also took some sheets of the freezer paper and faced the inside of the rudder cheeks. My Poor Man's Peel Ply.
This morning, I went out before I left for work and peeled off the paper and trimmed everything up with a razor blade. I did get some lifting on the edge of the rudder cheeks where I had my stuff off center where it was weighted down but I just cut it back. The defect will be under the spacer block anyway so no worries there. The post came out exactly as I had intended. Only thing left to do is pull out the staples that I used to tack the cloth. Was already running late and did not want to go find my pliers. I was thinking about putting more cloth on the post but I think it would be a waste of time and effort.
I was wondering how dyneema would hold up to the stresses of being used on the hinge. The 1.8mm line is rated at 159 kg. Where I will have the line doubled up at each crossing and a total of 12 wraps of line linking the rudder (probably 15 to have an extra end on each of the three segments to tie off) leaves a total of around 2000 kg load rating. Take off a little for the bends and knots, it will be more than strong enough to keep the rudderbox from falling off. In fact the whole thing will be stronger than the poor little transom so I will feel pretty confident about it. Add to that the connection being distributed over much greater area than if I had used the gudgeons and pintles originally planned.
Along that vein, I am also thinking about cutting out a hand hold just under the tiller arms that will be glued to the case. It will make a convenient carry handle to pull the boat around. Strap some wheels under the bow and pull it around backwards for launching and moving.
I am going to glue the spacer block between the cheeks tonight and then this weekend I will glass up the outside of the cheeks and spacer.
-
31st July 2009, 11:46 AM #3
Happily receives emails.
- Join Date
- Jul 2005
- Location
- 'Delaide, Australia
- Age
- 65
- Posts
- 8,138
Howdy David,
I don't know how the lashings at rudder fittings will go. Wharram does talk a lot about such features, but you often notice some time later that they disappear from the plans and are replaced by something more conventional.
Main point is that if you make the OZ box it does need some of the bolts to stop the ply and tiller peeling off.
A bolt at the bottom of the rudderbox through the spacer is recommended and the one through the tiller through the spacer is essential.
Not too that your box is around the wrong way in the drawing .. the sloping edge needs to be on the top.
Not critical, but it makes the tiller at the right angle.
BTW it does mean the rudderbox will be hard to take off the boat. Some people store them standing on their transom in the garage so they take up very little space.
Best wishes
Michael
-
31st July 2009, 01:48 PM #4
Senior Member
- Join Date
- Dec 2008
- Location
- McAllen, Texas, USA
- Age
- 64
- Posts
- 154
The angle is as specified in the plans. Was just a funky perspective thing from Sketchup. It was actually straight in the model I threw together. On the actual cheeks, I just traced the ones I had made before according to plans. I did plan on the bolts for the tiller. Well, I do admit to thinking of wrapping the arms of the tiller rudderbox connection instead but a failure there would take out the box all at once. The potential of the lashing failure is why I am dividing hinge into three segments. All three failing simultaneously is less likely. I am also going to mount an oarlock on the transom for sculling and backup steering.
I just wanted to try lashings rather than hardware for this application. I like the distributed stress rather than the point stress from bolted on pieces. I like the non-metallic nature to avoid corrosion. I like the low cost of the materials.
Of course there are some perfectly valid arguments against this method. Metal fittings are not effected by UV. Ease of removal. No stretch at all under these loads. Metal fittings would probably outlast several boats.
I might end up whacking it off and going to something else but seems like an interesting experiment to see how it performs as an additional data point. All I really know for sure is that the first model I built was doomed
D.
-
1st August 2009, 12:16 PM #5
Happily receives emails.
- Join Date
- Jul 2005
- Location
- 'Delaide, Australia
- Age
- 65
- Posts
- 8,138
I think it is worth the attempt. Either way you will know something that you don't know now!
Best wishes
Michael
-
1st August 2009, 03:17 PM #6
Senior Member
- Join Date
- Dec 2008
- Location
- McAllen, Texas, USA
- Age
- 64
- Posts
- 154
Well, that was interesting
You will probably laugh at the newbie mistake. I am not really that experienced with epoxy yet.
I just came in from peeling off all the lovely fiberglass I put on last night. Yes, with my bare hands and a pair of pliers, I was able to remove 3 layers of 4 oz from a piece of wood. without damaging the wood.
How does he do it you might ask????
Well, here is the little trick. You glass the bare wood and voila! The wood soaks up all the epoxy on the bottom layer and you are left with glass attached to nearly nothing.
As soon as I went out there and could hear the little crinkle as I handled the piece I realized what happened.
Oh well, at least I have a light coat of epoxy on the wood to serve as a base for the next couple coats I will have to put on to get the wood ready for glass.
*sigh*
-
1st August 2009, 05:09 PM #7
Yacht Designer & Builder
- Join Date
- Feb 2008
- Location
- Eustis, FL, USA
- Posts
- 2,270
Think of it as an expensive, home made, multi-layer, peel ply experiment . . .
-
1st August 2009, 08:05 PM #8
i-Sails Australia
- Join Date
- Apr 2009
- Location
- Hunter Valley NSW
- Age
- 69
- Posts
- 1,759
Hi David, yeah I'm with MIK and have a few concerns that these kind of designs won't have the lateral stability a rudder needs. A nice strong door hinge would be better I think.
I saw this not long ago. Yes, agree, it looks like a nice idea and all that but a sailing boat, even a small one, has a lot of lateral force on the rudder. Anyone who has ever shoved off and tried to hang a rudder on a pintle while draped over the transom will concur.
-
1st August 2009, 11:48 PM #9
Happily receives emails.
- Join Date
- Jul 2005
- Location
- 'Delaide, Australia
- Age
- 65
- Posts
- 8,138
Hey ... the nice thing about the Goat Rudderbox is that it goes on the transom any time you like and can just stay there.
It is a lot easier to feed the blade in between the rudder cheeks rather than try to hang the rudderbox.
MIK
-
2nd August 2009, 04:34 AM #10
Senior Member
- Join Date
- Dec 2008
- Location
- McAllen, Texas, USA
- Age
- 64
- Posts
- 154
All rudder attachments have some negative aspects. The real problems with this type of rudder attachment are:
Over time the lashing will deteriorate. They will need to be replaced probably every season or at least removed and inspected. With a small trailerable boat it is not really a problem.
You cannot take it off easily. In this case where the rudder foil just slips out, it should not be a big problem. With an attached rudder blade it would get in the way too much. Even with an uphaul, my last boat I made the mistake *one* time of launching the boat with the rudder attached. I thought it would be nice to have it ready when I got in. That was fun. You mean the stern goes down when the trailer is on the ramp?
The biggest problem is not that lashing is strong enough, it is that the attachment point is strong enough. The lashing holes can act as a perforation and just rip the wood off like a postage stamp. Water can get into the holes and start rotting out the wood from the inside leaving a nice sharp fiberglass edge to cut the lashings. The lashing itself could tow my car easily and probably dead lift it as well.
Where I have seen this type of rudder attachment used has been on some large catamarans. I really would not want to have them like I have seen them installed. You would have to either dive on them, beach the boat, or haul the boat to inspect or replace them. They use heavy lashings in small groupings instead of small lashings distributed distributed over a large area making them more prone to ripping out. In their defense, the ones I have seen were on skeg hung rudders which would decrease the potential of them getting caught on something but I would still be uncomfortable.
Conventional attachments have their own problems as well. If I used regular pintles and gudgeons, all the stress is focused on the head of the bolts and the nuts. Even with washers, it is relying on a very small area for attachment. Hold-downs sometimes don't. Stainless steel is wonderful but still can corrode and suprise you. All other metals have their own inherent problems. You still have the problem of water intrusion rotting wood but it is hidden under the bolt heads and washers. The nice protected area under the bolts is a friendly place to host rot and mold. Tighten the bolts too much and you will crush the wood structure and destroy it's strength. Too loose and you have huge point stresses bouncing around. Pulling bolts in and out rasps away any coatings you have to protect the wood inside the holes. The list goes on.
The rudder attachment is the biggest headache for a boat of any kind and second only to standing rigging on sailboats. Dissimilar materials. High static loads. Huge dynamic loads. To work, they have to stick out and be in the way.
-
2nd August 2009, 11:10 AM #11
Happily receives emails.
- Join Date
- Jul 2005
- Location
- 'Delaide, Australia
- Age
- 65
- Posts
- 8,138
Howdy,
One of the nice things about this rudderbox design I use (stolen from OZ raceboats where it is by far the most common type) is the way it avoids loads.
The actual structures I use come from my own playing around with NS14s over a series of rudderboxes that were really light but (ahem) a bit fragile, through to something not much heavier that was highly reliable. The main trick is in that bolt through the tiller and the internal spacer - if it is not there (or a glued dowel or something) the box will self destruct in seconds.
However if that mistake is not made the rudderbox design avoids loads and avoids passing them on to the hull.
If the rudder hits anything the loads on the box are only transferred by the shockcord so are gradual and quite low.
The other thing is that the side loads are taken by the tiller directly - it's the tiller that turns the blade, whereas other setups rely on the tiller turning the rudderbox and the rudderbox then turning the blade.
So in this box type the rudderbox gets a very easy ride compared to other designs.
This makes the rudder fittings, whatever type they are much less highly loaded. There is very little force trying to rip them off the transom. About the only way that it is possible to exert those sorts of forces is on dry land when the rudderbox might rest on.
The basic advantage is the load on the rudderfittings is so low that the reliability of normal fittings (or abnormal fittings) is raised immeasurably.
I do look forward to see how alternatives go, but I think normal rudder fittings combined with the OZ rudderbox are so reliable that we can think of them as being trouble free.
Best wishes
Michael
-
2nd August 2009, 12:21 PM #12
Senior Member
- Join Date
- Dec 2008
- Location
- McAllen, Texas, USA
- Age
- 64
- Posts
- 154
Death from above
By far, the biggest load I worry about is my bumbling butt falling on the tiller.
-
3rd August 2009, 06:54 AM #13
Senior Member
- Join Date
- Dec 2008
- Location
- McAllen, Texas, USA
- Age
- 64
- Posts
- 154
Warm enough for you?
Well, I take back what I was thinking when complaining about the heat when working with epoxy. I just have to move a bit faster but overall it is much more productive. Instead of waiting a day between gluing stages, I am down to about 4 hours. This is the slow cure mind you.
Status report:
I have the rudderbox 90% done except for some bits of cleanup and shaping. I feel so much better about the version 2 than I almost ordered some hardware to do conventional attachment. However, I am going to see this experiment through.
I had been unhappy with the tiller I had made before. When I look at the pictures in the plans and most of the pictures I see of live PD Racers from web pics, the sides of the tiller do not look as thick as the plans describe in the text. This time I went the full 1 in as specified in the text and it is not as ungainly as it seemed at first. It feels much more rigid than the one I had made before that was only 3/4 in on each side. It is probably a combination of gluing with epoxy rather than titebond and the extra thickness.
The rudder box itself came out much nicer as well. The only difference between mine and the plan specs is that my spacer block is larger and extends toward the boat another inch or so with a radius on the edge for the lacing. Also, I added a bit of rudder cheek so I could make a smooth transition from the outside of the rudder cheek to the rounded nose of the box. If I don't like the lacing, I can just cut off the nose and add conventional hardware.
Before I put the tiller and cheek support blocks, I wrapped the nose and cheeks with 2 layers of 4 oz glass to prevent the spacer block from splitting when I drill the holes through it. All I have to do now is cut a backing plate for the transom side of the hinge piece and glue and screw it together. I will decide this evening how much to cut down the hinge post. It is pretty wide at present which I think will give it a bit too much leverage. I probably will go about 1/2 to 3/4 in past the radius to leave enough space for a nice wide fillet between the hinge post and the backing plate. I might also stick some glass tape on the fillet as well to beef it up a bit.
-
3rd August 2009, 11:47 AM #14
Happily receives emails.
- Join Date
- Jul 2005
- Location
- 'Delaide, Australia
- Age
- 65
- Posts
- 8,138
Will be really interested to see how it goes. PDRacer ARE about experimenting.
MIK
-
13th August 2009, 12:24 PM #15
Senior Member
- Join Date
- Dec 2008
- Location
- McAllen, Texas, USA
- Age
- 64
- Posts
- 154
Actual Photo of real work done.... Finally
Well, I actually got some stuff done tonight. So far I think that this will be a workable solution for the rudder attachment.
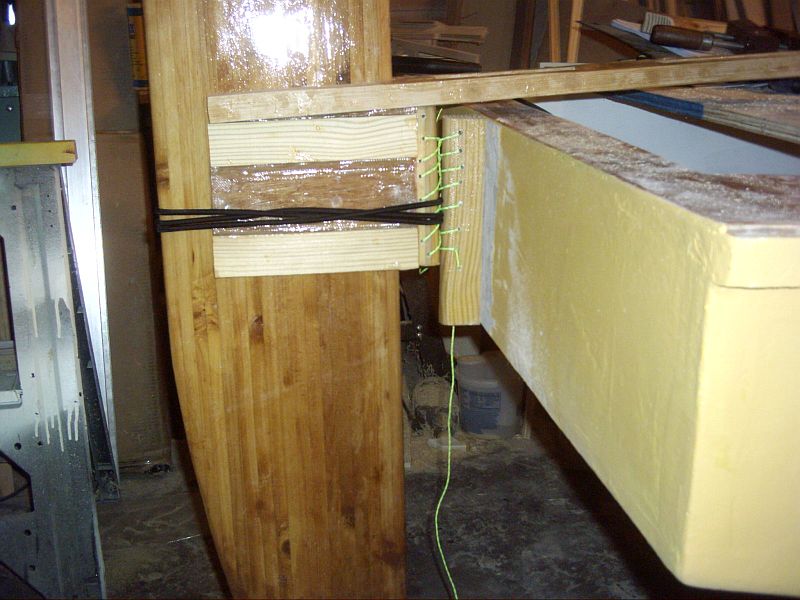
I still need to think hard on the lacing scheme. I think I will go with a larger hole. Maybe a bit larger lacing so it will give a bit more clearance for the bungie cord. The main issue will be to keep the whole thing from shifting from one side to the other.. At present, it seems nice and solid vertically.
After I look at it a while and think on it, I will see about permanent attachment of the transom piece.
My holes are a bit irregular but I figure that is to keep from having them aligned too well for strength. Yeah, that's it. Really it is. I forgot and made the first one too low. When I thought about it, I realized that I needed to start it off a bit higher to allow clearance for the tiller over the transom.Last edited by dkirtley; 13th August 2009 at 12:38 PM. Reason: Trying to get picture in place

 Reply With Quote


Similar Threads
-
OZ and Goat and Storer style rudderbox - avoid breakages
By Boatmik in forum Michael Storer Wooden Boat PlansReplies: 0Last Post: 24th March 2008, 03:10 PM
