

 Thanks: 0
 Likes: 0
 Needs Pictures: 0
 Picture(s) thanks: 0
Results 91 to 105 of 239
Thread: Another UK GIS (Gizzle in Hants)
-
19th August 2011, 10:48 AM #91
 SENIOR MEMBER


- Join Date
- Aug 2010
- Location
- New Jersey, USA
- Posts
- 767

The plywood spacers in the plan pertain only to the plywood version of the centerboard.
I reduced the fore and aft clearance by about 15mm total and still have plenty of wiggle room. I haven't yet closed it up and I'm thinking of including wedges to take the brunt of the trailing edge (and possibly the leading edge) on flat surfaces rather than on edge.
Sent from my iPhone using TapatalkDave
StorerBoat Builder, Sailor, Enthusiast
Dave's GIS Chronicles | Dave's Lugs'l Chronicles | Dave's StorerBoat Forum Thread
-
19th August 2011 10:48 AM # ADSGoogle Adsense Advertisement
- Join Date
- Always
- Location
- Advertising world
- Posts
- Many
-
19th August 2011, 12:22 PM #92
Senior Member
- Join Date
- Jul 2008
- Location
- Florida USA
- Posts
- 337
I highly recommend putting some cushioning at the trailing and leading edges. My experimental stack of a few outdoor carpet strips has done it's job and the dagger board is still pristine after several groundings but the carpet sandwich has been smashed to a remarkably thin V cross section at the trailing edge. I'm thinking something a bit more resilient will be the ultimate fix.
Simon
My building and messing about blog:
http://planingaround.blogspot.com/
The folks I sail with:
West Coast Trailer Sailing Squadron
-
19th August 2011, 07:55 PM #93
i-Sails Australia
- Join Date
- Apr 2009
- Location
- Hunter Valley NSW
- Age
- 69
- Posts
- 1,759
A nice big blob of silicon works nicely. Originally Posted by SimonLew

On the question of the daggerboard case spacers, I think every Goat builder has paused to think about it. Just go with 3mm wider than your board. From memory that's close enough to the plans. As for the padding, to protect and grip the board, seatbelt webbing strap glued to the insides of the case top and bottom is excellent. It allows the board to slide while at the same time providing just the right amount of grip, wet or dry. If you find you still need some more grip, a Laser style piece of rubber like this works well when mounted to coincide with the trailing edge, and you can adjust it.
Attachment 179463
-
19th August 2011, 08:47 PM #94
Senior Member
- Join Date
- Dec 2010
- Location
- "Old" Hampshire, UK
- Posts
- 105
Thanks chaps, I won't bother with the plywood spacers then. I expect there will be about 3mm clearence once I have coated the inside with epoxy and glass. The carpet idea is good but I don't have space now and would be concerned that it woud pick up and hold sand and grit that would scratch the boars after continued use although I may be wrong on this.
I'll look at fixing some closed-cell foam rubber along the aft end of the case to protect the aft end of the board, that should to the trick.
Toodle pip!
-
19th August 2011, 09:51 PM #95
i-Sails Australia
- Join Date
- Apr 2009
- Location
- Hunter Valley NSW
- Age
- 69
- Posts
- 1,759
Nope, way too soft. You'll need something harder like rubber or rubber backed carpet. Originally Posted by Gizzle
-
19th August 2011, 10:33 PM #96
Senior Member
- Join Date
- Dec 2010
- Location
- "Old" Hampshire, UK
- Posts
- 105
The stuff I'm looking at is quite firm, it is EPDM rubber foam so i think it will probably do the job. Originally Posted by woodeneye
-
22nd August 2011, 07:06 AM #97
Senior Member
- Join Date
- Dec 2010
- Location
- "Old" Hampshire, UK
- Posts
- 105
Chine logs trimmed up to size and bulkheads 1 and 4 are now done apart from needing a waterproof hatch of some type. Dagger board case just awaiting delivery of the rubber for the internals before the case can be glued together.
Blog has been updated with some pics... http://georgeisted.blogspot.com/
TTFN
-
31st August 2011, 01:22 AM #98
Senior Member
- Join Date
- Dec 2010
- Location
- "Old" Hampshire, UK
- Posts
- 105
Managed to get a few hours on the Goat this weekend mostly epoxy coating the various bits before they go 3D. I have also been musing on names with my son, my favourite so far is “Scream if you want to Goat faster”
Update on the blog here Tales of a Weekend Wood-Butcher
-
6th October 2011, 07:59 AM #99
Senior Member
- Join Date
- Dec 2010
- Location
- "Old" Hampshire, UK
- Posts
- 105
stem problems
It was time to start getting 3D and I wanted to follow the advice of others and dry-fit the Goat together before getting busy with the epoxy. It looks like I am going to have the same problem as some others at the bow with the two chine-logs touching so I guess I will take a few mm off each side and see if it will fit together a bit better. I did wonder if I had the stem in the wrong way around but the plan clearly shows the thicker end at the top.
-
6th October 2011, 07:47 PM #100
i-Sails Australia
- Join Date
- Apr 2009
- Location
- Hunter Valley NSW
- Age
- 69
- Posts
- 1,759
Hi Gizzle, yes you do need to shave a bit off the chine logs. Make sure you take off enough to make it comfortable. The gaps are then filled with epoxy after the sides have been fixed at the bow.
-
7th October 2011, 11:05 AM #101
Senior Member
- Join Date
- Jul 2008
- Location
- Florida USA
- Posts
- 337
Ideally if you take off just enough but not too much the two chine logs will just touch. This, I think will keep them from splitting away from the ply hull sides. If you have not seen this sketch it may help:
Simon
My building and messing about blog:
http://planingaround.blogspot.com/
The folks I sail with:
West Coast Trailer Sailing Squadron
-
7th October 2011, 10:43 PM #102
Senior Member
- Join Date
- Dec 2010
- Location
- "Old" Hampshire, UK
- Posts
- 105
Thanks chaps, yes that is exactly the plan. I was going to do it by eye and trial fit as I trim back the chine logs but the diagram (once I have checked dimensions agains reality) will be a time saver.
I was surprised at how easily the ply bends to shape, I was doing it on my own and it was pretty easy. I need to go buy some more screws amd make some more tape covered block before I can finish the dry-fit.
I have a strip of oak left over from the rudder leading edge that I think will end up being used at the bow to create a nice hard leading edge for when I bump into stuff (bound to happen!).
Cheers
-
7th October 2011, 11:45 PM #103
SENIOR MEMBER
- Join Date
- Aug 2010
- Location
- New Jersey, USA
- Posts
- 767
It's like you're inside my head. I would ask that you get out please thank you very much, but it occurs to me that you might actually do more good than harm in there. Could you please tell the other voices in my head to pipe down and focus on boat building? (If you do vacate my head, please be sure to leave the lights on!) Originally Posted by Gizzle
My chines are cut per Simon's suggestion, but I haven't brought the two sides together yet so I can't say how good his dimensions are.Dave
StorerBoat Builder, Sailor, Enthusiast
Dave's GIS Chronicles | Dave's Lugs'l Chronicles | Dave's StorerBoat Forum Thread
-
9th October 2011, 09:28 AM #104
Senior Member
- Join Date
- Dec 2010
- Location
- "Old" Hampshire, UK
- Posts
- 105
Originally Posted by davlafont
Nice Davlafont Perhas a case of great minds think alike.
Chinelogs trimmed back a little and the Goat is now 3D and looking sweet!
-
10th October 2011, 01:10 AM #105
SENIOR MEMBER
- Join Date
- Sep 2007
- Location
- Savannah GA USA
- Posts
- 583
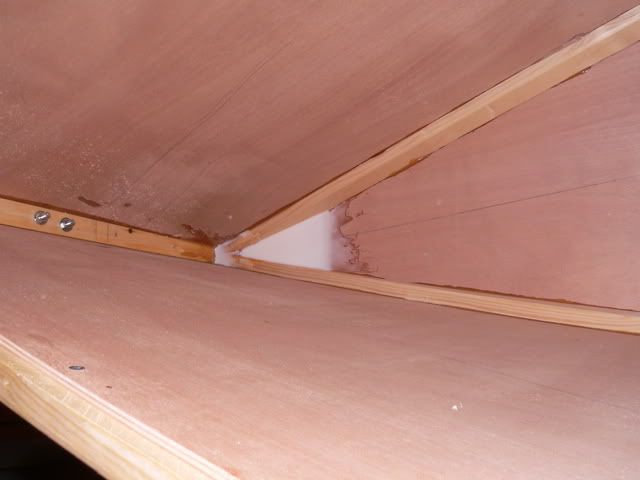
I took a cue from the canoe builders and did epoxy pours in each of the three corners. Here's the one at the bow:
 The "Cosmos Mariner,"My Goat Island Skiff
http://s176.photobucket.com/albums/w168/MiddleAgesMan/
Starting the Simmons Sea Skiff 18
http://www.flickr.com/photos/37973275@N03/


 Reply With Quote
