

 Thanks: 0
 Likes: 0
 Needs Pictures: 0
 Picture(s) thanks: 0
Results 1 to 15 of 17
-
12th August 2010, 02:07 PM #1
 Senior Member


- Join Date
- Mar 2009
- Location
- Hobart
- Posts
- 497
 Restoring a huon pine dresser top
So I have been reading about all these other restoration threads and so I suppose I should show you a little project that I rescued. The piece concerned is a small dresser top which looks to have been cut down by one shelf but at the same time it was sufficiently appealing for me to have a crack at it.
I found it in Gordon Brown's (ABC Collectors) Antique shop, just days before he closed down. Having known and bought a number of pieces off Gordon over the years, I managed to get it for a reasonable price. He mentioned at the time he thought it might have some Huon Pine in it but he wasn't certain as he hadn't bothered to look to closely at it.
It was painted pink, was dirty, and had various extras added to it, let alone one side was split.
However, having restored antiques over the past 20 years let alone all the woodwork (joinery) in both my current home (1840s) and my second property (1826) basically to repair this piece was going to be pretty straight forward.
In buying it I had a number of ideas for its possible use, including as open shelving in the 1826 farmhouse kitchen or alternatively, on a Huon Pine dresser base I had previously restored, if it fit.
So, once home and having removed the copious amount of extra nails that were sitting proud of the back (lining boards) and the two extra strips of wood (presumably previously used to mount it to a shed wall or whatever), I figured that the best way to restore this properly was to very carefully totally dismantle it. I started this by removing and numbering all the back boards, then the shelves and finally the top from the sides.
Thankfully no dramas here. The next part of the process involved the usal process of heat gun to carefully burn off the paint, scraping as I went, then paint stripping by hand each piece, carefully teasing out using flat blade screwdrivers and coarse grade steel wool. Anyone who has done this sort of work will know just how tedious and messy this stage is.
So once each part of the top was cleaned, it was a matter of washing with warm soapy water, and metho, using coarse grade steel wool to remove the last of the residual paint residues/paint stripper.
Once dried then it was a process of sanding starting off using 150/180 grade papers as needed, 220 and finally 360. Satisfied I had got each piece surface to condition required then I went through my usual process of brushing on shellac (strong) to start off with (I usually start with 3 coats), then lightly sanding using 220 grade paper, then more coats of shellac (diluted down) but now using a pad, again allowing to dry off before resanding using 360 grade and finally more shellac coats using a pad.
From here then it was simply a matter of allowing a day or two for it to harden. From here I reassembled the dresser top, glueing, pinning and nailing it back together. In repairing the side, this included the need to use clamps to ensure that the glueing and pinning was made strong. The final part of the re-assembly was the nailing back of the backing boards in the correct order.
The final part of the restoration was to fine steel wool the entire top and give it two coats of bees wax polish.
So what did I end up with, in fact the whole dresser top including the backing boards (with fine regency moulding) is Huon Pine, and yes for the moment it sits adorning the Huon Pine dresser top in my dining room.
Was it worth it, yes in that I saved a nice piece, enjoyed the process of its recovery and it is now a useful addition to my home, but economically if I were restoring it for someone else,.......probably not.
See pictures of the top as found and once stripped of paint but not totally disassembled. I need to take some pics of the completed piece as it is today and will post these once I can. Hope you enjoy. Dave
-
12th August 2010 02:07 PM # ADSGoogle Adsense Advertisement
- Join Date
- Always
- Location
- Advertising world
- Posts
- Many
-
12th August 2010, 02:34 PM #2
Senior Member
- Join Date
- Mar 2009
- Location
- Hobart
- Posts
- 497
Ok, so to continue with this thread but in a slightly different vein, I thought I would show some before during and after shots of the cedar and tassie oak mantle piece I restored in the 1826 farmhouse.
I restored this as a part of restoring the whole room, which I will also show some pics of. The room originally wasn't a bathroom but a small room off to the side of the main bedroom, but it made perfect sense to convert this into a bathroom. In this instance that meant pulling up the wide pit sawn blackwood and tassie oak boards, replacing supports, (bearers and joists) fitting all the necessary plumbing fixtures) and replacing the boards. The skirting boards were stripped and polished as per usual, they being Huon Pine. The floor was shellaced and then sealed using Feast Watson's tung oil/poly mix (Floorseal).
We also installed 3 baltic 6 pane windows to replace the one hidous window, installed a restored claw and ball bath, the vanity (melamine) covered with baltic lining boards, celary pine top, huon frame/baltic inset doors and a similar construction using a baltic pine dunny door split in two and baltic lining boards for the sides etc of the linen cupboard. We also had to do major repairs to the plaster work, as is typical in old houses.
The door into the bathroom is NSW cedar (4 panel.) while the rest of the house has mostly 6 panel cedar doors, cedar reveals and architraves. However, into the 'new" bathroom the revel is Huon Pine, while the architrave is cedar and Tassie oak, as per the mantle piece.
I also had to repoint and repair the fireplace brickwork.
The interesting thing with the mantle piece is the cedar diamonds inserted into the tops of the two outer legs of the overmantle and the use of reeded cedar down the legs. I don't recall ever seeing a mantle piece quite like this one before. The other mantle pieces in the front part of the house are sandstone.
Anyway, in stripping and restoring the mantle piece it was quite straight forward though incredibly fiddly.
I hope you enjoy the finished article. One day the house will be finished so that we can live there. Cheers Dave
-
14th August 2010, 08:00 AM #3
GOLD MEMBER
- Join Date
- Aug 2007
- Location
- St Georges Basin
- Posts
- 1,017
Overall, a nice job on the bathroom! Do you know why there would have been a fireplace in such a room in the first place?
It will be good to see the finished dresser back too.
What have you done with the vanity? In the pic it seems to have a flat top (no basin) with the taps sticking up at the side. Can you do a better pic of the details there? I'd like to see what you've done there.
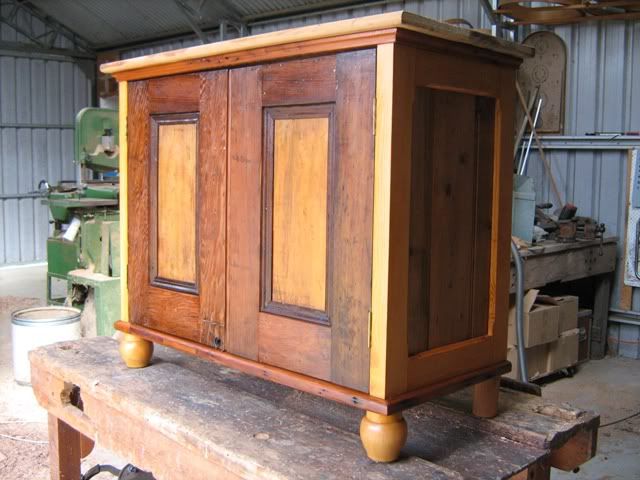
I'm not so sure about the linen press though. I'm not keen on the design and I'd reckon someone of your skills might have done something a bit nicer. I've used a lot of old doors for making furniture to suit our place (1860's). Here's a pic of a small cabinet using old doors, oregon bed frames and baltic lining boards. I've a linen press currently underway in the shed in the same style.
-
14th August 2010, 05:22 PM #4
Novice
- Join Date
- Mar 2007
- Location
- mount isa
- Posts
- 24
Just asking
Horse, you said, hot soapy water and metho, is that mixed together, thank you
-
15th August 2010, 09:12 PM #5
Senior Member
- Join Date
- Mar 2009
- Location
- Hobart
- Posts
- 497
Burraboy, cheers mate re the support. It is a major restoration project we are undertaking, but in the long run it will be worthwhile. The property is Heritage Listed here in Tassie, was recommended for the National Estate Register, though I don't believe accepted, but regardless of this has local significance.
Anyway re the fireplace, the room wasn't originally a bathroom but rather a relatively small room off the side of the main bedroom. Possibly originally it was a childs room or something similar ?? The point being given we have no children, it made sense to turn it into our bathroom. The fireplace should work, though whether or not we will actually use it, I have no idea. The main thing in restoring the room was to ensure that the fireplace could be used if so desired and needed.
As to the vanity, yes your observations are quite correct re the basin, for I am waiting on the plumber to return and to plumb the basin in as well as the bath. The taps regrettably are in the wrong location and so are going to have to be moved, which means I will need to plug the top, grr but thats life !
I will have to take some more pics of the setup, so as to show you better. It is possible I might already have some better ones and can check. I will certainly post some but at the moment time is limited as we are off to NZ next Friday for a week of skiing/snowboarding. After that I have a week off to get some more rennos done. Keep an eye out for this thread as I will post pics when I can. Ditto also the completed dresser top.
Re the linen press, I kind of know what you mean, but actually I didn't make it, my builder did it. I have a kind of similar one at home in the bathroom but I like the design of that one better. The one out at the country place is ok, it is kind of rugged, but I will keep your suggestions in mind when we get to do the kitchen. I want that to look really special, and have a number of ideas and some pretty special bits of timber, doors, mouldings etc for that. I might have to run a thread on that build when I get to it.
I like the small cupboard you have made there, as is has nice proportions and the differences in timber colours etc, really give it some presence.
My builder actually is really normally quite clever and has some good ideas. I should take a photo of the kitchen dresser he made for me in my home which is actually integrated into an old double sash window space. I think he excelled on that occasion.
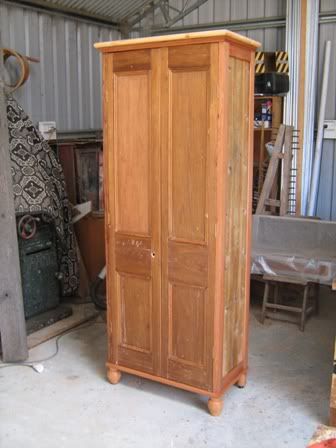
Like you too I have a small wardrobe project, which I think you too would like as it is similar in style (kind of) perhaps to the linen press you are making. I need to replace the backing and side boards with baltic to get rid of the radiata pine, but the frame, and the use of an old 4 panel door gives it some presence. Similarly I will change the current plinth for a better one. The one good thing is that I have so much old timber to choose from to get the right design. I wouldn't mind seeing a pic or two of your current project.
Hi Silky oak, no what I would normally do is first of all wash the paint stripped timber with hot soapy water and steel wool, dry that off and then give a final clean with metho. I know that another way to neutralise the acids in paint stripper is to use oxalic acid, but I am quite happy with how I do it and it seems to work no problems. Cheers
-
15th August 2010, 10:02 PM #6
GOLD MEMBER
- Join Date
- Mar 2005
- Location
- In the shed, Melbourne
- Age
- 52
- Posts
- 6,883
A lot of work, but the reward would be huge.

-
16th August 2010, 02:53 PM #7
Senior Member
- Join Date
- Mar 2009
- Location
- Hobart
- Posts
- 497
Thanks Waldo so true. Ok so I will post a couple of pics which show the house, one front on which shows the Regency colonial part of the house (french windows, 6 panel cedar front door etc, and the other from the side looking down at the old stone barn and house. The house was built as I understand in two stages.
For Burra's needs I have checked to see if I had any other photos of the vanity, and I have a couple more but I suspect the best thing will be to take some specific shots of the unit itself.
-
17th August 2010, 02:38 PM #8
GOLD MEMBER
- Join Date
- Aug 2007
- Location
- St Georges Basin
- Posts
- 1,017
You're a lucky man HC, a beautiful house and a setting to match! I can see why you need some furniture with a bit of character to fill it.
Here's a pic of the press I'm working on. If you have collected some old 4 panel doors it might give you some ideas.
-
18th August 2010, 01:44 PM #9
Senior Member
- Join Date
- Mar 2009
- Location
- Hobart
- Posts
- 497
Thanks Burra. Yes I know I have a responsibility to be careful in restoring the property for future generations. It is not grand, like a large sandstone country house, of which there are many dotted around the Tassie landscape, but it still nethertheless has a sense of history associated with it and is manageable as a project.
I suspect rather than clog up this thread re the house restoration process, perhaps I should start a seperate thread on that.
Ah yes we actually have a lot of antique furniture. Possibly a little too much I wonder is that really possible ???
I like the press you are working on and very much indeed I can see what you are getting at. I do have some spare doors, so yes, thanks for the idea, I am sure I will be able to put them to excellent use, both in the kitchen I need to build next and as well the 2nd bathroom/laundry that needs to be built.
I also have a spare small wardrobe, which I bought off ebay last year, which I think I am going to pull apart and rebuild using better timbers, and plinth (top and bottom) than whoever, made it used. I have plenty of old timber to choose from for this process. I will include a few photos to show as it is now.
Ditto also a couple of pics of my 1840s home in the city which I have been restoring for the past 20 years (I am not sure you ever really complete old houses).
And lastly my $26 cedar 3 legged table I bought off Ebay. Suspect it was a bit of a bargain. I have just last weekend finished its restoration/repairs. As you should be able to see from the photo, the top needed re-polishing and the leg needed a major repair. All done, and so now it serves as our breakfast table. Next I need to strip and re-polish 4 cedar balloon backs I have, oh and re-upholster them. I suspect I might need to do an Adult Ed course to learn about upholstery.
Sometimes I wonder how I manage to work full time as well, let alone have a life. Cheers
-
18th August 2010, 02:47 PM #10
GOLD MEMBER
- Join Date
- Mar 2005
- Location
- In the shed, Melbourne
- Age
- 52
- Posts
- 6,883
A beautiful house, it would be a very rewarding journey to bring it back to glory, externally and internally.
(I've kind of written that before)
-
19th August 2010, 12:53 PM #11
GOLD MEMBER
- Join Date
- Mar 2007
- Location
- Munruben, Qld
- Age
- 83
- Posts
- 10,027
How about some pics of the progress on the original post
 Reality is no background music.
Cheers John
-
19th August 2010, 01:36 PM #12
Senior Member
- Join Date
- Mar 2009
- Location
- Hobart
- Posts
- 497
Hi John
Yes absolutely will do, as it is finished and in use. A wee slight problem, I need to get a new memory card for the camera, which I will get today, and take some snaps and then upload them. But time is short as I am off to NZ for a ski holiday first thing tomorrow morning and somehow suspect time will defeat me to get this done, as I have much to get done here at work and pack tonight etc.
But I will definitely do this to finish off the thread, once returned. I am only away for a week. Dave
-
19th August 2010, 10:24 PM #13
GOLD MEMBER
- Join Date
- Mar 2007
- Location
- Munruben, Qld
- Age
- 83
- Posts
- 10,027
Okay Dave, will keep an eye out for the pic.. Have a nice break in NZ. I was there a couple of months ago and was just before the snow season although did see a bit of snow.
Reality is no background music.
Cheers John
-
6th September 2010, 02:53 PM #14
Senior Member
- Join Date
- Mar 2009
- Location
- Hobart
- Posts
- 497
Hi guys, sorry about the delay. NZ was brilliant, loved the skiing, beer etc all good. I have included on photo as a taster !!
However, and back to the theme of this story, I will post some pics of the completed dresser top. I have sitting on top of a Huon Pine dresser base I previously restored. They don't match size wise but for the moment that doesn't matter and as mentioned I think I will probably use the dresser top (attach to the wall) as kitchen shelving in the country property.
I have also included a couple of pics of the inside of the house that I am working on, including the front part of the hall which shows off well the cedar fanlight and cedar/pine side panels and also the huon pine door reveals I have just stripped and next the blackwood and baltic pine lining boards which I will also be stripping. Much work as ever to do. Dave
-
7th September 2010, 06:41 AM #15
GOLD MEMBER
- Join Date
- Aug 2007
- Location
- St Georges Basin
- Posts
- 1,017
Ah yes, those pics bring back some memories for me. Been there, done that (not the skiing), and about to do it again! You have a nice place there!

 Reply With Quote


Similar Threads
-
Restoring Oregon Pine Furniture
By Arry in forum FINISHINGReplies: 14Last Post: 9th June 2010, 08:52 PM -
restoring cypress pine timber floor or replace it?
By onebeginner in forum WOODWORK - GENERALReplies: 12Last Post: 5th September 2008, 10:53 AM -
Restoring silky oak front onto pine bookscase
By Blackout in forum FINISHINGReplies: 4Last Post: 31st July 2007, 07:10 PM -
Preserving/restoring Huon pine?
By ohno in forum FINISHINGReplies: 10Last Post: 6th June 2006, 10:36 AM
