

 Thanks:
  Likes:
  Needs Pictures: 0
 Picture(s) thanks: 0
Results 61 to 75 of 377
Thread: 2/3 Harley Davidson 1920 JS
-
9th February 2015, 06:51 PM #61
 Retired teacher, lifelong learner


- Join Date
- Jul 2012
- Location
- Murray River, NSW
- Posts
- 344
 Johnnie can't reply right now. He's running down to the bus terminal to jump on a Miami-bound Greyhound.
 Originally Posted by Repliconics


-
9th February 2015 06:51 PM # ADSGoogle Adsense Advertisement
- Join Date
- Always
- Location
- Advertising world
- Posts
- Many
-
9th February 2015, 07:13 PM #62
Retired teacher, lifelong learner
- Join Date
- Jul 2012
- Location
- Murray River, NSW
- Posts
- 344
Take the I 75 S, Johnnie. I just Googled traffic conditions and the Florida Turnpike is taking longer.
Your ever-friendly travel agent,
Craig
-
9th February 2015, 09:58 PM #63
Most Valued Member
- Join Date
- Aug 2010
- Location
- Horsham Victoria
- Posts
- 5,713
You know me Originally Posted by Repliconics

Whats a rhetorical question, I would not even be able to spell it without auto correct or copying it lol
-
10th February 2015, 06:08 AM #64
Deceased
- Join Date
- Mar 2013
- Location
- St. Helens Tasmania
- Posts
- 2,227
Yes that's it!. Originally Posted by DaveTTC
The last couple of days have been pretty much taken up with shaping the cylinders and trying to get the colour right.
After going through several shades I've gotten a paint that I think looks very close to the way it would of looked originally.
I've given the right cylinder a coat and I'm quite happy with it.
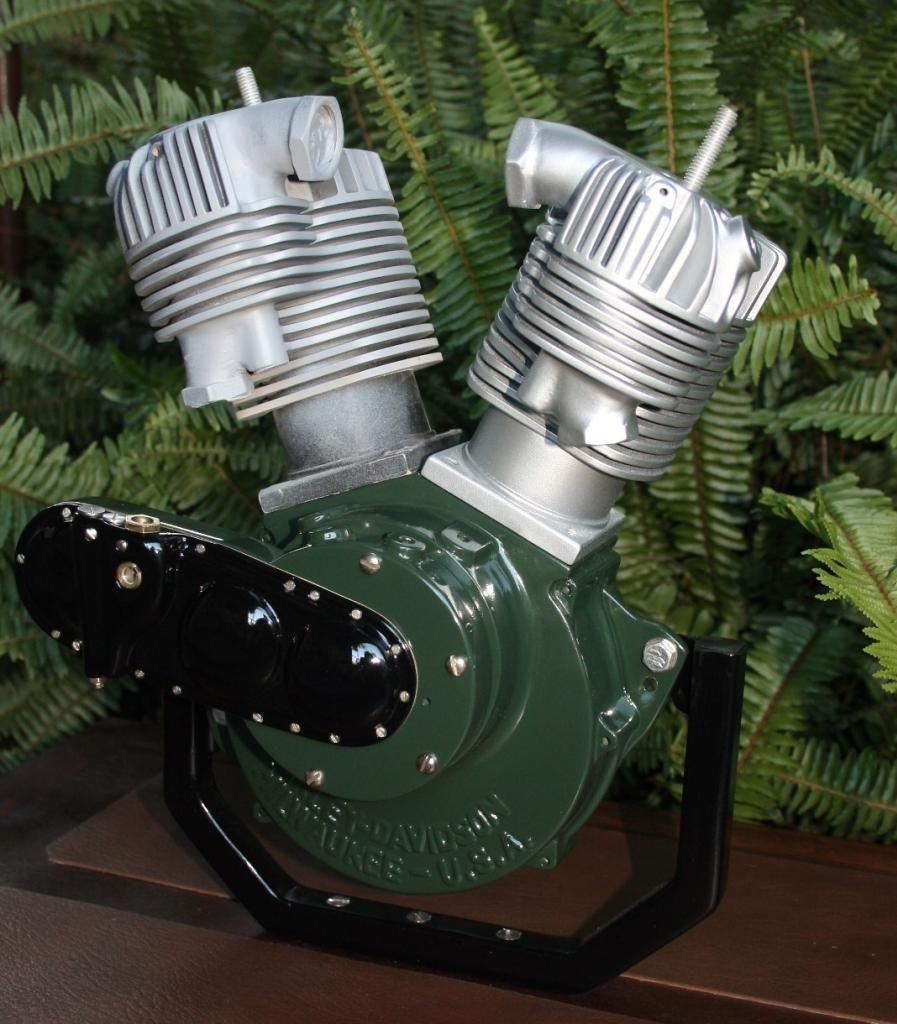
Both of the cylinders still need some work but I should have them finished in a day or so.
Going back and working on something you made over a decade ago is a real eye-opener.
I can only assume I thought I was late getting somewhere back then.
Cheers
Trev.
-
10th February 2015, 07:41 AM #65
GOLD MEMBER
- Join Date
- Apr 2013
- Location
- Torquay
- Posts
- 4,427
Gee,
I would be happy with that paint job too Trevor.
How do you get such clear writing / names in the "castings" . It looks incredible.
Hope you have a good day.
Keith
-
10th February 2015, 11:16 AM #66
GOLD MEMBER
- Join Date
- Nov 2008
- Location
- Canterbury UK
- Age
- 67
- Posts
- 3,997
-
10th February 2015, 12:45 PM #67
Most Valued Member
- Join Date
- Aug 2010
- Location
- Horsham Victoria
- Posts
- 5,713
Looking sweet there Trev. I can imagine I would find getting the angles right on a v twin and doing the fins harder to then on a straight.
Ahhhh its good to be back and following something again
On a side note Jade thought she'd keep all that plasticine for herself, she has since come around.
-
10th February 2015, 05:22 PM #68
Deceased
- Join Date
- Mar 2013
- Location
- St. Helens Tasmania
- Posts
- 2,227
The raised lettering on the crankcase is literally child's play. Originally Posted by Keith_1
I made it using a plastic stencil.
All I did was cover the front of the stencil with masking tape, and then filled the letters I wonted with bodyfiller.
Once the filler had cured off I just pushed them out and glued them to the engine.
After that it gets a little fiddley with sanding and painting, but the end result can look quite convincing!.
Thanks mate I'm pretty happy with the way their going myself. Originally Posted by Dalboy
The engines definitely getting a major overhaul!.
Glad your enjoying it Cowboy. Originally Posted by DaveTTC

Got a riddle for Jade ask her this for me: If I told you the last thing I said was the truth, and that the next thing I'm going to tell you is a lie!.
Would you believe me?.
Luv to know what she makes of it!.
Cheers Guy's
I'm not to sure that the paintwork shows up to it's best in the photo.
But I've finished the front cylinder and painted the lower part and the base in chrome.
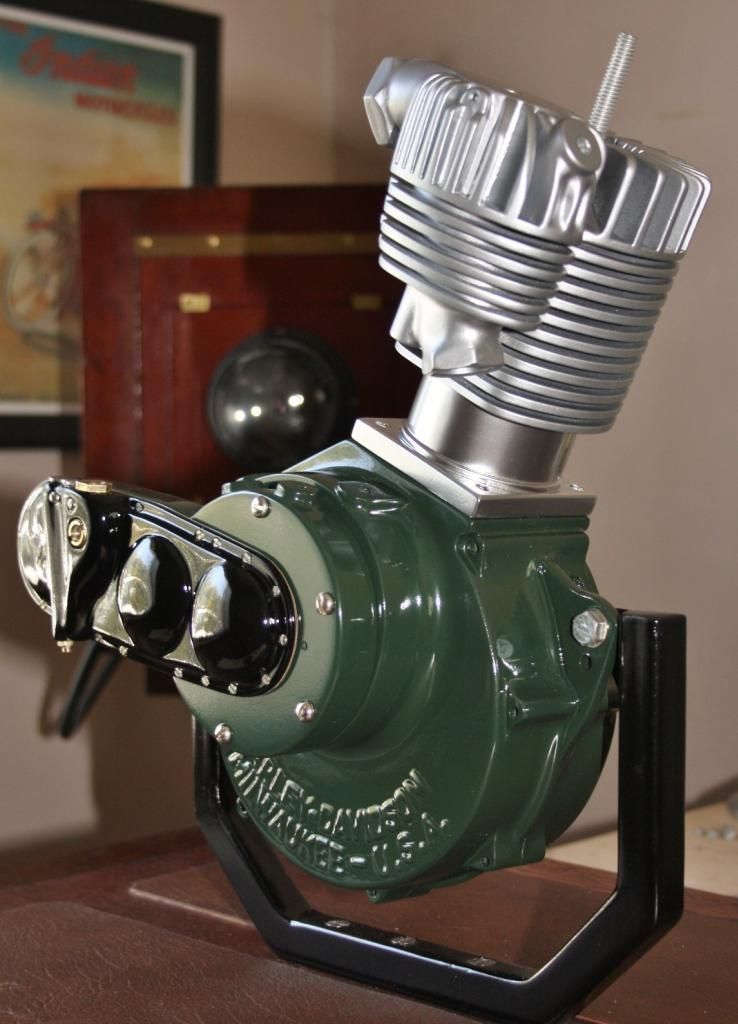
I really like the appearance of it, a big difference from the way I originally had it.
I'm giving the rear cylinder the same treatment at the moment.
Cheers
Trev.
-
10th February 2015, 07:56 PM #69
Retired teacher, lifelong learner
- Join Date
- Jul 2012
- Location
- Murray River, NSW
- Posts
- 344
Trevor, as per my PM, these were the cooling fins I was wondering about. The right hand one is a different profile but looks like it's that size to avoid something else that gets bolted on to the engine. Don't you dare change things now that beautiful paintwork has been applied.
Craig
-
10th February 2015, 08:54 PM #70
Most Valued Member
- Join Date
- Aug 2010
- Location
- Horsham Victoria
- Posts
- 5,713
There seems a fixation with fins.
I must say those fins on top radiate out in a nice straight line from centre. Could you imagine if we had had a build thread ten years ago. (I think that is how old you said this bike is)
Dave the turning cowboy
turning wood into art
-
10th February 2015, 08:58 PM #71
Most Valued Member
- Join Date
- Aug 2010
- Location
- Horsham Victoria
- Posts
- 5,713
Huh???? Repeat
Hmmmmm ...... I don't know
And Jade says again with a smile on her face "I don't know"
Dave the turning cowboy
turning wood into art
-
10th February 2015, 11:09 PM #72
Deceased
- Join Date
- Mar 2013
- Location
- St. Helens Tasmania
- Posts
- 2,227
Hey Craig in your PM you mentioned that it looked like something went in a screw hole at that point.
Your spot on here's an adjustment screw that goes into the head right between those two fins.
I've seen other heads from different models that are slightly different than the one I copied way back when.
The one I had was a 1920 JS a friend had given me a lend of it make the layout as accurate as possible.
I'll be honest and say I don't even know what the adjuster does!.
Only that it's there.
The other thing you may noticed is that the six fins after the adjustment screw all taper off.
On most of the Harley's I've seen from that era the fins are the same height all the way around.
In the end I guess it's just the way that particular model Harley was!.
I must mention to the other head is the same but in reverse.
Cheers mate.
And Jade says again with a smile on her face "I don't know"
You can tell Jade no surprise "I don't know" is pretty much right!.
The riddle is a version of the liar paradox there is no right answer.
Yet most people have an opinion.
I didn't think Jade would fall for it.
Give that girl a few more years and she probably workout if Schrodinger's cat is dead or alive.
Cheers
Trev.
-
12th February 2015, 05:08 AM #73
Deceased
- Join Date
- Mar 2013
- Location
- St. Helens Tasmania
- Posts
- 2,227
The rear cylinder is taking a little longer than expected.
A couple of the lower discs of MDF that make up the fins needed to be replaced.
But I got that done and painted the top section leaving just the bottom to be done in chrome.
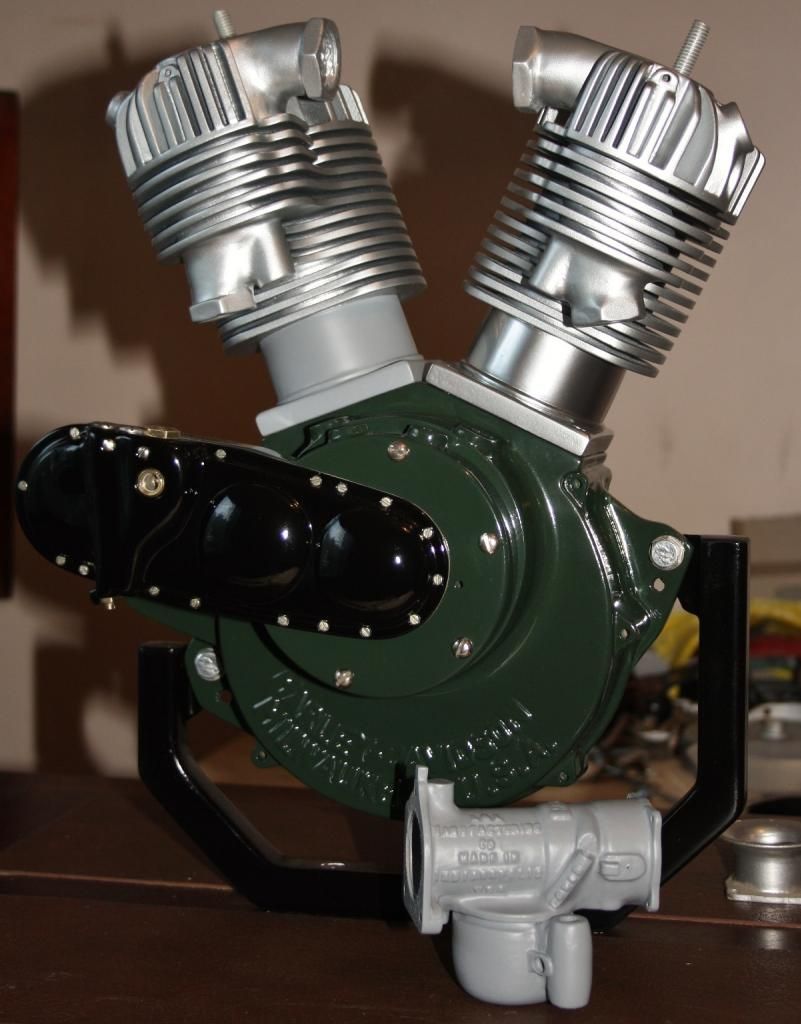
I've made a start on the carburettor as well.
It's in pretty poor shape and will need quite a bit of TLC to get back to where it should be.
It's a little hard to see in the photo but what's written on the side of the carbie is:
L&L Manufacturing Co, Made In Indianapolis USA.
I was lucky enough at the time when first made the carbie that I got my hands on a real one.
So I was able to make a mould of the lettering and transfer it to my 2/3 version.
Here's an exploded view of the carbie.
Obviously not all of the internal parts are in mine but the all of the external features will be.
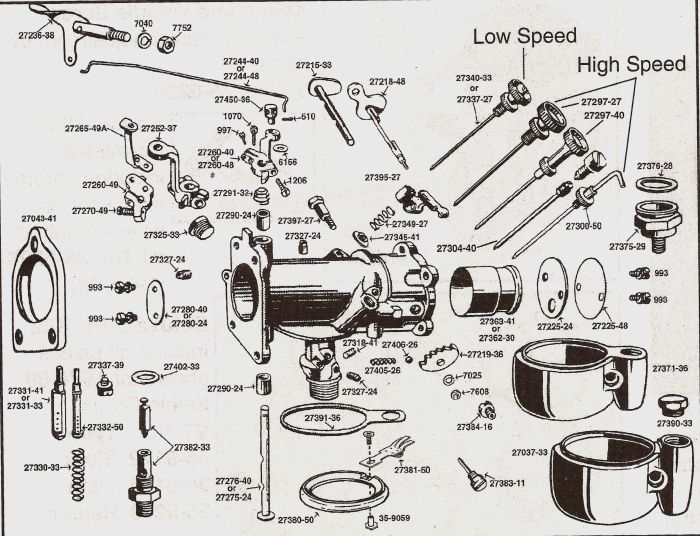
I remember at the time really enjoying working on the carbie trying to get all of the detail right.
I'm looking forward to hopefully not just repairing it but improving on my original effort.
Cheers
Trev.
-
12th February 2015, 09:16 AM #74
GOLD MEMBER
- Join Date
- Apr 2013
- Location
- Torquay
- Posts
- 4,427
Great to see the detail on the carby Trev. Looks great.
 Do you agree that some of the best parts of making the builds is the research that goes into it ? The web is a fantastic medium.
Regards
Keith
-
12th February 2015, 10:56 AM #75
Deceased
- Join Date
- Mar 2013
- Location
- St. Helens Tasmania
- Posts
- 2,227
I really do enjoy finding out about the detail and history of whatever it is I'm building. Originally Posted by Keith_1
The web does have a lot of great material on it.
Although I'd have to say I get quite frustrated with backyard experts, and a general lack of quality information.
The Brough is a good case in point.
Lots of good general information but you need to keep wading through it to find the serious stuff!.
The internet really needs a cut the rubbish button!!!!!
Cheers mate
Trev.


Similar Threads
-
It's a No.1, but not a Harley
By Bushmiller in forum HAND TOOLS - UNPOWEREDReplies: 19Last Post: 13th October 2014, 11:24 PM -
Harley Davidson chopper
By bobman 58 in forum INTARSIAReplies: 6Last Post: 6th February 2014, 08:26 AM -
Harley Davidson logo
By bobman 58 in forum SCROLLERS FORUMReplies: 4Last Post: 10th August 2013, 09:38 AM -
Harley Davidson
By Rum Pig in forum WOODIES JOKESReplies: 0Last Post: 15th October 2009, 12:10 PM -
Arthur Davidson
By Baz in forum WOODIES JOKESReplies: 5Last Post: 28th December 2005, 11:10 AM
