

 Thanks: 0
 Likes: 0
 Needs Pictures: 0
 Picture(s) thanks: 0
Results 16 to 30 of 115
Thread: Started My Car
-
18th August 2008, 09:15 PM #16
 BOUNTY HUNTER


- Join Date
- Aug 2007
- Location
- Newtown Geelong
- Posts
- 1,878
 Day 4
Day 4
Not a lot done today
I glued the inner guard bits on and sanded the joins when dry Then I started to shape one as per photos.
Hope to get more done tomorrow if all is well.
I must thank Marginata a great member for the Jarrah wood that most of this car is made from.Thanks David.
Hi Yonnee. I have bought the spoked wheels as in the photo of the car.As I also did with headlights.The spoked wheels are a bit beyond me at the moment,but the headlights are a piece of cake really.If you buy the kit of parts,it works out that you get the lot cheaper than buying the 5 wheels only.
You would be surprised how quick the car is to do.Full size plans and basically trace and cut. Back To Car Building & All The Sawdust.
-
18th August 2008 09:15 PM # ADSGoogle Adsense Advertisement
- Join Date
- Always
- Location
- Advertising world
- Posts
- Many
-
19th August 2008, 04:51 PM #17
GOLD MEMBER
- Join Date
- Mar 2007
- Location
- Munruben, Qld
- Age
- 83
- Posts
- 10,027
Wow, you are doing an excellent job. It's going to look absolutely fantastic when its finished. Keep those pics rolling in.
Reality is no background music.
Cheers John
-
19th August 2008, 07:44 PM #18
BOUNTY HUNTER
- Join Date
- Aug 2007
- Location
- Newtown Geelong
- Posts
- 1,878
Day 5 Nothing much to report today
Nothing much to report today.Shaped the grill and recessed the back to take the radiator.I would do this another way next time.
Rounded off the other guard,now trying to get them to be a mirror pair.(I said trying.)
Will see how I go tomorrow with them.
Also cut the timber for the seat and roughly shaped them..
Looks like I only have the bonnet and boot area to cut out.Oh plus bumpers etc.
I am going to make the bonnet one piece to start and not glue it in place as I want to have sides and top hinges as per real car.That way I can make a wood motor and sit it in place ----So a block of wood will do to get the car in shape.then I can do the bonnet thing at a later date..
Back To Car Building & All The Sawdust.
-
20th August 2008, 04:57 PM #19
BOUNTY HUNTER
- Join Date
- Aug 2007
- Location
- Newtown Geelong
- Posts
- 1,878
Day 6
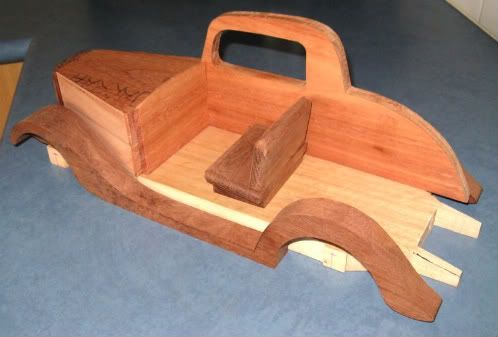
Cut the bonnet today.2 pieces of Jarrah 4 1/4" x 4 1/4" then cut sides at 15 degrees as photo. Sat most of the rough cut parts together to get an idea off where I am at.
I will be trying to put grooves in seats so they look the part.If it doesn't work to plan ,then just plain wood seats would be the go.
Starting to look like a car.I am a bit short on pink Jarrah,so I will bave to make the boot from other wood then laminate it.Not the best but thats the way it goes.
Sorry about photos.1st time using photobucket on the forum.
 ">
">
 ">a
Back To Car Building & All The Sawdust.
">a
Back To Car Building & All The Sawdust.
-
21st August 2008, 09:55 AM #20
GOLD MEMBER
- Join Date
- Mar 2007
- Location
- Munruben, Qld
- Age
- 83
- Posts
- 10,027
Coming together beautifully.
Reality is no background music.
Cheers John
-
22nd August 2008, 09:20 PM #21
BOUNTY HUNTER
- Join Date
- Aug 2007
- Location
- Newtown Geelong
- Posts
- 1,878
Day 8. I skipped day 7.
I'm Back.
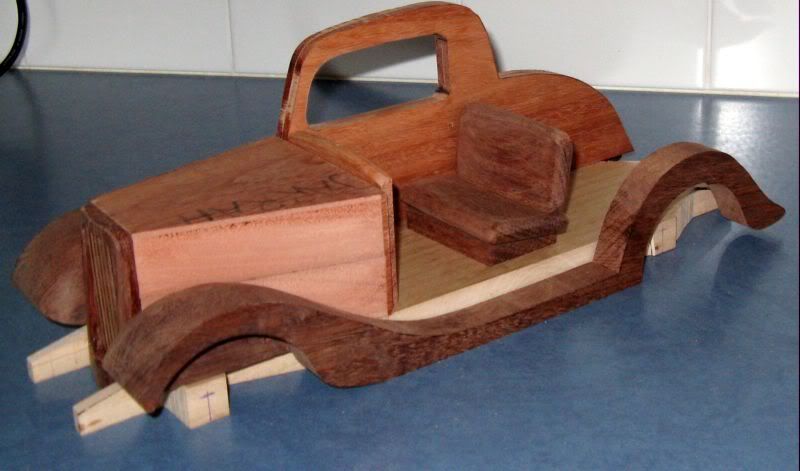
I have started to shape a lot of parts.First was the bonnet top.That didnt last long,I dropped it.Then I had to do a repair.See Photo.
Next was the seat.
Doesnt come up to good in photo.I will have to have a look at that.
Made a simple jig to drill the axle holes all in the right place on the 4 corners of the chassis.This worked fine.
All wheels touch the ground at once and no rocking.
Glued inner sides on body.
Setup some parts to see how it is looking.
Still havent made the boot area.I have run out of pink Jarrah.
I will spend my next 2 sessions shaping and sanding.Going to be a lot of that.
Back To Car Building & All The Sawdust.
-
23rd August 2008, 09:27 PM #22
BOUNTY HUNTER
- Join Date
- Aug 2007
- Location
- Newtown Geelong
- Posts
- 1,878
Day 9 a bit slow
Back again.
Things went a bit slower today.
A lot of thinking ,and not much action.
Had a boss like that once.
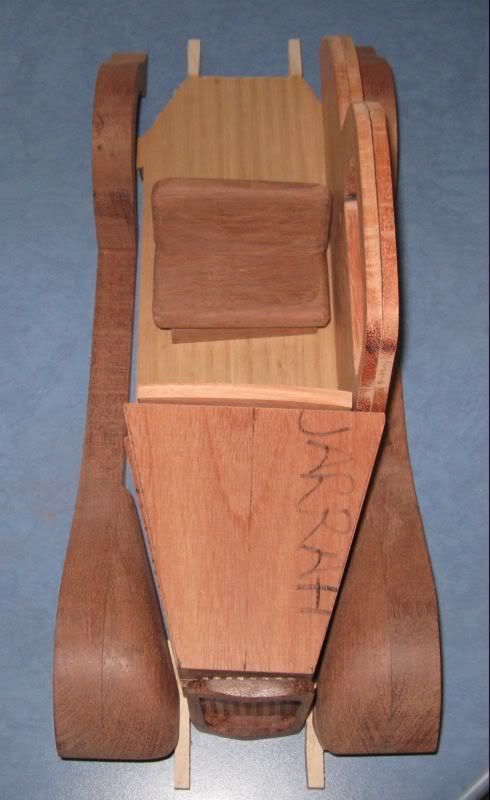
Worked on the seat back .It measured square
but looked high one side,so I reshaped it.
Think it is ok now.
I drilled and screwed back to base off seat
Didnt trust glue.once the seat is in the car,I cant get to it for repair
so I screwed & glued . I know,but that is me.
Next I glued the back window to the roof section.Will clean this up tomorrow.
Have done some sanding on other parts but finnished none.
I was hoping to get some more Jarrah but looks like someone lifted it for firewood.
See https://www.woodworkforums.com/showth...748#post792748


 Back To Car Building & All The Sawdust.
-
23rd August 2008, 11:18 PM #23
BOUNTY HUNTER
- Join Date
- Aug 2007
- Location
- Newtown Geelong
- Posts
- 1,878
Ripping Hair out
Does anyone else misplace things never to be found again.
I cut a bumper bar out.Never left shed and it was missing 10 min later.
That was 5 hours ago.Will make another.Geeze!Back To Car Building & All The Sawdust.
-
23rd August 2008, 11:35 PM #24
Senior Member
- Join Date
- Feb 2008
- Location
- South Australia
- Age
- 65
- Posts
- 197
Your not alone there as that happens to me as well

But the worst part is that I usually find the piece that I lost after I have finished making the replacement for it
-
24th August 2008, 09:04 PM #25
SENIOR MEMBER
- Join Date
- Sep 2007
- Location
- Melbourne
- Posts
- 1,133
Aussie,
Your car is coming along nicely..well done mate!
Cheers,
Chipman
PS now you have made another bumper, has the old one turned up?
-
24th August 2008, 09:58 PM #26
BOUNTY HUNTER
- Join Date
- Aug 2007
- Location
- Newtown Geelong
- Posts
- 1,878
Day 10
I recut the bumper bar I lost the other day then split in two for front and back.As you would.
I don't know how the pros would cut it.I marked it out and stuck the patern on the Jarrah with contact.I then cut the outer with the small bandsaw .I then sandes any sharp cut marks out of it so I didnt have any weak spots.
I then cut the inner side and sander and scraped both sides.
When I was happy with it I seperated it on the bandsaw and cleaned up the edges.
Feel free to tell me a better way to do something please.
I am only learning and thats what I want to do.Learn.
Did some more sanding and remodeling to get the lot to fit together.
I am going to order a 3mm roundover bit in the morning to do around the window areas.
I think my 1/4" bit should do the roof line and boot area.Will try on a spare couple of bits of Jarrah .I dont want any tareout on the roofline
Chipman Old bumper never showed up maybe tomorrow.I am going to make a take 2 of this car someday.Last edited by AUSSIE; 24th August 2008 at 10:01 PM. Reason: Old bumper never showed up
Back To Car Building & All The Sawdust.
-
24th August 2008, 11:28 PM #27
Trailer Bloke & Mild Mannered Moderator
- Join Date
- May 2007
- Location
- Tooradin, Vic.
- Age
- 52
- Posts
- 1,885
Words fail me...
I am in awe!!Too many projects, so little time, even less money!Are you a registered member? Why not? click here to register. It's free and only takes 37 seconds! Doing work around the home? Wander over to our sister site, Renovate Forum, for all your renovation queries.
-
25th August 2008, 09:27 PM #28
GOLD MEMBER
- Join Date
- Mar 2007
- Location
- Munruben, Qld
- Age
- 83
- Posts
- 10,027
Happens to me too mate, not only in the shed but in my office. I buy hundreds of pens and they just vanish and nobody know where they have gone. I swear there is a pen heaven somewhere. Originally Posted by AUSSIE

The car is coming along beautifully. A very good thread and most interesting. I am learning a bit every day. Keep it up.Reality is no background music.
Cheers John
-
25th August 2008, 10:34 PM #29
BOUNTY HUNTER
- Join Date
- Aug 2007
- Location
- Newtown Geelong
- Posts
- 1,878
Nothing worth a photo today.I turned up a gear stick
.Drilled a 3/16" hole at 15 degrees to suit in chassis.Then a hole at 30degrees in dashboard for steering wheel.
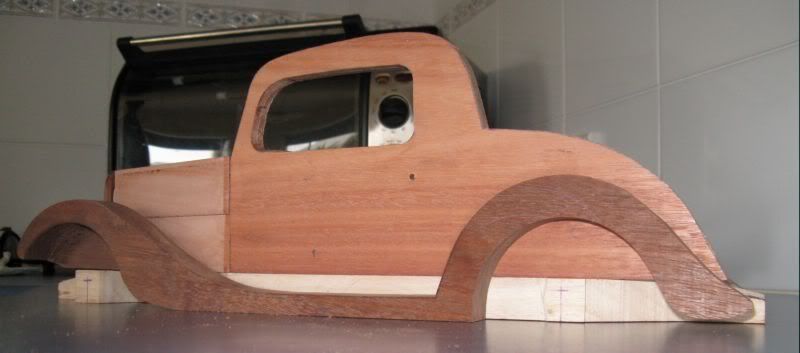
Repaired,fixed,sanded several parts.Glued and sanded bonnet.I drilled the chassis/bonnet combination from under chassis with 10mm drill,then slid 10mm dowel in both holes.This way I can remove,replace or open holes and reposition slightly.
I needed to have a semi permanent bonnet to enable me to shape gaurds to suit.
I thought I had mentioned this before ,but someone asked how I was glueing shaping and sanding the same day.I use quickset epoxy and C A glue.Very little PVA.
I like the epoxy for several reasons.One is obvious really quick setting 2 it cleans up ok.You wouldnt know there was a join in some cases It doesnt creep in the join.I hate it when PVA creeps. You get it all smooth today,then you notice you need to sand again to get it flush with the wood again..I use the CA glue when there are small parts such as gearstick or steering wheel.
I maybe doing things the wrong way.This is just the way I find best for me.I am willing to change if there is a better way.
I feel I get a lot more work done in the same time by using these glues.No down time .Back To Car Building & All The Sawdust.
-
25th August 2008, 11:29 PM #30
SENIOR MEMBER
- Join Date
- Sep 2007
- Location
- Melbourne
- Posts
- 1,133
The creeping with pva is really annoying...I have been caught out with it too. Anyway it looks like you are doing well with it... it is often the way that the little fiddly bits take up the time but it is the attention to detail that makes it into a great job and from the pics, yours is certainly heading that way.
Cheers,
Chipman


 Reply With Quote


Similar Threads
-
How to get started
By In2Wood in forum SMALL TIMBER MILLINGReplies: 31Last Post: 28th August 2008, 10:48 PM -
Getting started
By Matt88s in forum WOODTURNING - PEN TURNINGReplies: 16Last Post: 3rd May 2007, 04:43 PM -
Let's Get Started!
By RufflyRustic in forum WOOD WHISPERING WOMENReplies: 23Last Post: 17th February 2007, 10:06 AM -
How to get started
By swiftden in forum WOODTURNING - PEN TURNINGReplies: 5Last Post: 1st June 2006, 11:51 AM -
Getting started again
By haemish762 in forum WOODTURNING - GENERALReplies: 4Last Post: 21st October 2005, 12:48 PM
