

 Thanks: 0
 Likes: 0
 Needs Pictures: 0
 Picture(s) thanks: 0
Results 91 to 105 of 115
Thread: Started My Car
-
2nd October 2008, 03:00 PM #91
 Trailer Bloke & Mild Mannered Moderator


- Join Date
- May 2007
- Location
- Tooradin, Vic.
- Age
- 52
- Posts
- 1,885

 Don't upset the Admins!!!
Now... Get back to sanding!!
C'mon, more work, less fancy typing!
Just to brighten your day. Too many projects, so little time, even less money!
 Are you a registered member? Why not? click here to register. It's free and only takes 37 seconds! Doing work around the home? Wander over to our sister site, Renovate Forum, for all your renovation queries.
-
2nd October 2008 03:00 PM # ADSGoogle Adsense Advertisement
- Join Date
- Always
- Location
- Advertising world
- Age
- 2010
- Posts
- Many
-
3rd October 2008, 09:31 AM #92
GOLD MEMBER
- Join Date
- Jun 2007
- Location
- North Of The Boarder
- Age
- 68
- Posts
- 16,794
 every time I read the words "Mod's" I think of those years long ago where we also had "Bikies" "Sharpies" "Surfies" "Romper Stompers" ""Skin Heads" "Beatniks"
Mod's were the mild mannered Rockers wearing suits ties pointed toe shoes stove pipe pants.
  I can not see looking like that
-
3rd October 2008, 02:59 PM #93
 Keep a knockin' no one there
- Join Date
- Sep 2008
- Location
- Geelong West
- Posts
- 59
Looks like I am visitor No 3000
Looks like I am visitor No 3000
Good on you Aussie, you are doing well.
Is it getting close to finished?
-
6th October 2008, 11:03 PM #94
BOUNTY HUNTER
- Join Date
- Aug 2007
- Location
- Newtown Geelong
- Posts
- 1,878
I am Still Here Guys.-Not Lost
I am Still Here Guys.-Not Lost.
I will have some photos in a few days.
I have been over run with things to do.
The pic below is of gauge panel for car.
Doesnt look much,but took me several goes to get it too look OK.
Will slit it and then angle it.It will give me 2 ,
so I will have another one for the next project.
Come back in a few days for another look
Sorry about the quality of the photo.I only took the one and
made a mess of it.
 Back To Car Building & All The Sawdust.
-
7th October 2008, 10:03 PM #95
BOUNTY HUNTER
- Join Date
- Aug 2007
- Location
- Newtown Geelong
- Posts
- 1,878
A bit of Progress on Car
I have had a bit of progress on the car at last.
I think all the parts are done in poly.and with a few adjustments
here and there it should all go together.
I have been doing some more testing with finishes as well.
I bought some Micro-Mesh in a sort of a kit.
9 different grades and a chart.Each grade is a different color.
The last 3 grades begin to polish the finish.The last one,called 12000
actually gives a very high polish in no time flat.if you go through the grades.
I first saw it on TJ's CA pen demo.so I thought I would check it out.
He was using 2" x 2" pads,I got the 3" x 4" pads because of the size of the car I am doing I also got the Micro Gloss Liquid Abrasive. Really is a very fine polish,but I dont think it is needed.You would have to see this stuff to believe it.No cheap but no doubt
it will get cheaper.
Give me your thoughts on it.
Back to the car.I have mounted the body and bonnet to the chassis.Fitted the spare wheel.Also made all the small parts except the number plate and brackets.I justthought of them as I was typing this.My age is showing,OH well.
I best do them in the morning and get some poly on them.
Back To Car Building & All The Sawdust.
-
7th October 2008, 10:36 PM #96
Trailer Bloke & Mild Mannered Moderator
- Join Date
- May 2007
- Location
- Tooradin, Vic.
- Age
- 52
- Posts
- 1,885
Forget the guards! Makes a great Hi-boy.
Great stuff.Too many projects, so little time, even less money!Are you a registered member? Why not? click here to register. It's free and only takes 37 seconds! Doing work around the home? Wander over to our sister site, Renovate Forum, for all your renovation queries.
-
8th October 2008, 09:33 PM #97
GOLD MEMBER
- Join Date
- Mar 2007
- Location
- Munruben, Qld
- Age
- 83
- Posts
- 10,027
Brilliant AUSSIE absolutely brilliant.
Reality is no background music.
Cheers John
-
9th October 2008, 08:26 AM #98
GOLD MEMBER
- Join Date
- Jun 2007
- Location
- North Of The Boarder
- Age
- 68
- Posts
- 16,794
Aussie it looks fantastic
-
15th October 2008, 09:55 PM #99
BOUNTY HUNTER
- Join Date
- Aug 2007
- Location
- Newtown Geelong
- Posts
- 1,878
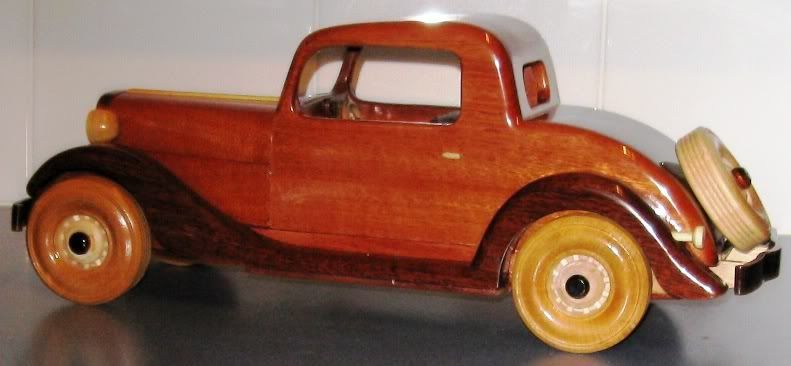
Getting Near Finished After A Few Mods
Getting Near Finished After A Few Mods
Attachment 86044 I had to put an underbelly on chassis,to support the one piece front and back guards.See below door area
Attachment 86045 shot along side of car
Attachment 86046 inside shot showing the gauges and steering wheel
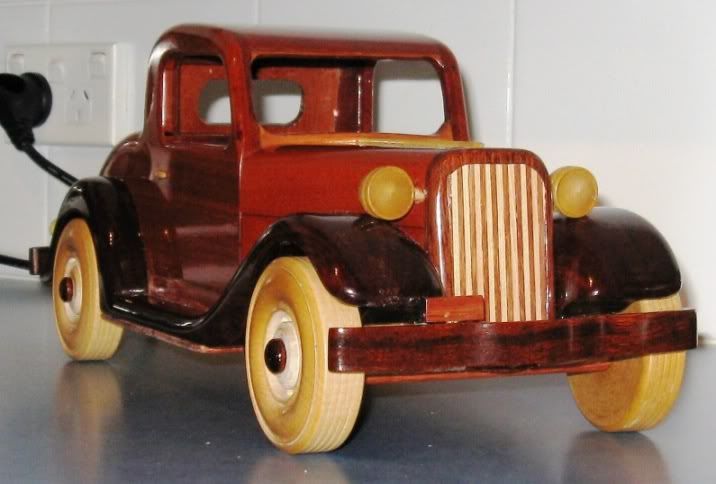
Attachment 86047 Grill mounted along with the trim on bonnet
Attachment 86048 A better shot of the seating area for guards
Attachment 86049Back To Car Building & All The Sawdust.
-
15th October 2008, 10:05 PM #100
Trailer Bloke & Mild Mannered Moderator
- Join Date
- May 2007
- Location
- Tooradin, Vic.
- Age
- 52
- Posts
- 1,885
You're the Man!!
Too many projects, so little time, even less money!Are you a registered member? Why not? click here to register. It's free and only takes 37 seconds! Doing work around the home? Wander over to our sister site, Renovate Forum, for all your renovation queries.
-
15th October 2008, 10:11 PM #101
BOUNTY HUNTER
- Join Date
- Aug 2007
- Location
- Newtown Geelong
- Posts
- 1,878
A couple of more photos
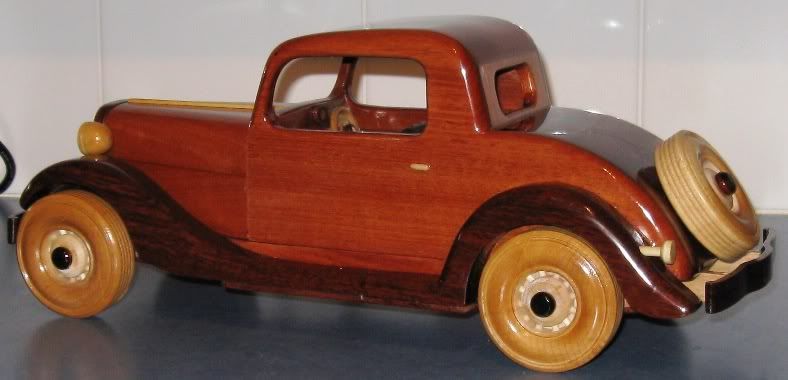
Attachment 86053 A couple of more photos The guard is just sitting on the underbelly.This should give it plenty of support.Without this it was only going to be stuck to paint on the side of the car.
If I glued guard before I painted car,it would be almost impossable to have a nice finish on car.For me anyway
Attachment 86054 I have the headlights and door handles to go on .Then the spare wheel and 4 main wheels.
I am still thinking how to mount the bumper bars and number plates
Yonnee-You have been there from the start and I know you will be there when the final shots are on the net--Not too far away now Hey?
3500 just up oct 16 9.16amBack To Car Building & All The Sawdust.
-
17th October 2008, 10:30 PM #102
BOUNTY HUNTER
- Join Date
- Aug 2007
- Location
- Newtown Geelong
- Posts
- 1,878
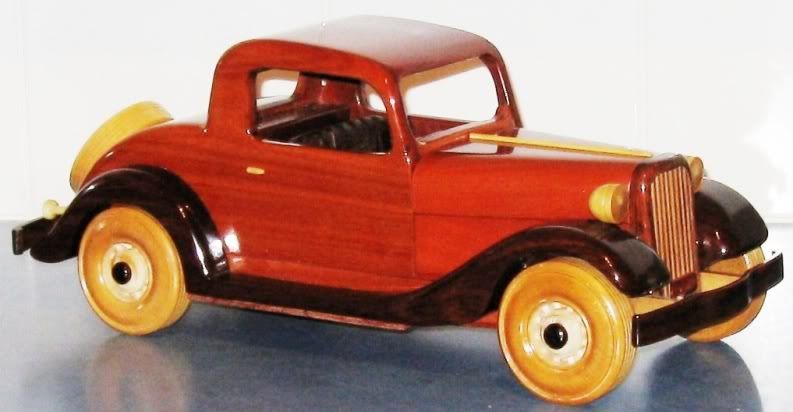
Guess what guys
My car is fueled up and ready to rumble

 Hello Admin
Car will not be at Melb show.
The car doesn't photograph well.The wood changes color with change of angle of ca
The car is 16 inches long that is 400mm .I had an email and person thought is was about 5 to 6" long .It is heavy as well
Would like to thank
David Howlett from Perth wood school
& Karl Vander Ploeg from Toys & Joys in USA
I started as a near beginner and feel like I have learnt.
alot doing this car.I Have already setup to make another with dicky seat and also opening bonnet etc..
Many thanks to several other people that have helped me with Ideas etc.
Aussie
 Back To Car Building & All The Sawdust.
-
18th October 2008, 09:34 AM #103
SENIOR MEMBER
- Join Date
- May 2006
- Location
- Australia
- Posts
- 1,139
Absolutely stunning..... wish you'd put it in the show!!! Maybe next one?
Looking forward to seeing the next one step by step
JuvyWoodcrafters Haven
Wodonga - Supplies for Turners and Woodcrafters
Mobile 0407261703
-
18th October 2008, 10:19 AM #104
GOLD MEMBER
- Join Date
- Jun 2007
- Location
- North Of The Boarder
- Age
- 68
- Posts
- 16,794
 WOW Can I take for a spin round the block
Aussie thanks for a great WIP
I see no reason it shouldn't be shown at The Show regardless if this is a first time can't wait till the 10th
Ray
-
18th October 2008, 11:27 AM #105
GOLD MEMBER
- Join Date
- Mar 2007
- Location
- Munruben, Qld
- Age
- 83
- Posts
- 10,027
Congratulations on finishing your car. Well it seems more like our car really, seeing it come together over the past months and sharing the WIP has been a great experience for all of us and I feel like I know this car personally. You have done a superb job on the car and a brilliant WIP with great step by step pictures. Look forward to seeing more of your projects AUSSIE although you have a hard task ahead to beat this one.
Congratulations once again mate. Really great job.
Reality is no background music.
Cheers John


 Reply With Quote


Similar Threads
-
How to get started
By In2Wood in forum SMALL TIMBER MILLINGReplies: 31Last Post: 28th August 2008, 10:48 PM -
Getting started
By Matt88s in forum WOODTURNING - PEN TURNINGReplies: 16Last Post: 3rd May 2007, 04:43 PM -
Let's Get Started!
By RufflyRustic in forum WOOD WHISPERING WOMENReplies: 23Last Post: 17th February 2007, 10:06 AM -
How to get started
By swiftden in forum WOODTURNING - PEN TURNINGReplies: 5Last Post: 1st June 2006, 11:51 AM -
Getting started again
By haemish762 in forum WOODTURNING - GENERALReplies: 4Last Post: 21st October 2005, 12:48 PM
