

 Thanks: 0
 Likes: 0
 Needs Pictures: 0
 Picture(s) thanks: 0
Results 1 to 15 of 18
Thread: Amatuer recylced outdoor table
-
2nd November 2011, 08:53 PM #1
 Novice


- Join Date
- Nov 2011
- Location
- Sydney
- Posts
- 20
 Amatuer recylced outdoor table
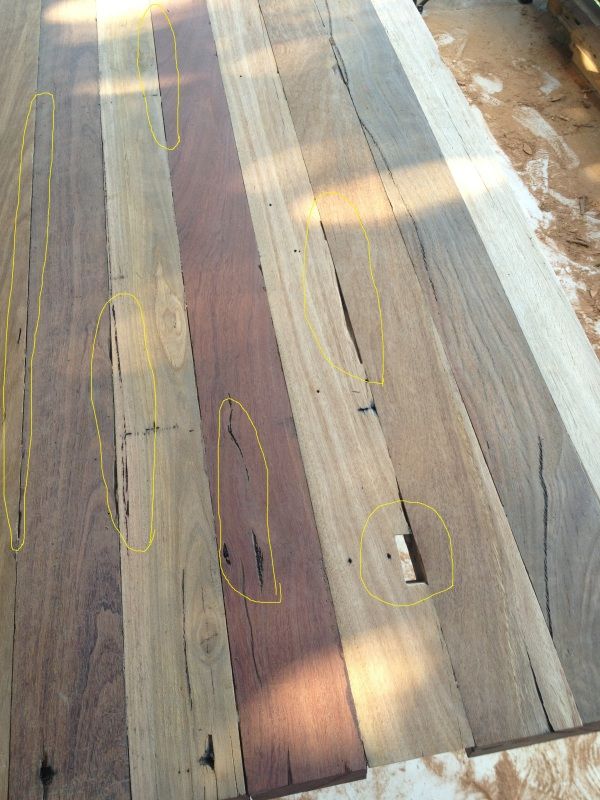
picked up some very old timber hardwood while labouring for a builder/friend of mine. Demolished a very old house 60-70+ years and discovered all the bearers and joists were different types of hardwood. One of the carpenters had plans to chop up and burn the timber but I jumped on my high horse and thought, hell why not attempt to make a table out of it.
So I went out bought a orbital sander, few sash clamps, a planner (borrowed a biscuiter) some polyurethane glue and I started construction on the top of the table.
things I've learned
1. DE nailing really sucks
2. planing old timber takes a long time (if only I had the money for a thickness planer, joys of being a broke uni student)
3. hardwood is heavy...really heavy
I've a long way to go, the table top still needs all the sides/edges circular sawed down on a 45* angle, plan is to give it kinda a floating look.
i'll post more pics when i start on the legs/bracing,
just for info.. I did wood work in highschool so this is very new to me but I do have to say I find it very enjoyable
P.s if anyone could identify the different timber it would be much appreciated, I think the red stuff is Jarah, the yellowish blackbutt and maybe some spotted gum??
cheers boys


[/IMG]http://i93.photobucket.com/albums/l53/Ivormiric/IMG_0027.jpg[/IMG]
-
2nd November 2011 08:53 PM # ADSGoogle Adsense Advertisement
- Join Date
- Always
- Location
- Advertising world
- Posts
- Many
-
3rd November 2011, 12:58 AM #2
GOLD MEMBER
- Join Date
- Oct 2003
- Location
- Canberra
- Age
- 48
- Posts
- 1,484
Great work on the table. Nice save from the fire.
It's hard to say what timbers they are. I think it is unlikely that they would have used Jarrah for framing, so perhaps the red timber is a red gum or similar. The rest look like blackbutt/messmate or similar, could even be tassie oak.
It looks like you've got lots of voids/gaps in the timber - I think it adds character to the table and will look great when finished. I have used a fair bit of recycled timber before and have filled the gaps with casting resin - it's a two part system (mix a hardener into the resin mx) and then fill up the gaps. But you need to plug the holes from the bottom before pouring of course. If you're keen, you could mix in sawdust, but given the variety of colour in the timbers, it may be best to leave it clear.
I should point out that my table is inside - not sure what exposure to direct sun and rain would do to the resin. If the timber moved much, I presume the resin might crack?
Anyway, just an idea.
TravSome days we are the flies; some days we are the windscreen
-
3rd November 2011, 11:37 PM #3
Novice
- Join Date
- Apr 2011
- Location
- sydney
- Posts
- 17
I just received a shipment of similar sort of timber, of which i was hoping to use in my major work for Industrial Tech. Very interested to see how this turns out and if you have any tips about working with it by the end of your project

-
6th November 2011, 04:35 PM #4
Member
- Join Date
- Oct 2010
- Location
- Broome, WA
- Posts
- 91
Looking good...and agree with Trav: nice save from the fire.
Looking forward to seeing the WIP.
-
9th November 2011, 09:08 PM #5
Lignum Vexator
- Join Date
- May 2007
- Location
- North of the coathanger, Sydney
- Age
- 68
- Posts
- 9,417
Nice wood
great save
regards
Nick
veni, vidi, tornavi
Without wood it's just ...
-
12th November 2011, 02:42 PM #6
Mildly Moderate
- Join Date
- Nov 2007
- Location
- Albury Well Just Outside
- Posts
- 13,315
 Originally Posted by ivormiric

I agree de-nailing is a lot of fun when someone else is doing it.
-
24th November 2011, 07:55 PM #7
Novice
- Join Date
- Nov 2011
- Location
- Sydney
- Posts
- 20
Small update: legs are cut on the angle, they came from the only bearer I had which over time has warped/concaved whatever the word is, so I thought if I cut them on a little a bit of an angle it would look better and won't be as noticeable if they were flat out vertical. Decided to put in a little support brace between the legs (which I routered/chiselled out) Went out and bought the cheapest Ozrito plunge router, probably made by some Chinese children in their backyard, my god is it a piece of ####, has no torque at all. Lesson learned. Not happy with my joints though


Last picture is some nice red hardwood (possible to identify) I found and cut up into shape which will slot in between the leg bracing (can see from the pictures above where it will slot in and run along underneath the table.
I'm thinking Ill add two more "timber braces" as per my fantastic paint drawing below to provide more stability and as I have a lot of nice timber left over
(the red colour are the two extra lengths I'm thinking of cutting in)


Thoughts?
Cheers boys!
-
25th November 2011, 07:43 AM #8
Skwair2rownd
- Join Date
- Nov 2007
- Location
- Dundowran Beach
- Age
- 76
- Posts
- 19,922

Nice save on some great looking timber there Ivor!!
 Great to have another member of the scavengers club om board!
I really can't see how that top will be stable enough with the way you intend to attatch it. Maybe I'm missing something, but I just cn't imagine the whoe assembly being really stable.
-
25th November 2011, 09:40 AM #9
Novice
- Join Date
- Nov 2011
- Location
- Sydney
- Posts
- 20
nor do I, I'm going blind Originally Posted by artme
my photos are not the best however I have a day off today so I'll attach everything and post some more photos up and we'll see how it comes up..
I also have no idea what to do about the finish...oil stain or beez wax? its under a covered pergola nontheless outside though
-
25th November 2011, 10:27 PM #10
GOLD MEMBER
- Join Date
- Mar 2009
- Location
- Sydney
- Age
- 37
- Posts
- 2,711
Some nice looking timber you got there!
How do you intend to attach the top?
Only a suggestion- have rails going the length of the table and flush with the top of the legs. This will provide extra support for the top to sit on, but also allow you to attach the top easily. You have a few options for attaching the top. You can buy z clips that basically screw to the top and to the rail, allowing for movement of the top. You could also make your own, they are called wood buttons (do a search).
Just a thought....
Andy
-
26th November 2011, 06:55 PM #11
Senior Member
- Join Date
- Sep 2006
- Location
- Newcastle
- Posts
- 192
Great work and nice save. Such a waste the amount of good useable timber that gets cremated. I really like the look of the top, different timbers and character galore.
Keep it up and look forward to the next update.
BTW, In the first shot, it looks like the timber came out of your washing machine nice and clean, but how on earth did you get the timber to fit inside??????
-
3rd December 2011, 12:41 PM #12
Novice
- Join Date
- Nov 2011
- Location
- Sydney
- Posts
- 20
ok, I'm 80% happy 20% iffy
First its very warped and its evident when standing from one side of the table but not from the other, I guess thats what you get with timber thats 3 times older then I am, but in all honestly its basically my fault as not having a thicknesser in combination with only 3 sash clamps when working with lengths of 2.8metres was always going to be a problem, oh well.
Secondly I'm only happy with 3/6 joints I routed, I guess thats what you get when you buy a piece of #### router and when you're amateur, bound to be mistakes.
I do love the timber though, everything I've used is recycled and ultimately saved from the fire place. It's also very satisfying every time I go up and have a look at it, to have something you created from start to finish is very rewarding...I guess it's like "I gave birth to it"not sure if the women would agree
I still have to choose a stain or oil or wax and this is where I really need help, I do want to add a very small amount of gloss (to give it some smoothness) and a little colour but not too much as I think it would ultimately insult its recycled heritage. Any thoughts guys? Would really really help as I've done a search but I've struggled to come up with anything as I have so many different types timber and so many different colours?
Cheers boys
Ivor
P.s I do apologise for the pink lines through the photos, seems to be something wrong with my iphone4 crappy, serves me right for buying one I guess..
http://i93.photobucket.com/albums/l5...c/IMG_0074.jpg
http://i93.photobucket.com/albums/l5...c/IMG_0073.jpg
http://i93.photobucket.com/albums/l5...c/IMG_0072.jpg
http://i93.photobucket.com/albums/l5...c/IMG_0070.jpg
http://i93.photobucket.com/albums/l5...c/IMG_0068.jpg
-
3rd December 2011, 12:47 PM #13
Novice
- Join Date
- Nov 2011
- Location
- Sydney
- Posts
- 20
Originally Posted by Charlie roth
If It is anything like my timber be prepared to have a lot of warps, you'll have to invision how it will effect anything in the future, for example you can see that my timber top is very warped on the right end side, it wasnt very noticable when i frist started clamping but it makes a big difference at the end...not really sure what you could do, maybe not use it at all.
Patience is key and a lot of sanding mate, i think i spend a good 3 Full days sanding it down and a full day just planning.
also Don't rush anything, unless you have a deadline, dont work on it if you're in a bad mood or if you can feel that you're skipping stuff that needs to be done, specifically sanding
Good luck mate!
-
4th December 2011, 08:07 PM #14
Mildly Moderate
- Join Date
- Nov 2007
- Location
- Albury Well Just Outside
- Posts
- 13,315
I think that the learning experience is always hard to beat. Well done on the table. The next project means that you will get better from what you have done on this one.
-
4th December 2011, 10:16 PM #15
SENIOR MEMBER
- Join Date
- Feb 2011
- Location
- Bathurst NSW
- Age
- 82
- Posts
- 530
Been watching from the wings, Ivor. Althopugh these timbers were not rescued from having been in a fire, nonetheless I am reminded of the Phoenix, and the rising from the ashes.
Timbers were pretty awful (to be complimentary) to start, but through your efforts, like the Phoenix have arisen to a new life. Keep at it and there will be without doubt a fine end result for you....perseverence and patience overcomes all setbacks eventually.

 Reply With Quote


Similar Threads
-
recylced oregon pine dining room table
By balcormo in forum RESTORATIONReplies: 1Last Post: 20th July 2011, 09:34 AM -
Red gum outdoor table
By cpuggs in forum FURNITURE, JOINERY, CABINETMAKING - formerly BIG STUFFReplies: 7Last Post: 7th March 2009, 07:48 PM -
Another outdoor Table
By Scally in forum WOODWORK PICSReplies: 9Last Post: 9th December 2007, 08:32 PM -
Amatuer woodturner
By shortwoodturner in forum WOODTURNING - GENERALReplies: 1Last Post: 13th February 2005, 03:08 PM -
Outdoor Table
By Suresh in forum WOODWORK PICSReplies: 5Last Post: 20th January 2004, 09:03 PM
