

 Thanks:
  Likes:
  Needs Pictures: 0
 Picture(s) thanks:
Results 1 to 15 of 155
Thread: Apothecary chest
-
24th April 2018, 09:34 PM #1
 Be inspired. Be creative. Be bold.


- Join Date
- Apr 2001
- Location
- Perth
- Posts
- 10,860
 Apothecary chest
Lynndy and I were in Auckland, New Zealand recently for the wedding of her niece. We stayed with her brother and his wife. They have a wonderful home with some nice examples of arts and crafts furniture, one of which was an apothecary chest. I really love these pieces, and Lynndy especially has wanted one forever. So the order was placed and a spot lined up in the entrance hall.
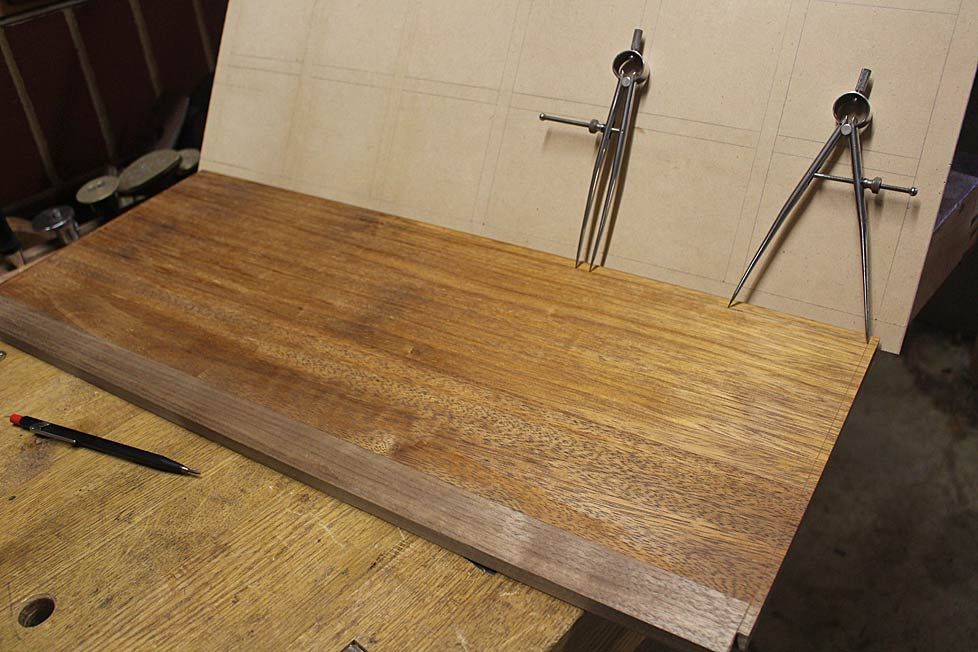
The design was mostly worked out in idle musing, and then I drew it up on sheets of 6mm MDF (I like this since the sheets end up as a story board and may be stored away more easily if needed at a later date).
The orientation is vertical, rather than typically horizontal, more along the lines of a Krenov-styled cabinet. I�ve never built a Krenov-styled cabinet and, as far as I am aware, he never built an apothecary chest! In other words, this is a chest on a stand. As an aside, I am not enamoured with the spindly legs of Krenov designs, and something with substance is needed. More on this at a later date.
The chest will contain 24 drawers, in 6 rows (so 4 drawers across and 6 rows down) �
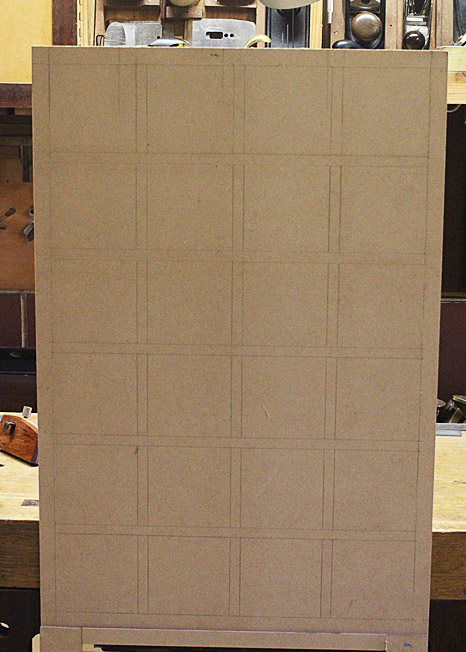
What has changed in the drawing above is the rows will be made to accentuate the vertical rather than the horizontal (by running the blades/dividers down first). This is more work, but is should create a different perspective.
I have never seen a curved apothecary chest before, so this may be the first one �
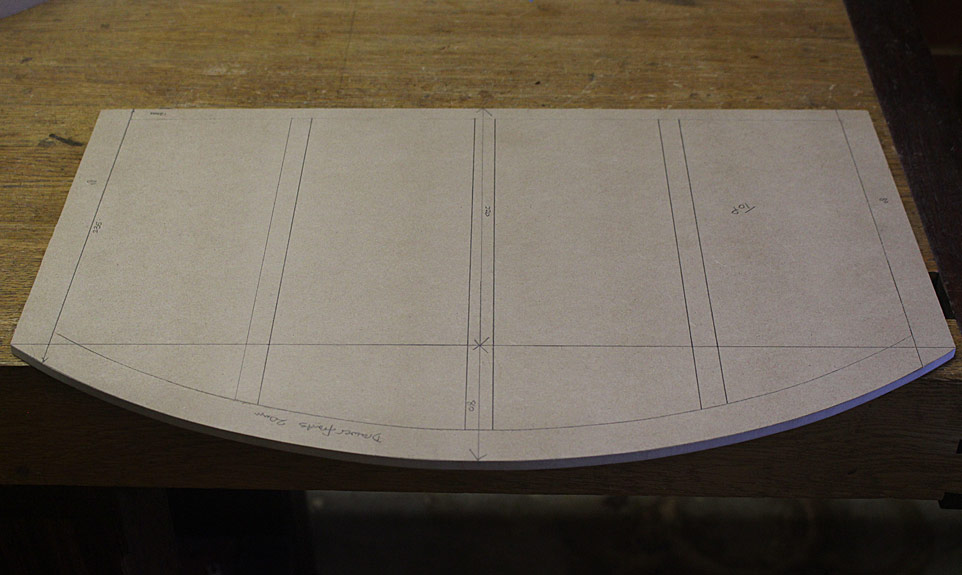
The wood is another first for me � black walnut from the USA. My local timber guy had a stack of 1� and 2� thick boards, all about 11-12� wide.
(For those who see metric measurements on the plans and here is mentioned imperial sizing, be aware that this is my common practice. The jointer-planer/thicknesser I have is European, and metric. The hand tools, such as a plough plane, are imperial).
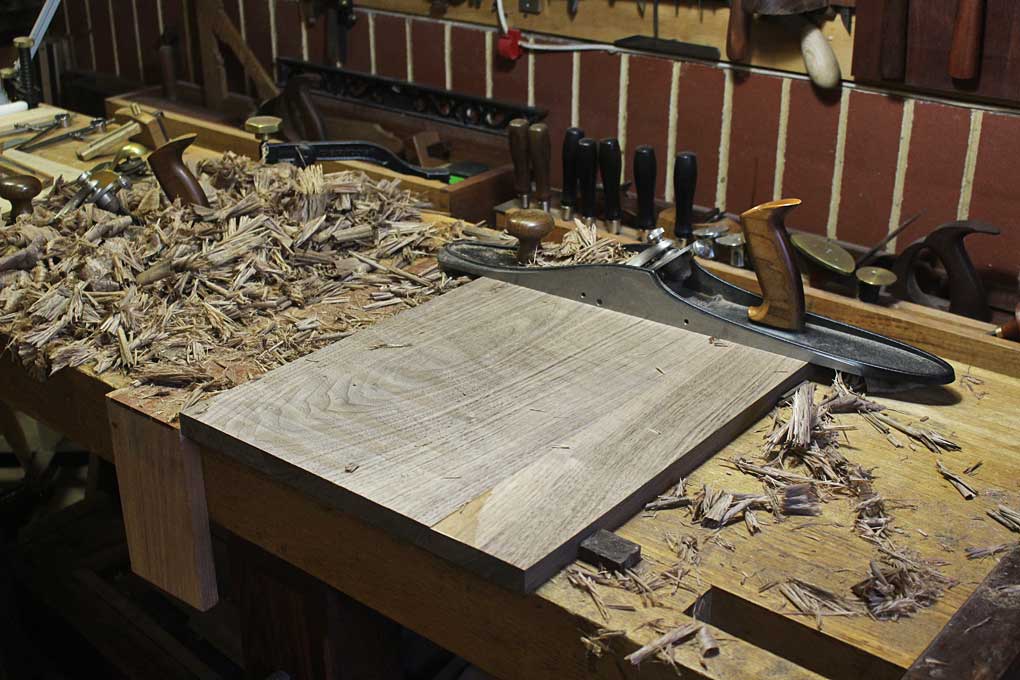
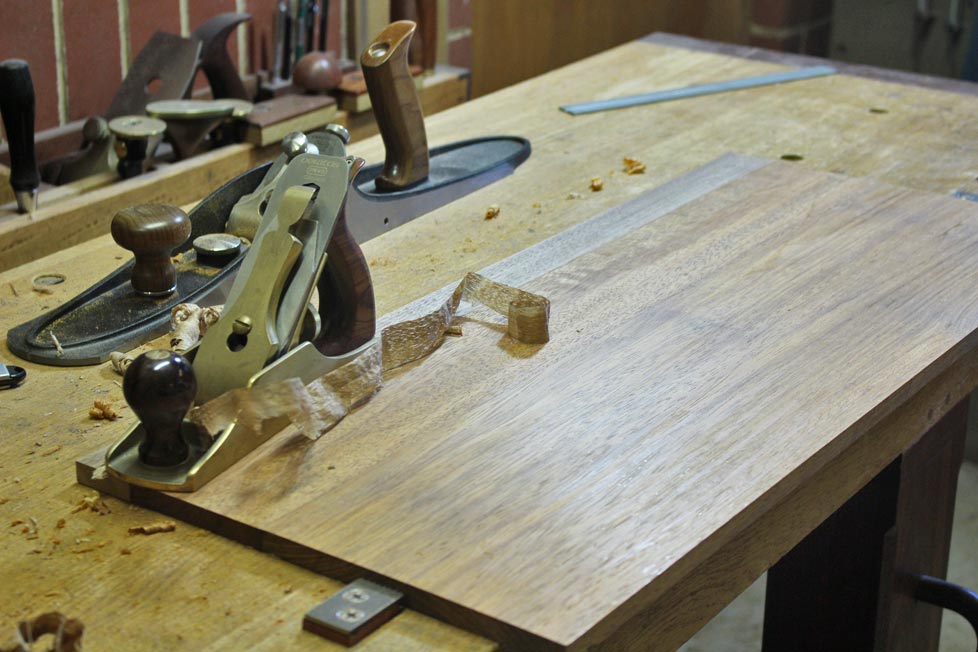
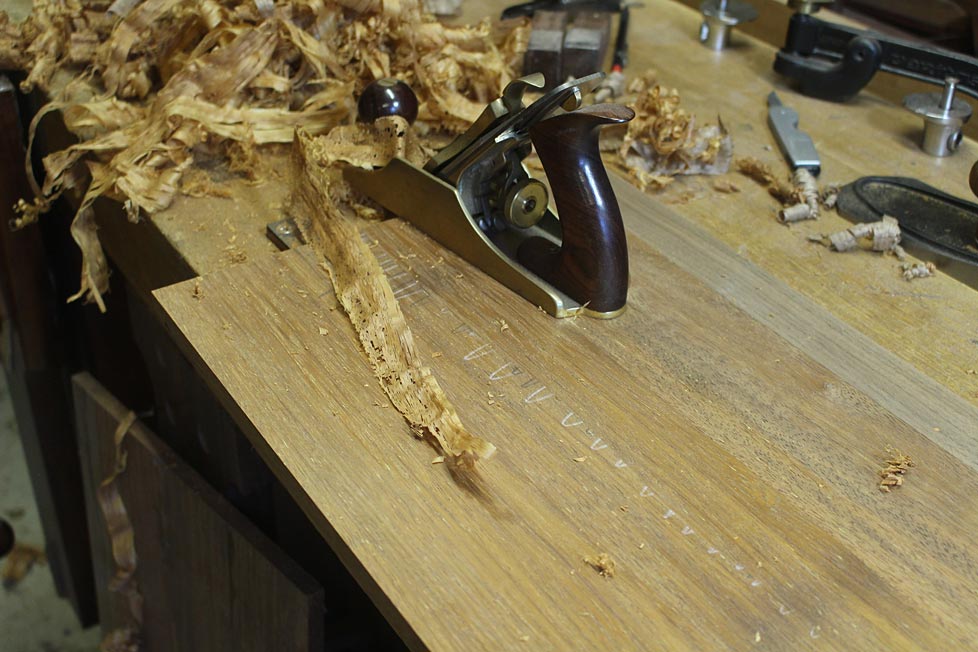
The boards are thicknessed a little oversize, glued up, and then taken to final dimension with hand planes.
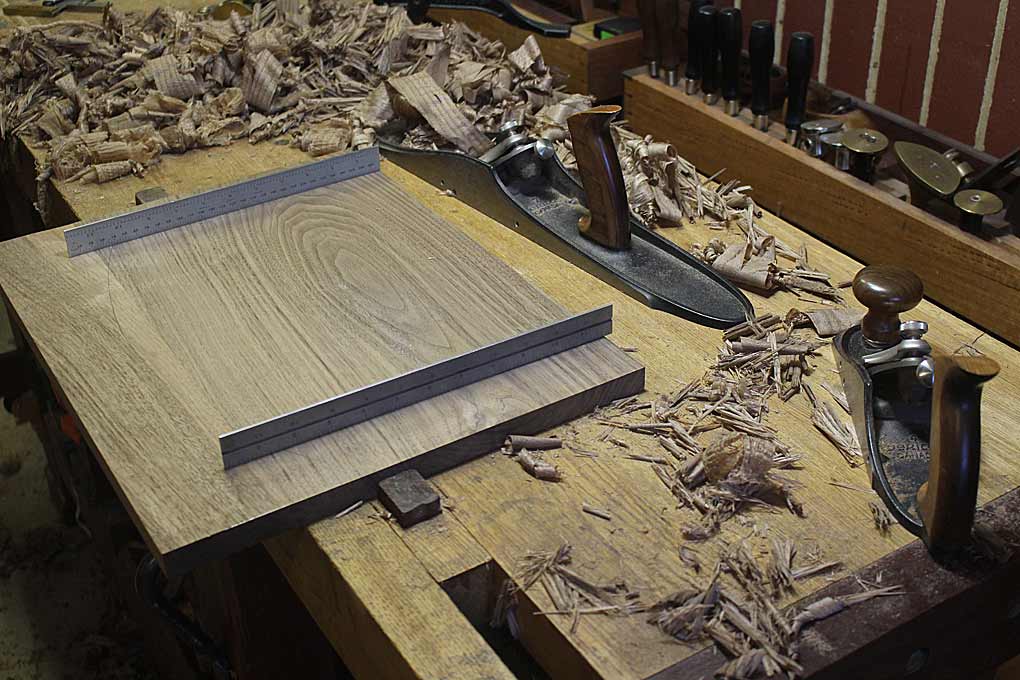
The walnut is so easy to plane. I get why so many rave about working with it.
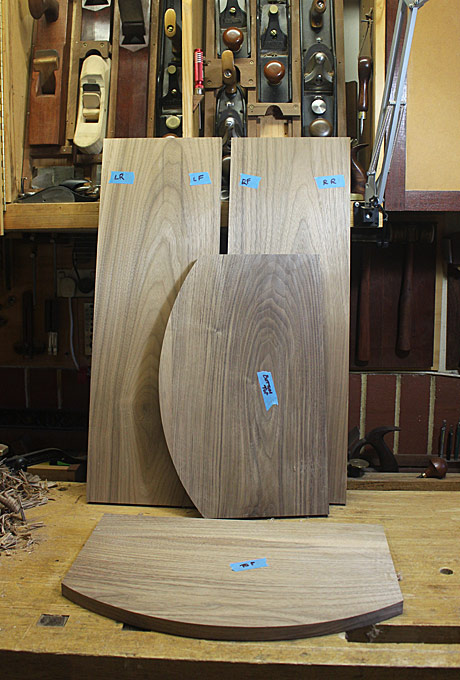
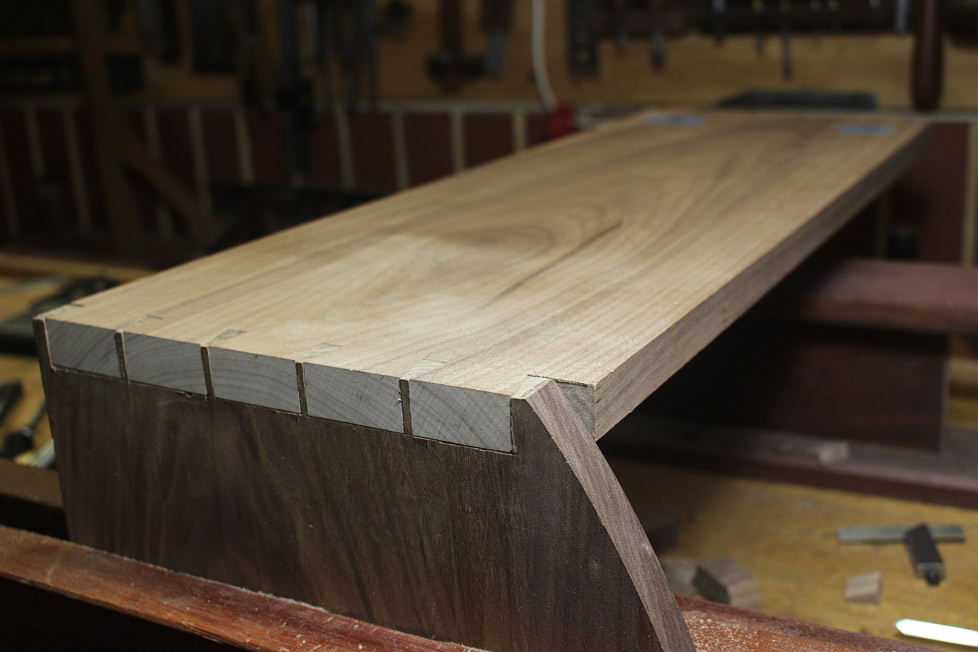
Don�t you love it when the carcase parts are done. These are all 20mm thick �
Starting to put it together
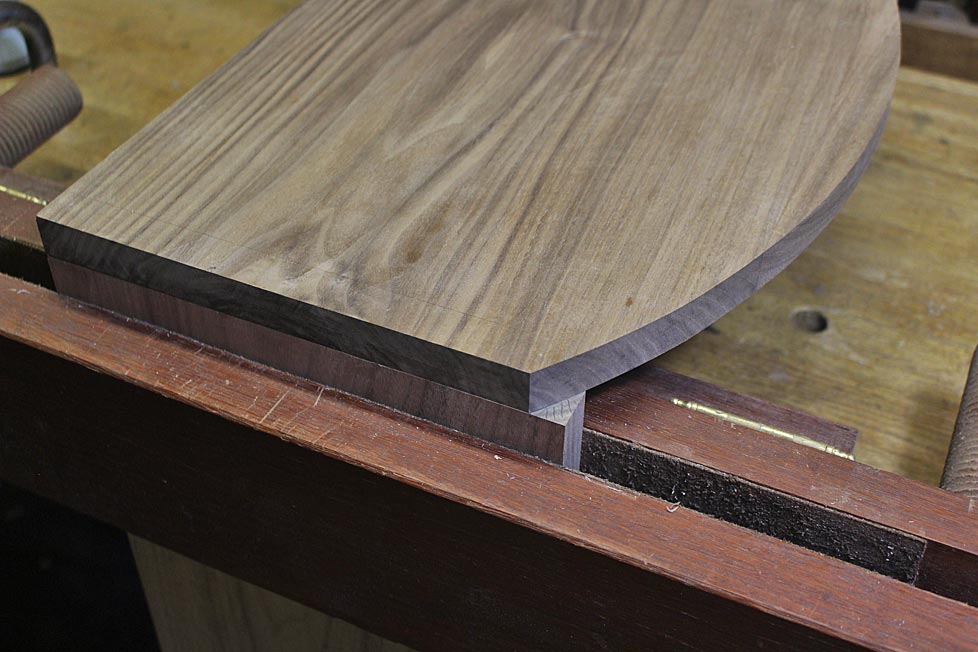
Starting from the bottom up, the side panels are left a little long as they will need to be given a curved bevel to meld with the bottom panel �
The dovetails are in the ratio of 6:1 � I felt the slightly extra wider base would add a little more authority.
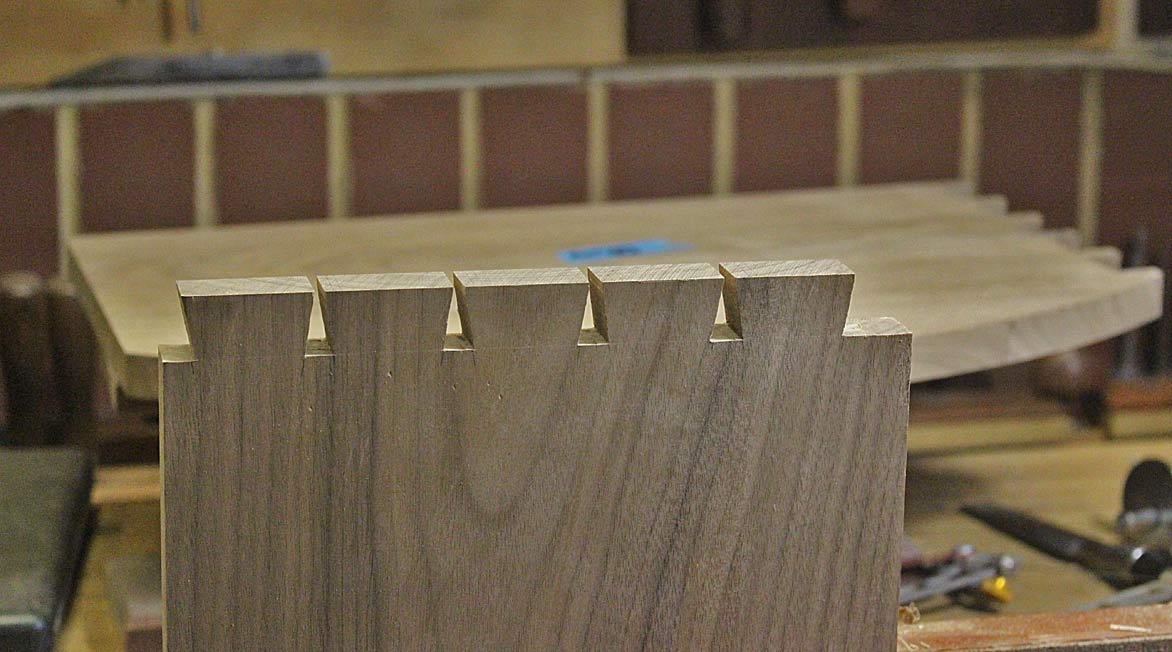
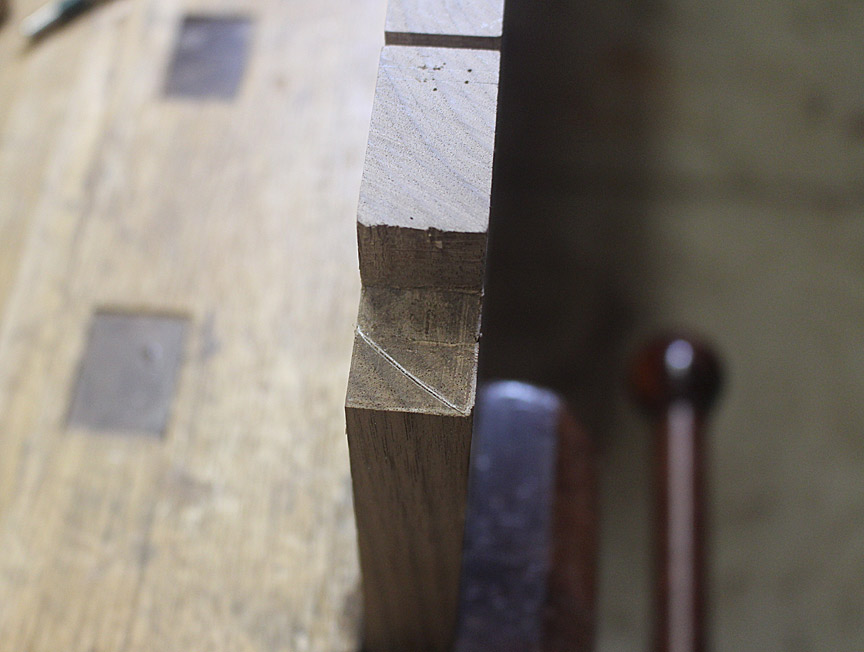
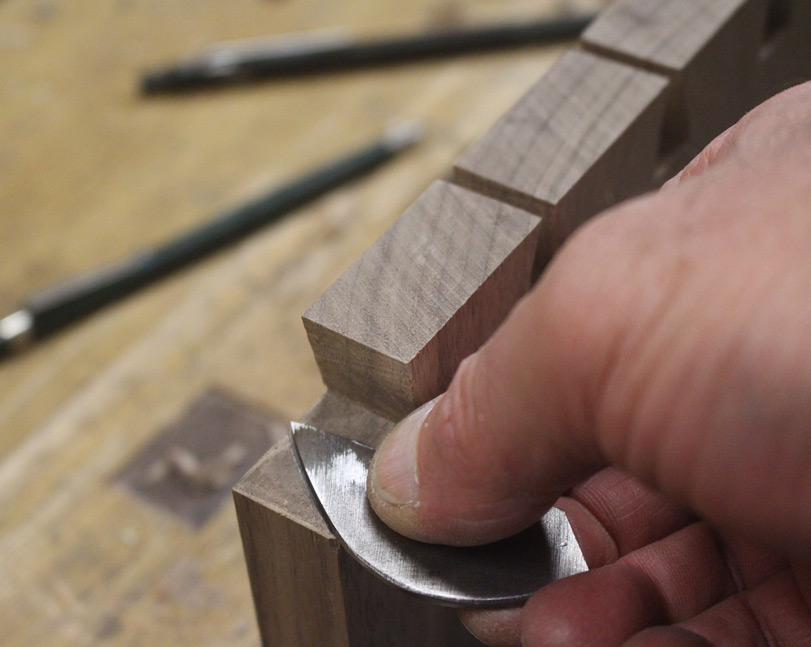
Here�s the first completed corner. It is important that the joints are tight (obviously) but also that they moved apart readily, since the cabinet carcase will be pulled apart, put together, and pulled apart many times as the drawer blades are measured and fitted ...
Note, also, the area that will need to be bevelled away. This is marked.
Now the dimension of the bevel is taken the length of the panel �
I made up a template of the curve by grinding a piece of scrap steel (chosen because it was lying around) �
� and the curve is transferred to the other end of the panel.
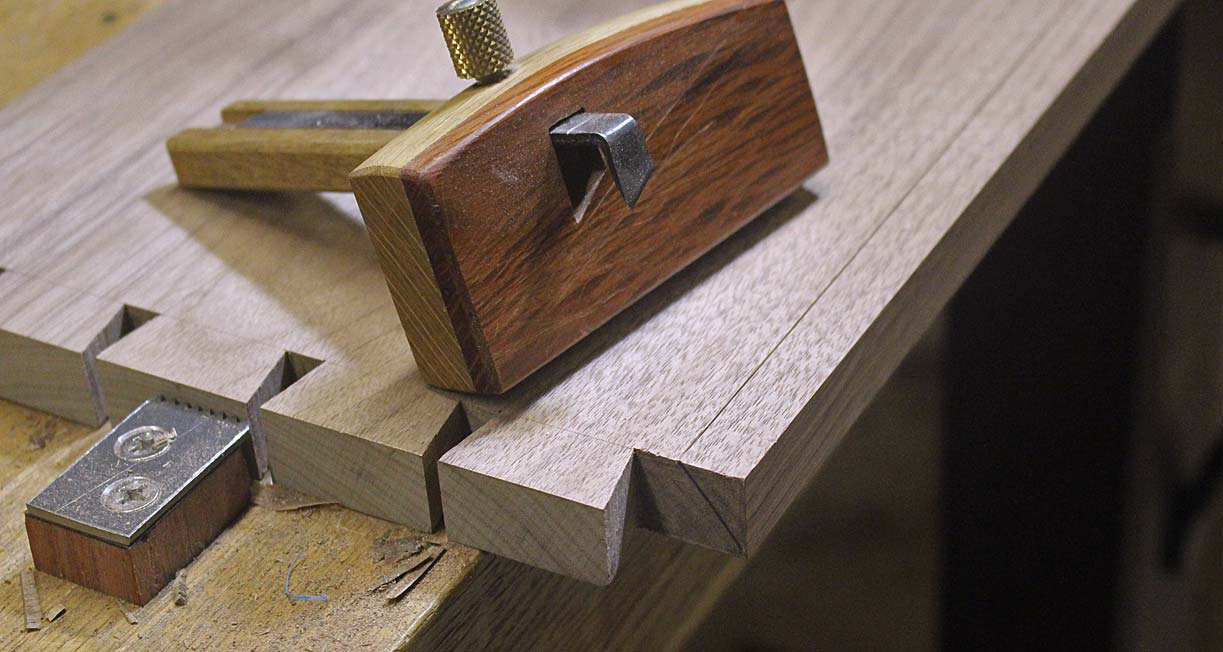
The waste is planed away with, firstly, a jack plane (shop made) �

... and then a modified HNT Gordon trying plane �
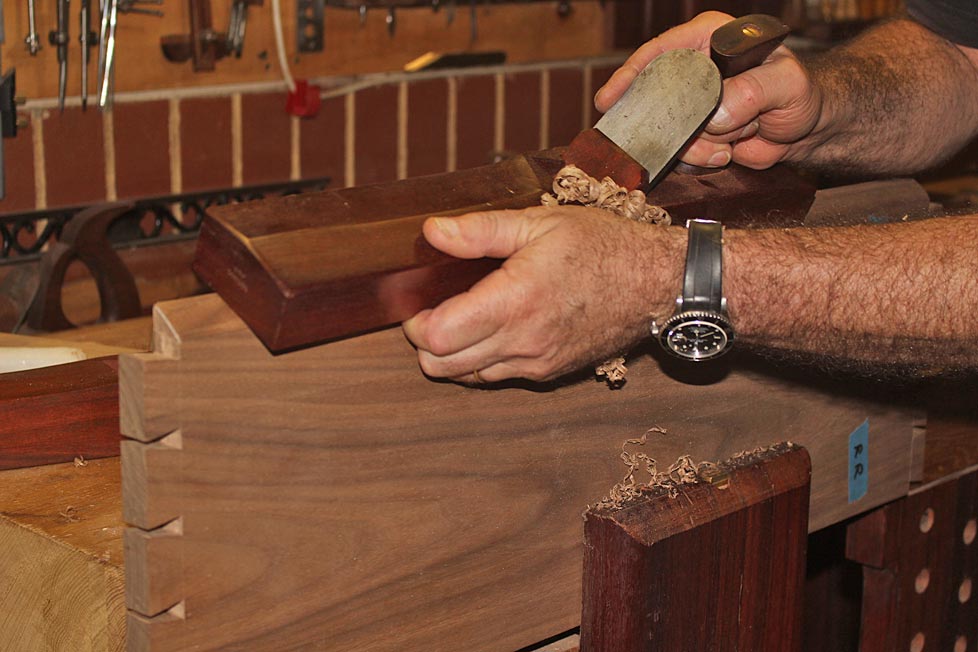
The reason for the trying plane is to keep the sides straight. A jointer plane could have substituted.
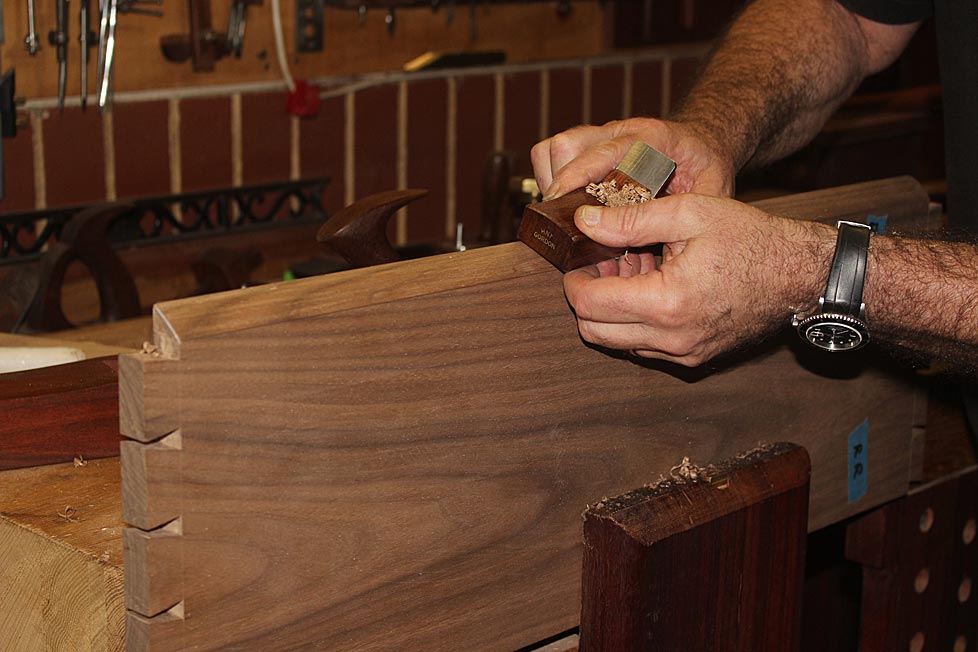
The final step here is to smooth and fair the surface with a HNT Gordon mini smoother �
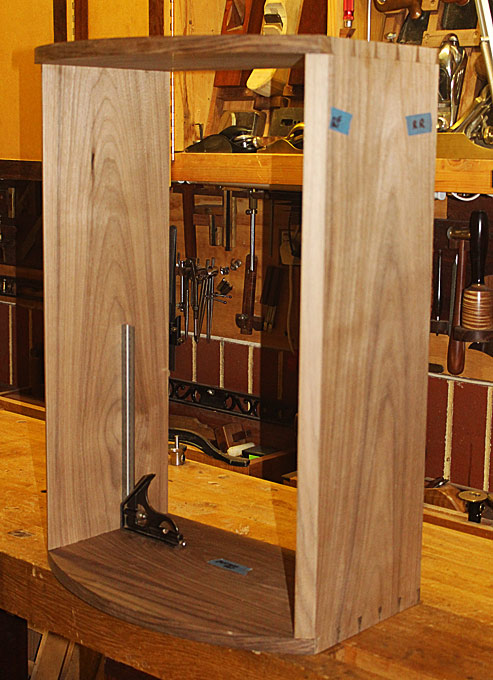
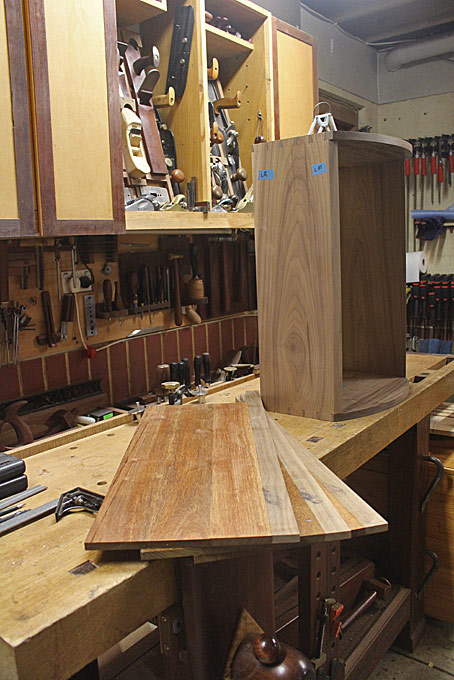
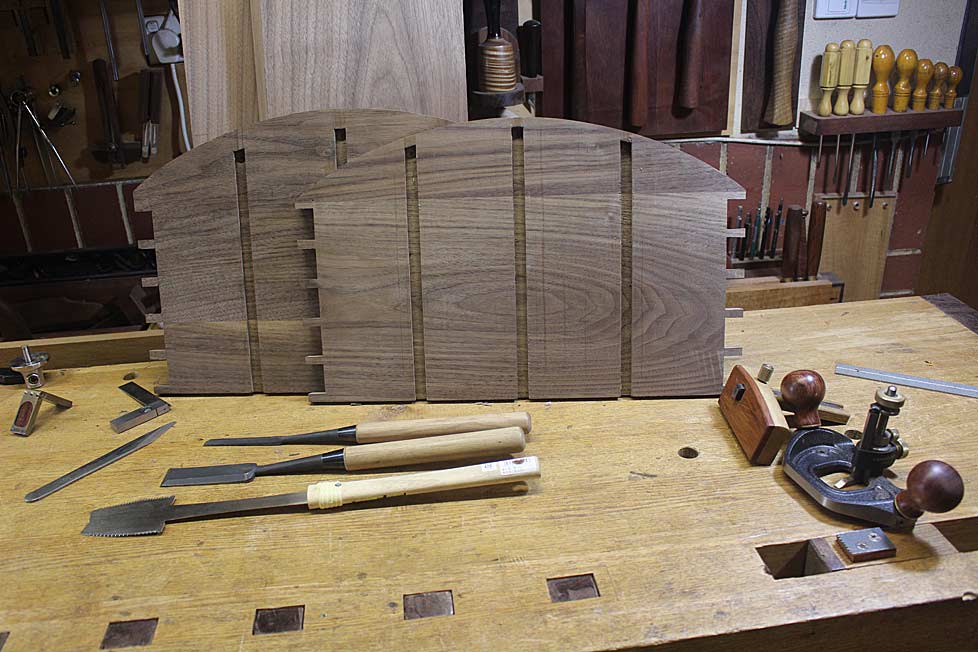
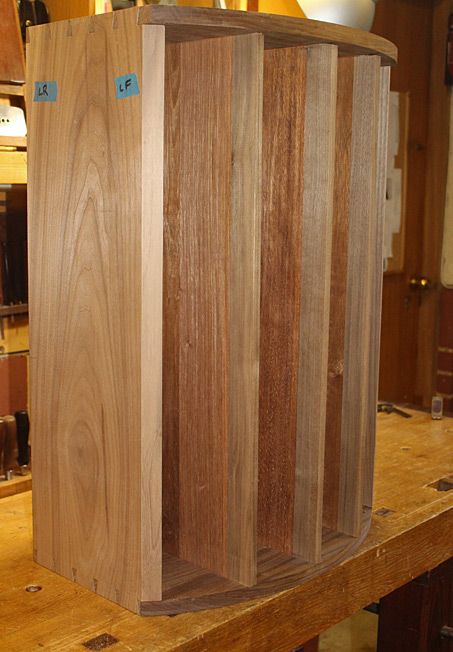
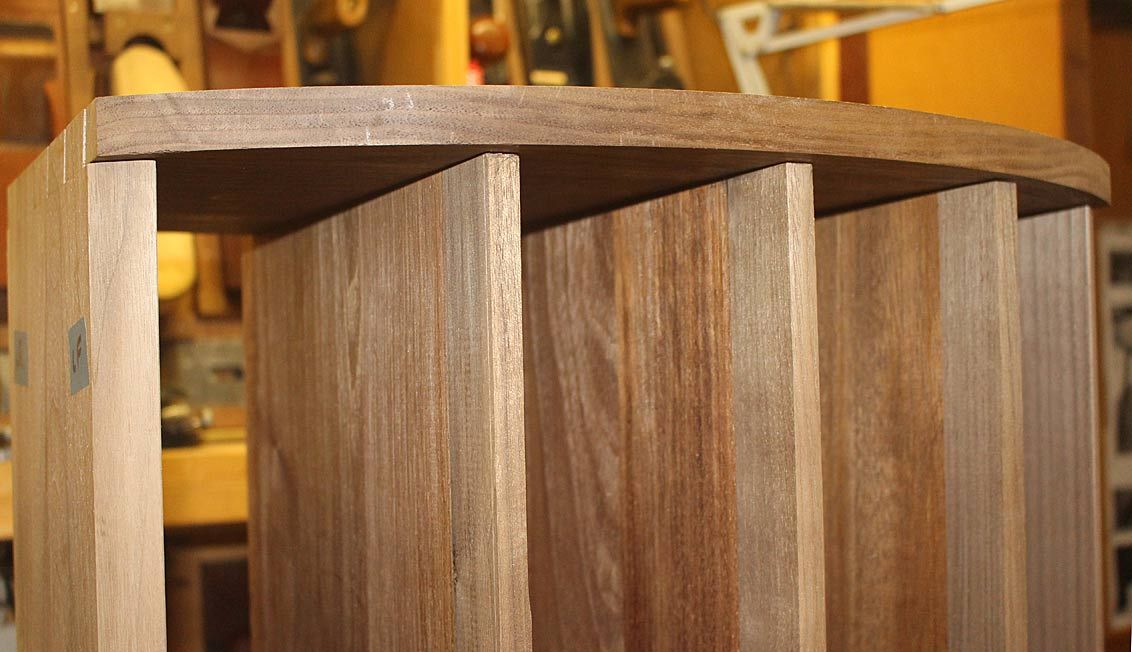
Finally, we get to complete the basic carcase (the flash makes the walnut look light, but it is dark in tone). the dimensions are 700mm high and 300mm deep (at the centre) �
Starting the vertical drawer blades/dividers
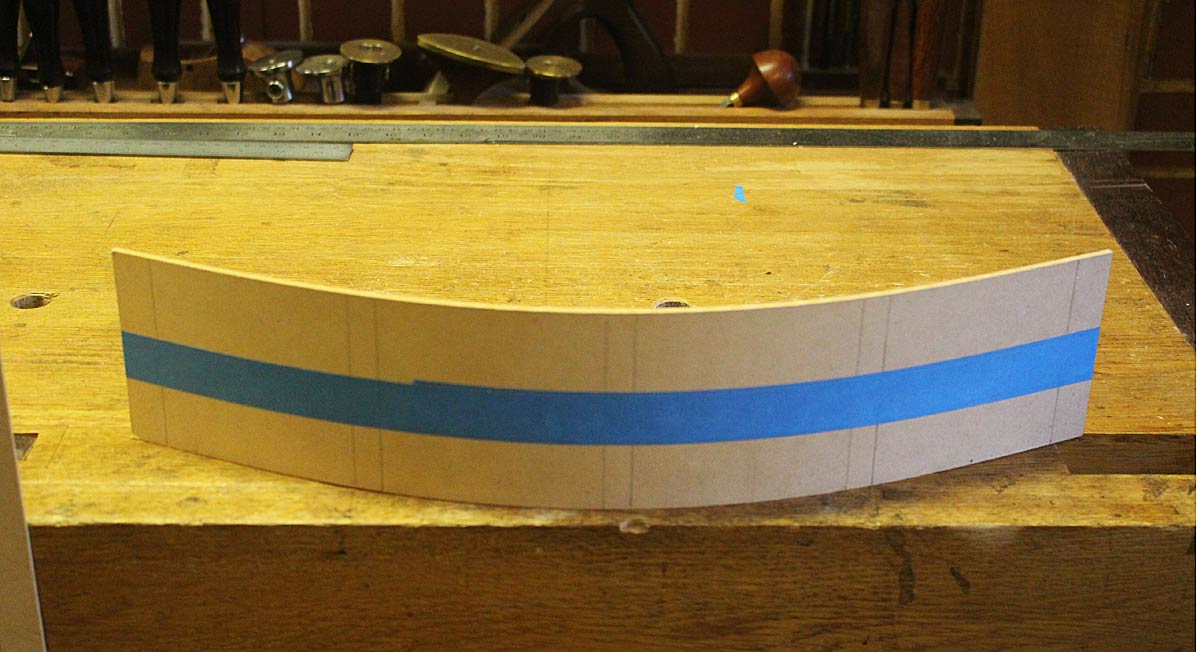
These are made with merbau as a secondary wood, with walnut facing �
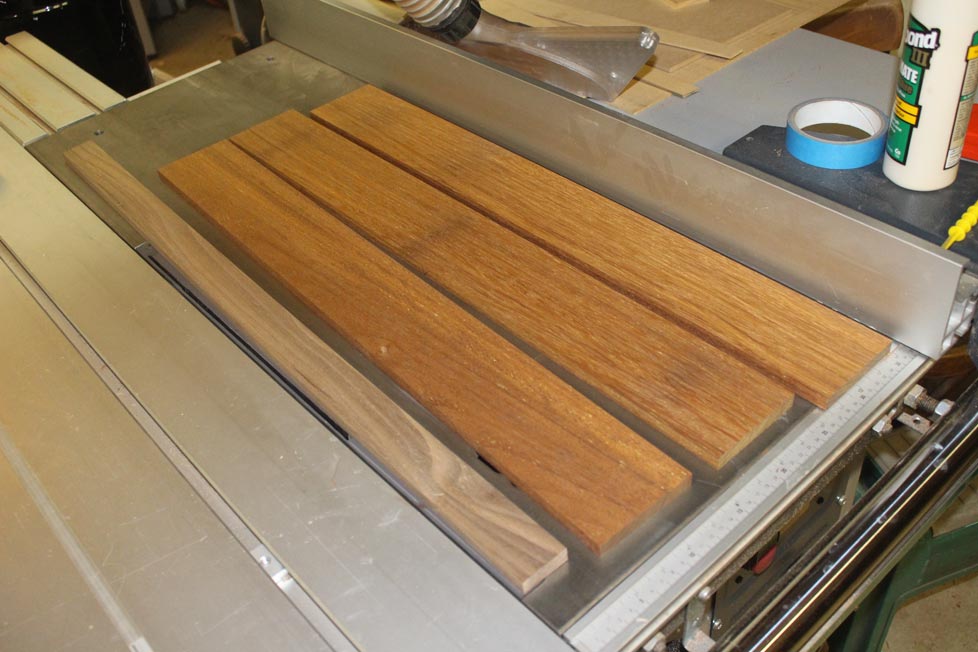
Merbau is from northern Queensland (some is imported from Papua New Guinea). It is hard and heavy, and typically used in Oz for flooring or outdoor furniture. I am using it because it is cheap and hard. As cheap as pine and as dense and wear-resistant as jarrah.
The boards are glued together and bound with blue tape ..

Three vertical dividers for now �
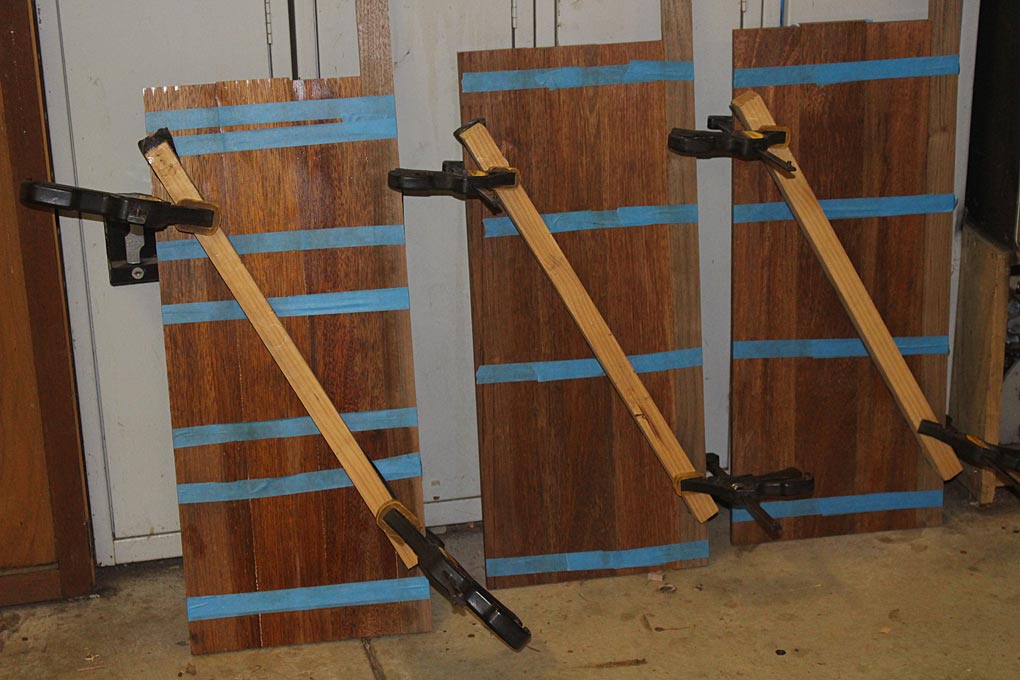
As before, they are also slightly oversize and will be planed to dimension to fit into 12mm wide dados.
More later.
Regards from Perth
DerekVisit www.inthewoodshop.com for tutorials on constructing handtools, handtool reviews, and my trials and tribulations with furniture builds.
-
24th April 2018 09:34 PM # ADSGoogle Adsense Advertisement
- Join Date
- Always
- Location
- Advertising world
- Posts
- Many
-
24th April 2018, 09:48 PM #2
 GOLD MEMBER

- Join Date
- Nov 2011
- Location
- Melbourne
- Posts
- 7,040
Another great build to follow.
Thanks Derek
Sent from my iPhone using Tapatalk
-
24th April 2018, 11:13 PM #3
SENIOR MEMBER
- Join Date
- Aug 2017
- Location
- Mt Kembla
- Age
- 62
- Posts
- 261
Looking good so far will be watching with interest.Appreciate the time you put into the post.
cheers....Roy
-
24th April 2018, 11:47 PM #4
China
- Join Date
- Dec 2005
- Location
- South Australia
- Posts
- 4,477
That is looking good, I love working with walnut, unfortunately walnut does not like working with me, I just about have t wear a full body suit
-
25th April 2018, 07:51 AM #5
SENIOR MEMBER
- Join Date
- Jun 2007
- Location
- Blue Mountains
- Posts
- 817
Watching with interest.
Thanks for posting your build.
cheers,
ajw
-
27th April 2018, 02:57 AM #6
Be inspired. Be creative. Be bold.
- Join Date
- Apr 2001
- Location
- Perth
- Posts
- 10,860
Apothecary Chest - part two
Wednesday was Anzac Day, a public holiday in Australia and New Zealand, and I had a few hours in the workshop to move along with the vertical partitions or dividers.
The panels had been thicknessed a little oversize. They need to be brought down to their final thickness of 12mm.
The panels need to be flat. The high spots are marked ...
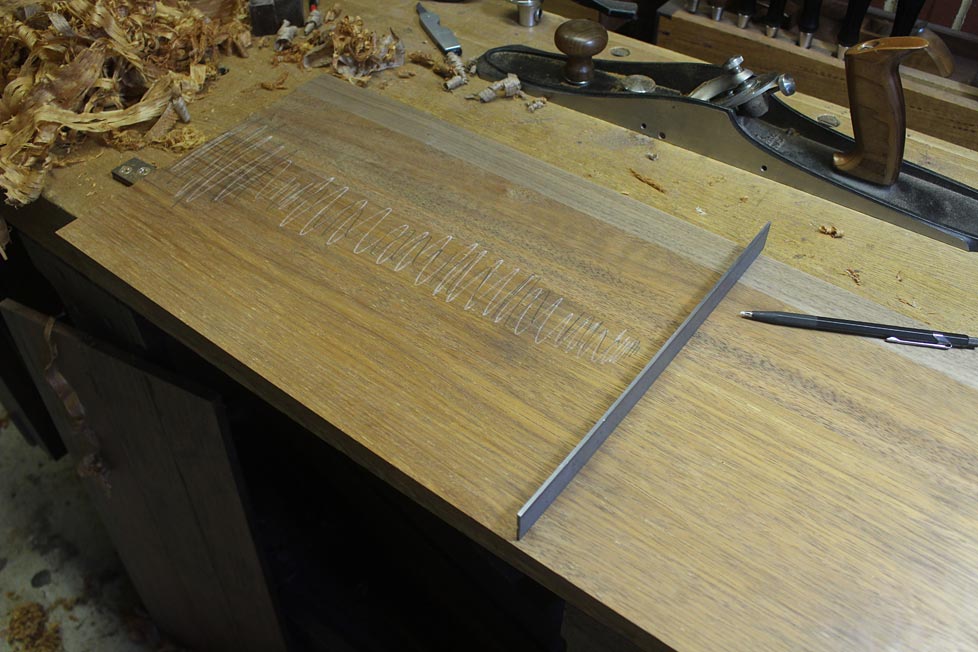
... and planed away ....
The base and the top of the cabinet is marked out for the stopped dados.
The dados end 10mm from the lower edge. The upper section has a 12mm overhang to take into account. The ends are marked ..
... and then drilled to a depth of 6mm, which is the depth of each dado.
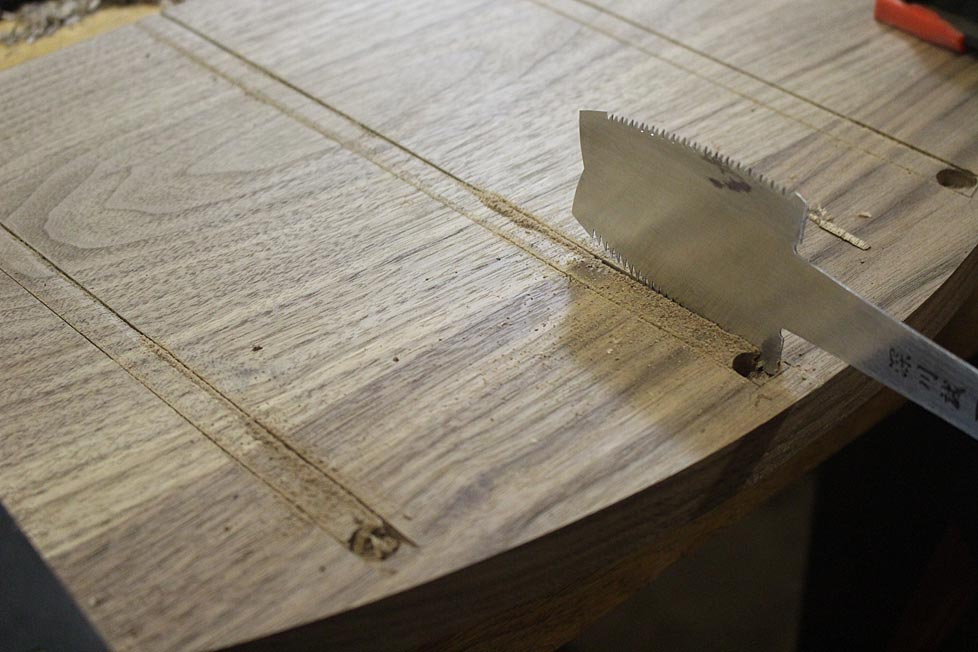
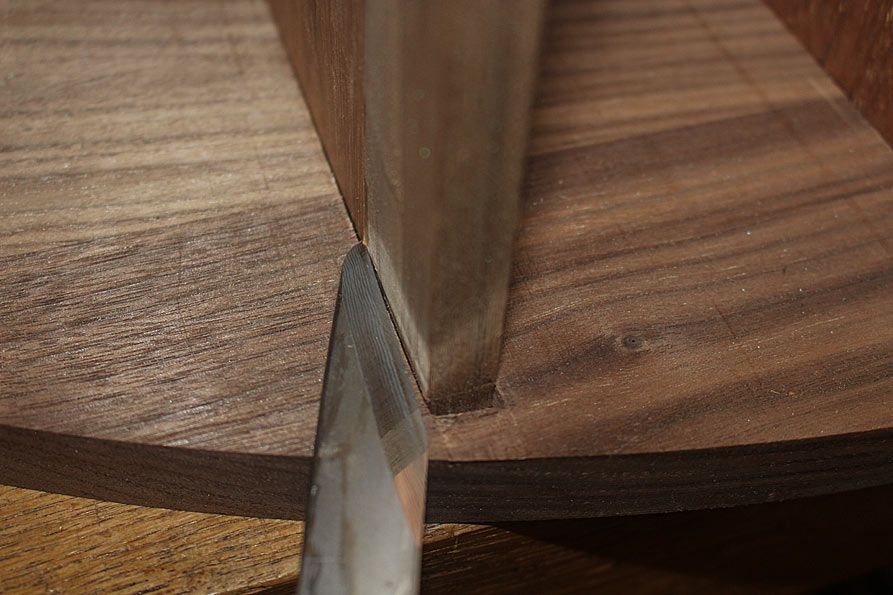
The sides of the dado are scored deeply with a knife, and a chisel wall is made along the length. This is to guide a saw cut.
The kerf is created with an azebiki saw. This is the traditional Japanese saw for cutting sliding dovetail joints, trenches and slots for sliding Shoji screens.
The panel is flipped around, and the kerf is deepened so that it runs the full length ...
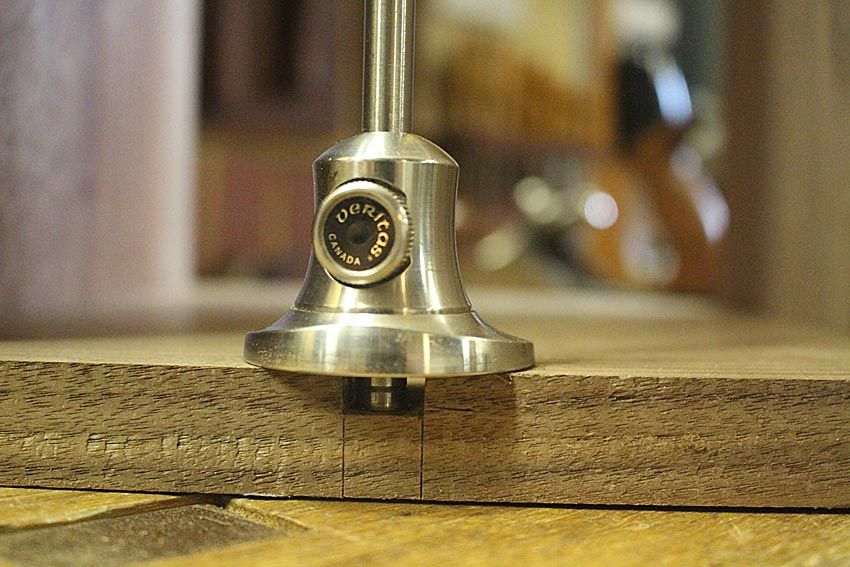
Now zip out the upper layers of waste with a slick or paring chisel ...
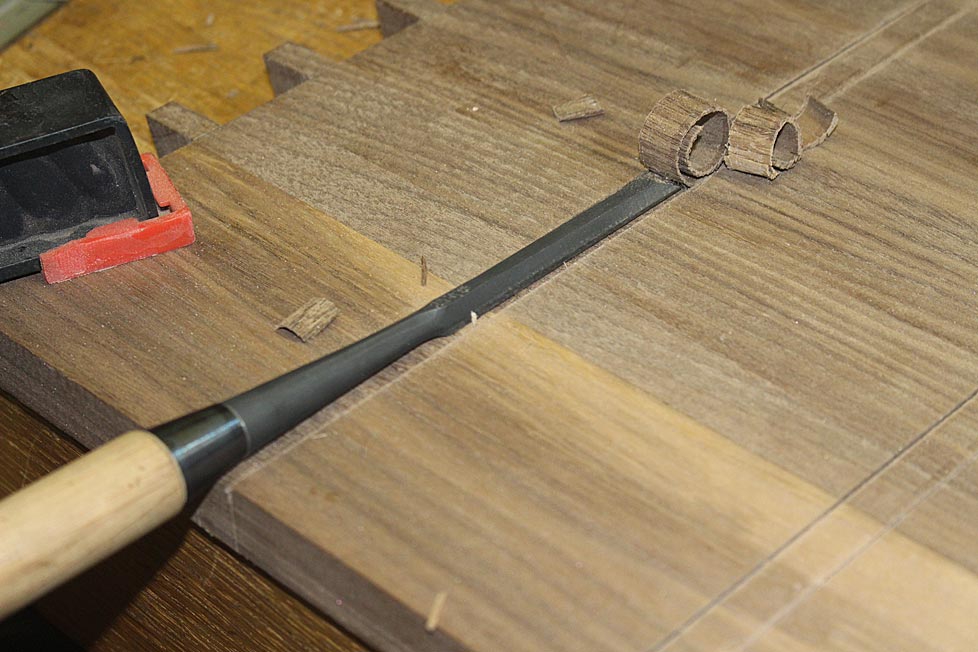
Remove the remainder to depth with a router plane ...
And we are done ...
More after the weekend.
Regards from Perth
DerekVisit www.inthewoodshop.com for tutorials on constructing handtools, handtool reviews, and my trials and tribulations with furniture builds.
-
27th April 2018, 07:18 AM #7
GOLD MEMBER
- Join Date
- Jun 2014
- Location
- Seattle, Washington, USA
- Posts
- 1,857
Looks cool, Derek. I'll be interested to see how you make the doors.
Knife hinges, I assume?
Cheers,
Luke
-
27th April 2018, 07:45 AM #8
Franklin Ferrier
- Join Date
- May 2007
- Location
- Gold Coast
- Age
- 70
- Posts
- 2,743
Luke, an apothecary chest is all drawers. I wonder if Derek is going to curve the inside face of the drawers or just shape the fronts?
Franklin
-
27th April 2018, 09:45 AM #9
Quantum materiae materietur marmota monax si marmo
- Join Date
- Jan 2009
- Location
- Bathurst NSW
- Age
- 55
- Posts
- 512
Following this one with interest. My bet would be curved inside as well.
If you find you have dug yourself a hole, the first thing to do is stop digging.
I just finished child-proofing our house - but they still get inside.
-
1st May 2018, 02:28 AM #10
Be inspired. Be creative. Be bold.
- Join Date
- Apr 2001
- Location
- Perth
- Posts
- 10,860
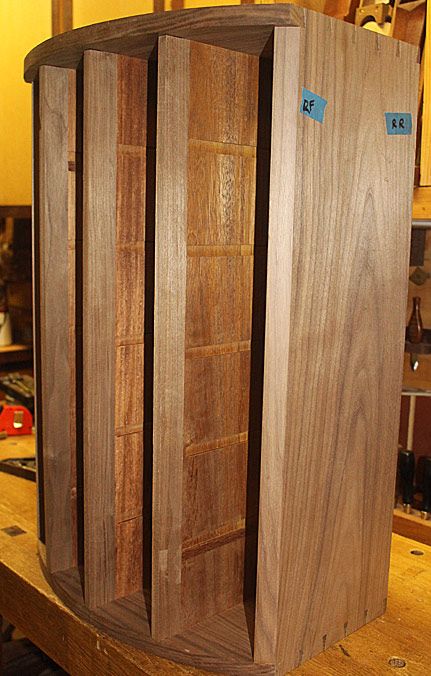
We left off with a dovetailed carcase, which had been given stopped dados made with a saw, chisel and router plane. The vertical dividers were made, but yet to be installed. Chest on its side ...

The dividers will be fitted, so ...
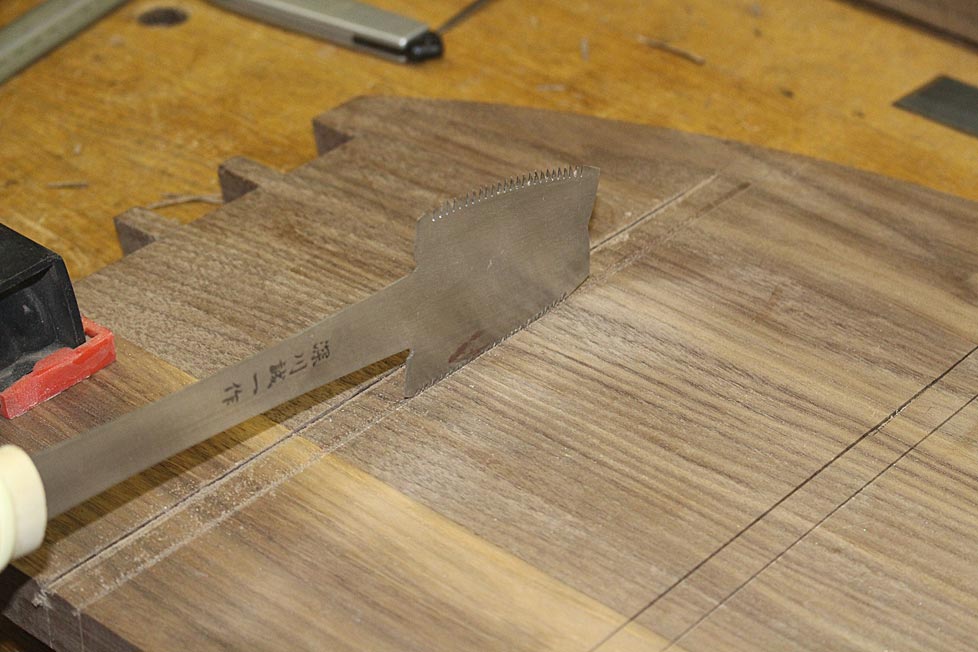
The dividers are slid in, and the section ahead of the stopped dado is marked with a knife ...
.. or a cutting gauge ...
.. and then cut away (I prefer a Japanese dozuki for this cut and it is cleaner than off a Western saw) ...
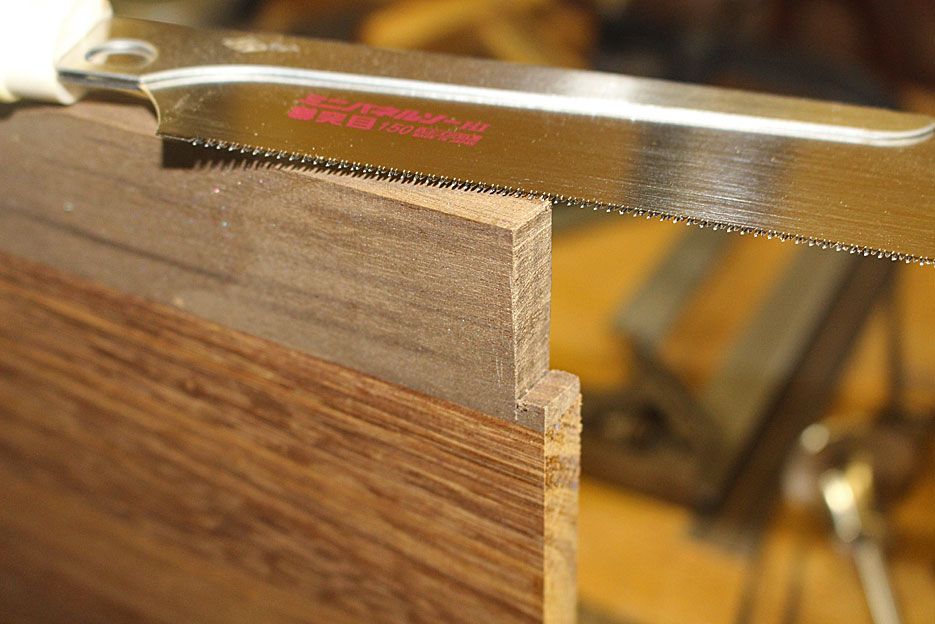
They need to be flush with the curved lower end of the chest (the sides dividers are yet to be shaped to the curve. That will be done later to avoid damage) ...
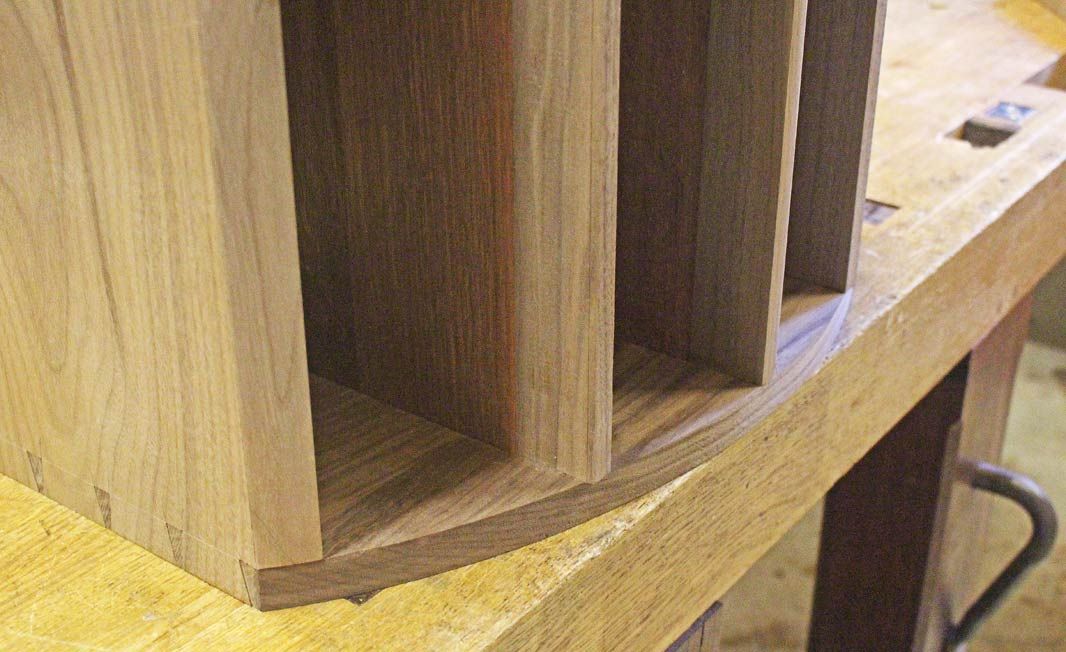
... while the upper section of the chest has a 12mm overhang ...
Note that all measurements and marking is done from the lower end of the carcase/dividers. This is the reference end.
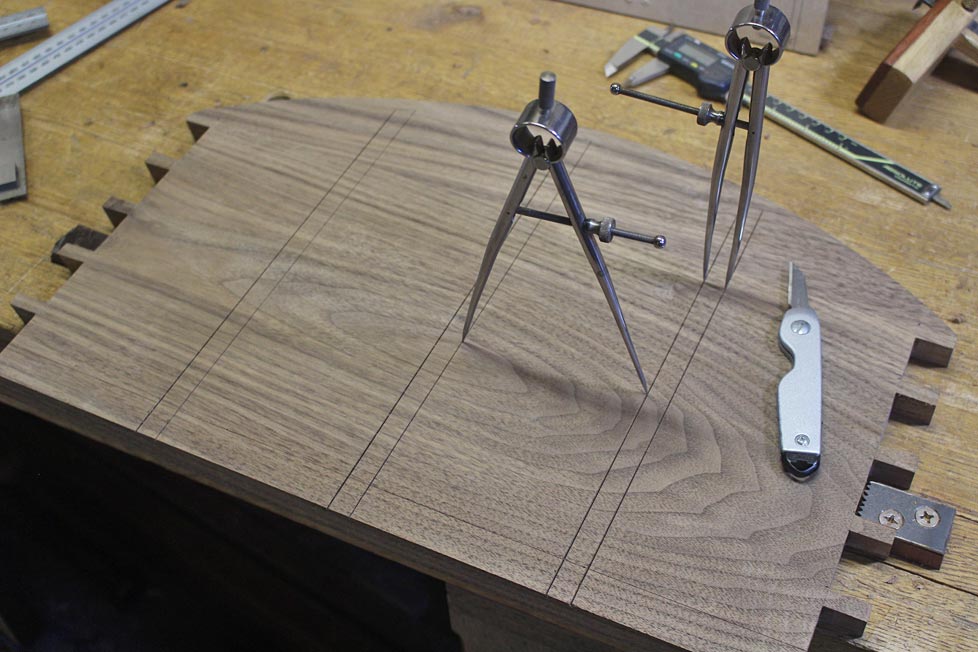
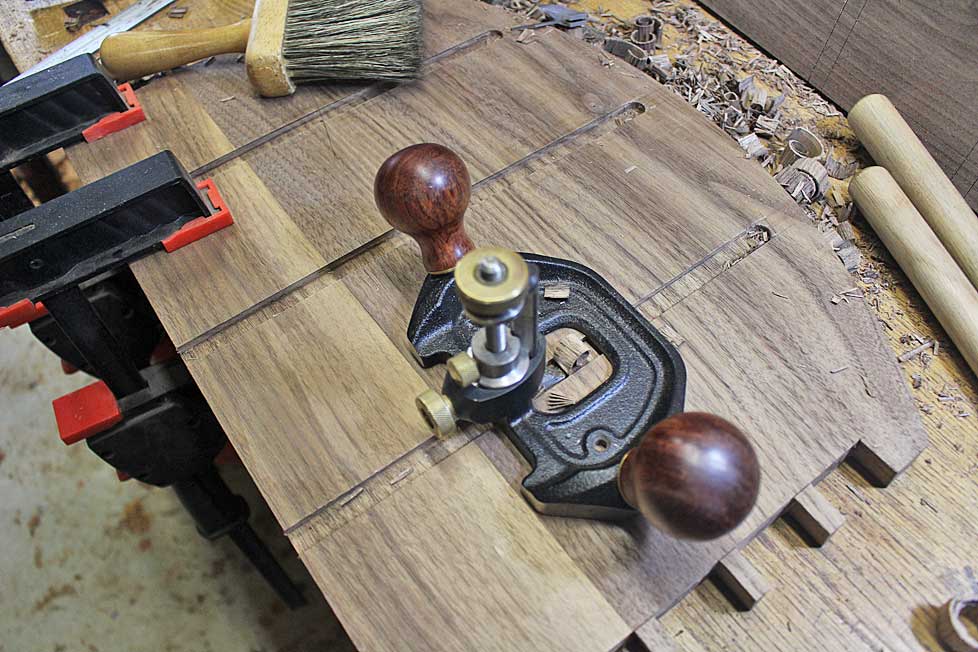
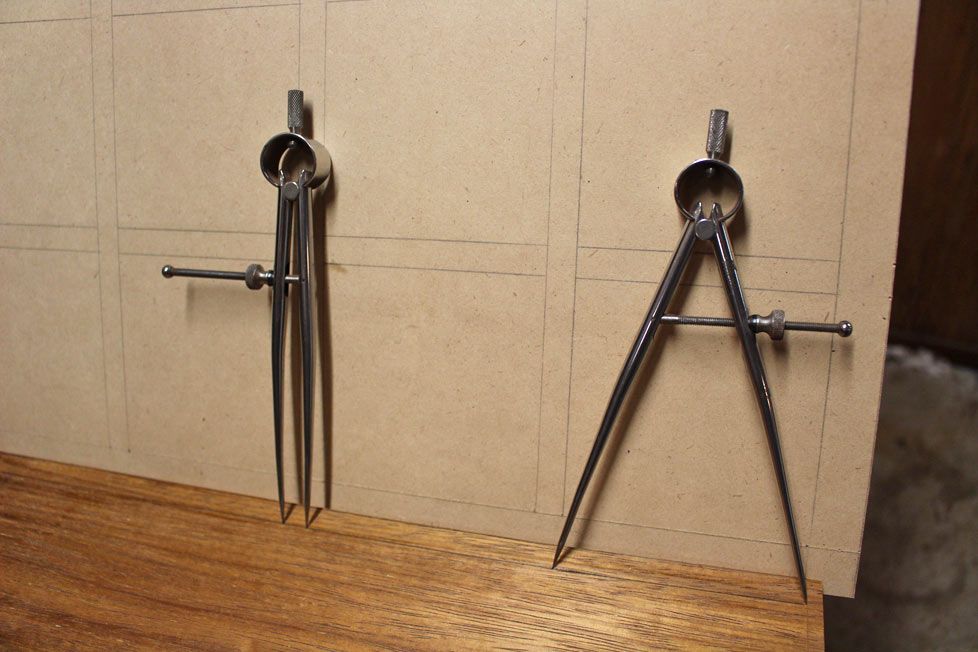
It is now time to add stopped dados to the dividers. The first step is to begin marking their positions. As before, this is completed with dividers ...
Each drawer is 100x100mm and the drawer blade/divider is 12mm ...
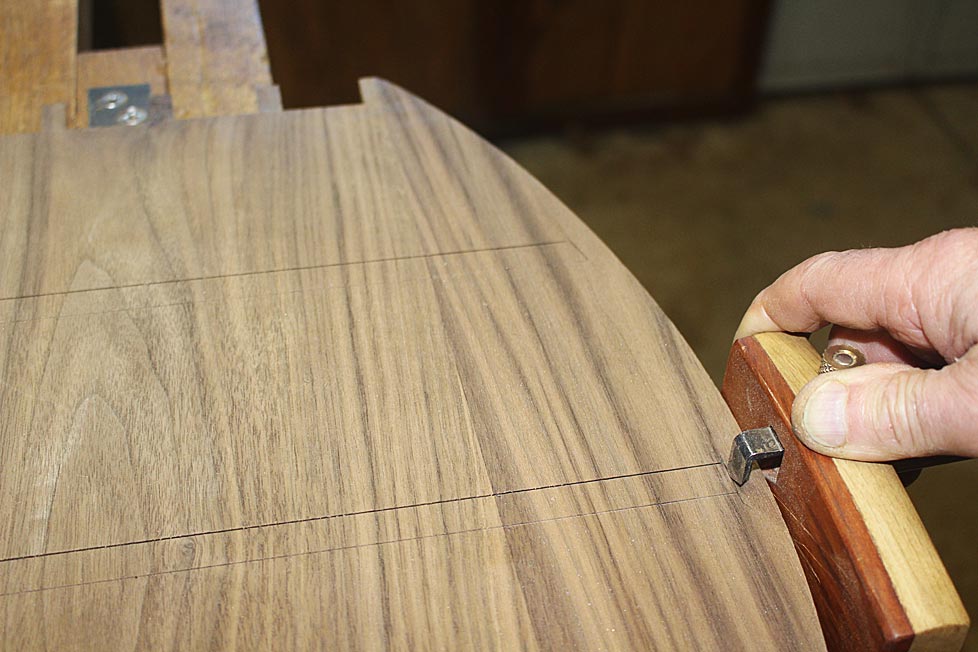
The dado lines are scored across the divider ...
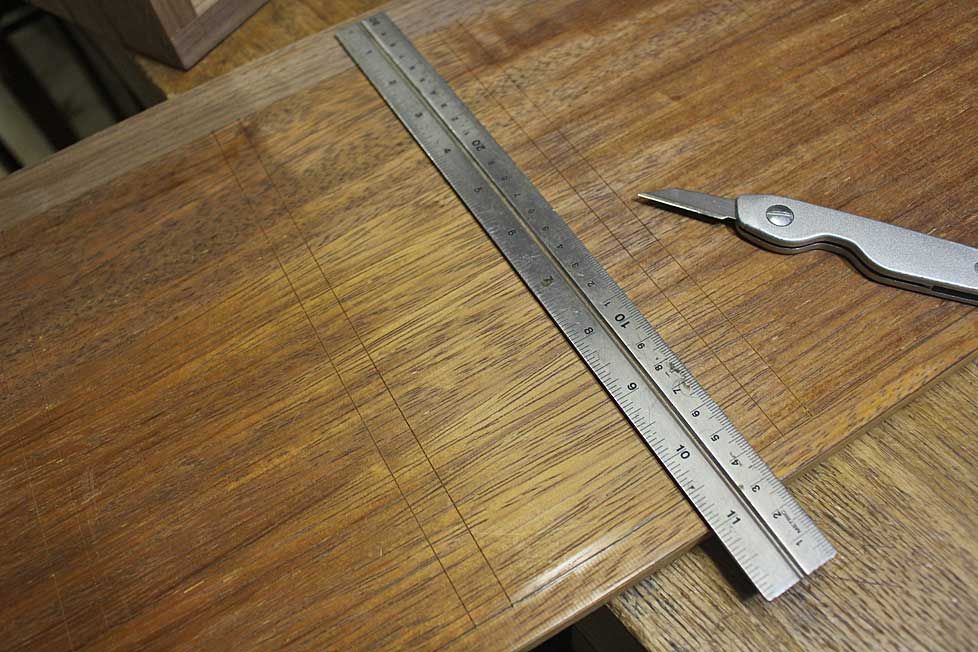
The ruler has a non-slip underside made of 400 grit wet-and-dry sandpaper, a tip I got from Andrew Crawford ...

The insides of the carcase are marked similarly ...
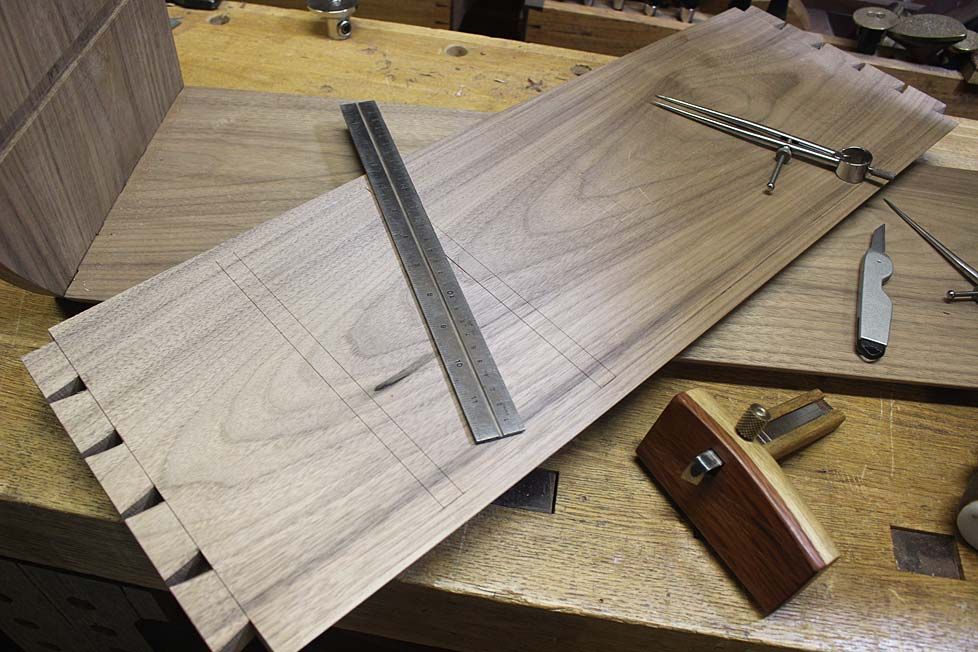
Finally all the stopped dados are marked. There are 40 in all - 10 in walnut and 30 in merbau. The merbau is an extremely hard and brittle wood. It was chosen as a secondary wood as it was cheap and will stand up to any wear from sliding drawers, unlike a soft wood like pine.
The dados are 3mm deep (as 12mm wide). With a 12mm thick panel, and 3mm from each side, there will be 6mm remaining. That is sufficient for structural integrity.
With 40 dados, I decided to use a power router, and built a simple guide ...

The guide is a one-shot job for a 12mm dado. Just place the slot against the lines made earlier, and run the router until it hits the stop ...
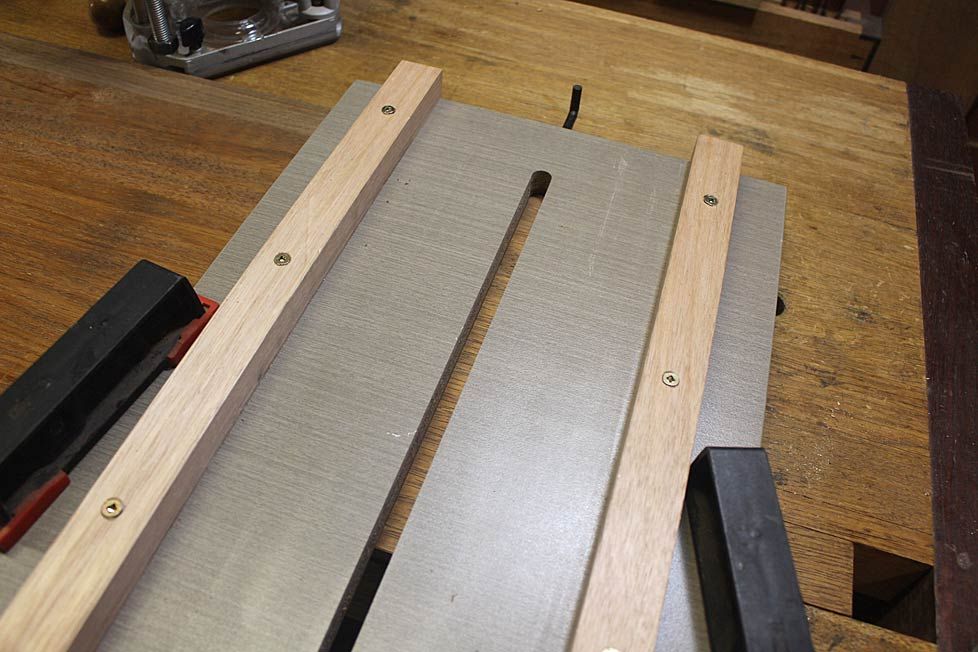
This is too easy ...
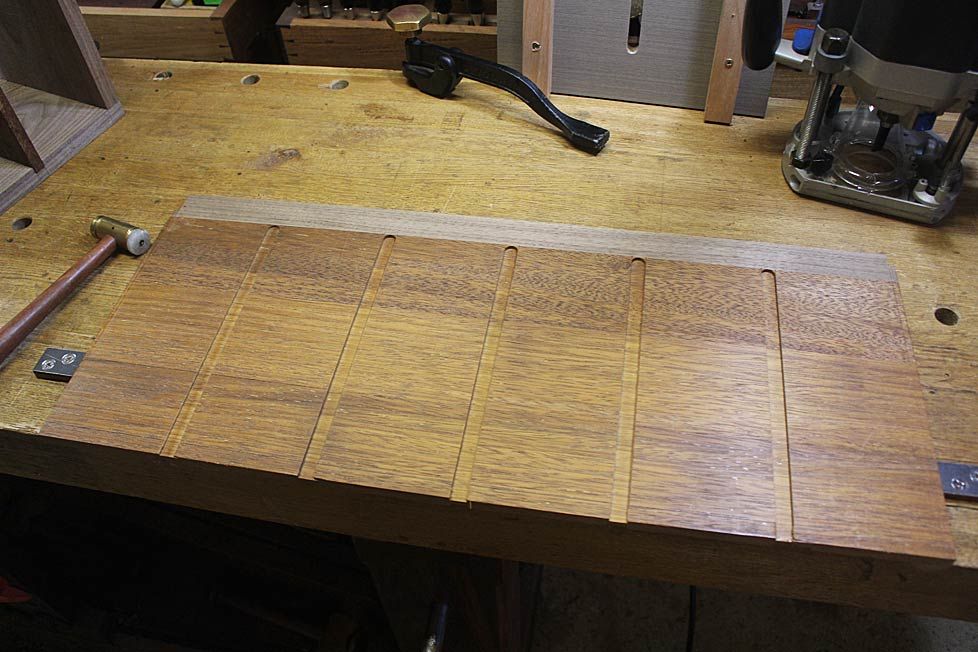
... and I become complacent, and cut against the wrong line! Fortunatley, this is a simple fix and will not be seen ..

So, at the end of the day the chest is dado-ed to death. The horizontal drawer blades will be fitted next time. This is going to be an interesting time since they will curve to fit at the front.
Regards from Perth
DerekVisit www.inthewoodshop.com for tutorials on constructing handtools, handtool reviews, and my trials and tribulations with furniture builds.
-
1st May 2018, 11:38 AM #11
almost a woodworker
- Join Date
- Feb 2007
- Location
- blue mountains
- Posts
- 4,904
Glad to see I am not the only one makes those sorts of mistakes. When people sometimes spot a mistake on things I've made I explain that is just to show it's hand made. That said if you had of cut those by hand there would no mistaking where to cut. Goes to show machines can let you down more that hand tools will.
Great build by the way. I have always liked apothecary chests. Something about all those drawers to peek into for a one stop treasure hunt.
Regards
John
-
1st May 2018, 01:05 PM #12
Franklin Ferrier
- Join Date
- May 2007
- Location
- Gold Coast
- Age
- 70
- Posts
- 2,743
I'd say it was a failure of not marking the waste. Machines just let us make the mistakes faster. What it does show us is that Derek is a mere mortal like the rest of us.
 Franklin
-
1st May 2018, 01:26 PM #13
GOLD MEMBER
- Join Date
- Jun 2014
- Location
- Seattle, Washington, USA
- Posts
- 1,857
Anyone else missing all the photos from Derek's last post?
-
1st May 2018, 05:14 PM #14
Be inspired. Be creative. Be bold.
- Join Date
- Apr 2001
- Location
- Perth
- Posts
- 10,860
Which are missing, Luke? There should be 17 in all.
Regards from Perth
DerekVisit www.inthewoodshop.com for tutorials on constructing handtools, handtool reviews, and my trials and tribulations with furniture builds.
-
1st May 2018, 07:12 PM #15
GOLD MEMBER
- Join Date
- Nov 2011
- Location
- Melbourne
- Posts
- 7,040
I just read the last instalment from Derek.
Including pics [emoji41].
Cheers Matt
Sent from my iPhone using Tapatalk


 Reply With Quote


Similar Threads
-
Sea Chest
By LR09WA in forum WOODWORK - GENERALReplies: 14Last Post: 11th June 2011, 08:00 PM -
Ice Chest
By 2sharp in forum FINISHINGReplies: 6Last Post: 22nd January 2008, 04:30 AM -
Ice Chest
By rod1949 in forum Links to: TIMBER & HARDWARE SUPPPLIERSReplies: 1Last Post: 15th September 2004, 08:13 PM -
Chest
By GRS in forum WOODWORK PICSReplies: 8Last Post: 7th July 2004, 12:26 PM -
Apothecary Chest
By Paul O'H. Ingersoll Canad in forum WOODWORK PICSReplies: 4Last Post: 28th February 2004, 12:16 AM
