

 Thanks:
  Likes:
  Needs Pictures: 0
 Picture(s) thanks:
Results 16 to 30 of 38
-
15th January 2024, 03:01 AM #16
 Be inspired. Be creative. Be bold.


- Join Date
- Apr 2001
- Location
- Perth
- Posts
- 10,826

The initial carving of the second seat ... time to learn something from the initial carving of the first seat! Rock Maple is bloody hard stuff. I have used a scorp to quickly carve Pine and Tasmanian Oak. I used a scorp to scoop out the first seat, and it was not fun in 37 degrees Celsius (98 Fahrenheit). Well today it is 39 degrees Celsius (102 Fahrenheit). Time to try something new.
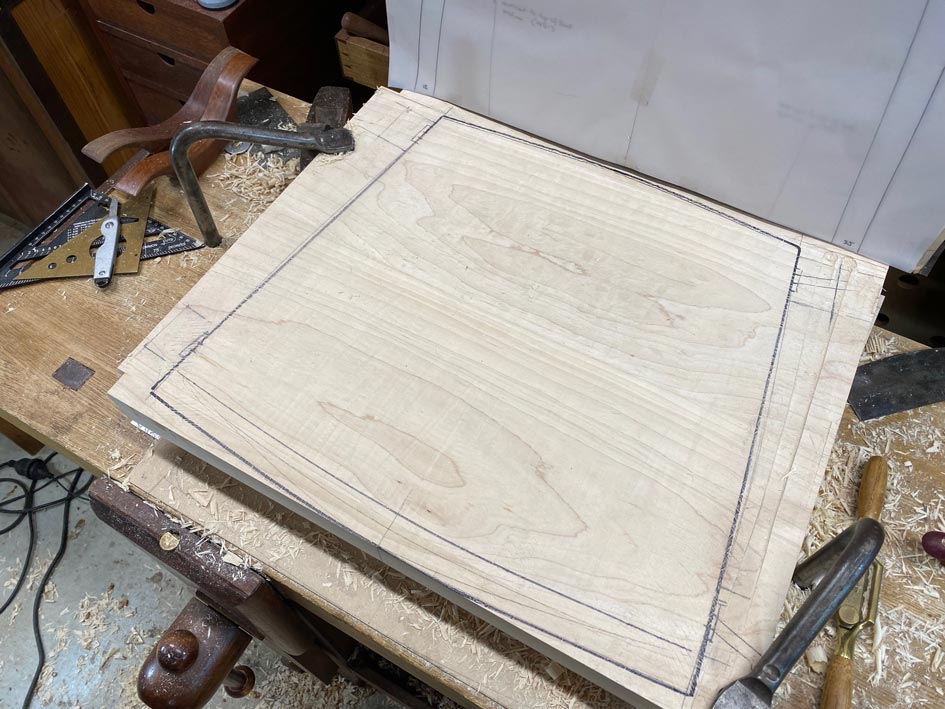
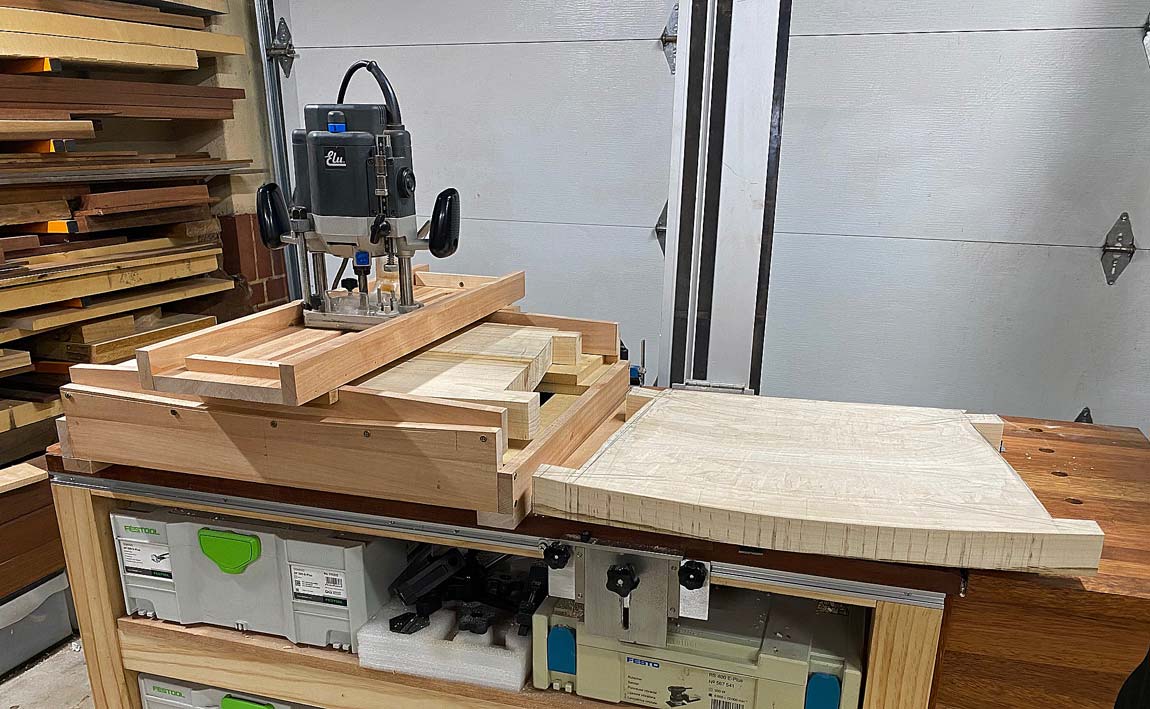
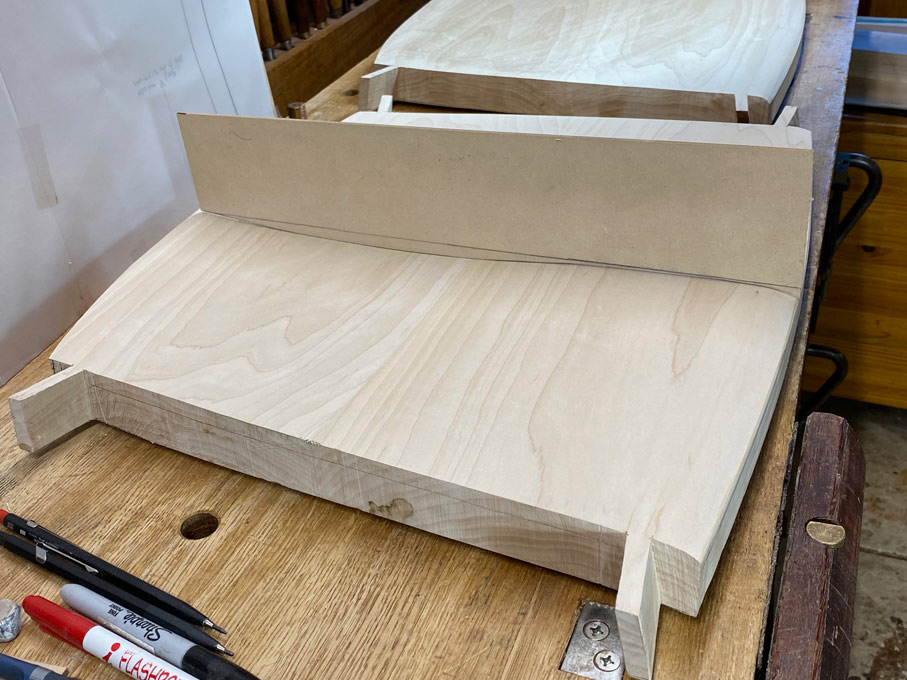
Here is the second seat, which has been curved on the router sled ...
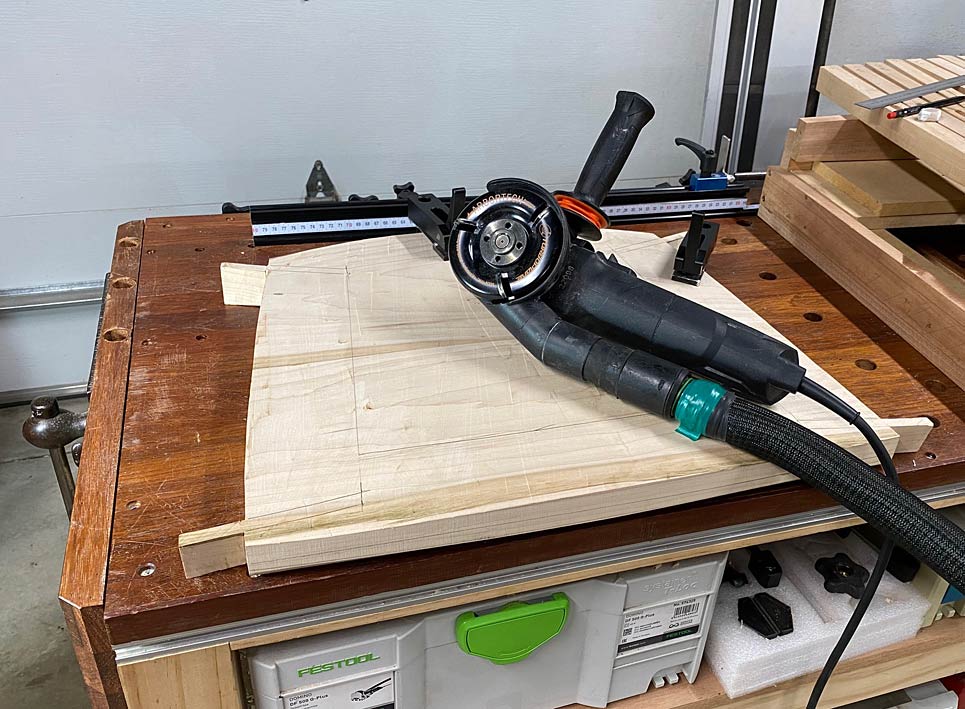
My 74th birthday present (3 days ago) was an Arbortech Turbo Plane kit ..

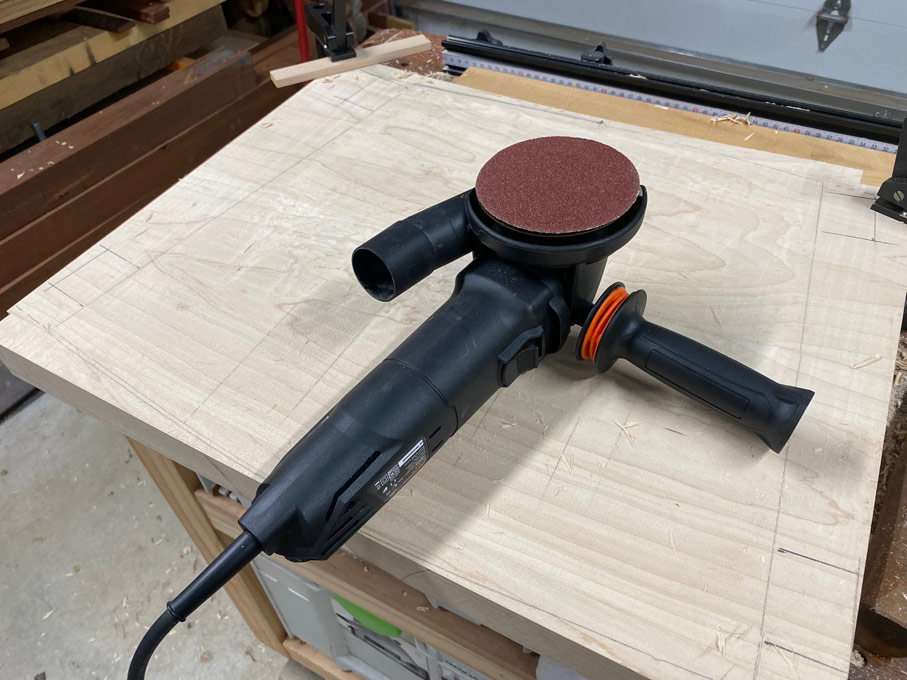
This can be set up in three ways: it can plane/joint rough boards, it can sand boards, and it can carve ...
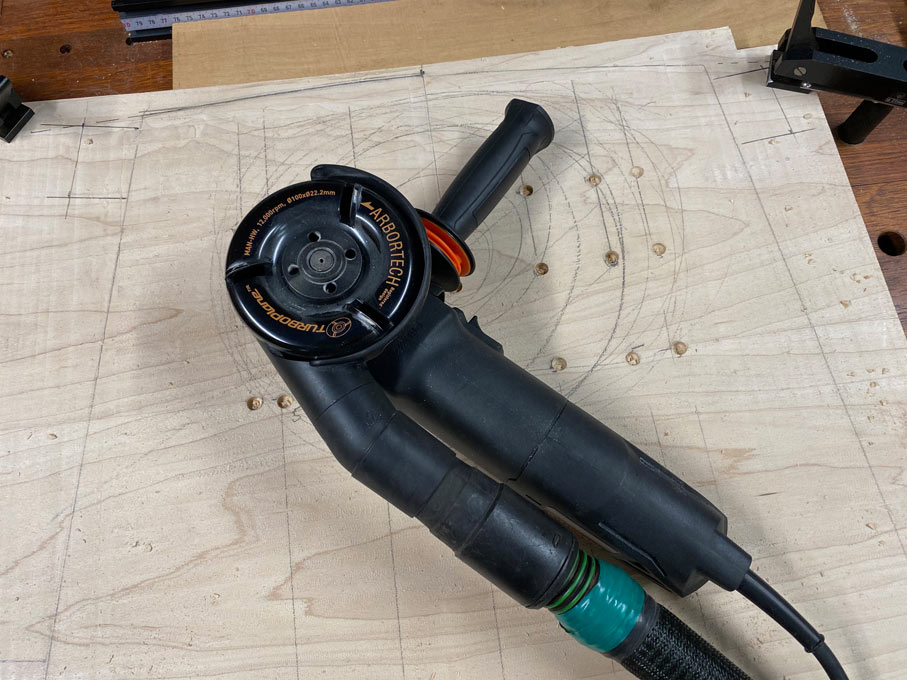
It has variable speed, but I found carving is best at the fastest rate. Most importantly, it has some of the best dust control one can imagine. There is barely any chips to be found.

The Turboplane was impressively fast in taking the surface down to the drilled depths ..
It is an angle grinder, and noisy, but less so than a router.
I mentioned that is is a sander as well. I took the opportunity to try this out. 60-grit was rapid, and left a surface as smooth as a baby's bum.
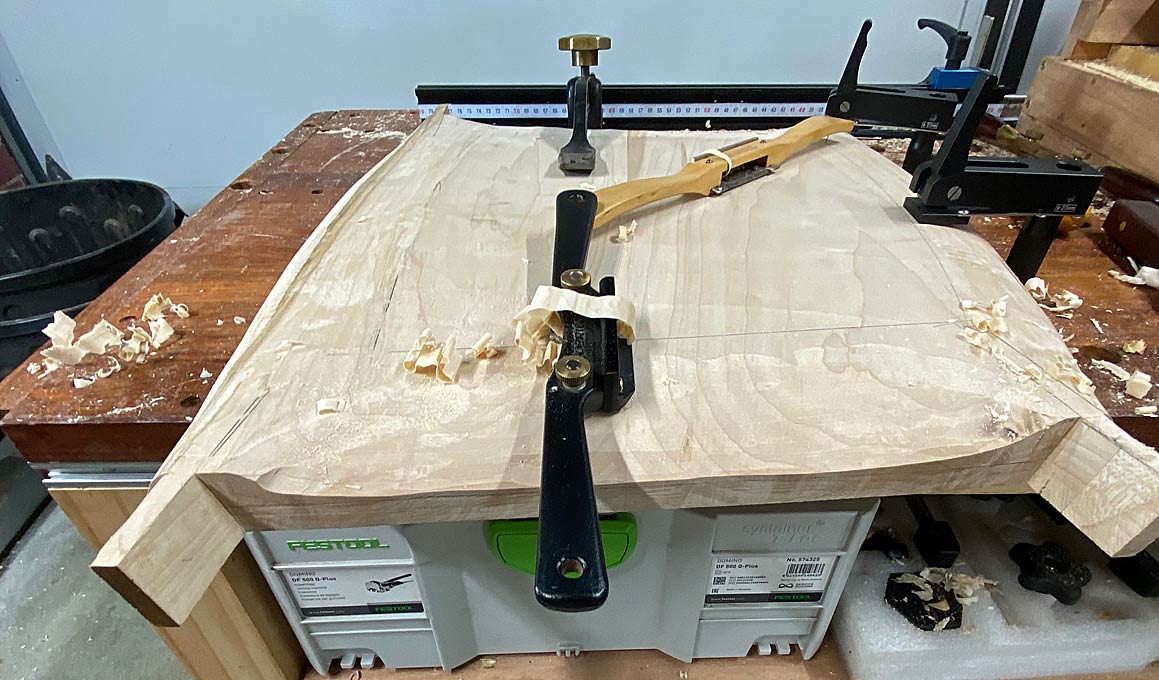
The second new tool used was one I made ... literally in about 10 minutes at this point in time. I had a small coffin smoother, about 4" long, with an open mouth and a single iron. It had been purchased in an "antique" shop for a few Dollars several years ago for the express purpose of turning it into a chairmaker's plane. I admit - I procrastinated ... until today. These are curved front-to-back and side-to-side. It was not much work, and this is what materialised ...
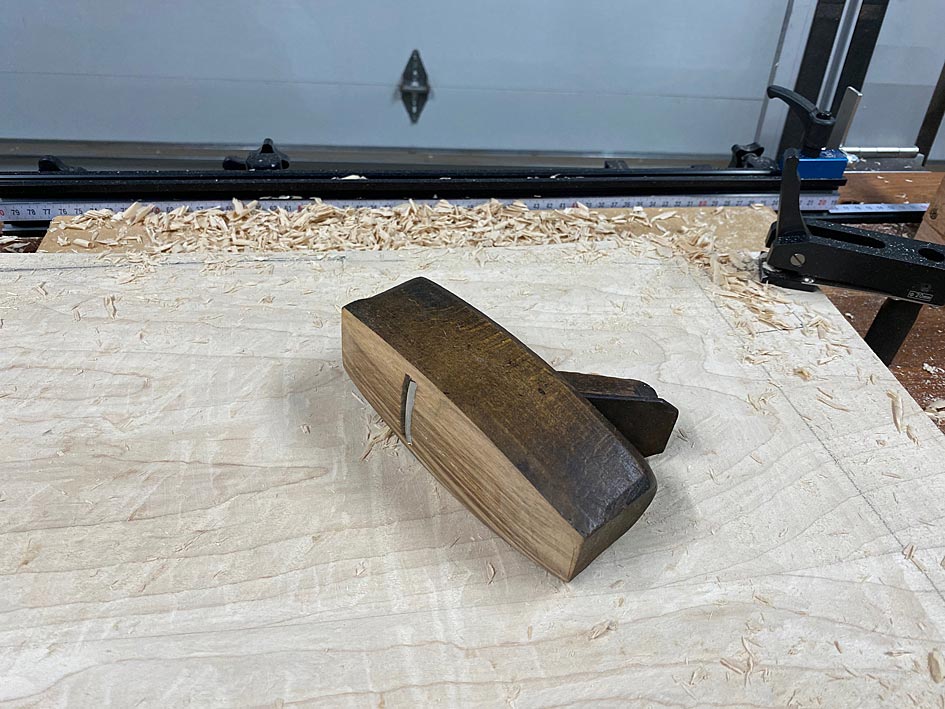
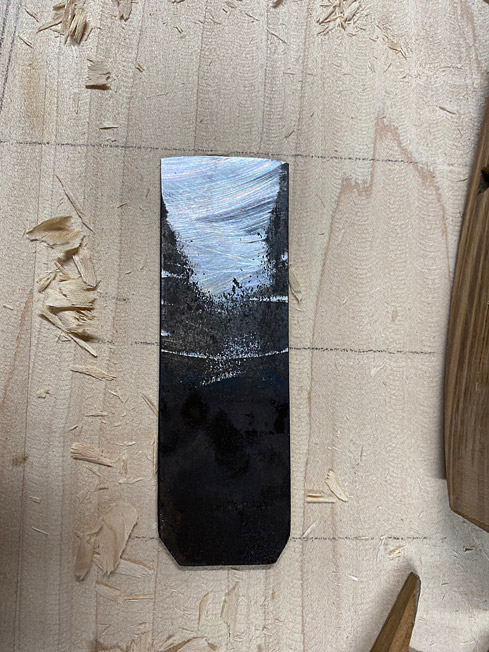
The iron was rusty, and simply flattened on the side of a 180 grit CBN wheel, and then shaped to match the curve of the plane. You can see that the camber is more like a jack plane than a scrub.
How did it work? Brilliantly! Really, after using the travishers, this plane left them in the dust ...
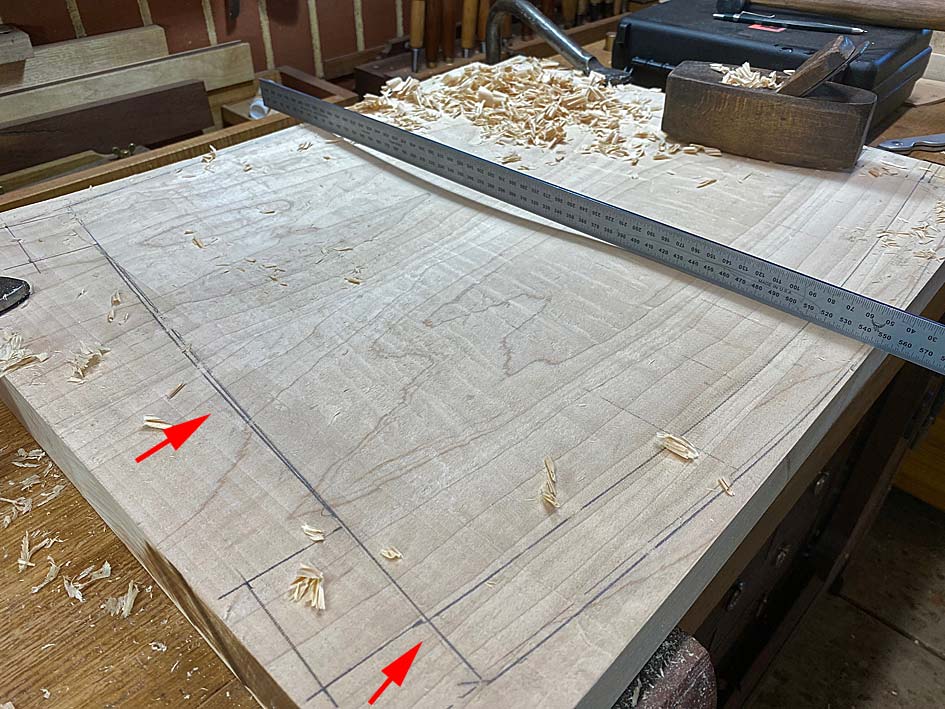
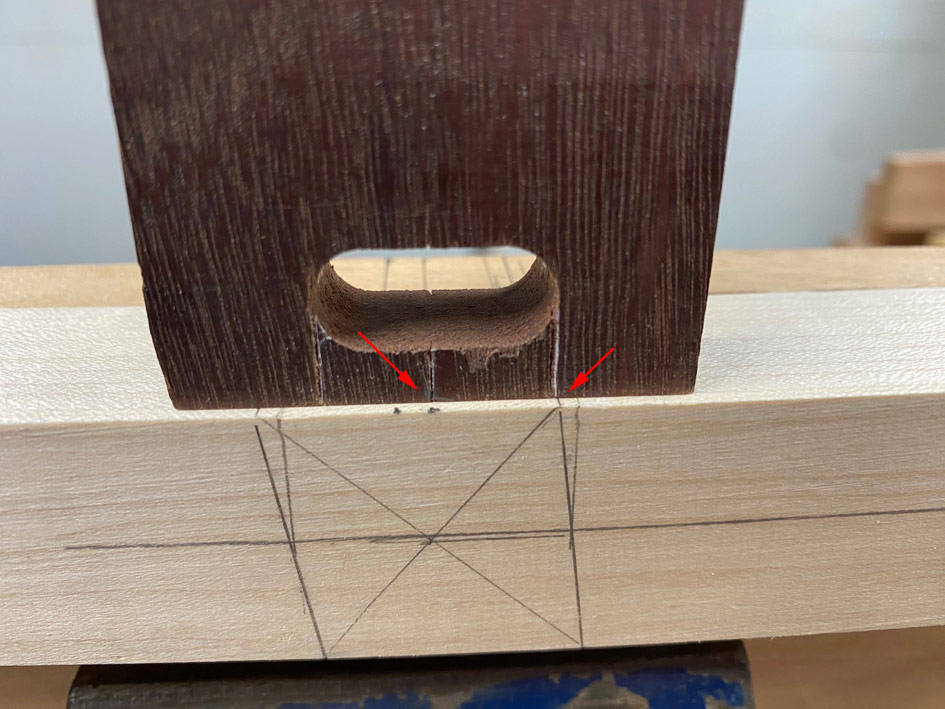
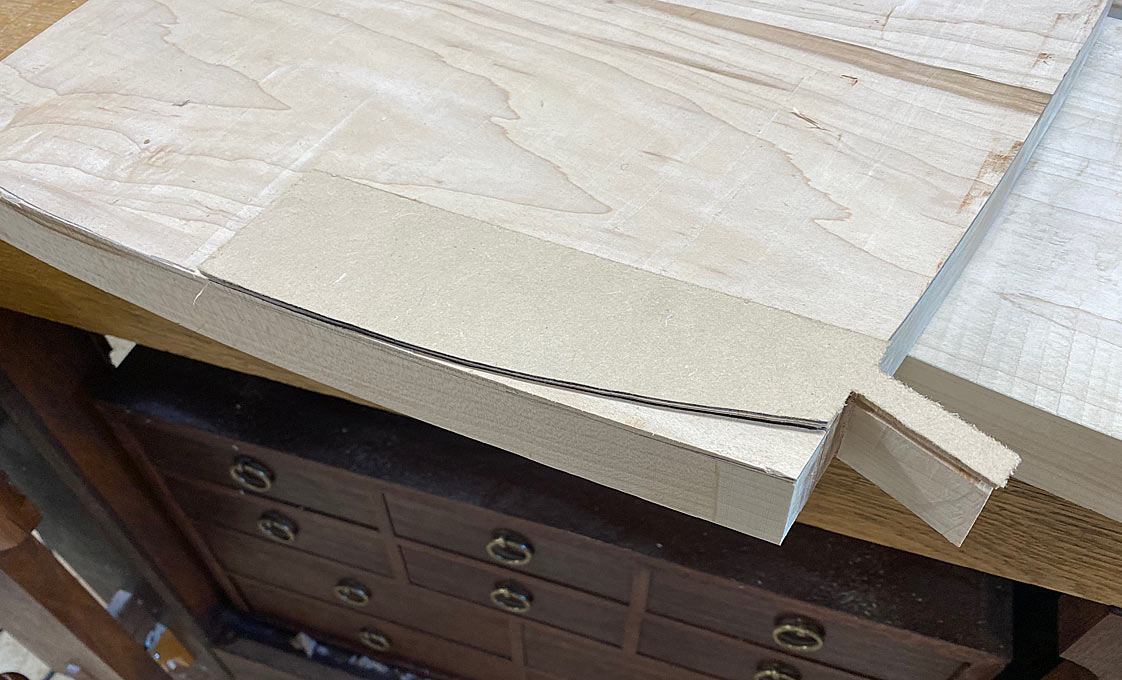
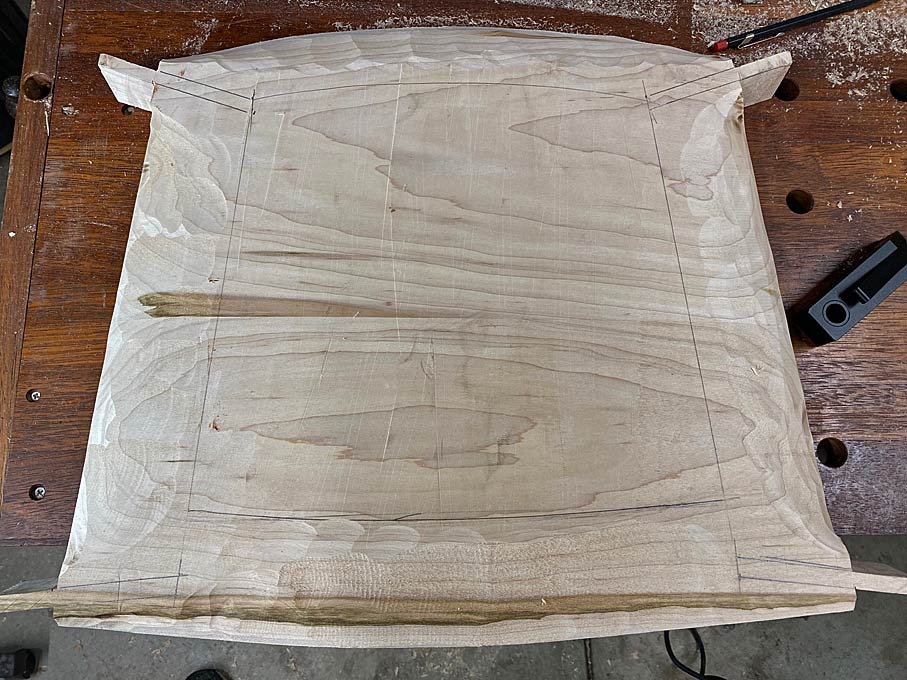
There are a couple of red arrows in this photo. The upper one points to the added curved side lines. The seats were temporarily made with straight sides, but they will have a slight curve (no straight lines on the chairs). The second red line points to where the front of the seat ends. It will be cut off at this line.
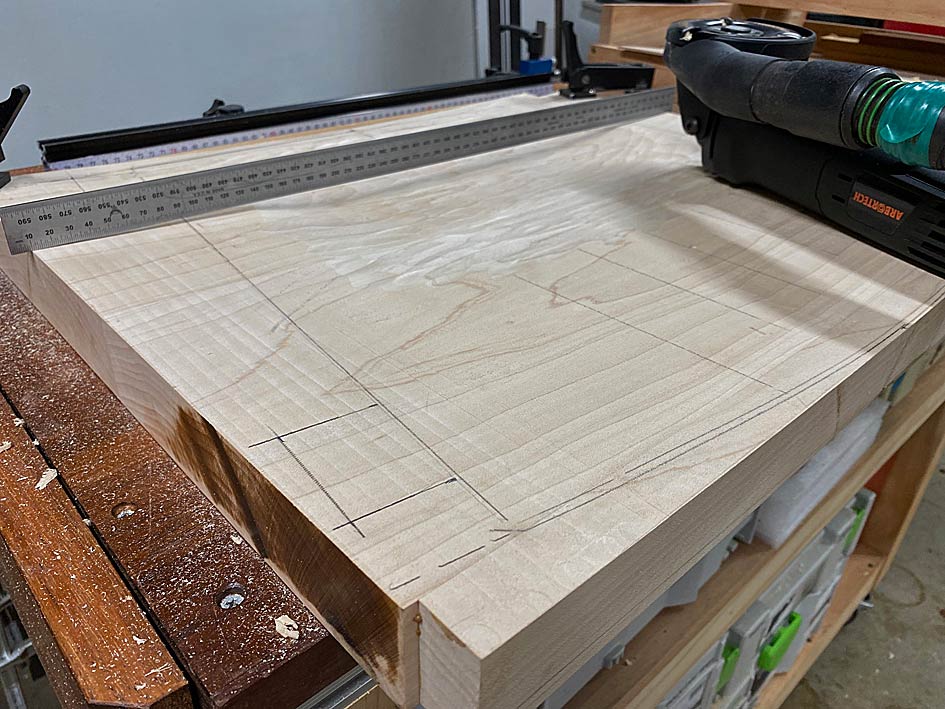
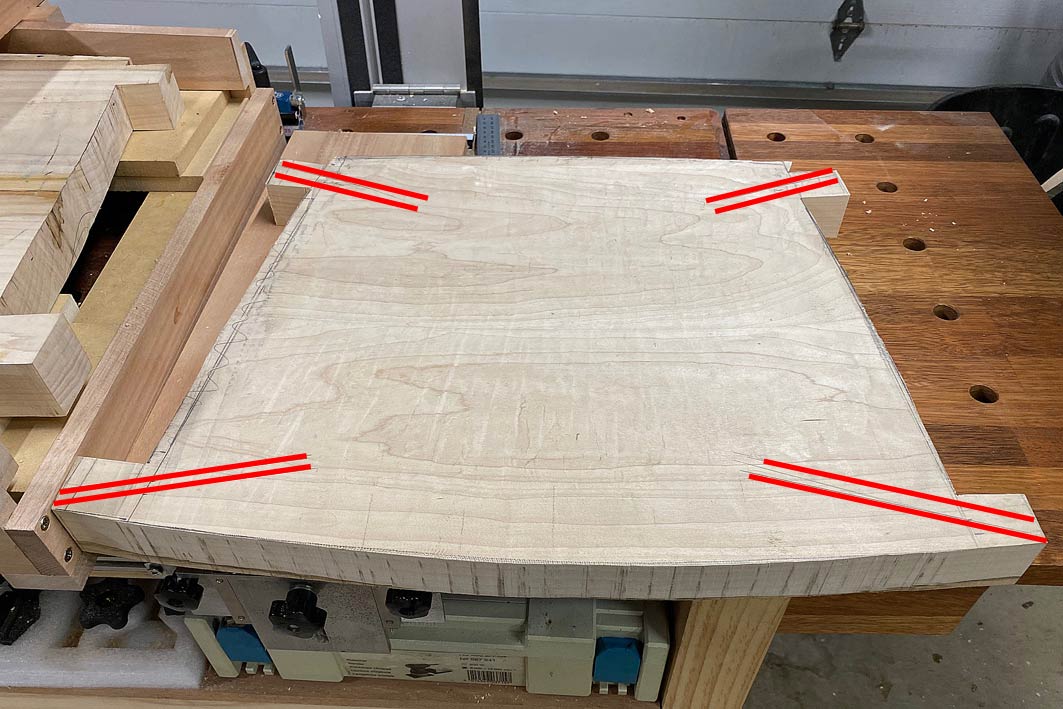
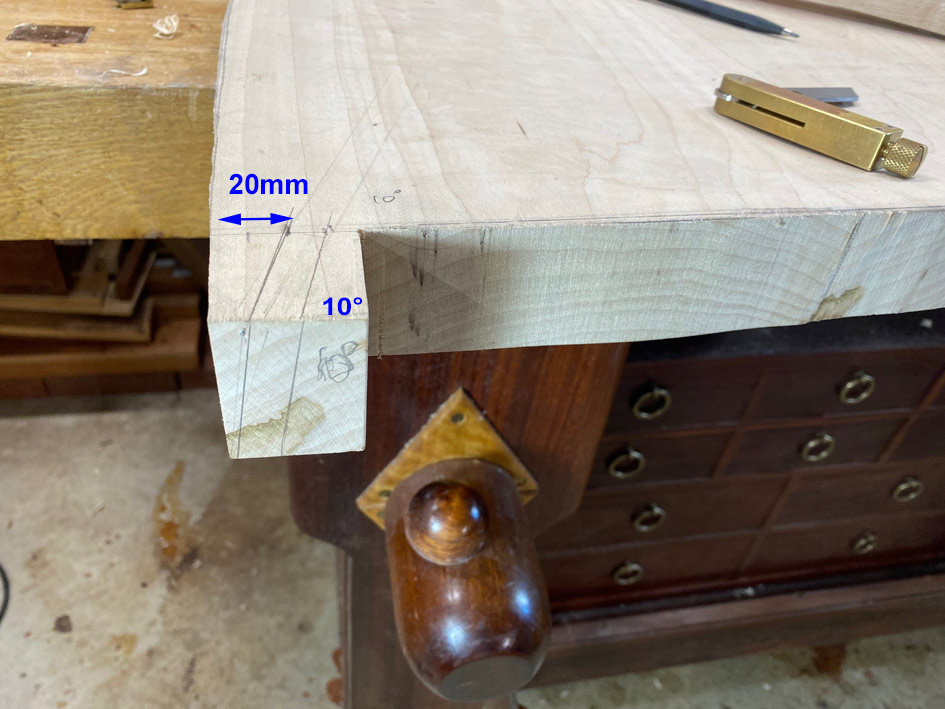
The photo below shows the outline of the seat prior to the underside being curved in the router sled. Note the sections left for the tenons, and the red lines here represent the angle these will be (20 degrees at the front and 10 degrees at the rear) ...
Finally, the router sled was converted from convex to concave ...
That is for tomorrow.
Regards from Perth
DerekVisit www.inthewoodshop.com for tutorials on constructing handtools, handtool reviews, and my trials and tribulations with furniture builds.
-
15th January 2024 03:01 AM # ADSGoogle Adsense Advertisement
- Join Date
- Always
- Location
- Advertising world
- Posts
- Many
-
15th January 2024, 09:34 PM #17
GOLD MEMBER
- Join Date
- Aug 2004
- Location
- Perth WA
- Posts
- 2,035
AMAZING
 Experienced in removing the tree from the furniture
-
16th January 2024, 04:11 AM #18
Be inspired. Be creative. Be bold.
- Join Date
- Apr 2001
- Location
- Perth
- Posts
- 10,826
Andy, on the WoodHaven forum, left a message which was remarkably predictive of what I had planned to write.
Andy, spot on! In fact, you preempted the very topic I planned to write.For me, the interest is in the problem solving. To make a single chair, with all parts curved, would be a challenge. But to make a matching set, you are going to need a tight system of reference edges and surfaces, to be removed only when all shaping is complete. Your methods so far make sense - of course they do! - I just mean that it sometimes takes me a minute to catch up and see why you are making a part the way you are. I'll be happily admiring the rest of the build.
Everything in furniture building requires forward planning. This is even more the case where, as here, these chairs have not been built before, do not come with plans, and are based on sketches I have made. One sees chair builds on YouTube where the Maker lays out a template, cuts it out, finishes it with a template router, and then starts glueing parts together. If only ...
When one looks at the chair design, attention is taken by the arms and back. Yet these are aspects which will be approached last. Far more important is the seat, since this creates the plan for the arms. But, building a seat like the one envisioned is complex as it has two shaped sides, a top side and a bottom. Most seats are carved only on the top, with the underside being left flat.
In addition, I have seen very few seats which are attached directly to the legs. Almost all rest on stretchers, with the stretchers morticed to the legs (e.g. The Chair). The latter is easier to construct as you build two sides, and then link them. With integrated tenons in the seat, one has to make allowance for the tenons, and these need to be cut at the correct angle before the underside of the seat can be shaped. The reason for this is that we need a flat reference edge to mark the tenon angles (which come from the drawing).
Here is the seat at the end of the last post ...
The underside is flat at this stage (being the reference sides), as are the sections where the tenons will project. But ...
While I am confident about the angle of the tenons, I want to be sure of this, and this requires that the legs be clamped to the ends of the seat at the angle predicted. The legs have been left flat - not yet rounded - as it is easier to add a mortice at this time.
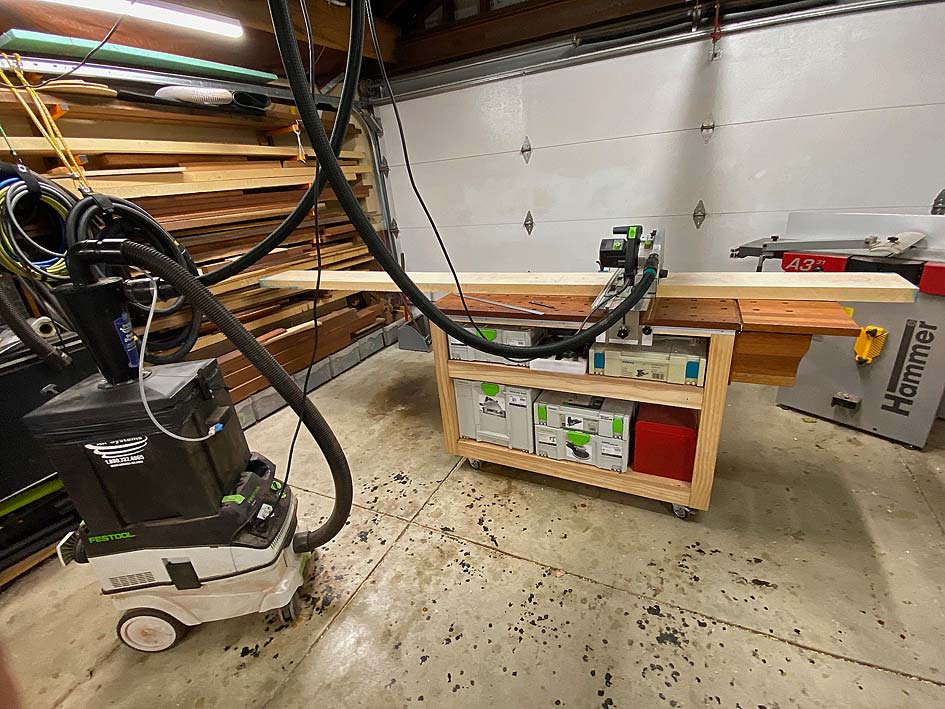
So the next stage is to do just this, but I only have legs for one chair. As a result, work stopped to complete the other four legs. First, a section was cut off one of the 3m long (x 250mm wide x 50mm thick) Rock Maple boards (my wife helped me load this!).
Easier to crosscut on a MFT with a tracksaw than a tablesaw. Mine is a 20 year old Festool I purchased about a year ago in as-new condition.
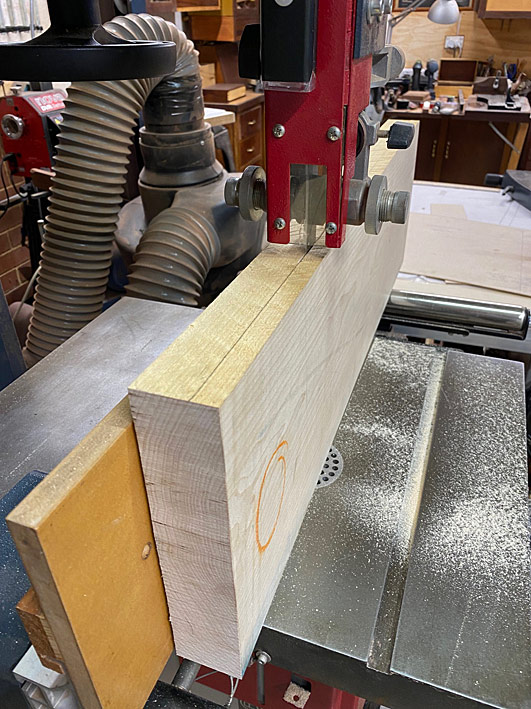
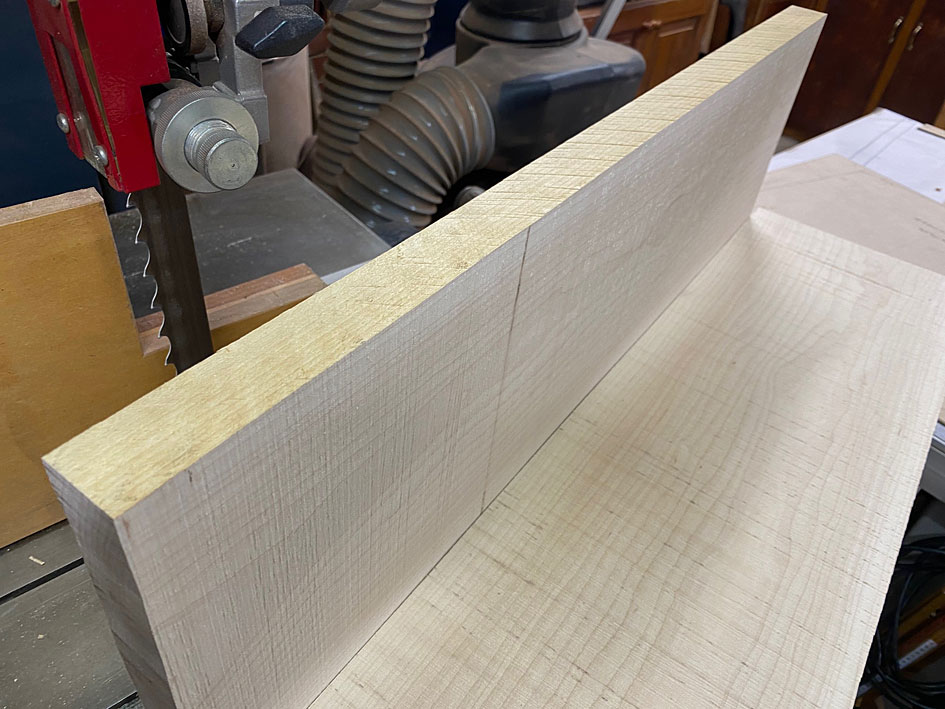
The section was re-sawn to 32mm and then planed to 30mm. Great tracking by the combination of a Hammer N4400 (which I have had for about 15 years) and a 1" Lenox Woodmaster CT blade ...
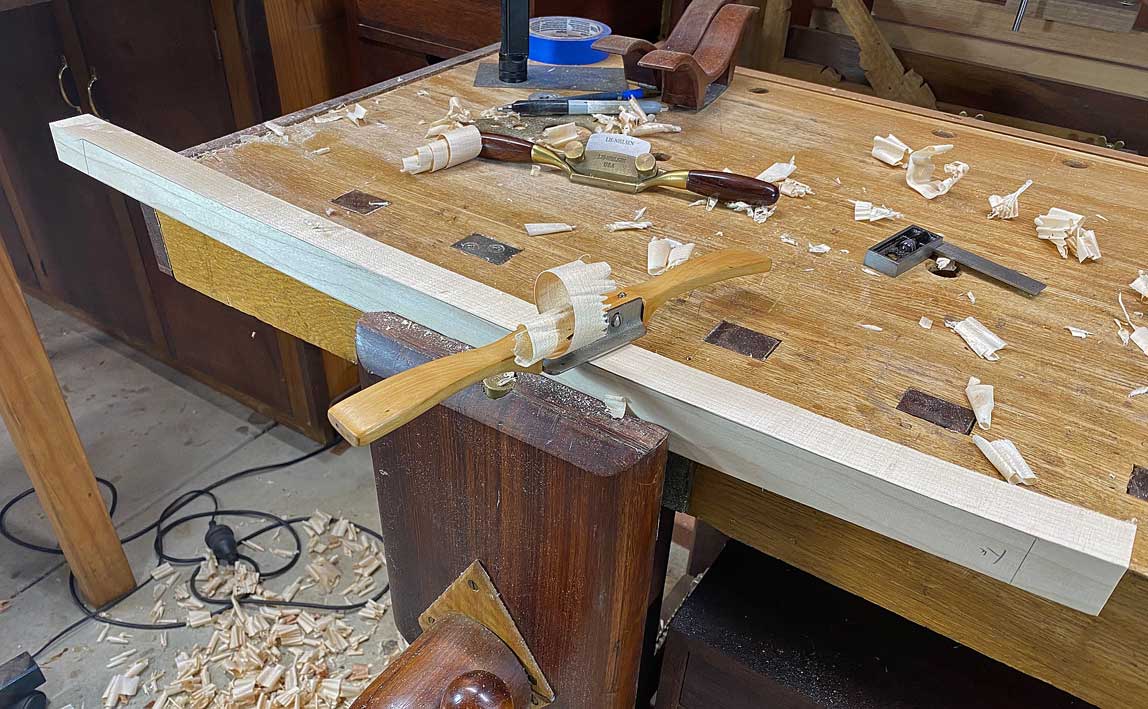
As I mentioned in an earlier post, it is less stressful to mark the legs with a template, bandsaw to the lines, and then use spokeshaves to clean up. Here are some of the spokeshaves I use ...
A Stanley #84 boxwood spokeshave excels in taking thick shavings. This is where I begin ...
Veritas make a copy of this in the form of their LA Spokeshave, and it is very good (I use one or the other, not both) ...
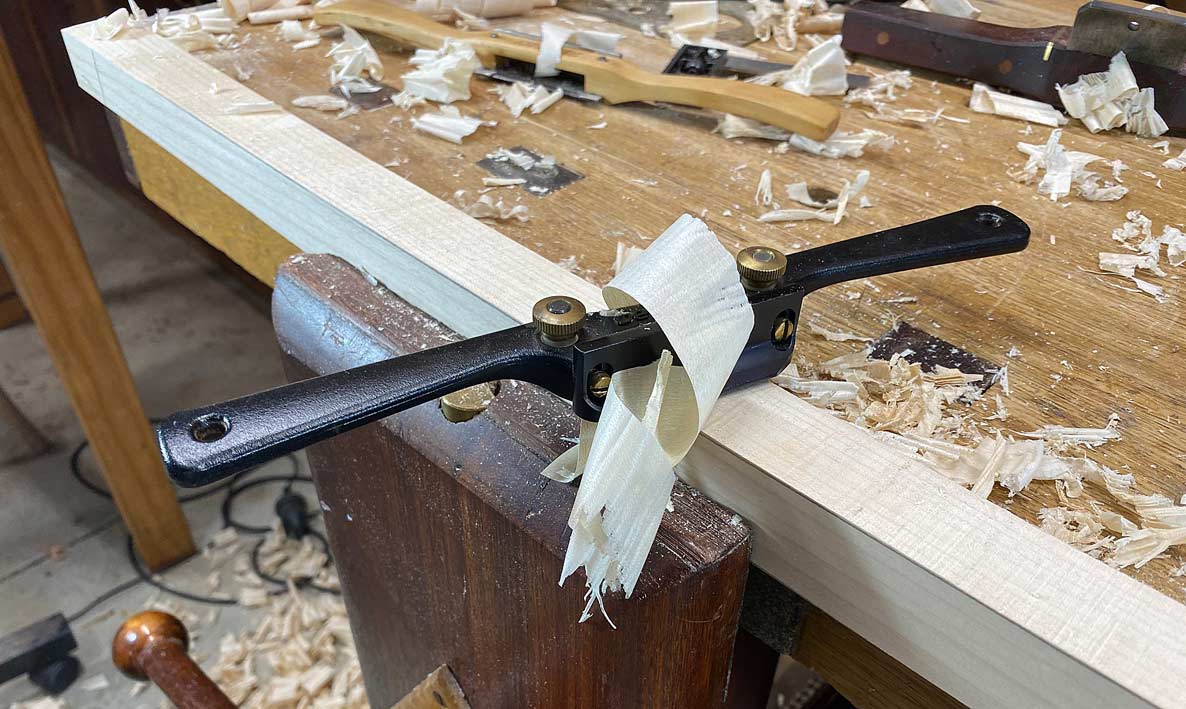
Many years ago I was gifted a flat and round spokeshave by Terry Gordon (HNT Gordon tools). It is a Malaysian/Asian design with a high cutting angle. This is my go-to if there is any reversing grain ...

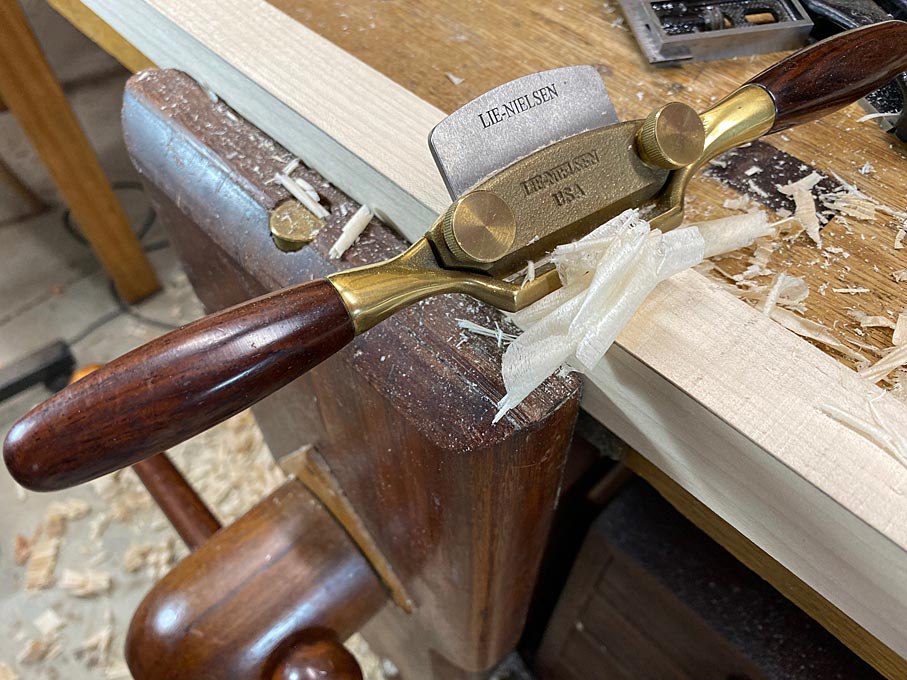
Lastly, the LN Boggs spokeshave takes very fine shavings and is used like a smoother to finish the surface ...
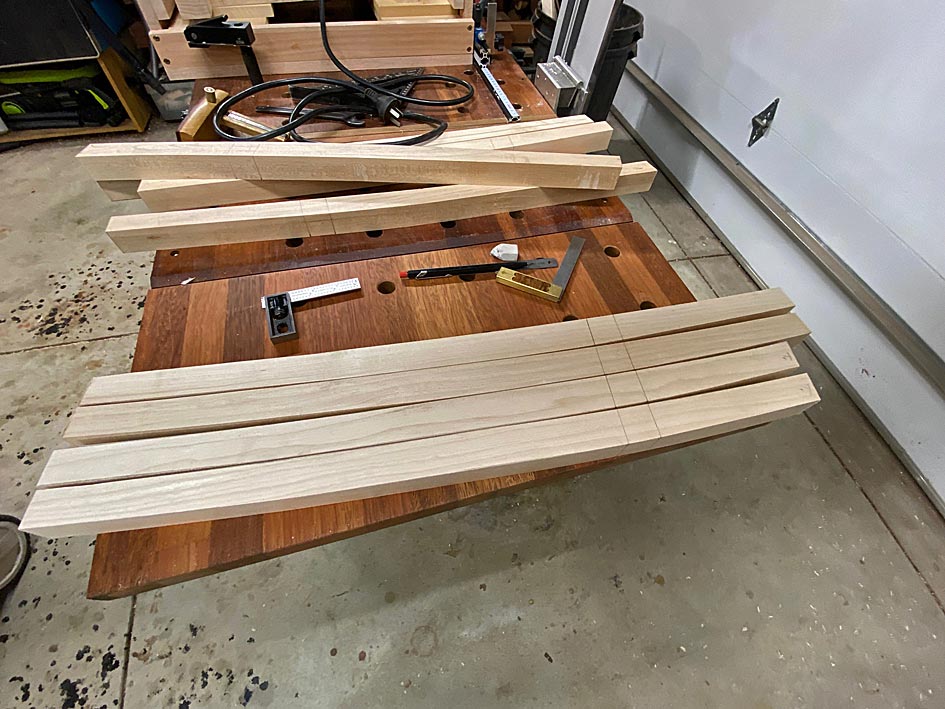
Here are the completed leg blanks ..
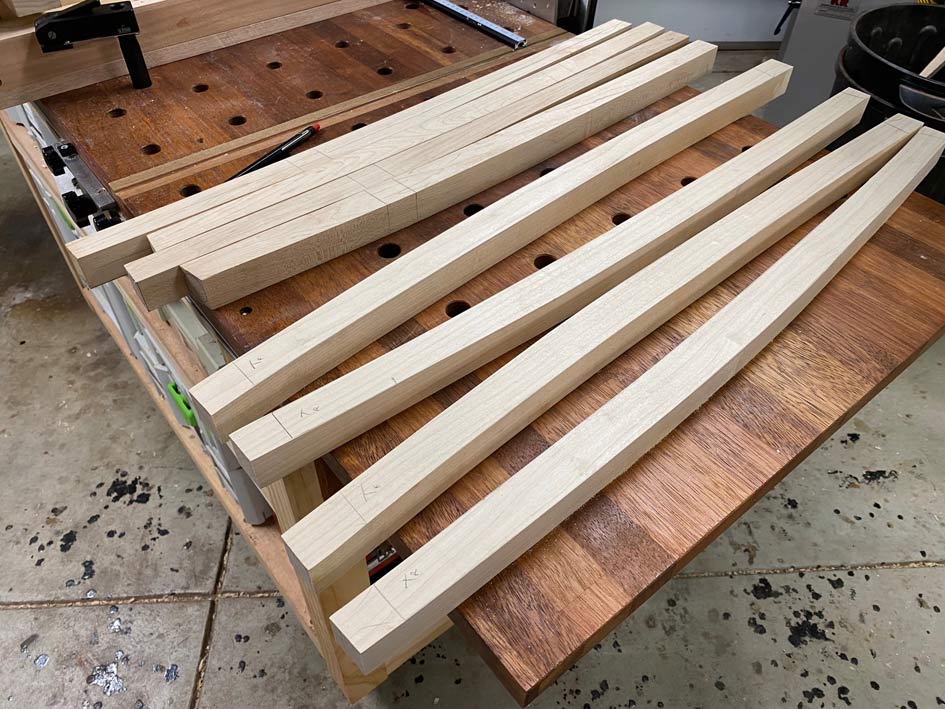
Tomorrow I will mark out the tenons.
Regards from Perth
DerekVisit www.inthewoodshop.com for tutorials on constructing handtools, handtool reviews, and my trials and tribulations with furniture builds.
-
17th January 2024, 03:13 AM #19
Be inspired. Be creative. Be bold.
- Join Date
- Apr 2001
- Location
- Perth
- Posts
- 10,826
Especially after today, this build really feels like a step forward, a step sideways, and then a step forward again ... cha cha cha ..
I really do know where I am going, and what has to be done, even if it does not seem that way! Templates would have made the process easier.
So where are we up to? Well, it is the stage where the through mortices are made. We start with 8 legs ..
The mortices will be made with a Domino ...
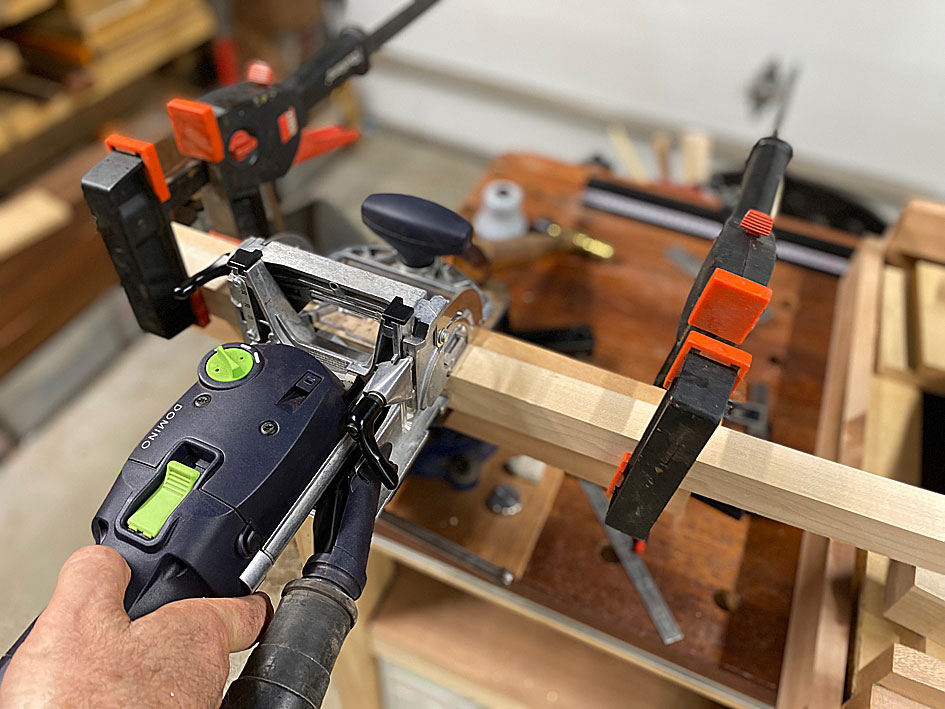
Then it gets a little complicated :
1. The legs are curved.
2. The mortices are cut half way from each side, and must be aligned well to meet in the centre.
3. The Domino can cut a maximum of 24mm width. The mortices are 30mm wide (by 10mm).
I have a guide for setting up the Domino to cut a specific size mortice width. This is for a 10mm x 24mm domino. Since the legs curve, the boundary lines for the mortice angle. The boundary lines cannot be dropped down on the vertical, so ...
First set the left side centre indicator ..

.. and then the right side indicator ...
Two plunges of the Domino creates this ..
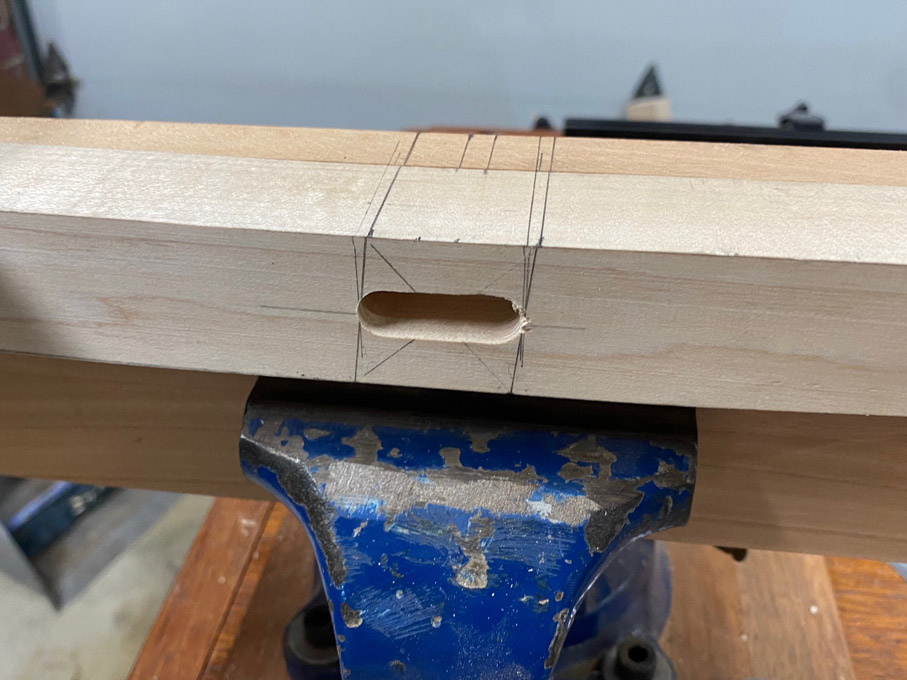
Repeat on the other side.
With all 8 legs morticed, I began to lay out the tenons.
All the legs are angled at 10 degrees towards the centre. This is prior to cutting the tenons ..
Rear leg ...

Front leg ...
Here is the mock up with the plan/drawing in the background ...
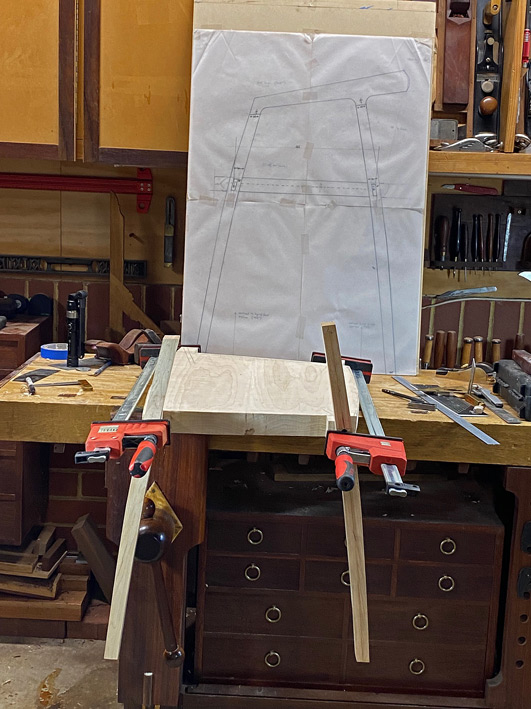
And a close up ..
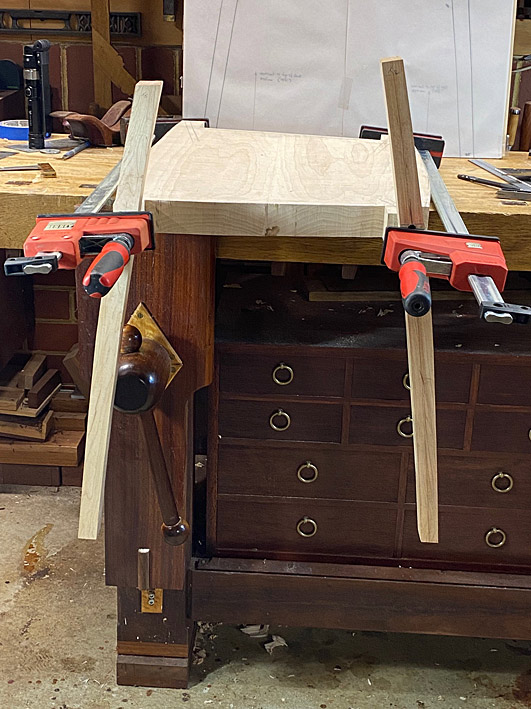
A last photo for today - taken from the rear. The ears represent the stock for the tenons ...
Tomorrow the tenons will be cut, and then we can get back to shaping the seats.
Regards from Perth
DerekVisit www.inthewoodshop.com for tutorials on constructing handtools, handtool reviews, and my trials and tribulations with furniture builds.
-
17th January 2024, 04:56 AM #20
GOLD MEMBER
- Join Date
- Mar 2010
- Location
- US
- Posts
- 3,130
I'm guessing by number four, this is going to start to seem like a lot of work!
Maple is a nice wood to work until it does something odd, and it also strikes me as something a little intolerant of free and open tools like a scorp. Between making planes out of maple and beech, beech wears better even though it's probably about 5% softer, but it works under a chisel and a gouge as if it's 1/3rd softer. AT least. And the way it accepts tools is wonderful.
wood database has a term for maple's characteristic, and it's one that locust and others here share even though they're really not that hard. "blunting", but it's a smooth wood, good directional strength and takes dyes and micronized pigments nicely.
The legs look like an ideal candidate on the flat bits for a victor 020 or stanley version of same (not a collector, I think that's the right number). The chipbreaker solves how much of a pain I used to think compass planes were,
Forgot to comment earlier - I think it's what you're doing - round legs with tenon side matching the contour of the leg rather than a flat "receptacle" for the mortise. It would just stand out - on a char that is nothing but curves, to have a square transition showing would look like pursed lips sticking out and then truncated.
An attractive chair, though. George's mention of silversmiths gone woodworker sticks out to me with a subsequent silversmith turned toolmaker apprentice. No straight lines.
But looks good on this chair. and it'd be hard to figure out where to put a straight line without it looking like a 1970s or early 1980s guitar.
I missed some of the early discussion - is the "bowl" on the original chair bent ply?
(too - same wood as carved top guitars and violin tops. Planes and gouges definitely more common. You could fashion a really rank scraper if you're one for really manipulating burrs and remove wood alarmingly fast, too. The last carved top guitar I made -rosewood - ended up spokeshaving a flat off around the radius and then scraping all of it for safety, and it didn't take long. 6 of them would, though.
https://i.imgur.com/xyb7mFC.png
more complicated shape than a seat bowl, but there is a little more freedom for variation in a guitar top if something has to be corrected for eyes - well, to some extent. Some parts at the top of the carve need to be really close to being in a flat plane without it looking like one. I have thoughts on making square wood round visually evenly and to a tight spec, like this https://i.imgur.com/v5fpTAr.jpg but I think they are just things one person to the next does the way they want to do it. Have never used anything power on a guitar neck other than sparing use here and there (36 grit or 24 grit ceramic paper - like bora purple, by the way, scary fast at removing wood, but really messy and probably not available in round discs for a reasonable price).
I hope you share what you find in terms of material removal by hand on the legs, because I think you'll find the last legs take 1/4th of the time the first do and you'll feel a lot safer.
Also interested to find out if you hit any of the mineral pockets in your maple. All of my hard maple came from one purchase, and it's good for a sharpening or two and then you run into almost invisible little grayish clear minerals that destroy everything.
-
17th January 2024, 11:48 PM #21
Be inspired. Be creative. Be bold.
- Join Date
- Apr 2001
- Location
- Perth
- Posts
- 10,826
Thanks David
This Rock Maple originates from the US. It makes beautiful furniture - clear, tight grain that takes detail very well - but is the devil to work ... very hard, and unpredictable in regard to tearout.
I did consider using a Record #020 I have, but it was just a whole lot easier to use spokeshaves on the inside curve and a HNT Gordon smoother on the outside curve. The curves are not that regular that one could use a circular plane without resetting it from time to time.
In any event, I needed to make one more leg today (having cut a mortice a little too long), and pulled out the Record to give it a run. Freshly sharpened blade, tight chipbreaker .... and it sucked!
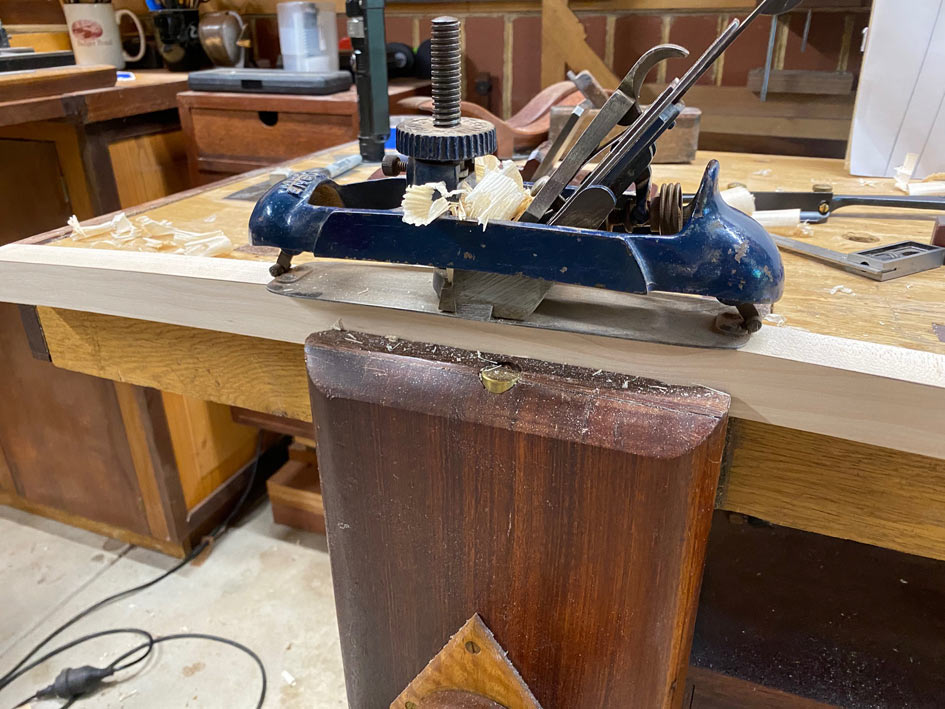
You can see the concertina shavings. This usually indicates that the chipbreaker it too tightly set, but it was not. In fact I pulled it back a smidgeon, and the performance was worse.
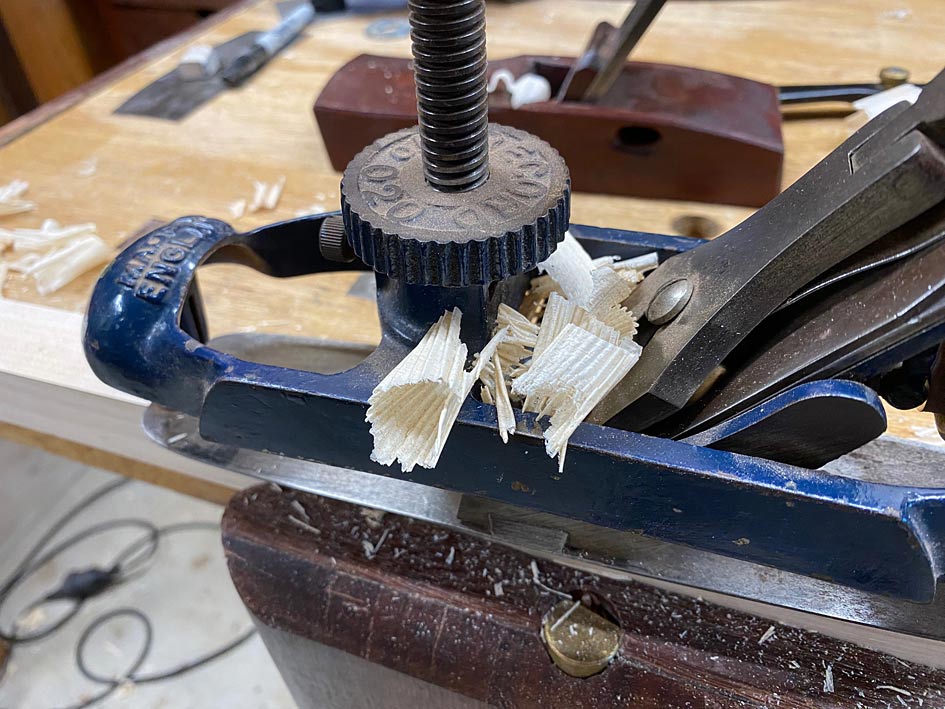
The main issue was that the blade (Stanley) chattered ...
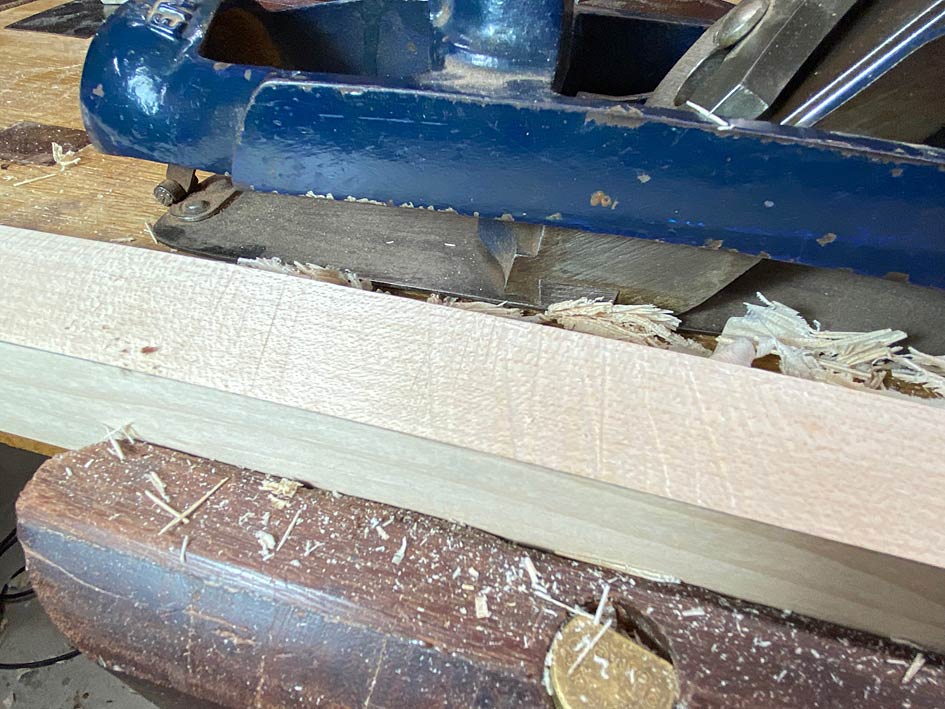
By contrast, the HNT Gordon sailed through the wood leaving behind a perfect surface.
The seat of the chair I originally linked to was solid wood, I think. These chairs are turned out by CNC machines. I am learning, as I progress here, the value of machine joints (such as dominos) in these designs. I am going to post on the work I did today, and I came so close to moving in that direction!
Regards from Perth
DerekVisit www.inthewoodshop.com for tutorials on constructing handtools, handtool reviews, and my trials and tribulations with furniture builds.
-
18th January 2024, 01:43 AM #22
Be inspired. Be creative. Be bold.
- Join Date
- Apr 2001
- Location
- Perth
- Posts
- 10,826
Time to saw the tenons.
I have gone back-and-forth on doing it this way. I can understand why so many builds use loose tenon joinery. Simply, it is easier to do so than creating integral tenons. It also makes it possible to shape the seat fully separately, especially the perimeter. The seats here have been roughly cut to shape, and only the top partially sculpted. It has been a very round-about way of building ... more steps that could have been avoided.
So why build this way? Well, I want integral tenons as they will be stronger than loose tenons. It is also difficult to rout the mortices in the edge of the seat owing to the awkward angles involved. Lastly, adding mortices may not be possible owing to the reduced depth of the sculpting.
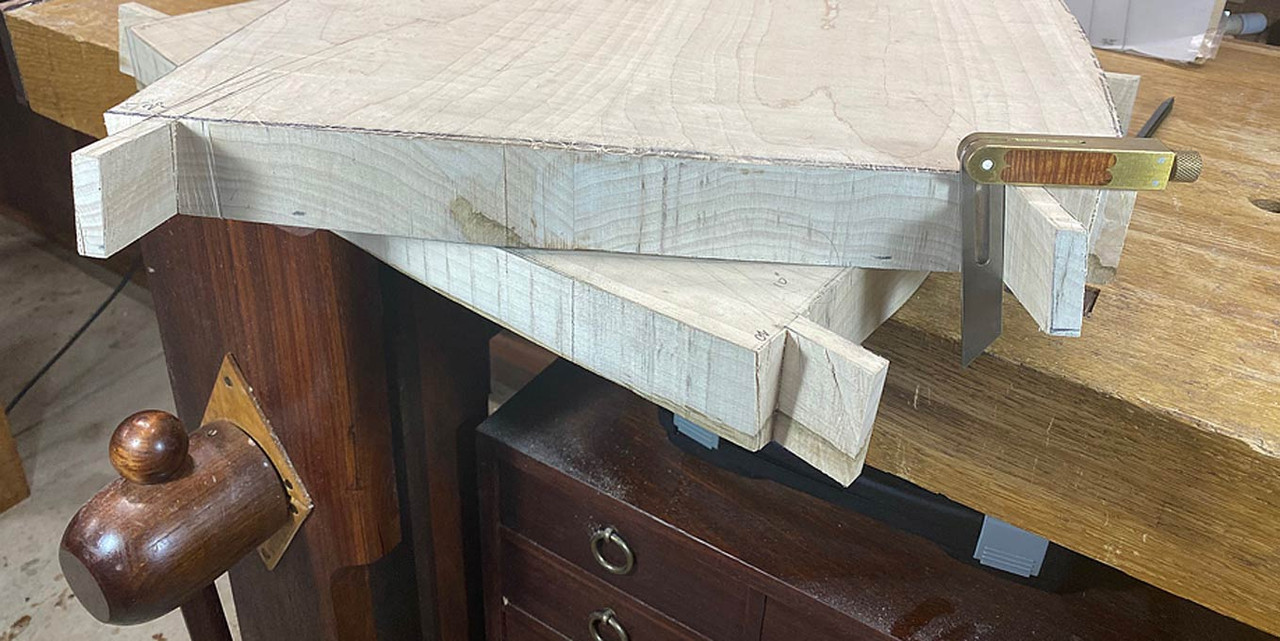
The tenons are not straight-forward as they angle inward at 10 degrees, creating compound angles, as will be seen shortly ...
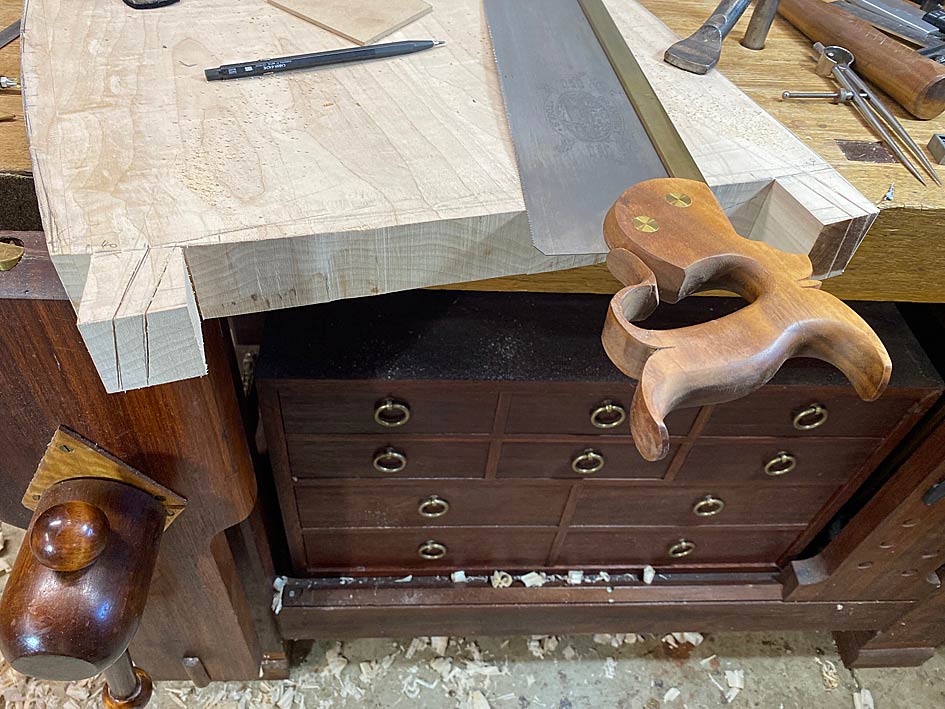
Using a template for 10 degrees, the angles for the tenons were plotted on the ears ..
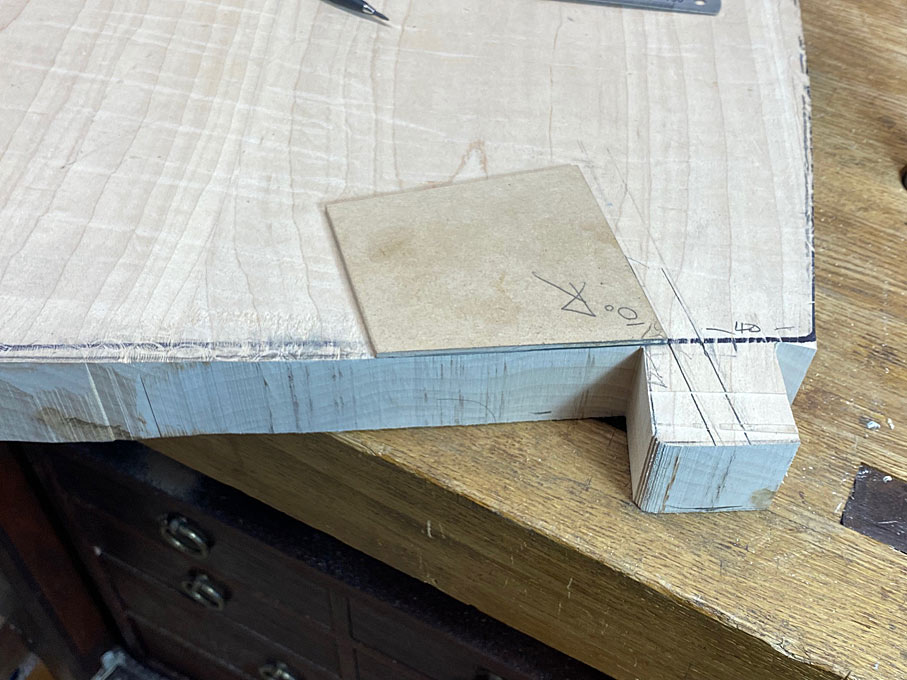
Dividers are used to mark the 10mm width ..

There is also a 10 degree splay angle to add ...
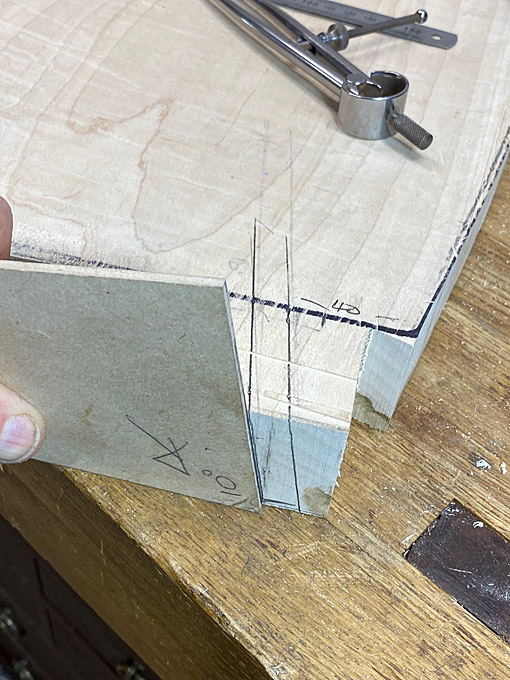
At this stage my spatial-ability challenge came to the fore and I was in over-load with angles. Marking out the angles on the reverse side gave me the biggest headache, and I came so close to accepting loose tenon joinery!
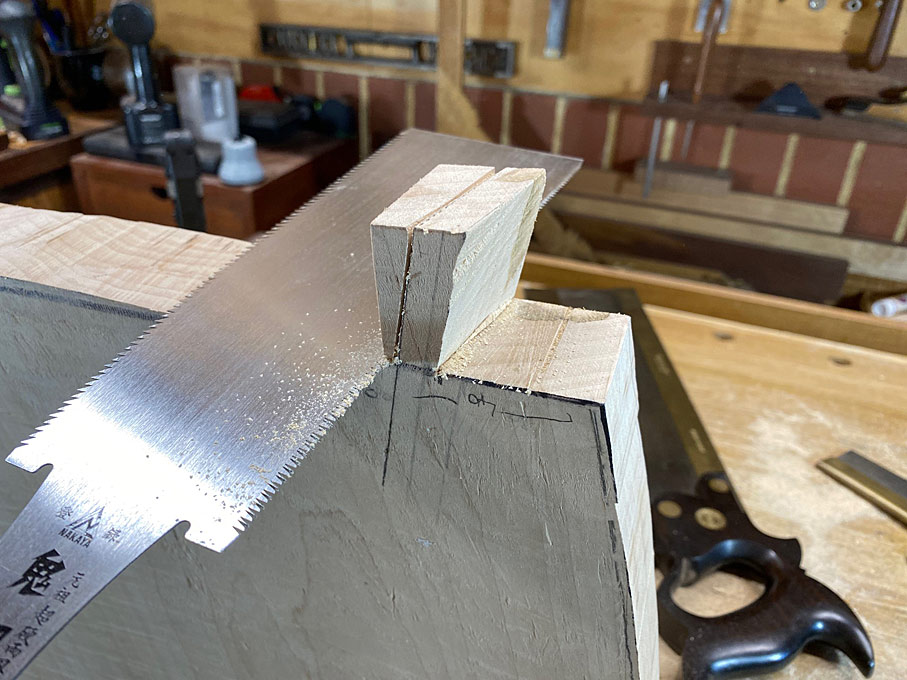
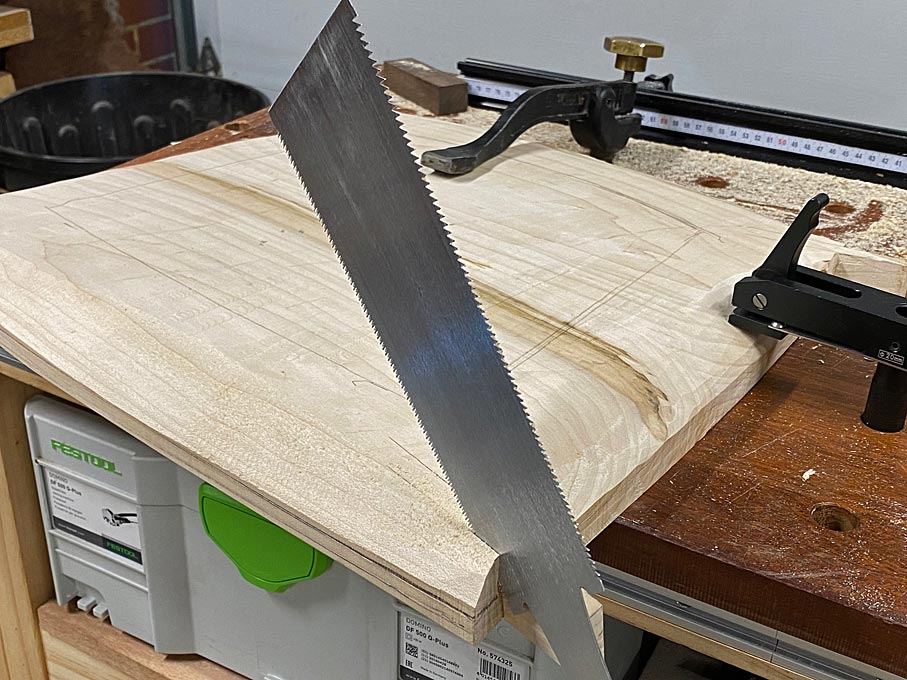
I decided that loose tenon was always a backup, and so just go for it. The saw used is a 16" Wenzloff & Sons tenon saw (10 tpi rip). It is a HUGE saw, but worked really well here with its aggressive cut.
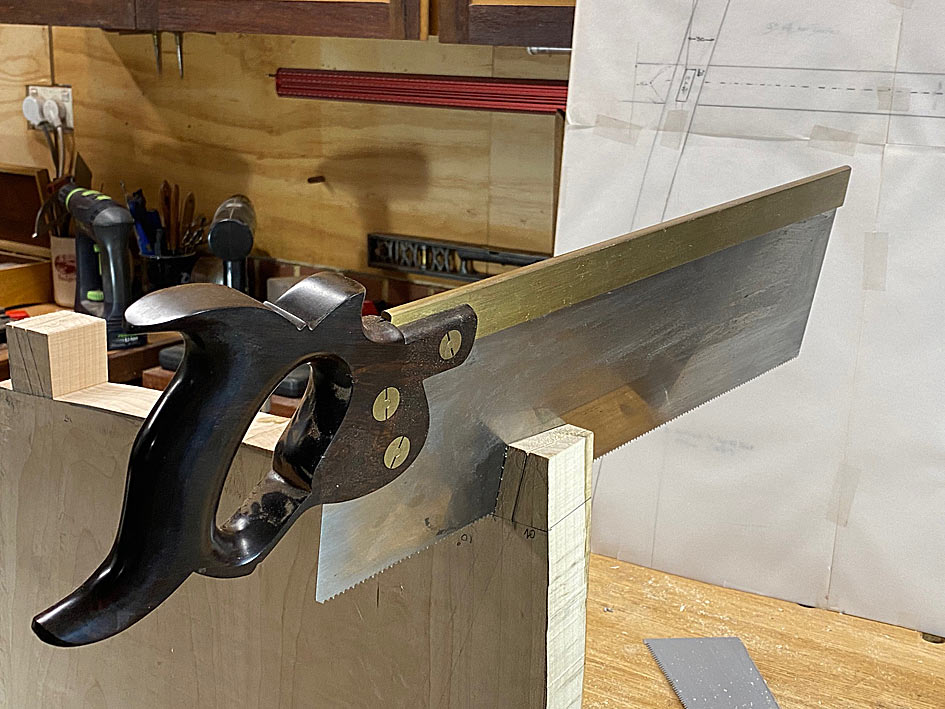
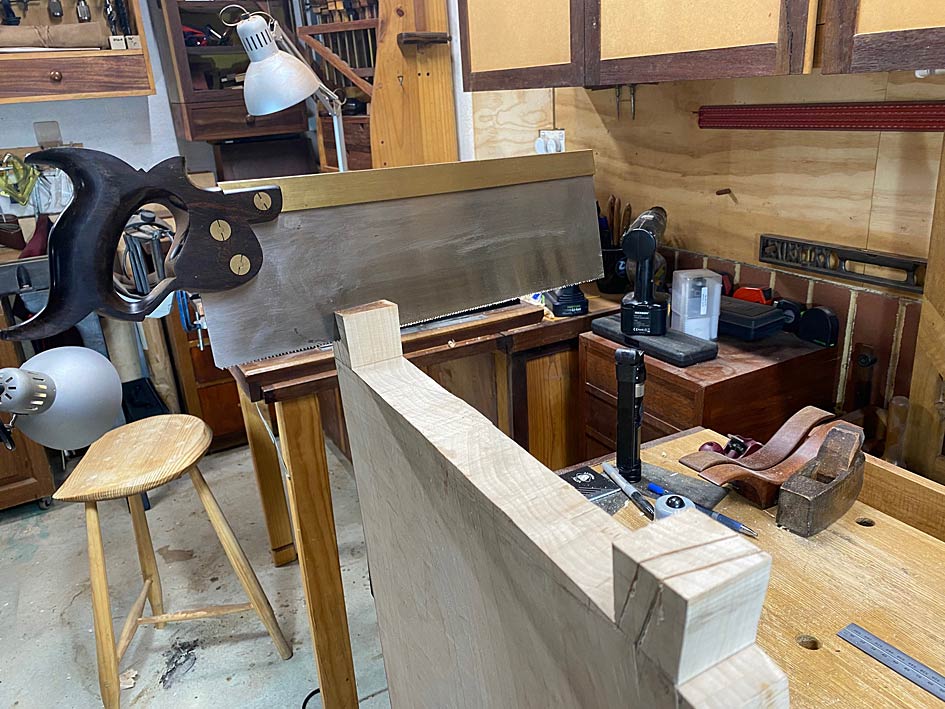
Cutting to the line, which left just a smidgeon of waste.
Waste removed with a Ryoba ...
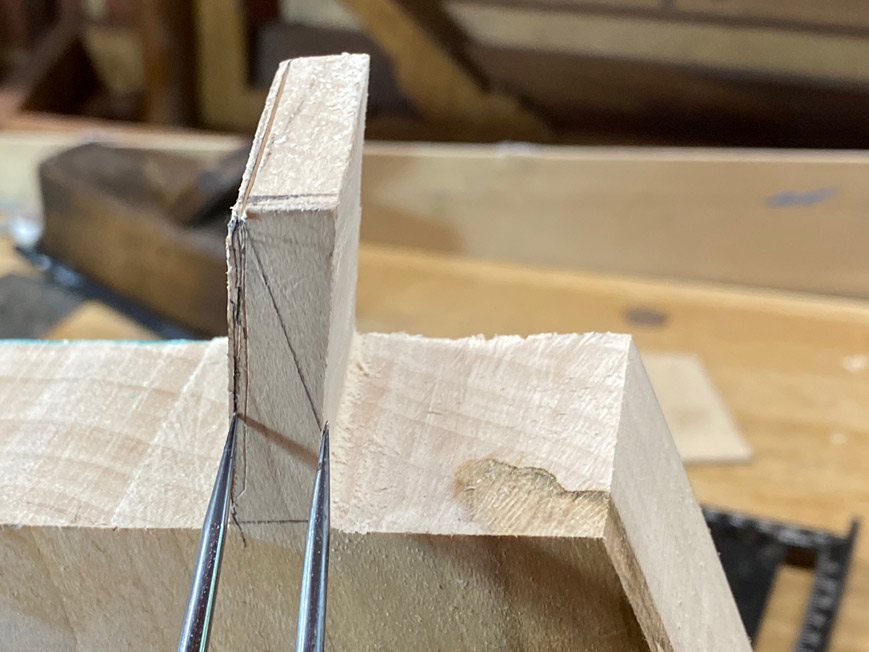
All tenons cut ...

I checked several and all were on the money at 10 degrees. I'm a happy camper ...
Eight tenons and eight mortices ...

Next on the agenda: rasp the perimeter to shape, finish the tenons while there is still a flat reference (under) side, and then shape the underside of the seat.
Regards from Perth
DerekVisit www.inthewoodshop.com for tutorials on constructing handtools, handtool reviews, and my trials and tribulations with furniture builds.
-
18th January 2024, 02:38 AM #23
GOLD MEMBER
- Join Date
- Mar 2010
- Location
- US
- Posts
- 3,130
That's a bummer!! I've not used the 020 on maple, and would make a comment of sliding the chipbreaker back a little bit, but it should have stopped you in your tracks rather than skipping like that, so it appears to just be unable to deal with maple regardless due to the lack of rigidity. that's too bad. (ties back to the wood database comment about blunting - maple doesn't like to accept tools as well as it should given it's not really that hard). Originally Posted by derekcohen

the guitar necks are typically done by cutting or rasping the ends close to radius and then draw knifing and spoke shaving the material, finishing the sizing with a nicholson super shear or some kind of file to get visual straightness and then sanding to remove evidence of anything that doesn't look round. I'm not much for sanding, but a guitar neck calls for it.
Lie nielsen's shaves are wonderful in maple, though you're aware at this point that they'll allow a limited amount through.
Maple's a funny wood - it can unload three feet of ribbon and then have a strange spot that the shaving just doesn't want to stay together almost no matter what. It is a favorite here among the locals who don't use hand tools because of how crisp it is off of tablesaws, but even with power tools, i find the router template thing agonizing - you can't just cut right at the template and it's probably more suitable to cut well fat and then use a spindle sander with a bearing. boring.
A contact wheel on a belt grinder is not a particularly "hand work" way of doing things, but is also very effective for getting close to a line and at least you get to do it freehand. the amount of dust from a high speed grinder is unreal, though.
I turn handles, but octagonal handles, I just grind on the belt grinder. regardless of positioning of vacuum hoods, there is dust everywhere. The belt grinder can take wood off faster than i can do it by hand with anything. A low brow solution, but one that works.
-
18th January 2024, 05:21 AM #24
GOLD MEMBER
- Join Date
- Mar 2010
- Location
- US
- Posts
- 3,130
good lord! I just noticed the 020 that I have is bedded at about 60 degrees. It may not even need a chipbreaker set, but for the objective of removing material here, it's three swings in a miss to do material removal at that angle when there are 45 degree shaves that can be turned any direction.
No wonder it chattered. 60 degrees!!
My 020 is like a lot of tools. I had a prior compass plane (a 113) and at some point came across an inexpensive 020 and replaced it and then that plane has mostly stayed on the shelf.
one would guess record didn't take any liberties in terms of changing variables.
60 degrees!! I'm blown away.
-
18th January 2024, 12:14 PM #25
Butcher of wood
- Join Date
- Jun 2010
- Location
- Bundaberg
- Age
- 54
- Posts
- 3,428
Yeah, compass planes can be an absolute PITA to set up and use! I have a Sweetheart era 113 that very rarely comes out; it's biggest job was trimming the rounded end of my kitchen benchtop. The curve was about 900mm wide on endgrain QLD Red Gum 30mm thick... but I made it work eventually.
The "trick" is to get the curvature of the sole ever so slightly out so there is a tiny gap under the blade; and then force the blade down into the cut. This causes the whole plane to take up any slack in the mechanism joints, forces the sole to match the workpiece and slightly deforms the castings to apply some pre-load stresses. I think..... . And of course it requires almost constant adjustment of the curved sole. I have tried to get fancy and tweak the front knob with every completed stroke but that level of mastery of the bugger would require daily use of the thing to accurately judge the required tweakage....
Oh; and a depressingly fine set on the iron. I honestly can't remember the cap iron setting last time I used it (middle of last year on some curved lead-light cabinet doors) but I will check when home next.
I've been on the lookout for a 20 or 020 for a while to see how they compare with the 113 and maybe do a shootout comparison. I wouldn't mind seeing if a thicker iron helps too; I have a PMV-11 assembly in my 3 that I should probably try in it one day...Nothing succeeds like a budgie without a beak.
-
19th January 2024, 02:12 AM #26
GOLD MEMBER
- Join Date
- Mar 2010
- Location
- US
- Posts
- 3,130
I'm guessing on the 60 degrees on the bed, but you could just about slice a quadrant in three parts and it's right around 2 parts of bed angle on the 020 stanley that I have.
It's a heavier plane. I never used the prior plane for any significant removal (rather clean up) and was satisfied that it worked better with the cap iron.
there must be a reason it's so steep - like the angle of attack into wood on outside curves or something?
it could be that a heavier plane with a fixed sole is better, but you have to have touch to use a plane like that and you have to impart force by feel to keep the iron in the cut - some of the old wooden ones are like that and some have a toe.
eons ago, I found a griffiths or something with a boxwood adjustable toe and got it mostly for the purpose of having a good one to copy. .
...just checked it. it's a moseley plane and the bed is 50 degrees. I haven't used it, but the mouth has a fair bit of erosion (doesn't matter when the toe defines the radius based on where it's adusted)...
Don't want to distract too much from derek's thread - seeing his results, I'd have gone to a spokeshave (pair maybe, it's kind of slow sometimes to use the LN shaves if the removal amount is significant) and then a file or something before sanding here. though I sure do hate sanding, but haven't had success with "zero facets" result on curves except to scrape. And the scraping can leave "hair" in figured wood or reversals.
Also observing a little - never made chairs and don't want to but the wife is bugging about wanting four new chairs that "match" the table we already have. Chairs can be found pretty reasonable where she grew up (mennonites and amish), but the matching part would be tough. She brought it up again yesterday but stars point to it being my issue to solve one way or another. Our chairs are not as sculpted as derek's, but there is nothing straight on them, and I know the mennonites don't do much for hand tools, so they're just slats and lumber run through machines and jigs.
Actually, the last time we went to a chair shop, a mennonite guy came out looking like a bee covered with pollen from sanding - no mask, no nothing. head to toe and almost white from the coating, skin and clothes and all.
-
22nd January 2024, 02:50 AM #27
Be inspired. Be creative. Be bold.
- Join Date
- Apr 2001
- Location
- Perth
- Posts
- 10,826
We ended up last time with the sides cleaned up and the tenons cut to angle ...
The tenons were now sized to correct width ...
... pared ...
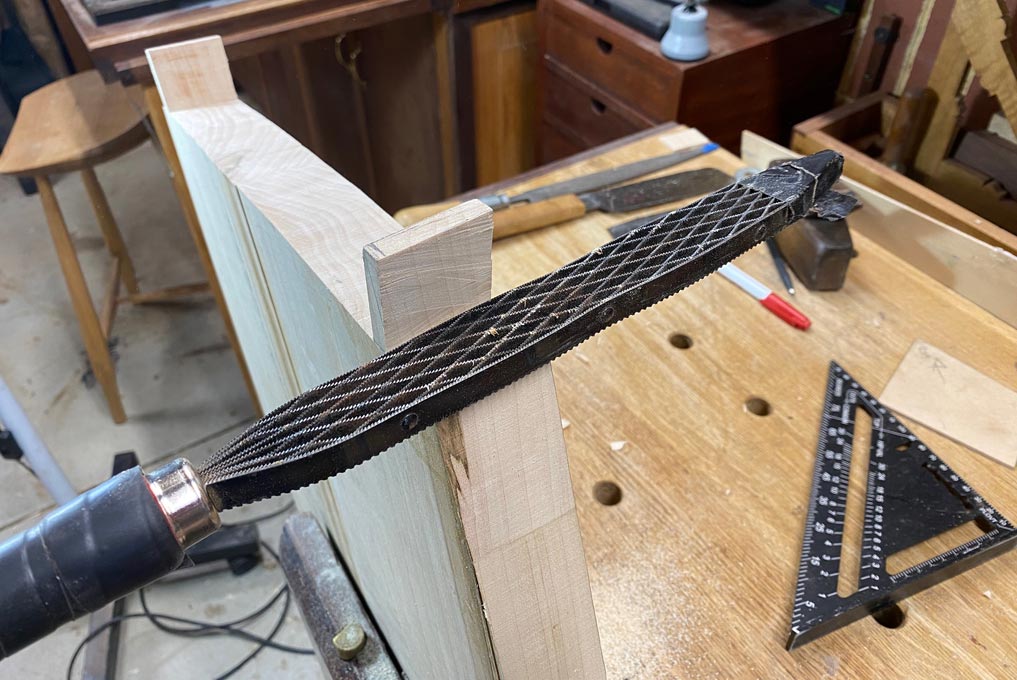
.. and rasped to width ..
I made a template to ensure each would later be a tight fit ...
So now we have two chair blanks with a semi-shaped outline, a profiled upper side and four sized tenons ...

Now it was back into the router sled to shape the underside, which was to curve in parallel to the upper side ...
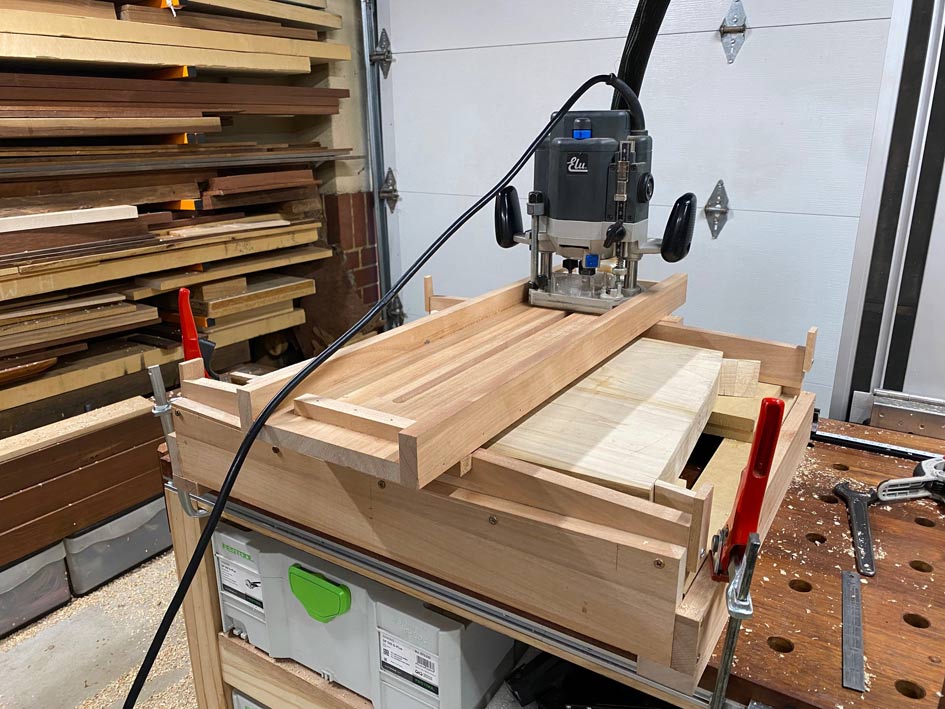
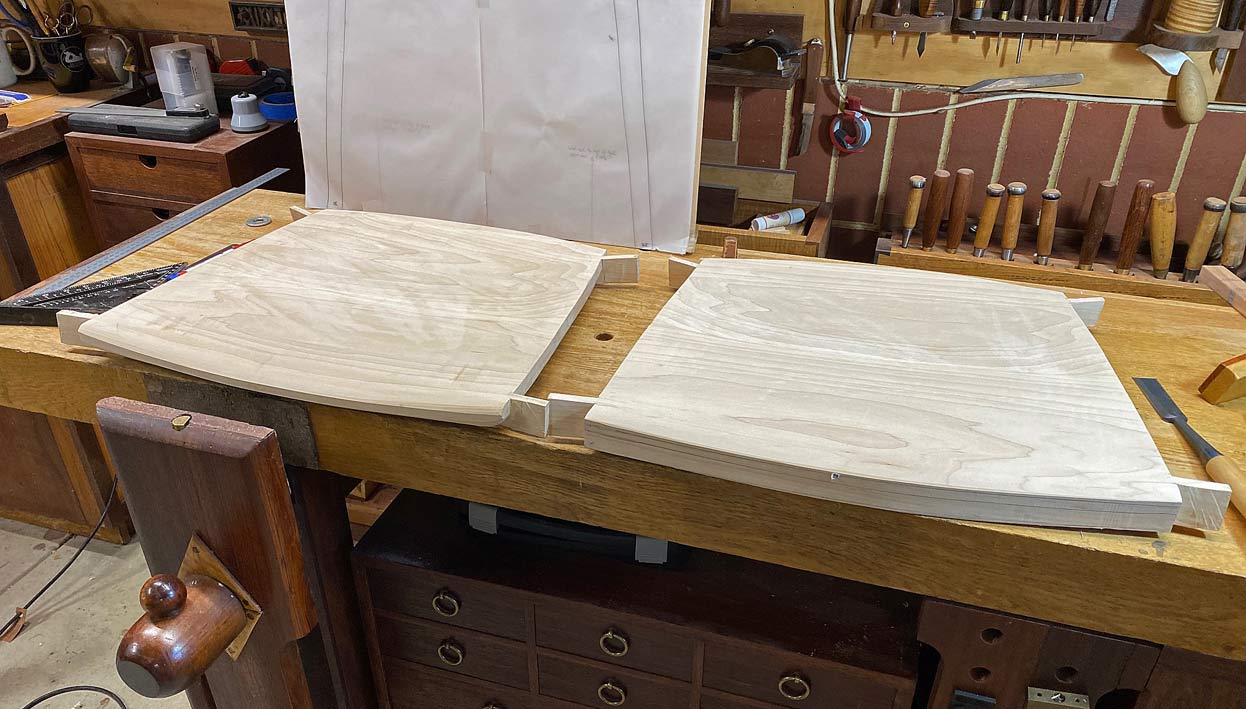
The result was two of these, after some cleaning up with a jack plane ...
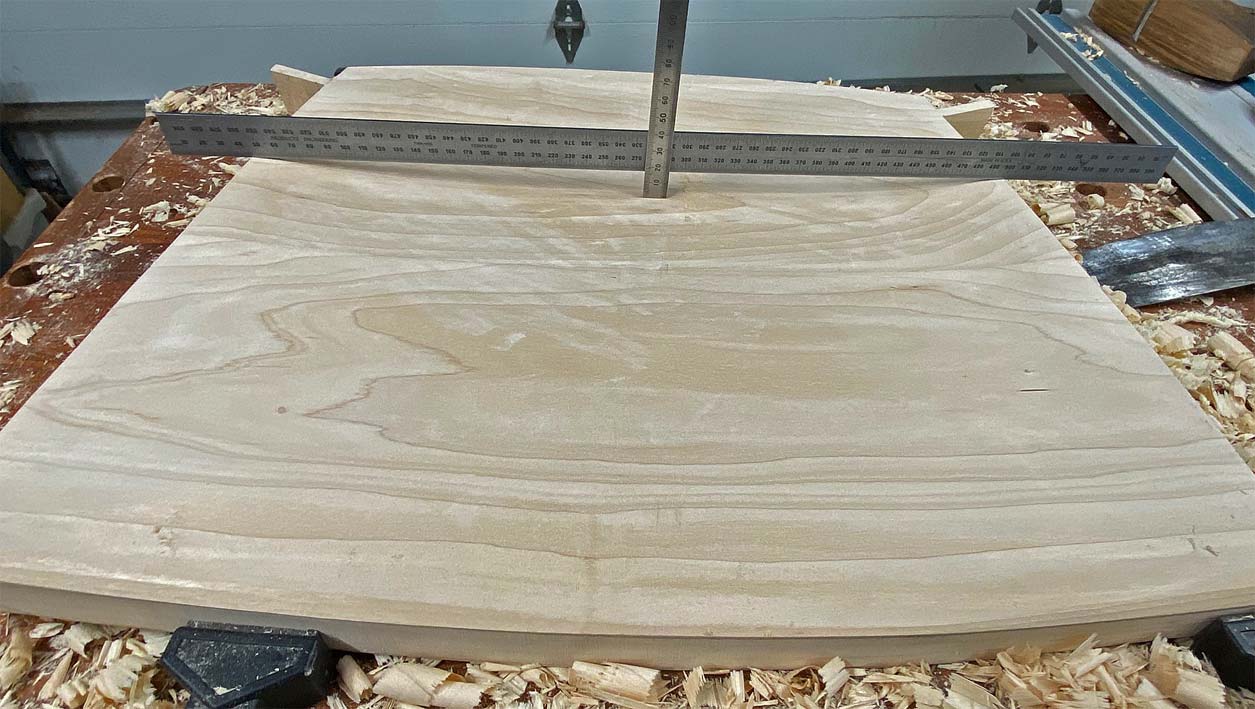
Time to give the seats their final plan shape. The seats were flipped over ..

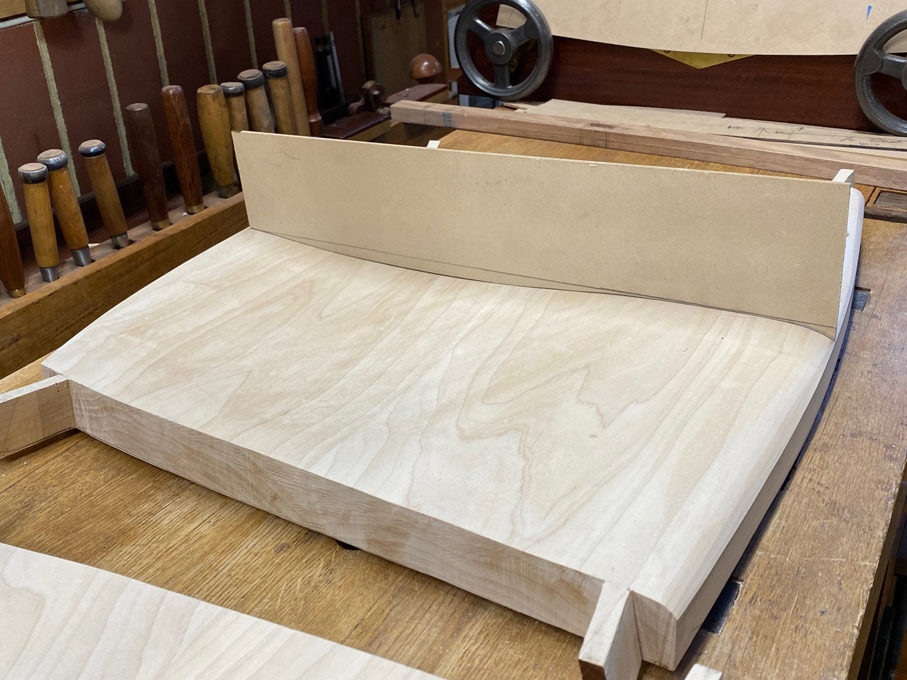
And a template used to mark the new rear curve ..

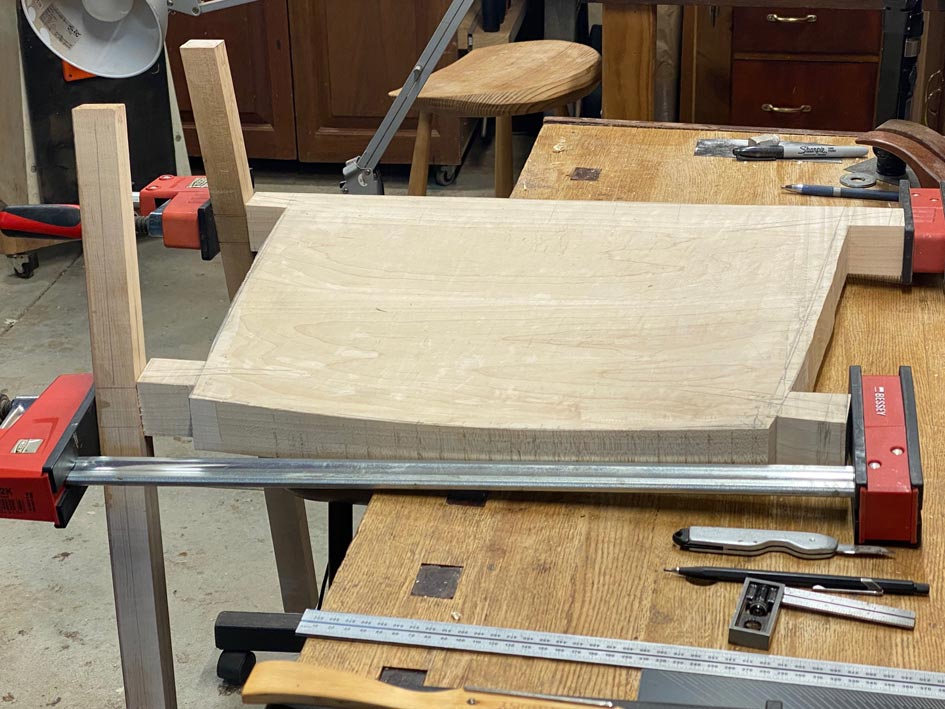
One of the problems photographing this Rock Maple is that the light colour does not show details particularly well. Especially the seat hollows and internal curves. In addition to the upper curve, the seat is hollowed out to a depth of 18mm.
Nothing to see here. But ... from the sides ... one then the other ...
Note that the carved seat adds a 4 degree slope to the seat, which is what is in the design (however the original drawings missed it coming from carving seat, and adjustments had to be made).
We are closing in on the last lap for the seats - well, next to last lap (it seems to go on forever!). The undersides need to be shaped to remove the bulk (which was needed for the tenons), and create a sleeker presentation. Back to the Arbortech carver to remove the waste ...
I frankly do not know how many hours this saved if I had been using hand tools. I did try a razor sharp drawknife, and the Rock Maple laughed at it. The Arbortech is terrific. It does take a little while to get the feel for gentle carving, as it can run away from you if you carve with a climb cut.
Spokeshaves next, and the Veritas LA does a magic job ...
To get the best out of this spokeshave (since many described it "diving" into the wood), it is important to understand that the toe is curved 4 degrees from the mouth (as is the Stanley). Think of this in the same way one uses a travisher, which has a similar toe: The angled mouth acts to open or close the mouth. Set the blade and then adjust the depth of cut when using the body - toe down and it cuts a fine shaving, pressure on heel and the shaving is thicker. I suspect that "diving" occurs when the shaving is thicker, and attention is not given to grain direction.
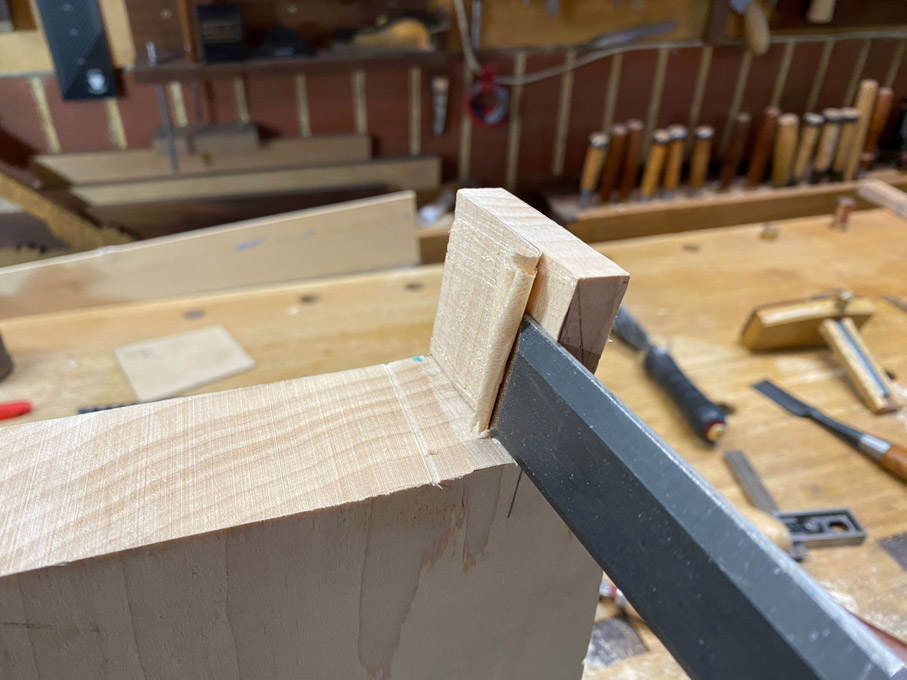
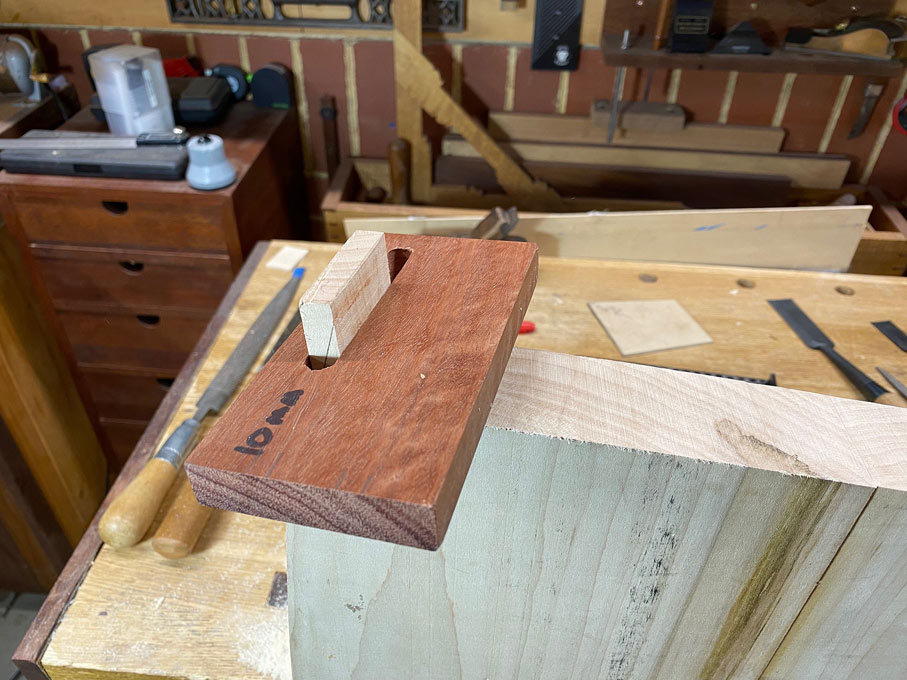
The tenons are at the centre of the design. The seats started out at 50mm thick. They are down to 35mm at the centre, and will end up about 15mm thick at the surrounds. However the tenons must end up 30mm high.
Here the tenons are being "extended" from the seat, with two saw cuts ...
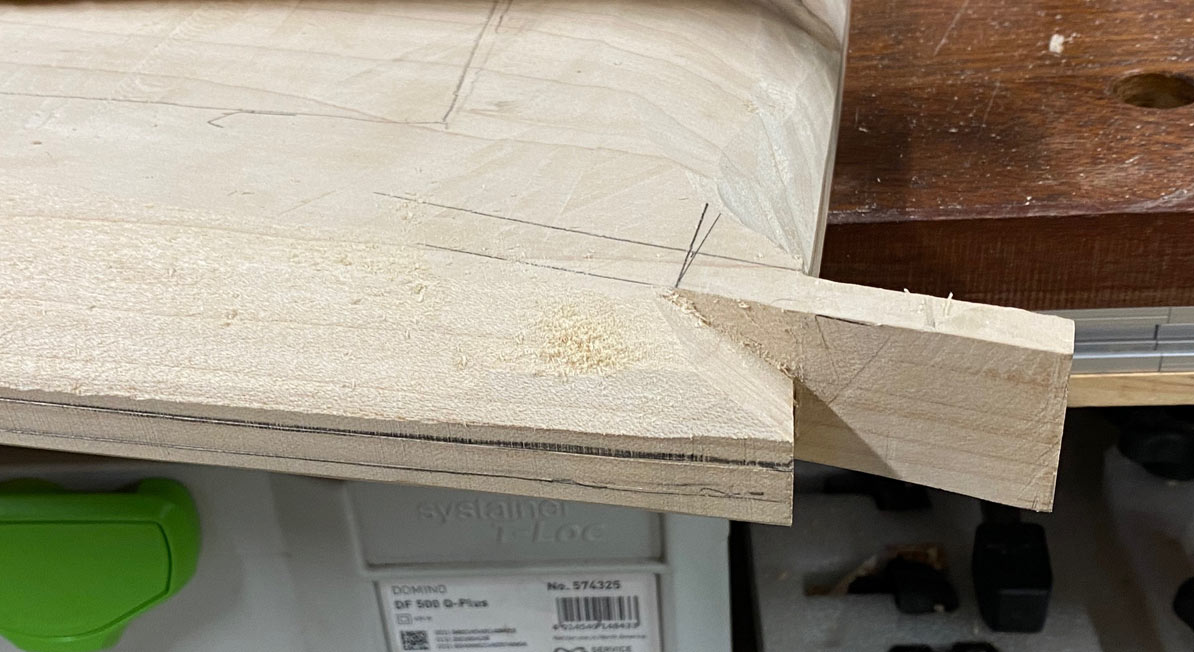
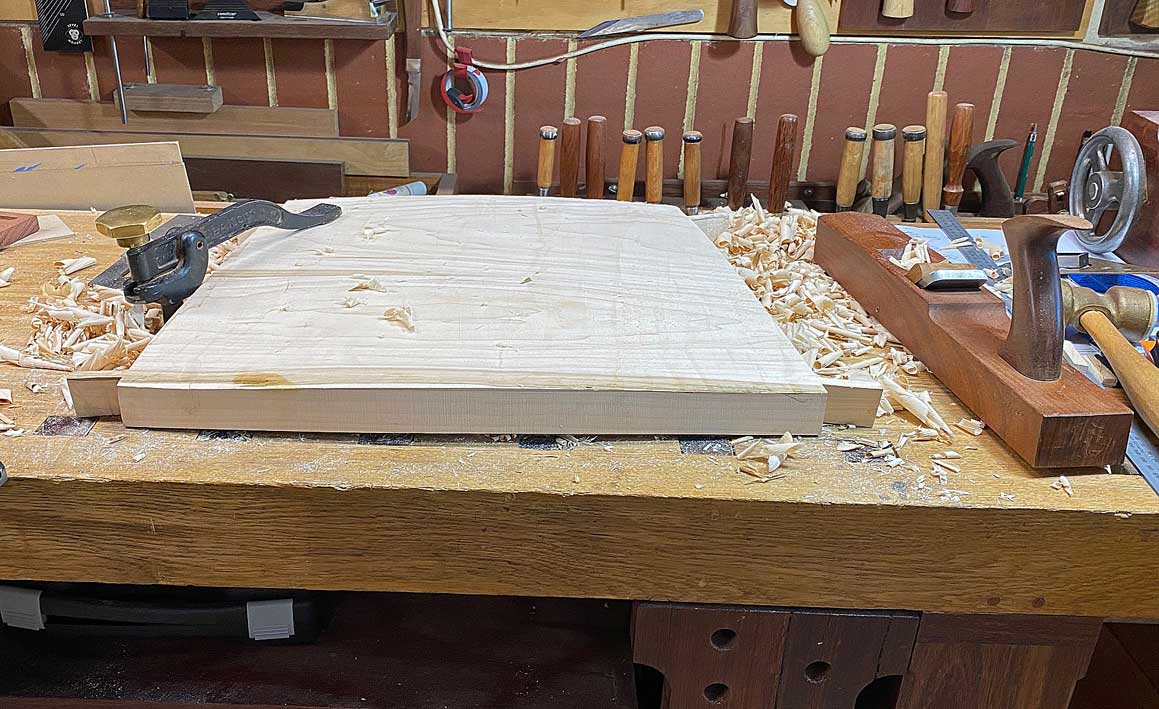
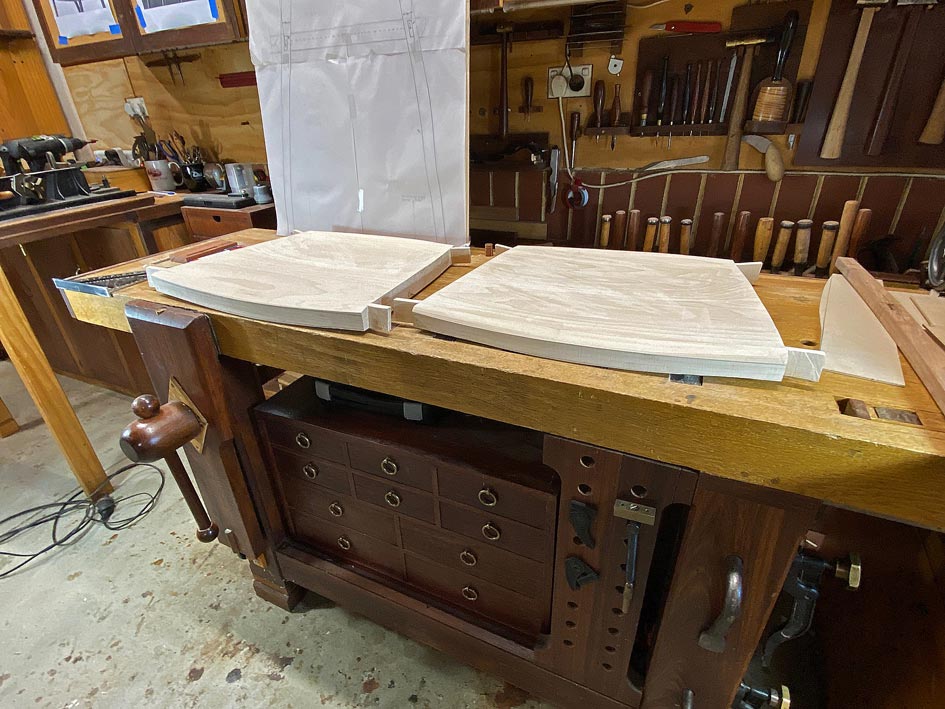
The spokeshaving of the first seat is done, and alongside an unfinished seat for comparison ...
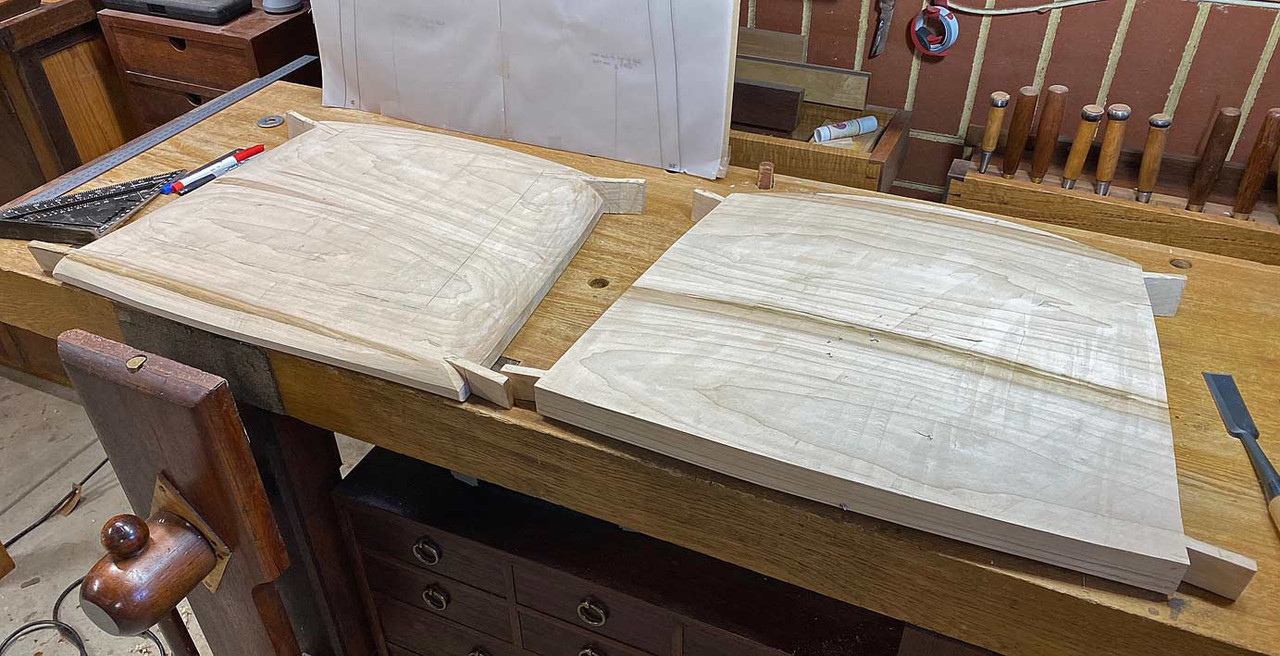
Working on the second seat at the close of the day ...

Regards from Perth
DerekVisit www.inthewoodshop.com for tutorials on constructing handtools, handtool reviews, and my trials and tribulations with furniture builds.
-
22nd January 2024, 02:05 PM #28
GOLD MEMBER
- Join Date
- Aug 2011
- Location
- bilpin
- Posts
- 3,559
Derek, I refer to your comment about loose tenons being weaker than integral. There is a certain amount of truth in that but compromised by the fact that the grain in an angled integral tenon becomes cross grained to the extent of the angle. Under normal circumstances this is avoided and a straight grain tenon is the ideal. The amount of time spent mucking about with integral tenons in chair manufacture, often having to be angled in multiple directions compromises the grain integrity even further. We now have a situation where the difference between the two options has become somewhat less destinct. When making this style of chair (solid carved base) I prefer to resort to slip tennons for the reasons previously stated. Tenons are epoxied into the seat base in the interest of strength but I prefer not to use epoxy for general glue up as it lacks flexability which can often become a problem on stressed joints. A bobbin sander makes leg shaping a breeze.
Like your work.
-
22nd January 2024, 05:42 PM #29
Be inspired. Be creative. Be bold.
- Join Date
- Apr 2001
- Location
- Perth
- Posts
- 10,826
Rusty, I agree with you. More that you realise.
There is a good reason why so few chairs (if any!) have tenons integrated into the seats. Being able to choose the grain direction for the tenons is vital for strength. I am not happy with the run out for these seats. My confidence in the reliability is low, and I am making the hard decision to rebuild the seats (!) with loose tenon joinery.
Fortunately, I think that I have worked out the method shaping the seats more efficiently, the plans have been worked out, so this is not a total disaster. Plus the existing legs can be used. Deep breath and get on with it.
Regards from Perth
DerekVisit www.inthewoodshop.com for tutorials on constructing handtools, handtool reviews, and my trials and tribulations with furniture builds.
-
23rd January 2024, 01:11 PM #30
GOLD MEMBER
- Join Date
- Apr 2009
- Location
- Melbourne
- Age
- 52
- Posts
- 1,126
Fingers hurting with the likes given, Love your work mate.


 Reply With Quote

Similar Threads
-
Dining room chairs
By Template Tom in forum ROUTING FORUMReplies: 0Last Post: 18th May 2016, 06:15 PM -
dining room chairs
By Gaza in forum WOODWORK - GENERALReplies: 1Last Post: 23rd December 2007, 08:13 PM -
Dining Room Chairs
By dreinoga in forum DESIGNS & PLANS FOR PROJECTSReplies: 3Last Post: 13th November 2004, 09:28 PM -
Books on making dining-room chairs
By willy_punter in forum WOODWORK - GENERALReplies: 4Last Post: 8th June 2004, 05:21 PM -
Oak dining chairs
By Darryl in forum FINISHINGReplies: 1Last Post: 27th March 2002, 09:13 AM
