

 Thanks:
  Likes:
  Needs Pictures: 0
 Picture(s) thanks:
Results 1 to 15 of 38
-
12th January 2024, 02:37 AM #1
 Be inspired. Be creative. Be bold.


- Join Date
- Apr 2001
- Location
- Perth
- Posts
- 10,826
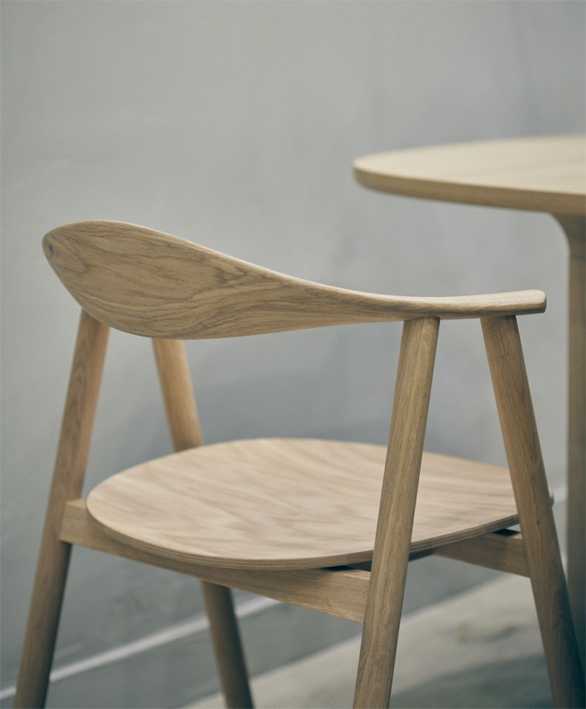
 Building dining room carver chairs
See my earlier post on "shaping legs" for the introduction.
After some discussion, and a sudden increased awareness of dining room chairs, I decided to level the seat in profile ...
The seat will not end up horizontal, however, but be curved across the width, and further carved for extra depth at the butt end.
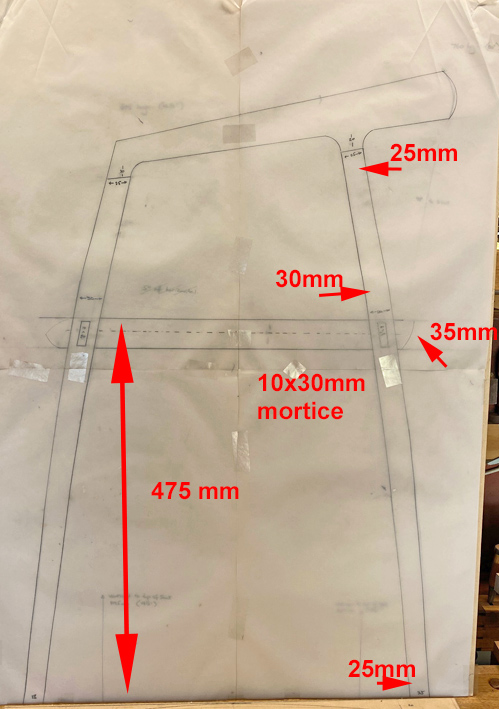
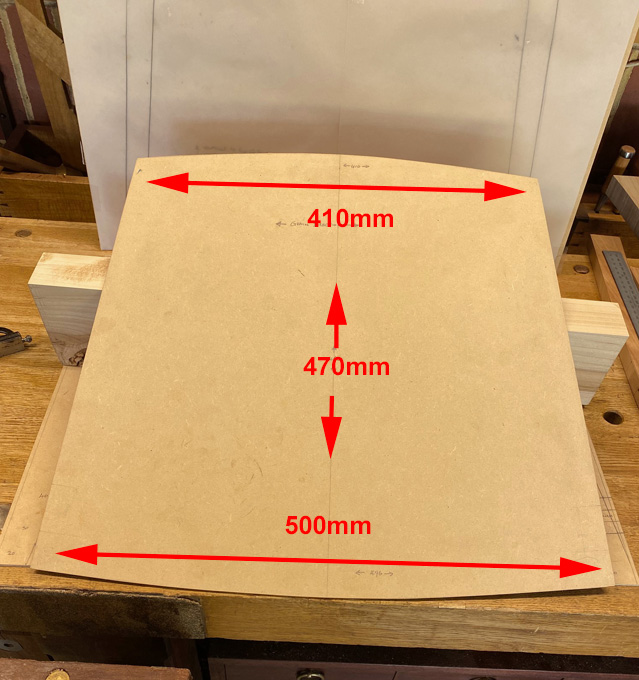
This is a basic template for the seat ...
The seat will be attached directly to the circular legs with through integral tenons for strength, and because the curved seat would make it difficult to use loose tenons. The tenon/mortice with be 10x30mm.
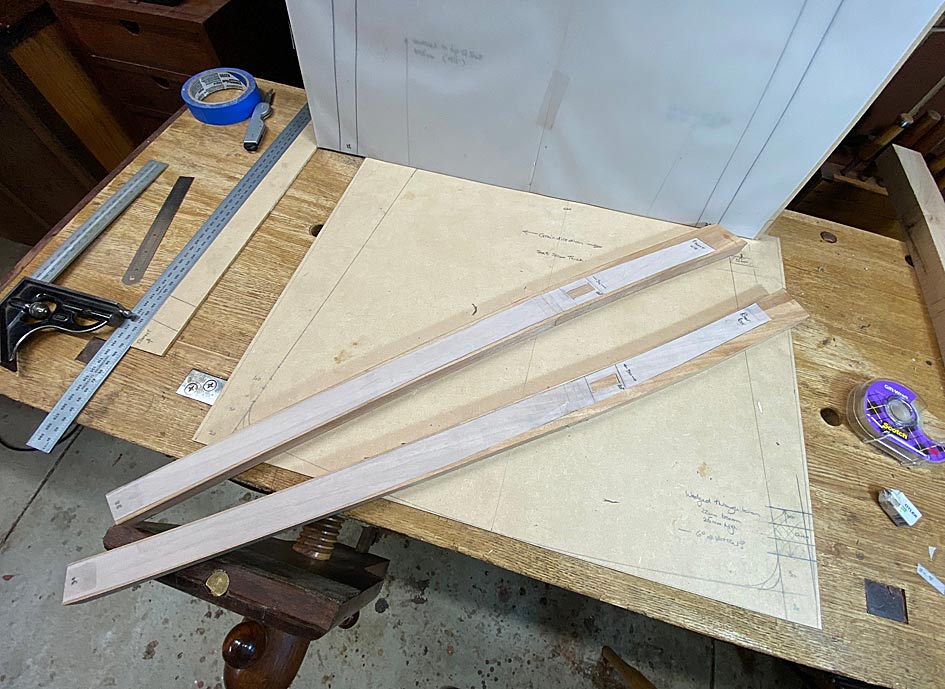
A tracing of the legs was used to create templates ...
In drawing the legs, each was mapped out separately, but with the same basic parameters: 25mm diameter at the top and bottom, and 30mm diameter through the centre. Similar curve plotted. The rear legs are roughly 30 mm longer than the front legs, and I anticipated that the proportions would differ as a result. However, when I placed the two templates on top of one another, they were exactly the same! And not only that, but the mortices were in exactly the same position as well!!

As a result, one template was used for both front and rear legs.
The plan was to bandsaw out each leg ...

... and then use a pattern bit on the router table to trim the waste ...
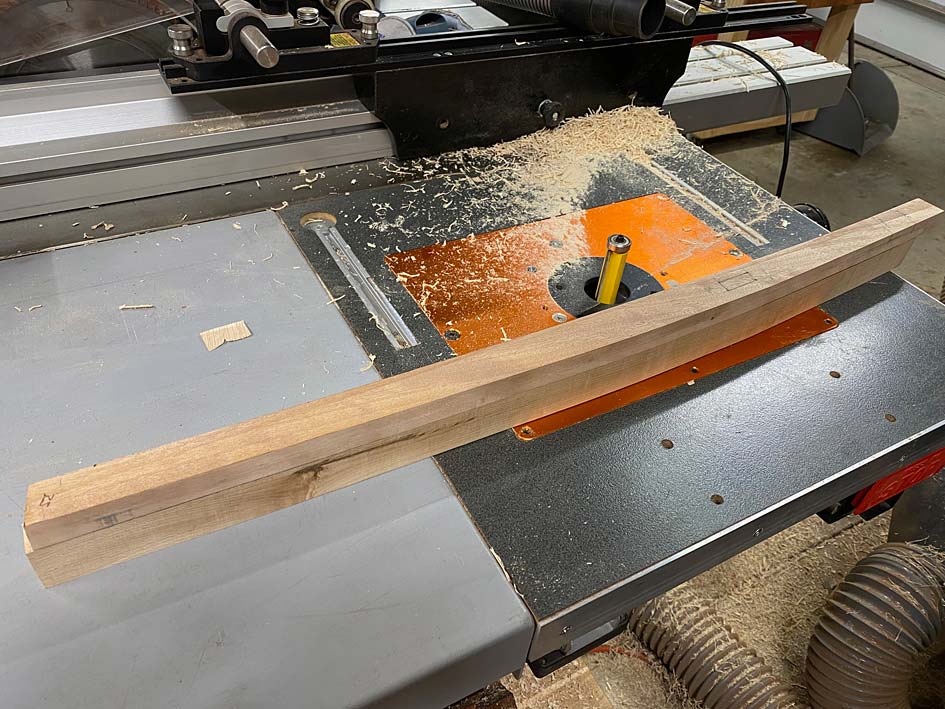
This did not go to plan. The first leg was uneventful, but the second decided to explode. This is what I feared from the Rock Maple. Even with care in regard to grain direction, and resorting to climb cuts where needed, the router bit I had available was not helpful (the router bit I ordered had not arrived, and would be some days away).
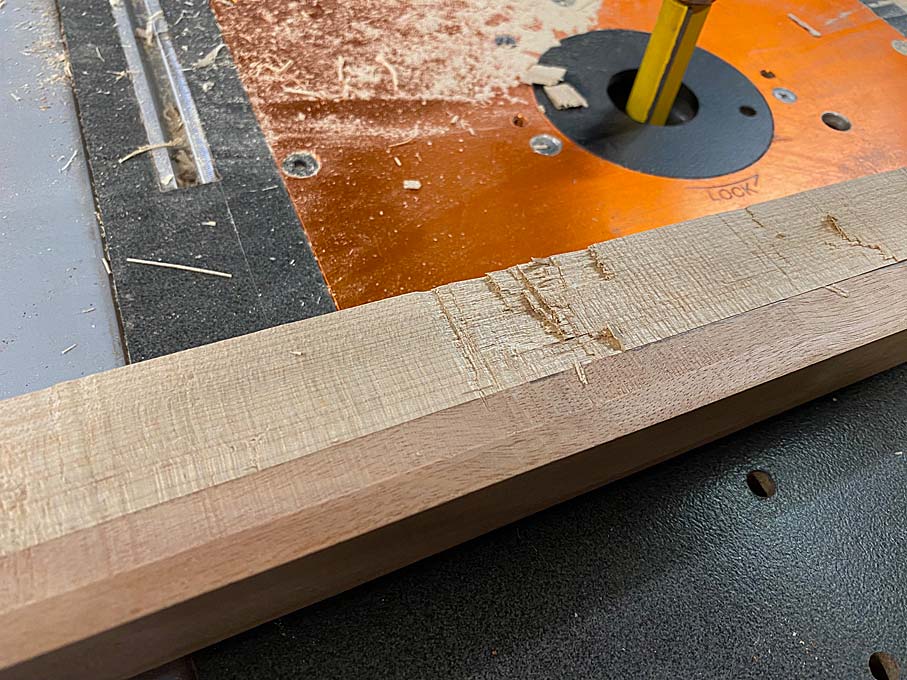
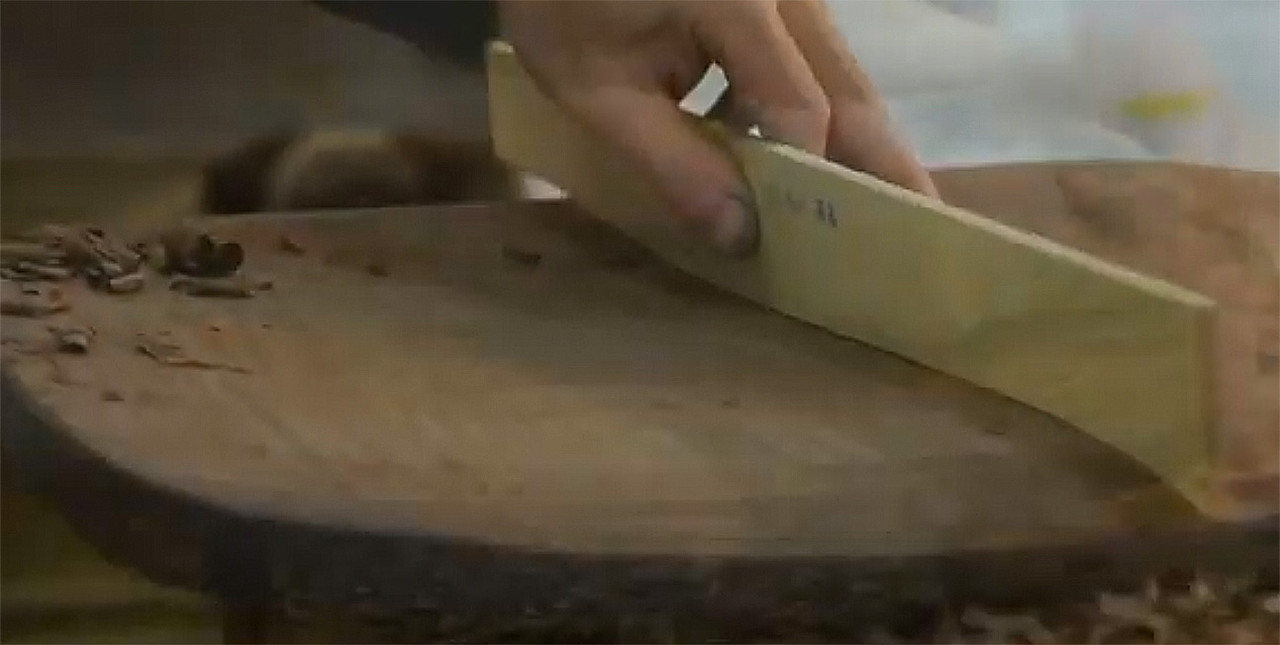
I had four leg blanks for the first chair cut out, and decided to do it in a method with which I am more comfortable ... with hand tools. Since there was so little waste to remove, a spokeshave on the inside curve was simple enough ...
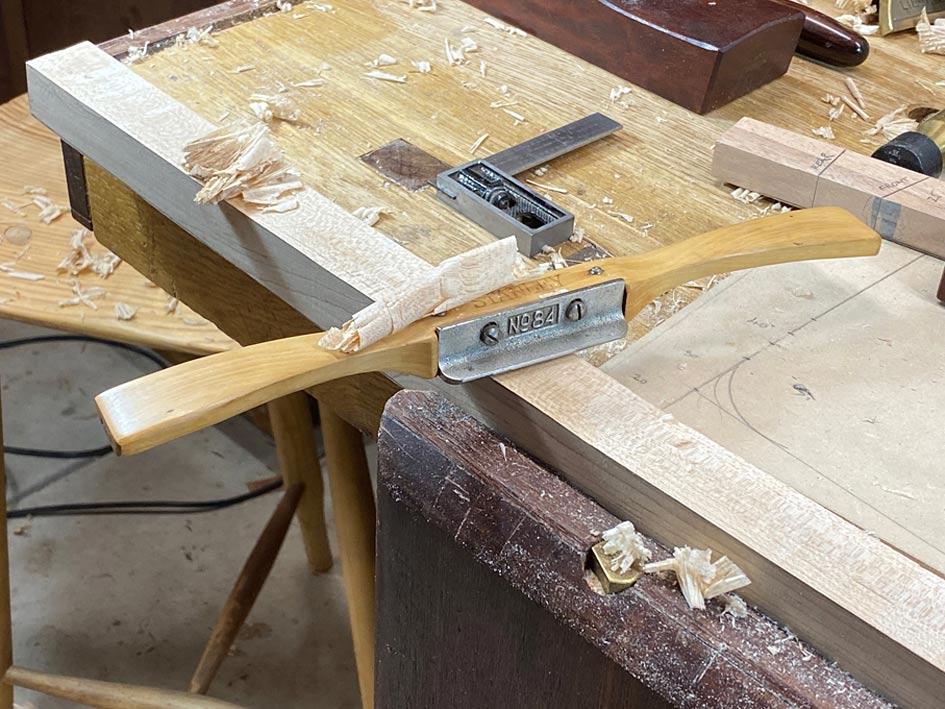
... and a hand plane on the outside curve was even easier ...
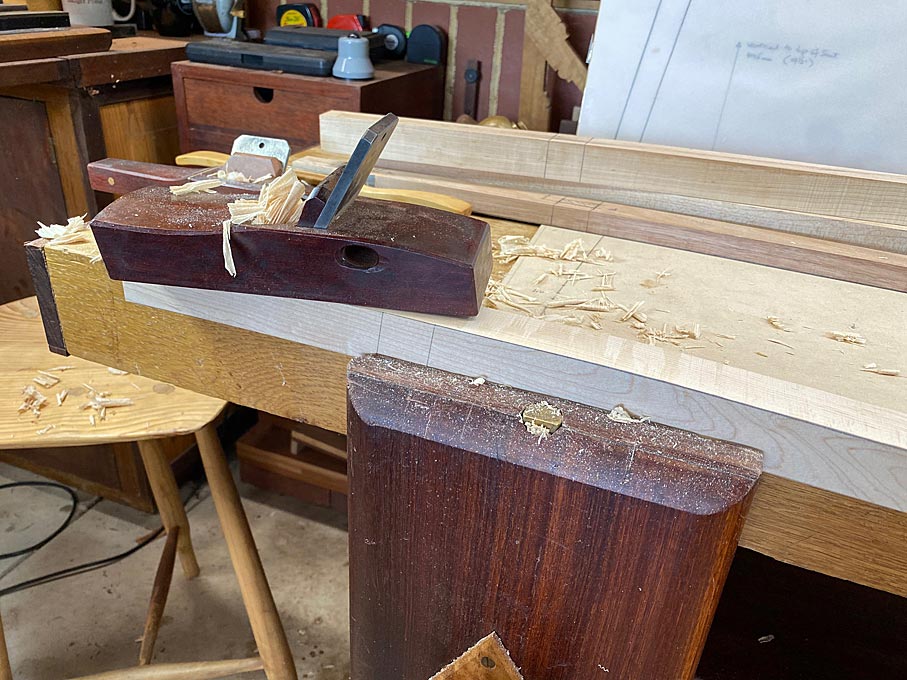
It is vital to check frequently that everything is perfectly square. Morticing would not be possible otherwise.
Rock maple may be hard and brittle, but it cuts cleanly with a plane blade.
The leg blanks are 30mm thick. Once the outline is cut to match the template, the ends will need to be reduced to 25mm ...

Lastly, for now, the position of the mortice was marked on both sides of each leg. The legs will be attached with through mortice-and-tenons, and each mortice is cut half-wway from each side ...

I am putting aside these legs for now, and will return to the final shaping, along with the other four, after the seats are made. which is next up.
Regards from Perth
DerekVisit www.inthewoodshop.com for tutorials on constructing handtools, handtool reviews, and my trials and tribulations with furniture builds.
-
12th January 2024 02:37 AM # ADSGoogle Adsense Advertisement
- Join Date
- Always
- Location
- Advertising world
- Posts
- Many
-
12th January 2024, 11:04 AM #2
Be inspired. Be creative. Be bold.
- Join Date
- Apr 2001
- Location
- Perth
- Posts
- 10,826
The question I have is whether to keep the ends of the mortices round, or square them off? Square ends make for easier square (hand cut) tenons .. integral to the seat), but round ends will look better - in keeping with the round legs.
Regards from Perth
DerekVisit www.inthewoodshop.com for tutorials on constructing handtools, handtool reviews, and my trials and tribulations with furniture builds.
-
12th January 2024, 02:15 PM #3
Dances with splinters
- Join Date
- Jul 2005
- Location
- Oberon, NSW
- Age
- 63
- Posts
- 13,360
They're through tenons, so will be visible?
I don't know why you posed the question... you rarely do 'easy' and we know you'll be going round!
- Andy Mc
-
12th January 2024, 04:10 PM #4
 GOLD MEMBER
- Join Date
- Apr 2006
- Location
- Hobart
- Posts
- 5,129
Pragmatic Originally Posted by derekcohen

It is easier to cut rounded mortices if you use a powered router or domino - a domino is really a specialist router. So if you have rounded mortices then you round over the tenons.
If you chisel the mortices then they will have square corners.
Aesthetic
In my view rounded exposed tenons will look softer in the curvaceous rounded legs of your chair design.
Sub Conscious
You drew rounded tenons in your original design. Why change horses mid stream?
Derek Chair 1.jpg Derek Chair 2.jpg
Derek's Chair and Detail
-
12th January 2024, 04:15 PM #5
Be inspired. Be creative. Be bold.
- Join Date
- Apr 2001
- Location
- Perth
- Posts
- 10,826
Hi Graeme
Thanks for the input. I always value your views.
The original drawing had rounded tenons. The last drawing had squared. Neither mean anything definitive until they are done
Regards from Perth
DerekVisit www.inthewoodshop.com for tutorials on constructing handtools, handtool reviews, and my trials and tribulations with furniture builds.
-
12th January 2024, 06:48 PM #6
Butcher of wood
- Join Date
- Jun 2010
- Location
- Bundaberg
- Age
- 54
- Posts
- 3,428
I agree; go with rounded tenons.
If however you are feeling that routing them out will look too �machine like� you can always drill the ends of the mortises using a hand brace!
I actually did this several years ago as an experiment just to see how hard it could be; the answer is �fairly bloody hard� as it required a very sharp, very straight auger bit, very steady hands and much attention paid to keeping the bit bang-on square. It turned out that every mortise ended up very slightly tapered, a bit like a very finely angled dovetail; but the tenons could then be wedged which added a decorative touch (this wedged detail was inspired by an article by Neil Erasmus on building drawers; front attached with dovetails, rear attached with rounded and wedged tenons).Nothing succeeds like a budgie without a beak.
-
13th January 2024, 03:36 PM #7
GOLD MEMBER
- Join Date
- Apr 2006
- Location
- Hobart
- Posts
- 5,129
Hi Derek
I really like your dining chair design. So minimalistic, elegant and functional - eliminate the unessential, and nothing else!
Coincidentally, I have been working on a very similar design for 3 or 4 years now, but with one very major variance from yours - I have the two front legs, the arms and the back rail as a single piece of timber. Am stuck at the HTF do I fabricate it stage?
- Steam bend the timber, or
- Laminate the timber.
I am drawn to the latter but coralling the laminates in the glue up is daunting. The laminates would have to be aligned horizontally on the leg/arm interface and vertically on the back rail curve, so there must be a twist on the arms. This could be interesting. Especially the grain alignment.
Daunting; no where near ready to cut timber yet.
Suspect that this is one of those cases where the first iteration is impossible, and the tenth is easy.
Meanwhile, my PC died spectacularly jus before Christmas, and I am certainly not a geek.
-
13th January 2024, 03:47 PM #8
GOLD MEMBER
- Join Date
- Apr 2006
- Location
- Hobart
- Posts
- 5,129
Yet another of those stories that ends ... "I should have used the drill press and a clamping jig." Originally Posted by Chief Tiff
-
13th January 2024, 04:26 PM #9
Butcher of wood
- Join Date
- Jun 2010
- Location
- Bundaberg
- Age
- 54
- Posts
- 3,428
But that would have defeated the purpose of finding out if I could do it by hand and eye! Originally Posted by GraemeCook
 Nothing succeeds like a budgie without a beak.
-
13th January 2024, 04:35 PM #10
Be inspired. Be creative. Be bold.
- Join Date
- Apr 2001
- Location
- Perth
- Posts
- 10,826
Originally Posted by Chief Tiff
CT, while I really enjoy using hand tools, I am also pragmatic. At present I have started the process of shaping the two seats, which are carved from solid Rock Maple. Have you tried using hand tools to scoop out Rock Maple?! The seats are curved from side-to-side, both top and bottom. The result must end with the sides being 35mm thick, as the tenons will be shaped from this (30 x 10mm tenons ...) And, oh, they will be rounded at the ends as this is sympathetic to the design. So what if they have the look of machine-made joints. I know they are hand made and, frankly, no one of my friends will even notice. Only us woodworkers do.
So I am partly carving the shape for the seats using a router sled I built. This will remove much of the waste, and then it will be finished with hand tools. I am not crazy!
Regards from Perth
DerekVisit www.inthewoodshop.com for tutorials on constructing handtools, handtool reviews, and my trials and tribulations with furniture builds.
-
13th January 2024, 04:42 PM #11
Be inspired. Be creative. Be bold.
- Join Date
- Apr 2001
- Location
- Perth
- Posts
- 10,826
Graeme, there are a number of ways to build the arm-back structure. Early on I discarded laminations (too much risk of the Rock Maple looking like plywood. A dark wood may be more successful) and steam-bending (Rock Maple is a very poor candidate). Originally Posted by GraemeCook
That left me with a multi-piece construction. The choice of where to place the joins is the next decision. It could be a the juncture of the arms and back ... ala The Chair. I am going to join join two pieces at the centre of the back.
The next choice is how this will be done. Lots of ways, and I'll leave that for now. Hint ... think Tage Frid.
Regards from Perth
DerekVisit www.inthewoodshop.com for tutorials on constructing handtools, handtool reviews, and my trials and tribulations with furniture builds.
-
13th January 2024, 04:58 PM #12
GOLD MEMBER
- Join Date
- Apr 2006
- Location
- Hobart
- Posts
- 5,129
I will re-read him tonight. Originally Posted by derekcohen
-
14th January 2024, 02:56 AM #13
Be inspired. Be creative. Be bold.
- Join Date
- Apr 2001
- Location
- Perth
- Posts
- 10,826
Shaping the legs have been set aside until the seats are carved. Shaping the seats is a challenge I have been looking forward to, but I must admit that two days have passed, and there is not much to show for a lot of effort. Let's have a look at the design of the seats.
The notable feature of these chairs is that they do not have a single straight line. Anywhere. There are three design aspects ...
Firstly, the plan for the seats will be curved like these ...
However, they are to be 35mm high at the sides, and recessed like these ...

The underside must curve sympathetically with the seat ...

The third factor is that the seats will be attached to the legs with mortice-and-tenons, and will not rest on stretchers, as most chairs appear to do (and seen in an example, above). The reason for this is to increase the appearance of lightness. Shaping of the seat has to make provision for the integral tenons.
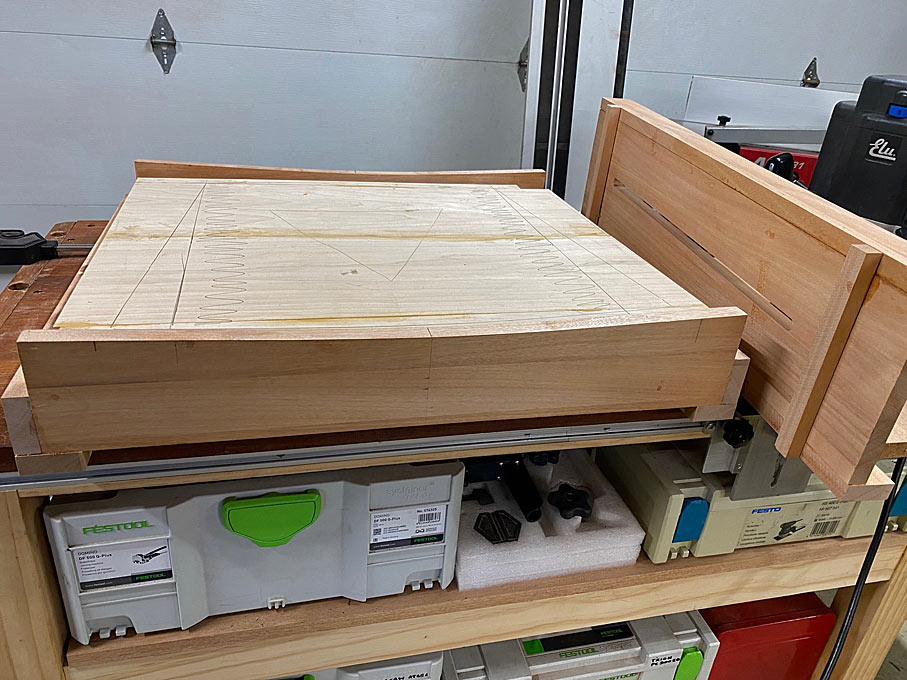
The seats are to be shaped with a combination of power- and hand tools. Power is needed .... this is Rock Maple!
I spent time building a router sled to curve the tops and bottoms of the seats. The tops are documented here.

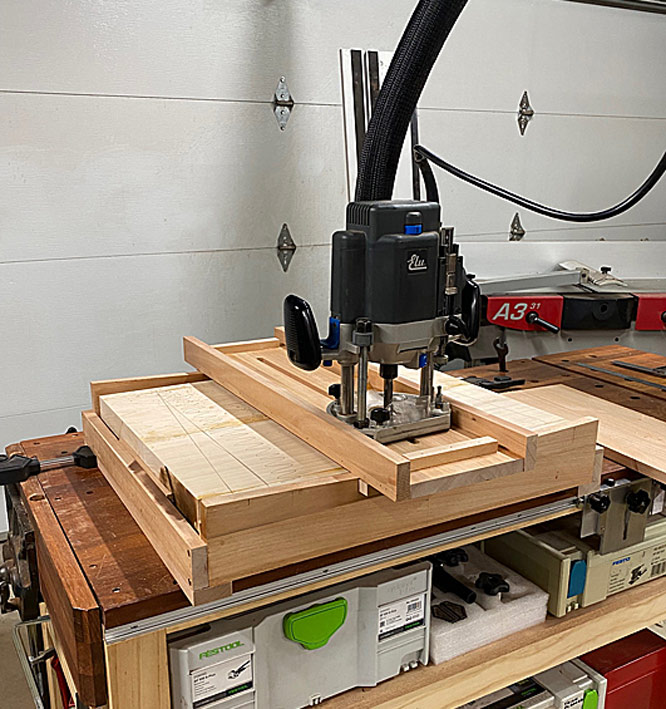
Today was 37 degrees Celsius (99 degrees Fahrenheit), and it was HOT in the unconditioned workshop, all windows and doors closed to be kind to neighbours. And it was slow going pushing the router back-and-forth. Plus it was messy ..
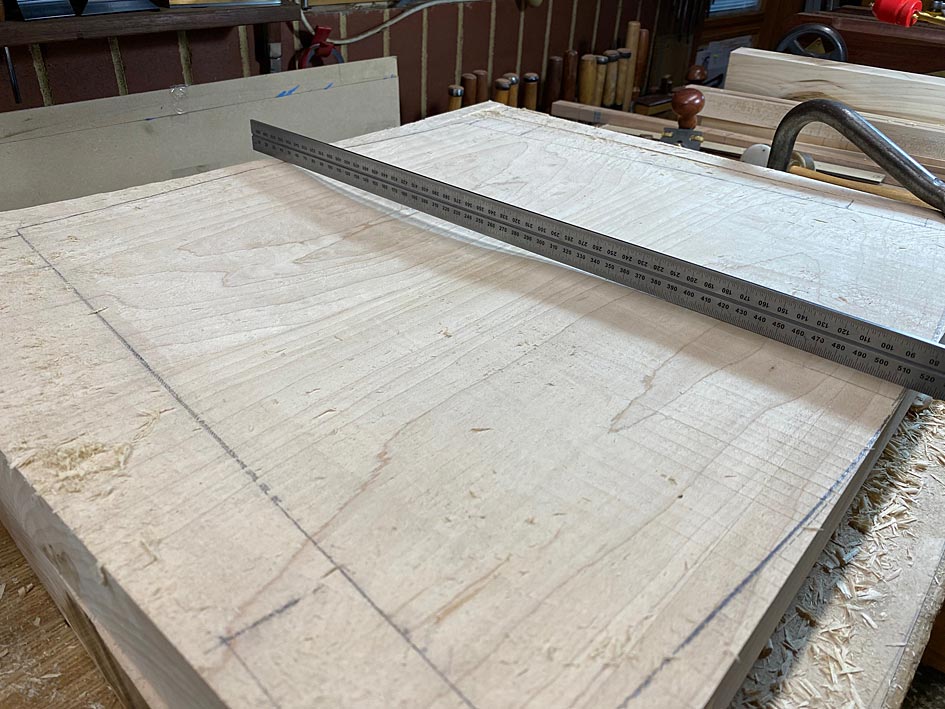
This was the result of my labours: two boards with the initial curves on their tops. These boards started out at 50mm thick.

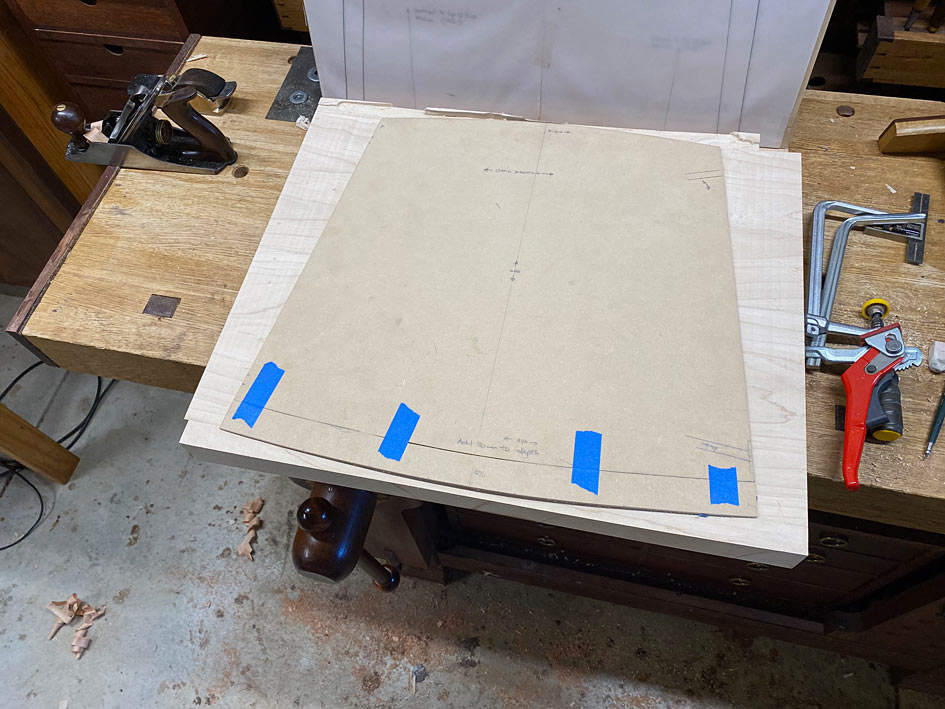
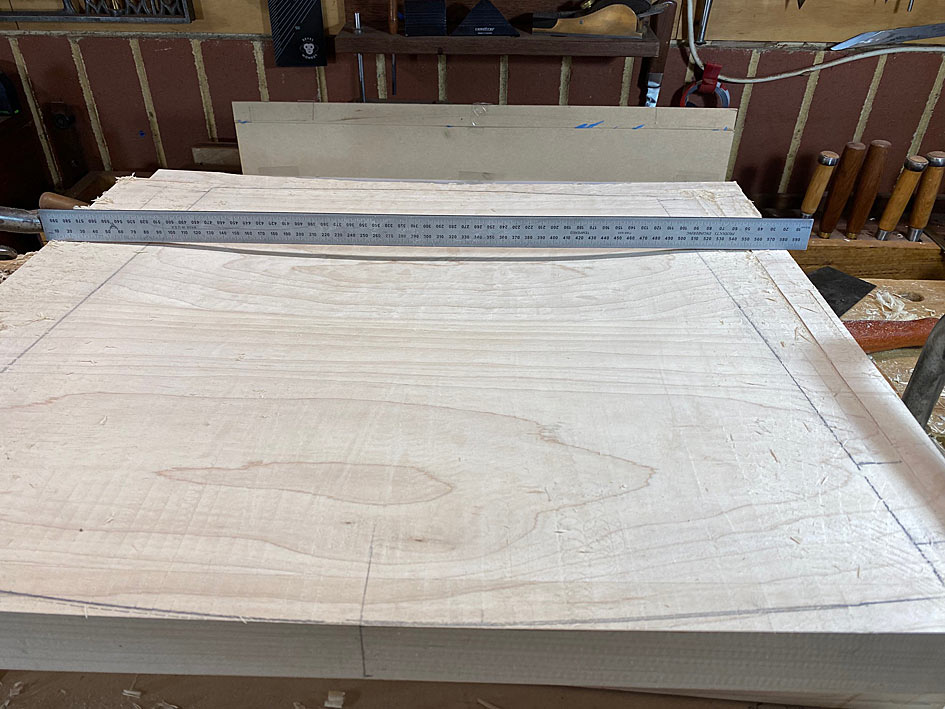
There is a template for the basic shape. This is simply to position the tenons. The outline will be modified later ..
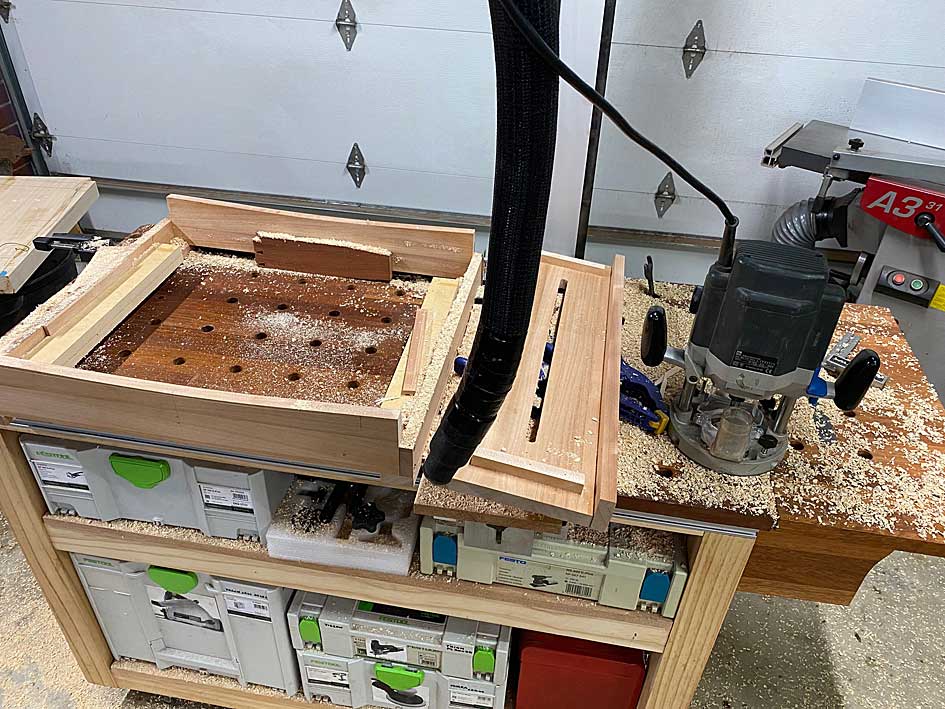
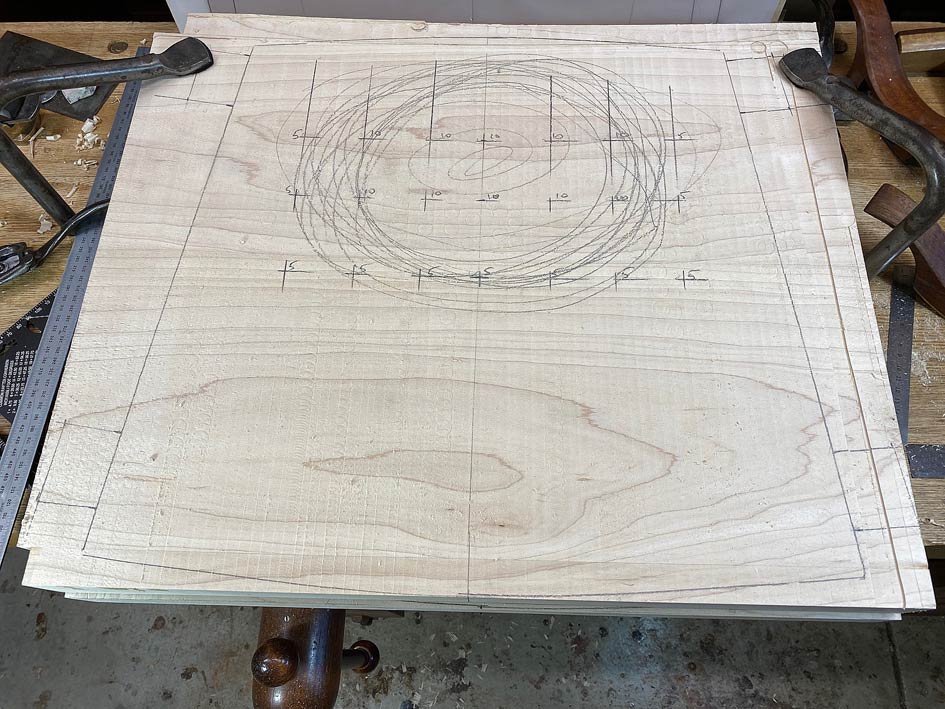
The section for deeper hollowing is marked out, and a grid created to position 10mm holes through the centre and 5mm holes at the sides to guide waste removal ...
A scorp was used to remove the bulk of the waste ...
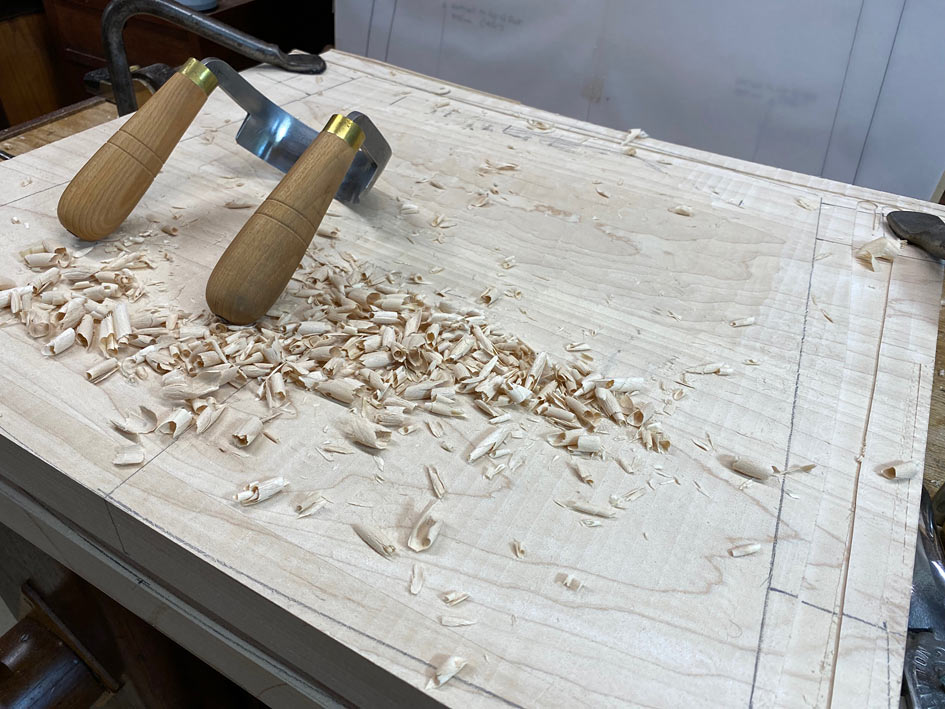
This was hard work - the Maple is hard stuff - and the next seat will use a different method. That will be revealed in the next post.
Shaping is done with travishers. I have two I built with different radius soles. This is one ..
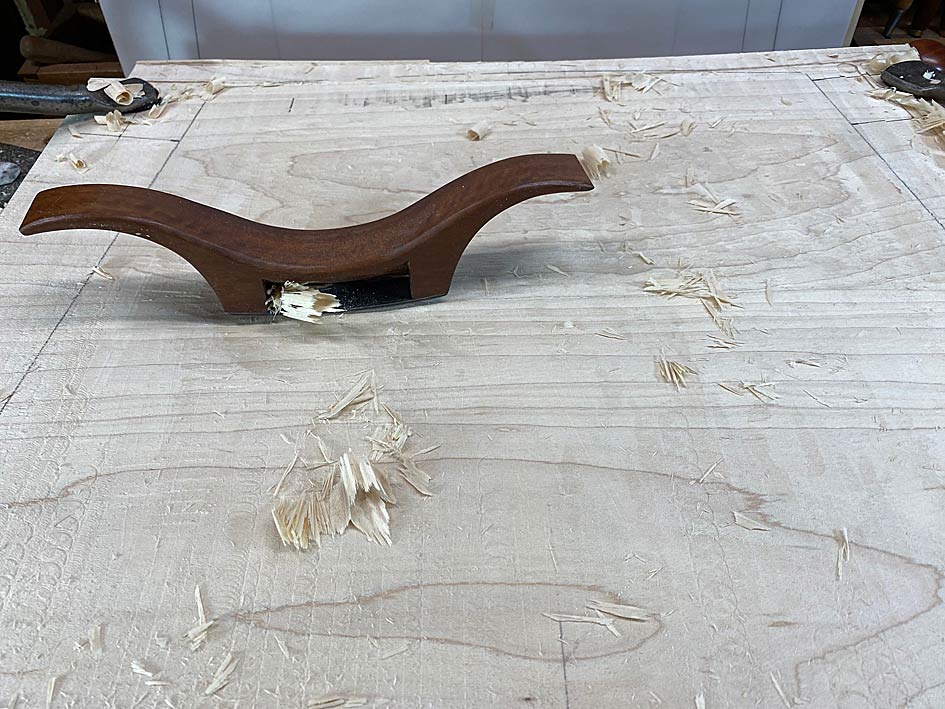
The result of my labours .... across the width ...
And through the centre ...
Lots of shaping still to be done at the front and underside.
In addition to the hollowing of the seat for comfort, the extra depth at the rear creates an effect tilt towards the rear legs. The amount of seat tilt can also be adjusted via shortening legs, if needed.
More soon.
Regards from Perth
DerekVisit www.inthewoodshop.com for tutorials on constructing handtools, handtool reviews, and my trials and tribulations with furniture builds.
-
14th January 2024, 12:15 PM #14
GOLD MEMBER
- Join Date
- Apr 2006
- Location
- Hobart
- Posts
- 5,129
Even when we lived in America, Derek, I managed to avoid hard maple, partly because of $$$'s and partly because of its reputation for being hornery.
What router bit are you using and what alternatives are you considering?
I have only done chair molded seats in much more benign timbers - sassafras, blackwood, CTP and radiata - and last time I resorted to a CNC. Even then, I got frustrated by all those little ridges left by the tool path and tried a lot of bits to minimise the hand clean up and sanding process. Eventually, I got the best results from an unexpected bit - a Carbitool half core box bit.
Carbitool Bit.jpg
It still left a visible tool path, but large sections of the cut out required minimal attention.
PS: Have you used a life model for the bum profile, or a generic guestimate?
-
15th January 2024, 02:57 AM #15
Be inspired. Be creative. Be bold.
- Join Date
- Apr 2001
- Location
- Perth
- Posts
- 10,826
Graeme, I have been using a 1/2" carbide spiral bit. Working with overlaps. Slow but steady.
Regarding a test fit, it is hard to do this as there are so many steps involved in carving these seats ... back-and-forth as you will see. I do check them as we progress.
Regards from Perth
DerekVisit www.inthewoodshop.com for tutorials on constructing handtools, handtool reviews, and my trials and tribulations with furniture builds.


 Reply With Quote

Similar Threads
-
Dining room chairs
By Template Tom in forum ROUTING FORUMReplies: 0Last Post: 18th May 2016, 06:15 PM -
dining room chairs
By Gaza in forum WOODWORK - GENERALReplies: 1Last Post: 23rd December 2007, 08:13 PM -
Dining Room Chairs
By dreinoga in forum DESIGNS & PLANS FOR PROJECTSReplies: 3Last Post: 13th November 2004, 09:28 PM -
Books on making dining-room chairs
By willy_punter in forum WOODWORK - GENERALReplies: 4Last Post: 8th June 2004, 05:21 PM -
Oak dining chairs
By Darryl in forum FINISHINGReplies: 1Last Post: 27th March 2002, 09:13 AM
