

 Thanks:
  Likes:
  Needs Pictures: 0
 Picture(s) thanks: 0
Results 16 to 30 of 195
Thread: Building Wegner's "The Chair" .
-
4th January 2014, 10:06 AM #16
 Senior Member


- Join Date
- Jun 2013
- Location
- Geelong
- Posts
- 427

Merry Christmas Derek, great way to advance your knowledge and you get a chair at the end of it.
"Be who you are and say what you feel, because those who mind don't matter and those who matter don't mind" dr Seuss
-
4th January 2014 10:06 AM # ADSGoogle Adsense Advertisement
- Join Date
- Always
- Location
- Advertising world
- Posts
- Many
-
4th January 2014, 03:00 PM #17
Be inspired. Be creative. Be bold.
- Join Date
- Apr 2001
- Location
- Perth
- Posts
- 10,821
Hi TT
Thank you for your detailed reply. There are many interesting ideas. However I suspect that we use very different methods for different reasons. ("If it were ME doing it I'd be making 6, 8, or 10 of them, so a lot of this hand tools stuff would be out the window for a start.")
Your methods make sense if you are in production, building chairs quickly and willing to omit details.
For example, "When I turned the legs, I'd leave them square where those stretchers tenon in.
Id use the chisel morticer to go in square just deep enough - to create a mortice to take the whole end of the spreader at say 13mm."
But the legs on the chair here are offset, so square makes it difficult to judge where the mortice will go, unless you are using a CNC machine.
Plus, I want the intersection to be identical to the original, which means coping the tenon shoulders, which you would omit.
Drill and screwing? ... well ... Wegner is no doubt spinning in his grave
Regards from Perth
DerekVisit www.inthewoodshop.com for tutorials on constructing handtools, handtool reviews, and my trials and tribulations with furniture builds.
-
4th January 2014, 05:33 PM #18
Banned
- Join Date
- Jul 2013
- Location
- Perth
- Posts
- 665
No worries
No worries Derek,
I'm still confused how we know that the original stretchers had coped tenon shoulders?Plus, I want the intersection to be identical to the original, which means coping the tenon shoulders, which you would omit.
You apparently don't have the original plans for the chair, and are copying a knockoff copy.
You do you know the manufacturer of the knockoff copy didn't cope the end of the tenons to match the turned leg with a spindle moulder and specific coped tenon cutter - purley because thats what machinery he had, its it was quickest easiest for him?
How do you know Wegner didn't use the method I suggested in the original for e.g?.
That was my point, if your copying a copy - then it could well have been adapted to suit the copyists access to whatever machinery he had available to him - during his adaptation of the original design.
You might be faithfully copying a poor copy from a structural strength / integrity engineering point of view - that Wegner would never have used.
My suggested method would be leagues ahead on downward sheer strength on the tenon because the whole end of the spreader would be supported within the mortice - while in the coped tenon end method you propose to copy, the only inherent mechanical strength against downward sheer moment from being sat on - is the much smaller cross sectional area of the remaining tenon?
Would Wegner spin in his grave at a improvement for example that would save time assembling / making hios chaor and strengthen it?
We just seem to be in some imaginary commitment to an old design, probably put together with animal glue?
Will you be doing likewise in homage to history?
Why is this important?
Because from what I can see your making Wegners chair in Australian Jarrah a species Wegner probably never imagined let alone intended, and as I have posted elsewhere recently - the acidic nature of sap in WA Jarrah - usually starts the break down process within glues that aren't inert (like epoxy resins) - within the first 5 years or so.
The whole REASON that designers and makers looked for mechanically strong joints was because they knew that they couldn't rely upon the strength of their glues for any length of time.
I've suggested the strongest joint method I can in the hope that the chair will last as long as possible regardless of what glue is used.
Maybe Wegner would applaud such an improvement - adaptation.
If you wanted to make that chair fast - without any engineered strength - then a finger joint on the chair leg and end of stretcher - and use the electrically cured glue - and reply entirely on the mechanical strength of the glue being stringer than the strength of the timber.
Just about all timber cupboard door style andrail joints are done this way these days for speed of assembly - and they are good for maybe 6 years before the joints start to fail.
It works but it isn't best practice from a purely mechanical strength point of view.
Pelleted dowel thru the fully housed stretcher end - would probably be the mechanically strongest joint you could get.
When its finished - no one (except yourself) at a casual glance, will have any idea what joint you eventually pick and use.
The method I suggested would be what I'd have used if I was making a chair to last 200+ years = i.e. heirloom furniture.
No one gets to see the method employed unless they are there when the chair eventually falls apart.
Will you be hand sawing the tenons and making the mortices with a chisel and hammer, and hand turning each leg?
Whatever works for you Derek - is what you should use.
Only you will know whats inside that joint glue wise and engineering deign wise for strength... and as long as your personally happy with it at the end is what matters.. there is no right or wrong...
Would Wegner spin in his grave of all the components were made on a 5 axis CNC machine and came in a kit from Ikea - and people put them together at home on the Kitchen table at night with a bottle of PVA - or metal screw together knock down / assemble it yourself fittings, for the joints?
How would we know what Wegner would think (or do - design) if he had access to today's CNC technology?
Gotta make you wonder eh...
And if he saw his chair being 3D printed?.... without use of human hands and in materials he never imagined (Graphite fiber)?...
I think Wegner would possibly have a brain phart.....because he would 'see' so many NEW design possibilities with the property's of materials he couldn't even imagine, and manufacture techniques that again he could never have even dreamed of.
Always fun to speculate.
-
4th January 2014, 06:31 PM #19
Class Clown
- Join Date
- Nov 2005
- Location
- Darkest NSW
- Posts
- 3,207
I know it won't appeal to Derek, but for me:
Coped tenon = cut domino hole in square end of stock, create curve using spindle sander of appropriate diameter, insert domino, finished.
The only tricky bit is making a jig to clamp on the spindle sander so that the stock is guided in exactly along the centre line of the spindle. I then used the same spindle to make a coved sanding block so that the outside curve on the mating piece (rough shaped by spokeshave) could be tweaked to exactly the same radius.
Of course, using only hand tools, its a different kettle of fish......
Watching this one with interest Derek - good stuff
-
4th January 2014, 07:00 PM #20
Be inspired. Be creative. Be bold.
- Join Date
- Apr 2001
- Location
- Perth
- Posts
- 10,821
Hi TTI'm still confused how we know that the original stretchers had coped tenon shoulders?
You apparently don't have the original plans for the chair, and are copying a knockoff copy.
I do not have a knock off copy. I have an original Wegner The Chair chair. The Real McCoy.
I have been examining the original chair joint.
Regards from Perth
DerekVisit www.inthewoodshop.com for tutorials on constructing handtools, handtool reviews, and my trials and tribulations with furniture builds.
-
4th January 2014, 07:28 PM #21
Banned
- Join Date
- Jul 2013
- Location
- Perth
- Posts
- 665
Ohh = O.K.
Ohh - OK I understood differently.
I had second wind .. contacted the Australian Forum to see if anyone in Perth had The Chair. But unfortunately no.
I started searching through eBay (Australia). Perhaps I could find an original for less than the $4500 asking price � several thousand dollars less than that.
And you know what? There was one! Just one other bidder � who put in a token bid � and I was the owner of one of the chairs I have coveted for yonks � $500 for an original #503 The Chair in original condition save for a recovered seat.
This is a chair that was made under license for a short while in the 1960s by Danish Design in Melbourne. It has Tasmanian Blackwood body and Teak legs.

I understood it was a licensed copy made in oz as per the above.
Cheers
-
4th January 2014, 07:45 PM #22
Wood Planner
- Join Date
- Apr 2008
- Location
- Lalla, Tasmania
- Posts
- 1,350
I wouldn't, I'd just buy one from evil bay Originally Posted by derekcohen


SBPower corrupts, absolute power means we can run a hell of alot of power tools
-
4th January 2014, 09:56 PM #23
Be inspired. Be creative. Be bold.
- Join Date
- Apr 2001
- Location
- Perth
- Posts
- 10,821
Hi TTI understood it was a licensed copy made in oz as per the above.
That's correct. The chairs have been made under licence by a couple of companies, the main one being PP Mobler and the other being Carl Hansen & Son.
In the 60's, a factory was set up in Melbourne by Danish Designs, who manufactured the chaires under licence for a short while.
Here is one link I could find: Pair of Hans Wegner “the chair” made by Danish Deluxe Australia in blackwood | Red Rider
All chairs made under licence are identical as they use the same templates and sanding replicators.
There are cheap replicas on eBay, but these are look-a-likes and not the same thing at all.
Regards from Perth
DerekVisit www.inthewoodshop.com for tutorials on constructing handtools, handtool reviews, and my trials and tribulations with furniture builds.
-
5th January 2014, 12:28 AM #24
Banned
- Join Date
- Jul 2013
- Location
- Perth
- Posts
- 665
Ok
I hear you Derek,
Perhaos one reasin to cove the end of the spreaders and mortise them in - is that the design is very minimalist. BY that I mean there's not a lot of meat left in those legs once they are turned down to that dimension, so if you do mortice them in from two directions (and you were to house them in the way I suggested) - you MIGHT end up removing more than 50% of the available timber in the leg & weaken them structurally perhaps.
So coving them might be best achieved maybe with a special set of coved tenoning knives in a cutter block on the spindle moulder perhaps?
To do it by hand - a coping saw?
It should be achievable I would think with time and care.
Please do post up pics when you do this - keen to see how it works out.
And good luck.
Cheers
-
6th January 2014, 03:50 AM #25
Be inspired. Be creative. Be bold.
- Join Date
- Apr 2001
- Location
- Perth
- Posts
- 10,821
Tenons
Here is the link to the sawing of the tenons. Not straight forward (is anything?).
http://www.inthewoodshop.com/Furnitu...airTenons.html
There is also a partial answer to how I plan to cope the tenon shoulders.
Question time again How would you go about making the mortices with hand tools?
Regards from Perth
DerekVisit www.inthewoodshop.com for tutorials on constructing handtools, handtool reviews, and my trials and tribulations with furniture builds.
-
6th January 2014, 06:41 AM #26
Banned
- Join Date
- Jul 2013
- Location
- Perth
- Posts
- 665
Does
Does a drill press count as hand tools?
Or an electric hand drill?
Or are you going to wind the handle on a hand drill?
I'd use a drill press with set stop for depth - drill a row of holes at the 2 different depths and chisel them out.
That's assuming I didn't use the mortising attachment on the X31 or a chisel morticer...
Your really keen on all this hand tool bidness aren't you?
Fair play to you.
Does it drive you nuts that you don't get repeatable accuracy this way and have to hand fit every joint by trial and error until you do get a snug fit?
I understand why your making just one chair - no one would live long enough to make 6, 8, or 10 doing it this way - but its undoubtedly a "Zen and the art of chair making by hand" type exercise.
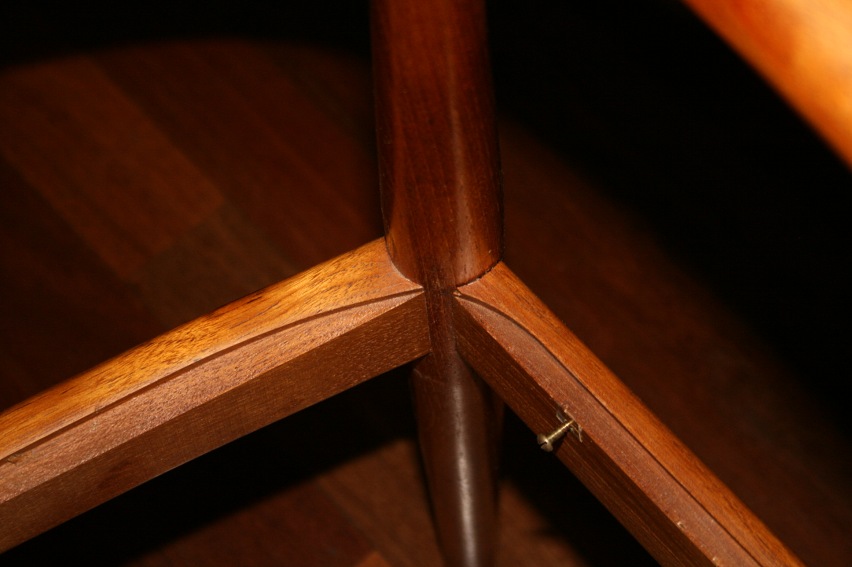
Does it look to you like those mass produced stretchers in your photo were made similarly by hand?
There's a clue in there for you somewhere!
Electrickery - white fella magic.... heap good medicine paleface!
-
6th January 2014, 11:56 AM #27
Be inspired. Be creative. Be bold.
- Join Date
- Apr 2001
- Location
- Perth
- Posts
- 10,821
Hi TT
You're spot on! I'm impressed.
If I was building more than one there is no way in the world that I would be doing so purely by hand. The parts on the original chairs were made on a duplicating sanding machine, and only finish work was done by hand - largely sanders.
I discussed a lot of this in the months leading up to this build, that is, this is a machine-built chair with joinery that lends itself to machine-building. It is likely the reason why one one person ever (as far as I am aware) has built the chair by hand, and even then the joinery used was a shortcut (parts were dowelled together).
Why build by hand? Firstly, it is relaxing and quiet. I am not in a rush, but the work is proceeding at a decent pace (a couple if hours each day in the workshop while I am on holiday). There is the challenge to myself to test my abilities. Of course, it pays to be somewhat masochistic!
In some instances working with hand tools is now easier for me than using power tools. They are point-and-shoot, where as one has to set up a tablesaw to cut a precise angle, or a jig to hold the work piece at a precise angle while the saw does its job. Lots if room for error - and it happens in the blink of an eye. Still, if I was in production ...
I do plan to drill out the mortices with a depth stop and an brace. I'd rather use a router - that is the ideal tool - but I'm trying to do it without electricity for all joinery. The only power tools I have used are a bandsaw (I'm not that much of a masochist!) and a lathe (at least I got to hold the chisel in my hands).
Regards from Perth
DerekVisit www.inthewoodshop.com for tutorials on constructing handtools, handtool reviews, and my trials and tribulations with furniture builds.
-
6th January 2014, 01:45 PM #28
Banned
- Join Date
- Jul 2013
- Location
- Perth
- Posts
- 665
Interesting Derek
I think what your doing is great because it helps preserve hand skills - it would be a terrific project for wood working students (supervised) for them to come to understand the joinery aspect (String mechanical joints) of chair making and design for e.g.
Also I appreciate the aspect of little noise.
I'm beginning to get my head around your quest.
Stick at it...
A brace and bit you say?...
Keep the pics coming.
Cheers
-
6th January 2014, 04:00 PM #29
Be inspired. Be creative. Be bold.
- Join Date
- Apr 2001
- Location
- Perth
- Posts
- 10,821
Hi TT
Thanks for the encouragement.
If you are curious, you are welcome to come over and see the set up. I welcome the advice so far. I'm not sure where in Perth you are. I am in Rossmoyne (along the Canning River).
Regards from Perth
DerekVisit www.inthewoodshop.com for tutorials on constructing handtools, handtool reviews, and my trials and tribulations with furniture builds.
-
6th January 2014, 07:31 PM #30
 GOLD MEMBER
- Join Date
- Mar 2004
- Location
- Brisbane (western suburbs)
- Age
- 77
- Posts
- 12,117
Derek - if I were cutting mortises into round legs, I would do them in the square leg blank, before turning. I've done this a couple of times before, and it worked well - much easier to keep everything in line & the mortises square. Tap a plug of softwood into the completed mortise, so that the sides don't chip or get duffed during turning & sanding - if you don't go hog-wild with the plug, it's easy enough to prise it out once the leg has been turned & sanded.
I wouldn't try cutting the copes with a coping saw on such wide pieces, at least not right to the line. I would cut them across to free the cheeks, either with a backsaw or with my 10" bowsaw. It's hard to keep a bowsaw accurate & level in such a wide cut, so I would more likely opt for the backsaw, after trying it out on some scrap. If you cut across from the outside of the shoulder to the inner point, you will be left with a small arc of wood that has to come out. I'd use an in-cannel, straight gouge, that's either the right size or close enough, to complete the job. You only need to get the top & bottom perfect, the insides can be a bit rougher, but it should still look like a perfect fit.
I've used this method for fitting legs to round posts, for something like a tripod table: Table Silky Oak round red.jpg
For the table I only need to ensure the coped shoulders are clean at the outside, the inner bit is hidden under the flange on the post, so any roughness there won't show. You are going to have to be more careful, as the whole top of the shoulder will be visible. Also, I haven't tried these joints with wood as hard as Jarrah - Silky Oak is a crisp-cutting wood a few notches down the Janka scale from Jarrah! I'd be doing a couple of practice-runs before tackling the real thing...
CheersIW

 Reply With Quote


Similar Threads
-
Anyone in Perth own Wegner's "The Chair" ?
By derekcohen in forum FURNITURE, JOINERY, CABINETMAKING - formerly BIG STUFFReplies: 14Last Post: 21st February 2014, 02:30 PM -
Building the Atkin sailing dinghy "Vintage"
By jalmberg in forum BOAT BUILDING / REPAIRINGReplies: 9Last Post: 14th February 2011, 02:37 AM -
"white-faced building board"
By Soren in forum NOTHING AT ALL TO DO WITH WOODWORKReplies: 2Last Post: 18th January 2011, 11:07 PM -
Building a "50th anniversary" Hartley TS21
By SimonP in forum BOAT BUILDING / REPAIRINGReplies: 12Last Post: 18th June 2010, 11:14 PM -
Great New "Martin" Acoustic Building Manual
By Beachcomber in forum MUSICAL INSTRUMENTSReplies: 8Last Post: 14th July 2008, 07:06 PM
