

 Thanks:
  Likes:
  Needs Pictures: 0
 Picture(s) thanks: 0
Results 106 to 120 of 195
Thread: Building Wegner's "The Chair" .
-
26th January 2014, 07:18 AM #106
 GOLD MEMBER


- Join Date
- Aug 2009
- Location
- Armadale Perth WA
- Age
- 55
- Posts
- 4,524

By-the-by ... Mike Dunbar: Chairmaker and Presidential Kingmaker? - Popular Woodworking Magazine
"Speaking of books by Dunbar, Popular Woodworking Magazine has just released Dunbar�s long-out-of-print bible on Windsor chairmaking. This book was selling for $200 and more on the used market. Dunbar has revised the text and now you can buy it for just $27 at ShopWoodworking.com. It�s definitely one of the most important books ever written on Windsor chairmaking. "
-
26th January 2014 07:18 AM # ADSGoogle Adsense Advertisement
- Join Date
- Always
- Location
- Advertising world
- Age
- 2010
- Posts
- Many
-
26th January 2014, 08:34 AM #107
SENIOR MEMBER
- Join Date
- Jan 2008
- Location
- NSW southern Highlands
- Posts
- 548
Derek Originally Posted by derekcohen

You will be gluing on what could be called semi end grain, and the biggest problem may be failure due to glue starvation where the wood soaks up the glue. I don't believe this will be a major hurdle but suggest caution by ensuring you have the clamping perpendicular to the joint, which could be achieved by leaving sections for the clamps to hold onto which can be cut off after the glue has set.
On the joint itself my suggestion would be to leave it as per the original with curved ends on the points, as a point at the bottom of the gullies will only serve to concentrate stress in that point and possibly a location for a fracture, you will after all be using clamps to pull together two sets of wedges, sufficient pressure is obviously needed to bring together the joints, but too much could easily result in some nicely decorative firewood.
Regarding the actual overall shape, by all means use the original as a guide, but you are limited by the material you have, and I would trust the eye rather than the rule
Regards
-
26th January 2014, 08:55 AM #108
GOLD MEMBER
- Join Date
- Mar 2004
- Location
- Brisbane (western suburbs)
- Age
- 77
- Posts
- 12,117
Derek, I didn't mean to give you sleepless nights over it, it was just that my eye was drawn to the angle of the grain in a place where there is going to be a bit of stress. It isn't as severe as the run-out in the chair leg I had to replace a couple of weeks ago. I'm always extra cautious when using highly figured woods, because they are usually not as resistant to bending stresses as a straight-grained piece of the same species. It may not be a problem, that's a tough wood you're using, & there may be adequate strength. You are far more experienced in working with this species than I am, so trust your own judgement rather than mine! Originally Posted by derekcohen
WRT the arm rests, I can't visualise exactly how the grain in the two joined pieces will align, but the material within the joint itself won't be the problem. Regardless of which glue you use, it's the weakness caused by short-grain external to the joint at a point of high stress that could cause you grief. It all depends on how much stress this area will have to bear. Take heart that the arm-rests on chairs like the walnut reproductions I made have similar problems with short grain in the rather flimsy tenons that join them to the backs. I haven't seen any break there, though I'm sure it must have happened. The problem I have seen is failure of the joint between the upright piece that supports the arm-rest & the seat side-rails, which seems to bear the brunt of (ab)use.
I notice Mr. Wegner provided a fair bit of meat around those arm-rest/back joins, and you get some support from the legs. The Black Bean chairs I referred to previously had similar 3-piece back/arm-rests, but were even finer, iirc. I can't remember how they were joined, but those parts of the chairs remained sound, unlike their leg/rail joints.....
Hey, ol' buddy, you are the one feeling the pain, but this whole project is one huge learning experience for all of us! How many versions did you say Hans made before he got it right? This is vers. 1.0, you may not get everything perfect this time.....

Cheers,
Cheers,IW
-
28th January 2014, 03:23 AM #109
Be inspired. Be creative. Be bold.
- Join Date
- Apr 2001
- Location
- Perth
- Posts
- 10,820
Hi Ian
The grain direction is what it is. I cannot imagine the originals being much different. I've watched the video of them being made many times and the factor simply cut off a chunk and used that. There was no special attention given to the grain direction, only to try and maintain figure and colour continuity.
This will give a good idea of what is planned for the arm-backrest joint. There are areas about which I would appreciate your comments.
Link: http://www.inthewoodshop.com/Furnitu...8part1%29.html
Regards from Perth
DerekVisit www.inthewoodshop.com for tutorials on constructing handtools, handtool reviews, and my trials and tribulations with furniture builds.
-
28th January 2014, 09:10 AM #110
GOLD MEMBER
- Join Date
- Mar 2004
- Location
- Brisbane (western suburbs)
- Age
- 77
- Posts
- 12,117
Mornin' Derek. Some very quick thoughts:
As you say, the grain directions are what they have to be, there is no way to completely eliminate short grain using solid wood and get 180 degrees change of direction. Laminating may be the engineering solution, but solid wood is more aesthetically pleasing, imo. I would be more concerned about those short-grain stubs that join to the legs than the back joints. The stubs will be reinforced by the dowels from the legs, of course, & I haven't seen any chairs in this style break there, either, though of course that doesn't mean it hasn't happened.
If you manage to make two nice, tight joints for the back/armrests, I reckon that part of the chair will be the least of your worries, given the surface area available for glue. If your surfaces are accurate, the joint will pull together as tight as you dare clamp it, & to assist that, I'd be taking a smidgin off the tips of both sets of triangles - not enough to be seen in the finished joint, but enough to allow them to snug up. I'd also clamp across the join to minimise any chance of the triangles acting as wedges & splitting one piece or the other as you clamp them home. Once glued up, I can't see there is any structural weakness due to concentration of stress, as has been suggested - if your joints are really good, you have effectively re-made solid material, so it would only be a problem if part of a joint let go.
As far as the most suitable glue goes, I would have thought that any glue would be adequate given the surface area involved. Would joint starvation be a real problem with such porous surfaces? I didn't know epoxy is supposed to have 0.5mm gap (does that apply to all epoxies, or specifically the type you use?). The glue theory I've read says that as long as the glue 'wets' (i.e. forms molecular bonds with ) the surfaces being joined, the glue material gets stronger as you approach a single molecular layer of glue. Will your joins be tighter than that?
Copying those rounded tips would certainly tax my skills beyond their limit, I think. Just sawing all of them to perfect points would be hard enough for me. They are twice as deep (or more?) as common dovetails, and will have to be perfect all the way through, since you will be cutting into them when you complete their shaping. I would probably have to resort to some (very) careful paring, which I dislike having to do, particularly with wild-grained, hard wood. I wouldn't even contemplate rounded tips - that's one feature I wouldn't try to copy, though I'm sure it could be done with enough care & limitless patience! Think of pointed finger joins as a deliberate subtle 'clue' you are leaving, so that sharp-eyed appraisers of the future can pick this as a hand-made replica!
Cheers,IW
-
28th January 2014, 12:07 PM #111
GOLD MEMBER
- Join Date
- Aug 2009
- Location
- Armadale Perth WA
- Age
- 55
- Posts
- 4,524
Just an orientation question, Derek.
You said the original joint was cut on a shaper.
Are the blocks that you have there now oriented such that for the back (eg) it would sit flat on the shaper table and pass across the cutter - with an appropriate fence setup?
Thanks,
Paul
-
28th January 2014, 04:59 PM #112
Be inspired. Be creative. Be bold.
- Join Date
- Apr 2001
- Location
- Perth
- Posts
- 10,820
Hi Paul
Thanks for the Dunbar reference. I actually purchased this just before Christmas as I would like to build a few Windsor chairs.
The original chair fingers were cut on a shaper. From what I have seen in videos, there was some basic shaping, the joinery was added, and then the shaping was completed by machine before parts were glued together. Once glued, this was faired by hand to the finished size.
The way I have shaped the sections is probably similar. I need to re-visit the video to determine this. The method I chose seemed to be the obvious one, but may well reflect a memory of what occurred in the video.
Regards from Perth
DerekVisit www.inthewoodshop.com for tutorials on constructing handtools, handtool reviews, and my trials and tribulations with furniture builds.
-
28th January 2014, 05:12 PM #113
Be inspired. Be creative. Be bold.
- Join Date
- Apr 2001
- Location
- Perth
- Posts
- 10,820
Hi Ian
Epoxy is a good filler. It tends, however, to sit on the surface. Andrew warned me about this and has since recommended a cross linked PVA.
The two-piece arm is an example of this. I cut and glued this three times! The first time there was a slight gap in the centre, which was not good enough (it had to be invisible or else), and I reasoned that there had not been enough clamping force over this section. So I sawed it along the joint, re-jointed and glued again (with epoxy - because I did not want any glue creep). The result was a visible glue line, a fine one but visible. So I sawed it off again, and re-jointed. This time I did what I should have done before, that is, rolled the epoxy on in a thin, thin layer and not painted with a brush. Lots of clamping to squish it all together. Result - invisible glue line.
The fingers are going to be as tight as I can make them as it is their interior that will show - since the outsides will be carved away. That is why I am not feeling confident about a rounded end. It has to be perfect all the way through. Your tip of trimming the ends to fit tightly will be helpful. (Of course that only works with a thin finger, not a fat finger).
Regards from Perth
DerekVisit www.inthewoodshop.com for tutorials on constructing handtools, handtool reviews, and my trials and tribulations with furniture builds.
-
30th January 2014, 12:26 AM #114
Be inspired. Be creative. Be bold.
- Join Date
- Apr 2001
- Location
- Perth
- Posts
- 10,820
This follows on from the last post. Decisions to be made. Your ideas are wanted ..
http://www.inthewoodshop.com/Furnitu...8part2%29.html
Regards from Perth
DerekVisit www.inthewoodshop.com for tutorials on constructing handtools, handtool reviews, and my trials and tribulations with furniture builds.
-
30th January 2014, 06:59 AM #115
SENIOR MEMBER
- Join Date
- Jan 2008
- Location
- NSW southern Highlands
- Posts
- 548
Derek
The record #148 Dowelling jig should handle this without problem
Regards
-
30th January 2014, 11:10 AM #116
GOLD MEMBER
- Join Date
- Mar 2004
- Location
- Brisbane (western suburbs)
- Age
- 77
- Posts
- 12,117
Hmmm, a nervous time ahead getting those drilled holes to come out exactly where you want them! I'm not sure I'd like to be within throwing distance of the back if things go badly awry.
Good luck!IW
-
1st February 2014, 10:21 PM #117
GOLD MEMBER
- Join Date
- Apr 2012
- Location
- Sydney
- Posts
- 1,503
Only the hole at the surface matters, if you have a paper template for each side of the fingers, then a pilot hole from each side to get approximate angle followed up by drill of final size from each side.
If it is slightly out, only you will know.
-
1st February 2014, 11:04 PM #118
GOLD MEMBER
- Join Date
- Aug 2009
- Location
- Armadale Perth WA
- Age
- 55
- Posts
- 4,524
I don't suppose it would be in any way easier, but I saw a picture of bermuda dovetails ... where the shape of the shown connection is only a few mm deep.
I thought of this at the time and wondered if there was a way to apply that to this.
Like eg a sliding dovetail connection internally and only the fingers meeting a few mm deep on each side.
Cheers,
Paul
Ah .. I see ... you would have to have it all shaped down first to do that. Got it.
-
2nd February 2014, 02:22 AM #119
Be inspired. Be creative. Be bold.
- Join Date
- Apr 2001
- Location
- Perth
- Posts
- 10,820
If only it was that simple. Originally Posted by hiroller

The thing is that the backrest is shaped after the fingers are sawn and glued together. This means that the joints have to be tight all the way through. It is not enough to just fake them at the surfaces.
Regards from Perth
DerekVisit www.inthewoodshop.com for tutorials on constructing handtools, handtool reviews, and my trials and tribulations with furniture builds.
-
3rd February 2014, 02:51 AM #120
Be inspired. Be creative. Be bold.
- Join Date
- Apr 2001
- Location
- Perth
- Posts
- 10,820
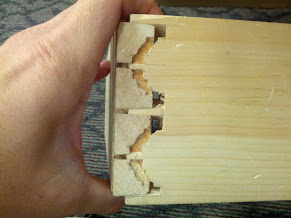
A bit more practice today to create a rounded finger joint.
http://www.inthewoodshop.com/Furnitu...NoCoconut.html
Opinion and recommendations gratefully received.
Regards from Perth
DerekVisit www.inthewoodshop.com for tutorials on constructing handtools, handtool reviews, and my trials and tribulations with furniture builds.


 Reply With Quote


Similar Threads
-
Anyone in Perth own Wegner's "The Chair" ?
By derekcohen in forum FURNITURE, JOINERY, CABINETMAKING - formerly BIG STUFFReplies: 14Last Post: 21st February 2014, 02:30 PM -
Building the Atkin sailing dinghy "Vintage"
By jalmberg in forum BOAT BUILDING / REPAIRINGReplies: 9Last Post: 14th February 2011, 02:37 AM -
"white-faced building board"
By Soren in forum NOTHING AT ALL TO DO WITH WOODWORKReplies: 2Last Post: 18th January 2011, 11:07 PM -
Building a "50th anniversary" Hartley TS21
By SimonP in forum BOAT BUILDING / REPAIRINGReplies: 12Last Post: 18th June 2010, 11:14 PM -
Great New "Martin" Acoustic Building Manual
By Beachcomber in forum MUSICAL INSTRUMENTSReplies: 8Last Post: 14th July 2008, 07:06 PM
