

 Thanks:
  Likes:
  Needs Pictures: 0
 Picture(s) thanks: 0
Results 121 to 135 of 195
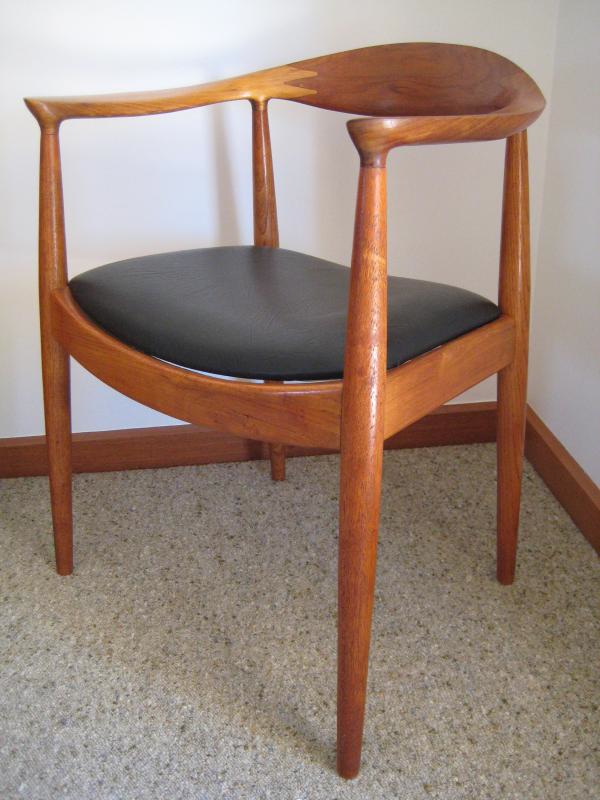
Thread: Building Wegner's "The Chair" .
-
3rd February 2014, 09:09 AM #121
 GOLD MEMBER


- Join Date
- Mar 2004
- Location
- Brisbane (western suburbs)
- Age
- 77
- Posts
- 12,117

"Would you go with the pointed finger or keep practising?"
Well, as I said, I'd do the pointed finger, partly because I think it's a bit easier to get perfect than the rounded one, but perhaps mostly because if I made something like this, I would like to include some subtle clue that distinguishes it from its factory-made sibling. No-one will ever spot it unless it's pointed out, & for some reason, I find that amusing & satisfying......
Cheers,IW
-
3rd February 2014 09:09 AM # ADSGoogle Adsense Advertisement
- Join Date
- Always
- Location
- Advertising world
- Age
- 2010
- Posts
- Many
-
3rd February 2014, 09:11 AM #122
 Skwair2rownd
- Join Date
- Nov 2007
- Location
- Dundowran Beach
- Age
- 76
- Posts
- 19,922
An exercise in frustration Derek!!
Would it be possible to use a Japanese style pull saw to do the cuts, one
without the stiffening along the back? I suggest this because it seems
to me that the top of your saw is pushed away from the clamp a little
and this would cause some alignment difficulties.
Another solution might be to cut V shaped fingers and round out the
ends with a fine rasp and a file.
-
3rd February 2014, 10:14 AM #123
GOLD MEMBER
- Join Date
- Apr 2012
- Location
- Sydney
- Posts
- 1,503
Hi Derek, Originally Posted by derekcohen

I missed the order of operations.
The key part is making sure the holes are parallel - maybe you need a hand crank drill press!
With the need to get the fingers 100%, are you better under cutting the fingers with the saw and paring/rasping out the rest?
It would be quicker than all the practice you've done so far.
-
3rd February 2014, 10:21 AM #124
SENIOR MEMBER
- Join Date
- Jan 2008
- Location
- NSW southern Highlands
- Posts
- 548
Derek Originally Posted by derekcohen
The answer with this is totally dependent on where you wish to take the exercise. If you wish to focus totally on a hand made replica then the path is the rounded finger joint, which ( as you are very much aware of ) is fraught with risk, and your material limits make this a real concern. One option is to cut shy of the line and finish to the line with chisel and rasp, which, whilst tedious would provide greater certainty of success.
If you would be satisfied with honouring Wegner, whilst not producing an exact copy then you may like to consider what influenced him in the design, and produce a chair that would have put a smile on his face. If Wegner had to produce the chair by hand I doubt that he would have used the rounded finger joint, but perhaps the " square dovetail " ( I assume by this you mean finger joint ). I think a much classier joint would be the " Cogged Scarf Joint " which is used in the Chinese arm chair I suspect influenced him in his design, but was likely rejected as more complicated to machine than the rounded finger joint. However, I think this joint would, whilst challenging, be more satisfying and simpler to construct than the rounded finger joint.
Regards
-
3rd February 2014, 09:39 PM #125
Member
- Join Date
- Oct 2010
- Location
- Broome, WA
- Posts
- 91
Hi Derek,
I've got nowhere near the skills to attempt what you are attempting but have you considered measuring the dovetails to beyond the line, sawing by hand, stopping the cut short of the 'point', and then drilling the hole to round the joint?
So make the cuts by hand, stop short and then drill the holes.....would that work?
cheers,
Justin
-
3rd February 2014, 10:01 PM #126
Be inspired. Be creative. Be bold.
- Join Date
- Apr 2001
- Location
- Perth
- Posts
- 10,820
A glimmer of light at the end of the tunnel
I need to explain why I have been so bloody minded about persevereing with the drilling and sawing strategy.
The arms and backrest are being shaped in a different way to the legs and stretchers/rails. The front and rear rails were shaped to fit the legs because I could not be sure of the angle of the mortice and tenon joints. The M&T joints are also internal joints and any gaps could be filled with the epoxy used to glue them together.
By contrast, the arms and backrest are known angles, however their joinery is on the outside where it is visible. The joinery here must be spot on. The connecting sections were purposefully made square and oversize. They will be joined and then shaped (in contrast to the legs, which were shaped and then joined).
_html_m43e4d0f7.jpg)
_html_7930a919.jpg)
In spite of being as careful as I could in squaring the square end sections, I realise that there will be some deviation, or that I should assume that there is some deviation for a worst case scenario. Consequently, I must find a way to saw the joinery from one reference side. In my mind, working inwards from two sides will create errors, even if they are small. This will lead to gaps. If the joinery is perfectly square from the reference side then it should not matter what the opposite side looks like: the parts will fit, and the outsides are going to be removed anyway.
The ability to drill perfectly square from the reference side is one example. This was demonstrated to work reliably. The irony is that the jig I made will drill a hole with greater accuracy (for the purposes here) than the best drill press could!
The ability to saw to the circumference of the hole is important because the wood is too hard and too thick to file to shape, and anyway I have always sawn dovetails to the line, never deliberately played "safe" and left room to pare away waste. I believe in this instance that, with a guide, I should be able to saw to the optimum spot (melding into the edge of the hole). Not only that but, done from the reference side, it should allow for a square joint all the way through the work piece.
Some terminology at this point: I am not sure what to call the finger joint parts. The joint is sort of like a dovetail, but tail and pin does not apply here. Why do I care? Because the joint I have been practicing will have a counterpart, that is, a "male" finger that fills this "female" section. Both end in a round. And the fingers are also separated by a round.
I returned to the workshop this afternoon for a little more practice. First I tried carving the finger, that is, marking it out and paring from both sides. It was quickly apparent that this was not going to work and was a LOT of effort.
I had an idea about the errors that occurred previously. What was in common was a saw cut to the one side of the guide and the guide was positioned at the side of a board. My thought was that the clamp I used was pulling it over slightly at that spot because it could not be centred on the guide. I simply used a different clamp.
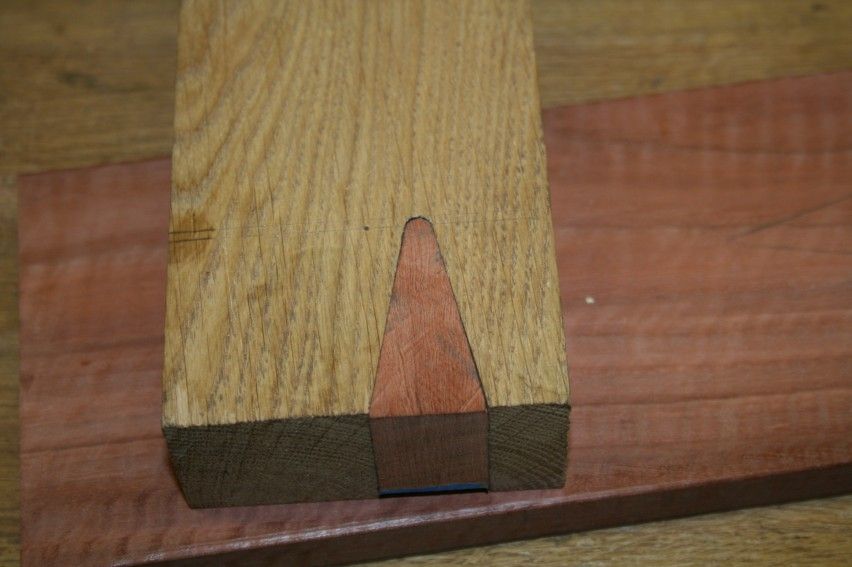
With everything else exactly as before, this is what I achieved ...
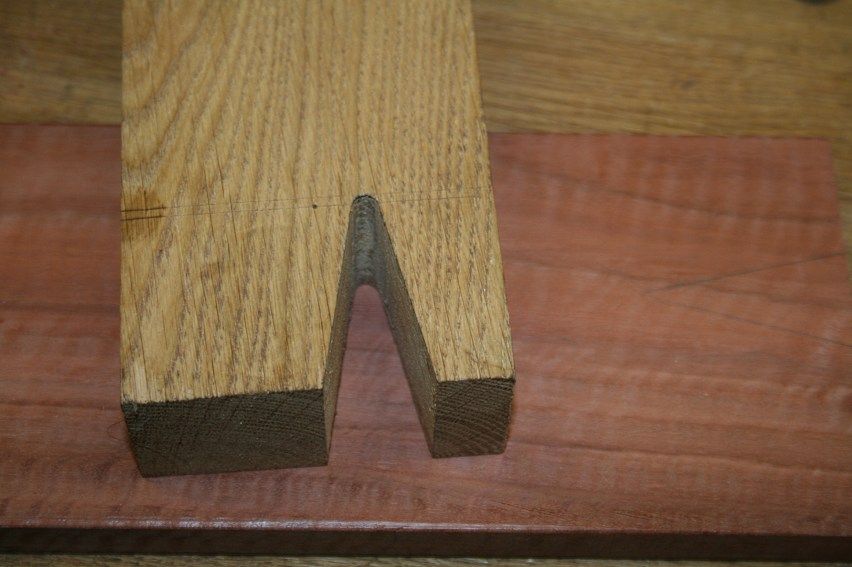
Other side ...
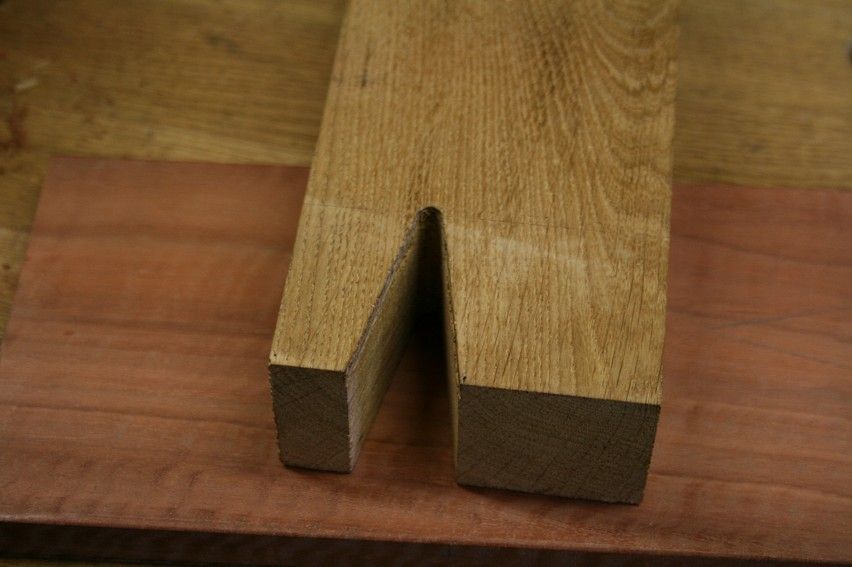
I was very happy with this. All that was needed was a little cleanup with a 3/16" round chainsaw file.
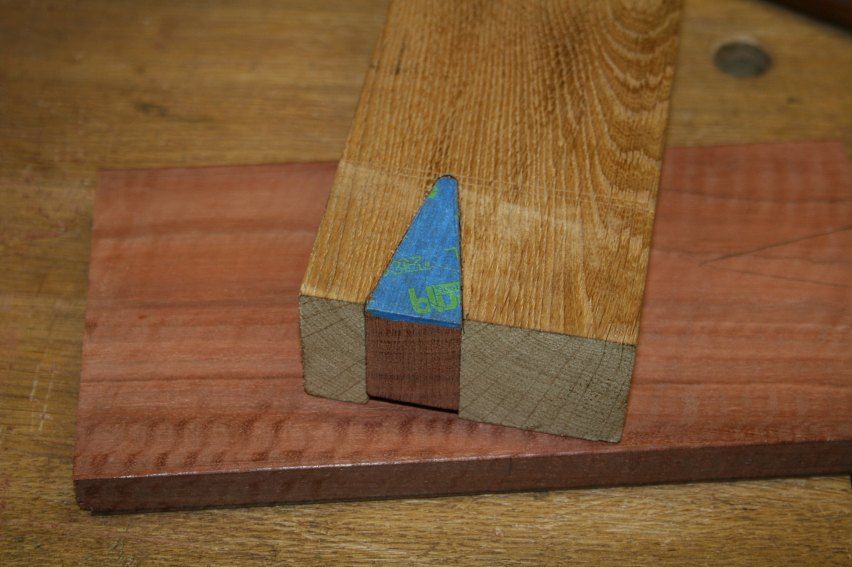
There was time to try a male finger. All I had to hand was a small piece of Jarrah waste. This was just enough.
I covered the Jarrah with blue tape and marked it from the female finger (this is how I plan to match the arm and backrest, as if it was a dovetail joint - another reason why the reference side must be able to create the non-reference side). The guide was clamped to the Jarrah and the sides sawn out. This left a pointed end, which was shaped with a file ...
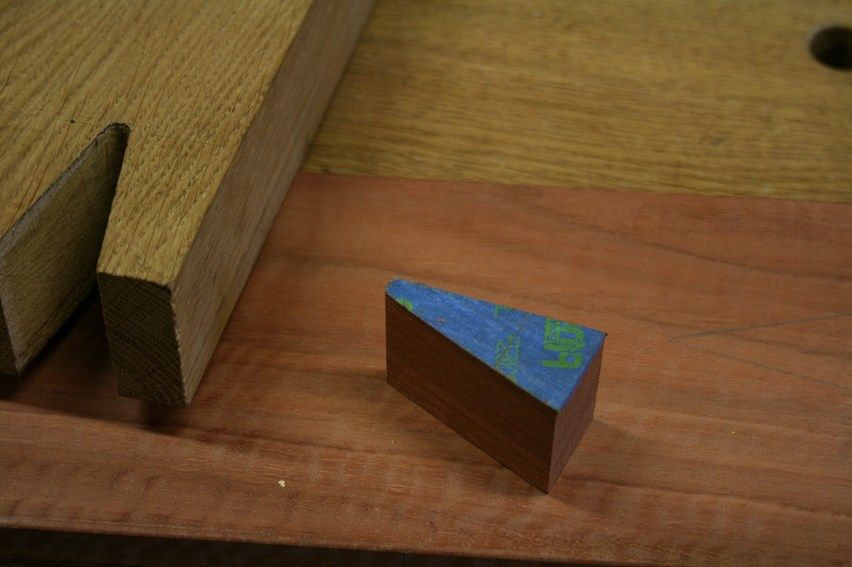
I had deliberately sawn the male finger a fraction oversize. This was rasped to fit (just needed a few strokes) ...
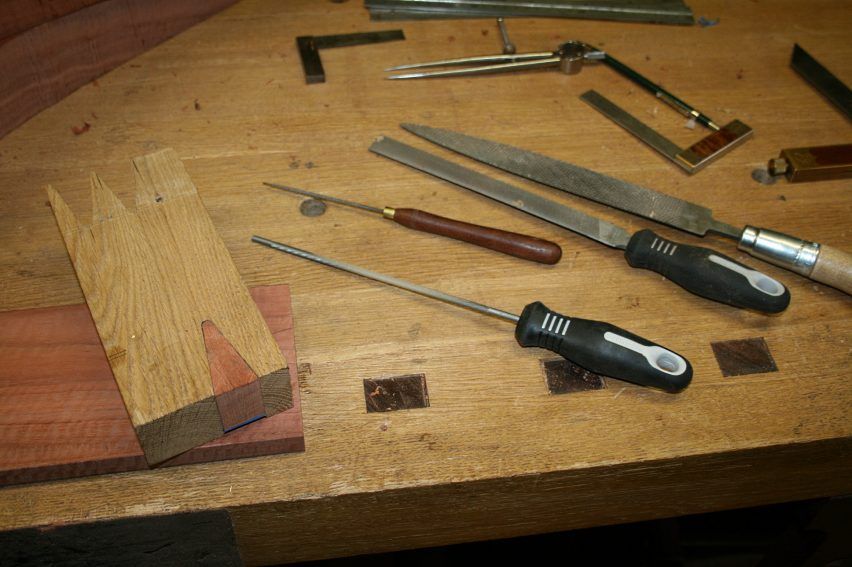
Tools ...
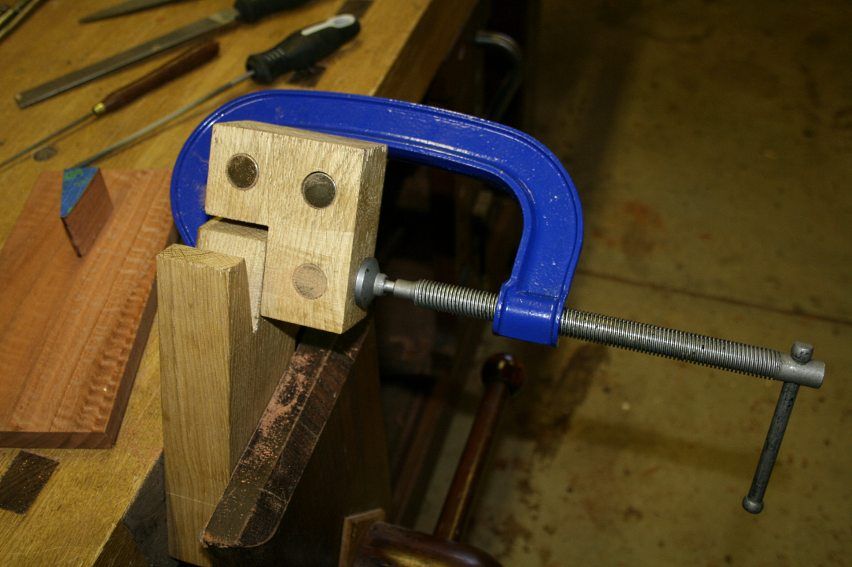
And the Record clamp that helped ..
A few more practice runs are needed before the real thing.
May I have your opinion about working from a single reference side?
Regards from Perth
DerekVisit www.inthewoodshop.com for tutorials on constructing handtools, handtool reviews, and my trials and tribulations with furniture builds.
-
4th February 2014, 08:41 AM #127
GOLD MEMBER
- Join Date
- Mar 2004
- Location
- Brisbane (western suburbs)
- Age
- 77
- Posts
- 12,117
Only way to fly. You stand a far better chance of keeping your mating surfaces parallel that way. The old blokes didn't develop the single face/face-edge approach to setting-out without good reason..... Originally Posted by derekcohen

Cheers,IW
-
5th February 2014, 02:35 PM #128
New Member
- Join Date
- Oct 2008
- Location
- Adelaide, SA
- Posts
- 3
I have been following this fantastic thread silently & with no expectation of ever having enough time to get to your level of skill.
You have probably already thought of this detail, but I have not seen it mentioned. You have focused on cutting accurately to the edge of your drilled hole. The cut line will need to be marked from the edge of the 'un-hole', not from a point on the end of the workpiece (I hope my made up terminology makes sense). My quick, not to scale, poorly done drawing to try to illustrate:
cut line.JPG
Hope this makes sense.
Pat.
-
5th February 2014, 06:43 PM #129
GOLD MEMBER
- Join Date
- Feb 2003
- Location
- back in Alberta for a while
- Age
- 68
- Posts
- 12,006
Hi Derek
following this thread in real time is a little difficult or me at the moment.
However the post above suggests a good approach to marking out.
My other suggestion is to use a plane maker's float to finish the mating surfacesregards from Alberta, Canada
ian
-
5th February 2014, 08:30 PM #130
Be inspired. Be creative. Be bold.
- Join Date
- Apr 2001
- Location
- Perth
- Posts
- 10,820
Hi Pat and IanYou have probably already thought of this detail, but I have not seen it mentioned. You have focused on cutting accurately to the edge of your drilled hole. The cut line will need to be marked from the edge of the 'un-hole', not from a point on the end of the workpiece ..
Pat, thanks for the drawing. Here are a few of mine.
First, the actual chair joint ..
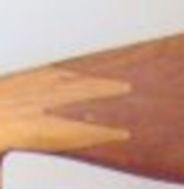
Here is the joint cut apart ...
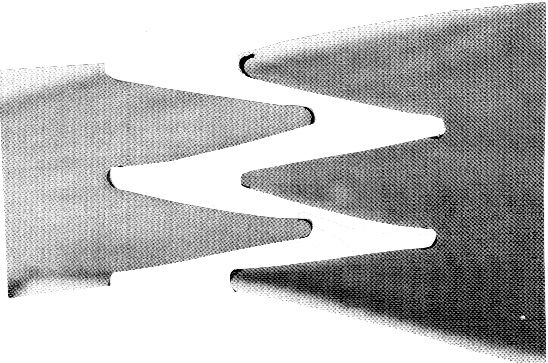
... and turned in the direction they will be sawn ...
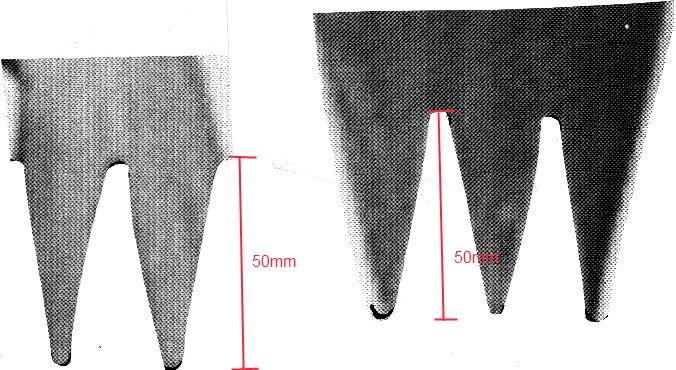
The length of each finger is 50mm. This extends from tip to tip (or hill and vale).
I agree that I have to set aside a section for the round. These drawings indicate that they are indeed formed from a round at the outside edge. I must point aside half 3/16"
Yes?
Regards from Perth
DerekVisit www.inthewoodshop.com for tutorials on constructing handtools, handtool reviews, and my trials and tribulations with furniture builds.
-
5th February 2014, 08:48 PM #131
Be inspired. Be creative. Be bold.
- Join Date
- Apr 2001
- Location
- Perth
- Posts
- 10,820
One more picture ...
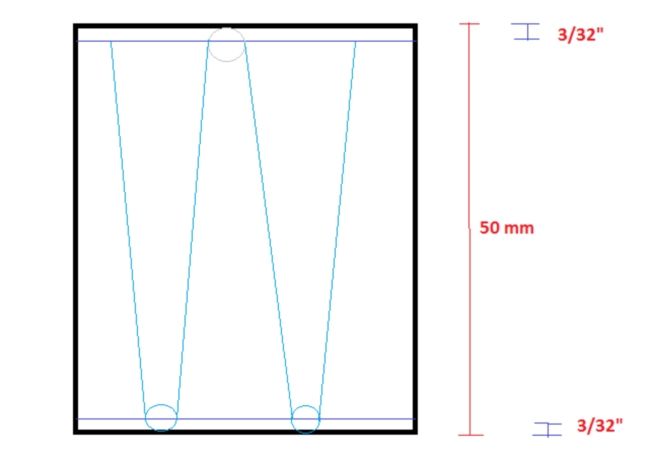
That should be right?
Regards from Perth
DerekVisit www.inthewoodshop.com for tutorials on constructing handtools, handtool reviews, and my trials and tribulations with furniture builds.
-
5th February 2014, 10:33 PM #132
Skwair2rownd
- Join Date
- Nov 2007
- Location
- Dundowran Beach
- Age
- 76
- Posts
- 19,922

Is it wise to use metric and imperial??
This is sure to lead to measurement errors.
-
6th February 2014, 09:20 AM #133
GOLD MEMBER
- Join Date
- Mar 2004
- Location
- Brisbane (western suburbs)
- Age
- 77
- Posts
- 12,117
In my case, Artme, Yes and No, or No & Yes, - depends on the situation..... Originally Posted by artme
For the generations who grew up with the imperial system, it's hard to shed it completely, is it not? I still find myself occasionally working in both units. There are times when it seems unavoidable to mix systems, such as when you only have suitable drill bits in imperial, or working on an old piece that was obviously made with imperial dimensions, and so on. And it's not unusual to find myself measuring in metric, but actually working in imperial dimensions, thanks to chisels that are all made to nominal imperial sizes, for example. In fact, when you think about it, most of the hand tools we own are built to imperial dimensions, thanks to the market power of the Septics (who fought a war to rid themselves of Imperialism) .....
When I first made the switch to metric, I frequently lost the plot & made a few royal cock-ups. But since I've become comfortable with it, my blunder rate has diminished. And whatever system I use, I can still manage to measure short on occasions. Have to keep the MIL in kindling wood somehow....
Cheers,IW
-
6th February 2014, 03:39 PM #134
GOLD MEMBER
- Join Date
- Aug 2009
- Location
- Armadale Perth WA
- Age
- 55
- Posts
- 4,524
There is a whole different mindset about making things for yourself, or disassembling things with the sincere intention of putting them back together again as good or better. To look at something and think I could probably make that, instead of I could probably buy that.
Although I was well in the mindset of pulling things apart ... the putting together side was not a lot beyond the Lego stage.
When I started to understand some things - mainly from these forums I think - I realised two big things:
1. That "flat" wasn't just one idea, nor was it an automatic thing or to be taken for granted. That flat wood and flat metal were worlds apart. etc
2. That the amazing and unthinkable precision that I saw in many made things could be created by cutting near, and creeping up on the fit. That idea was a revelation to me - had never considered that before. (I understand that there is a level beyond where the precision comes mostly the first time)
So my uneducated impression is that the "natural" way (for a one-off at least) would be to cut safe and creep up on a result. I'm sure Derek's skills are equal to that approach.
Am I correct (in reading between the lines) that it seems, with your experience and better judgement, that you feel that proceeding that way is prone to *more* error than a different way that you are working out as you go.
Second question ... if you use a jig to assist square sawing, would you use one to assist square paring?
Cheers,
Paul
-
6th February 2014, 10:55 PM #135
Skwair2rownd
- Join Date
- Nov 2007
- Location
- Dundowran Beach
- Age
- 76
- Posts
- 19,922
 Good question!! Originally Posted by pmcgee


 Reply With Quote


Similar Threads
-
Anyone in Perth own Wegner's "The Chair" ?
By derekcohen in forum FURNITURE, JOINERY, CABINETMAKING - formerly BIG STUFFReplies: 14Last Post: 21st February 2014, 02:30 PM -
Building the Atkin sailing dinghy "Vintage"
By jalmberg in forum BOAT BUILDING / REPAIRINGReplies: 9Last Post: 14th February 2011, 02:37 AM -
"white-faced building board"
By Soren in forum NOTHING AT ALL TO DO WITH WOODWORKReplies: 2Last Post: 18th January 2011, 11:07 PM -
Building a "50th anniversary" Hartley TS21
By SimonP in forum BOAT BUILDING / REPAIRINGReplies: 12Last Post: 18th June 2010, 11:14 PM -
Great New "Martin" Acoustic Building Manual
By Beachcomber in forum MUSICAL INSTRUMENTSReplies: 8Last Post: 14th July 2008, 07:06 PM
