

 Thanks: 0
 Likes: 0
 Needs Pictures: 0
 Picture(s) thanks: 0
Results 16 to 30 of 111
-
4th July 2010, 02:31 PM #16
 Dan @ TheLoveOfWood


- Join Date
- Jan 2008
- Location
- Australia
- Posts
- 752

My New Toy

Trimming the rabbets on the edge boards.
Glue Up

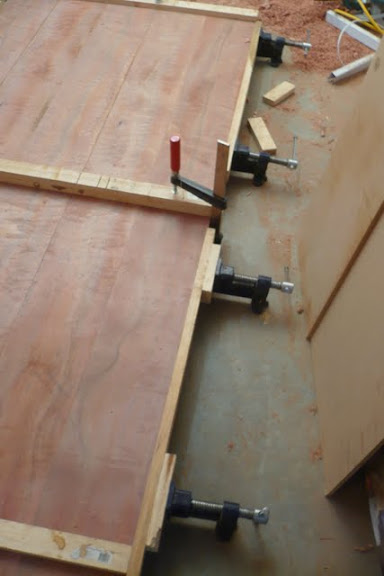
More pics of the glue up. One joint didn't set properly I think due to cold weather. I now have a heater running in the shed. lol.
Glue ups are the most stressful time of any job. The lid on my glue pot came off twice spilling about 70ml of glue onto my project... arggh... fixed the project. Will wait til it sets to peal it off the concrete floor.My blog: ~ for the love of wood ~ - http://theloveofwood.blogspot.com/
-
4th July 2010 02:31 PM # ADSGoogle Adsense Advertisement
- Join Date
- Always
- Location
- Advertising world
- Posts
- Many
-
7th July 2010, 03:29 PM #17
Dan @ TheLoveOfWood
- Join Date
- Jan 2008
- Location
- Australia
- Posts
- 752
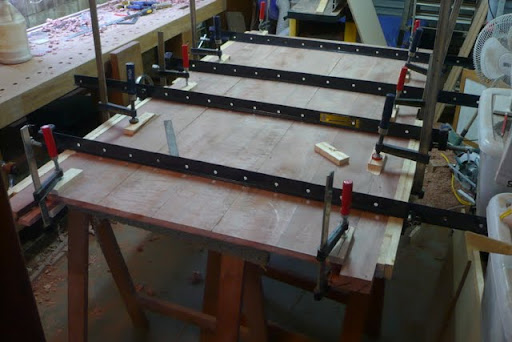
Final glue up stage. Had a few problems. I think the glue was not the best. But all worked out,My blog: ~ for the love of wood ~ - http://theloveofwood.blogspot.com/
-
7th July 2010, 04:06 PM #18
What... you mean it's not 1792?
- Join Date
- Oct 2006
- Location
- Melbourne
- Posts
- 5,271
It's you in the iiNet BoB ads, isn't it?

Well done on the glue-up..
I know you believe you understand what you think I wrote, but I'm not sure you realize that what you just read is not what I meant.
Regards, Woodwould.
-
7th July 2010, 04:26 PM #19
Dan @ TheLoveOfWood
- Join Date
- Jan 2008
- Location
- Australia
- Posts
- 752
-
7th July 2010, 10:07 PM #20
GOLD MEMBER
- Join Date
- May 2004
- Location
- Epping.Vic
- Age
- 58
- Posts
- 1,094
Nice work Dan looks like its coming together nicely for you, well done.
I like your new toy. Regards
Al .
You don't know, what you don't know, until you know it.
-
9th July 2010, 11:06 PM #21
plane sailing...
- Join Date
- Oct 2006
- Location
- Wodonga
- Age
- 53
- Posts
- 712
Looking good.
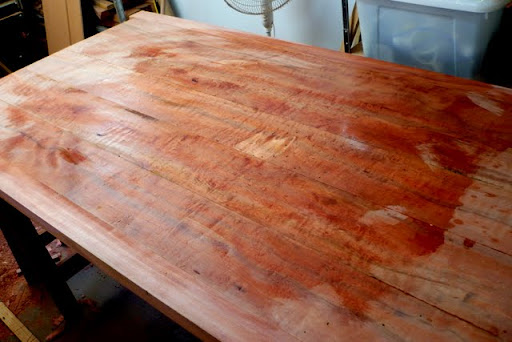
Some lovely looking timber too. Those sepia photo's of you jointing the top really shows up the figure.
Looking forward to the next instalment and piccies.
Steven.
-
9th July 2010, 11:24 PM #22
Heavy Machinery
- Join Date
- Mar 2008
- Location
- Lambton, Newcastle, NSW, Australia
- Posts
- 4,957
Hey Dan lookin sweet and a very cute apprentice. You said/typed LN 62 1/2 but the LN is a 62 and the LV is a 62 1/2 which do you have? If you have the LN 62 I would like to catch up one day and compare the LV 62 1/2 that I have. I can see I am going to have to lift my game and photographs on my WIPs.

Oh and I have the same problem with my 59, I have been going to pick up some 10mm id tube, if I do I will save you a bit.
-
10th July 2010, 12:20 AM #23
Dan @ TheLoveOfWood
- Join Date
- Jan 2008
- Location
- Australia
- Posts
- 752
Re: Dowel Jig stan. 59.
The other thought I had was to epoxy some dowel into a larger one and drill it out. The jig would except any pipe though. So 3cm of 10mm pipe would be a treat. In the past I've used 1/2" dowel with the jig which worked fine.
Re: LN 60 1/2
I checked the website. I have the LN 60 1/2 N. Overall, I'm pretty happy with it and have used it on rabbets and tenons with success. It's ~4mm A2 blade is nice. I haven't engaged the nickers yet. Haven't had the need. Using it I can see the advantage to have a specific rabbet plane to do depth and width control.
Lie-Nielsen Toolworks Australia | Rabbet Block Plane
Re: WIP photos
My goal is to eventually end up publishing some reviews/WIP in some of the wood mags. I emailed AWR but haven't heard back. I suggested I could write a review of on-line woodworkig in Aust, review some of my new tools, or a WIP. Just a bit of fun. I know there's a lot of more talented and skilled craftsmen out there, but I find if I have a goal like publication or a exhibition to work towards I take more care, and produce a better product. With all that in mind I've dragged out the tripod and tried to take some nice photos. The article in fine woodworking was helpful.
Re: Grain.
I was surprised by that jointing photo. It's impressive to see the fiddleback in cross section. Keep a eye on the blog - ~ the love of wood ~. Tomorrow I plan to upload some photos of the glued up top with some metho splashed on. I don't know if it's a fualt or a feature but there is this white patch of wood in the middle of the top... oh well.
 My blog: ~ for the love of wood ~ - http://theloveofwood.blogspot.com/
-
10th July 2010, 08:27 AM #24
Heavy Machinery
- Join Date
- Mar 2008
- Location
- Lambton, Newcastle, NSW, Australia
- Posts
- 4,957
Hi Dan
Sounds like fun doing reviews. yes 60 1/2N, sounds more like it, I have one also. I was going to get the low angle block as well but I already have a Millers Falls 56 with the LN replacement blade fitted which is a real sweetie anyway so maybe later. Its the 62 I was wanting to try. I bought the LV62 1/2 LAJ but it has some balance issues (all be they slight) and was wondering what the LN was like. Not to worry, I'll work it out.
Patchy grain can be a problem and like you have found here it doesn't always show its ugly head untill too late. I did a table for some people and had it all done, when I put finish on it, it had light patches in the grain that looked like finger prints. I sanded the whole thing back, sanded and scraped the crap out of it but when I put the finish back on it was still there. I delivered the table and they seemed happy with it (they were not too obvious) but a few days later they rang and said are these spots finger prints? I don't want unhappy customers so I went out to there house sanded the spots back and stained them with a diluted stain that I had mixed and tested in the workshop and then repaired the finish. A mission but they were very happy with the outcome and that I had gone to all that trouble. I since picked up a job frm there neighbour.
So Dan if you do some carefull experiments you can most likely stain it out. Weak mixes of stain lightly as she goes.
-
10th July 2010, 09:01 AM #25
Dan @ TheLoveOfWood
- Join Date
- Jan 2008
- Location
- Australia
- Posts
- 752
Generally I prefer not to use stain. Preferring to keep to the it came from the tree approach. I do see the benefit in small correction stain. I'll wait to see how it looks once flattened and sanded etc.
My blog: ~ for the love of wood ~ - http://theloveofwood.blogspot.com/
-
10th July 2010, 09:08 AM #26
Heavy Machinery
- Join Date
- Mar 2008
- Location
- Lambton, Newcastle, NSW, Australia
- Posts
- 4,957
Yes, I agree, the only stain I use is for filling holes (to mix with epoxy) which if I have a choice the holes also stay too. The only other use is for repairing antiques and matching.
Non of my new furniture is ever stained. But you don't want to spoil a nice piece of furniture for the sake of a spot. Good luck, suck it and see.
-
10th July 2010, 09:24 AM #27
Skwair2rownd
- Join Date
- Nov 2007
- Location
- Dundowran Beach
- Age
- 76
- Posts
- 19,922

Great Wip here Dan!!
I love the colour and grain in that Myrtle!
Good to see you geting so much great use and convenience from the bench with your vise set up.
BTW- Cute apprentice!
-
10th July 2010, 10:26 AM #28
gravity is my co-pilot
- Join Date
- Apr 2010
- Location
- Melbourne
- Posts
- 562
Sepia aside, I'm more impressed that Mr Boz can take photographs of himself while working! Originally Posted by Christos

-
10th July 2010, 11:41 AM #29
Heavy Machinery
- Join Date
- Mar 2008
- Location
- Lambton, Newcastle, NSW, Australia
- Posts
- 4,957
The apprentice took them.
-
10th July 2010, 11:47 AM #30
gravity is my co-pilot
- Join Date
- Apr 2010
- Location
- Melbourne
- Posts
- 562
I'm even more impressed now!


 Reply With Quote


Similar Threads
-
A Shaker table for Mother's Day
By derekcohen in forum WOODWORK PICSReplies: 8Last Post: 9th May 2010, 06:54 PM -
Shaker Sewing Table
By Glennet in forum WOODWORK PICSReplies: 24Last Post: 26th November 2009, 10:40 AM -
Small shaker-ish table
By Poppa in forum WOODWORK PICSReplies: 8Last Post: 8th April 2008, 01:05 PM -
Shaker Table Shaking
By Buzza in forum FINISHINGReplies: 0Last Post: 2nd February 2006, 05:04 PM -
Shaker table
By Geoffexpat in forum WOODWORK PICSReplies: 17Last Post: 1st December 2005, 09:21 AM
