

 Thanks:
  Likes:
  Needs Pictures:
  Picture(s) thanks:
Results 121 to 135 of 171
-
29th May 2010, 08:12 PM #121
 Banned


- Join Date
- Apr 2005
- Location
- kyogle N.S.W
- Age
- 50
- Posts
- 4,844
 ta. and that sabortooth thing. reakon that speeds the process much? costly ? never tried.
 Originally Posted by Woodwould

-
29th May 2010 08:12 PM # ADSGoogle Adsense Advertisement
- Join Date
- Always
- Location
- Advertising world
- Age
- 2010
- Posts
- Many
-
29th May 2010, 11:29 PM #122
gravity is my co-pilot
- Join Date
- Apr 2010
- Location
- Melbourne
- Posts
- 562
So only readers of this thread will understand the reason behind the first great run on the number 51 spokeshave for many decades: Superb! Originally Posted by derekh
-
29th May 2010, 11:42 PM #123
What... you mean it's not 1792?
- Join Date
- Oct 2006
- Location
- Melbourne
- Posts
- 5,271
I have the coarse (red) Saburr Tooth donut and I'm mightly impressed with it. I think it was around $80 from Jim Carroll. Originally Posted by apricotripper
.
I know you believe you understand what you think I wrote, but I'm not sure you realize that what you just read is not what I meant.
Regards, Woodwould.
-
30th May 2010, 07:18 AM #124
Banned
- Join Date
- Apr 2005
- Location
- kyogle N.S.W
- Age
- 50
- Posts
- 4,844
ta. sounds like a good fathers day gift. might have to accidently leave a catalog open around the house with it circled. Originally Posted by Woodwould
-
30th May 2010, 08:17 PM #125
SENIOR MEMBER
- Join Date
- Nov 2007
- Location
- belgrave
- Age
- 61
- Posts
- 7,934
Originally Posted by Woodwould

 anne-maria.
Tea Lady
(White with none)
Follow my little workshop/gallery on facebook. things of clay and wood.
-
30th May 2010, 09:35 PM #126
Heavy Machinery
- Join Date
- Mar 2008
- Location
- Lambton, Newcastle, NSW, Australia
- Posts
- 4,957
Looking fantastic WW, you are making good progress

-
1st June 2010, 01:31 PM #127
What... you mean it's not 1792?
- Join Date
- Oct 2006
- Location
- Melbourne
- Posts
- 5,271
The crest rail was sawn from the solid; the front face is vertical, but the back face was tapered to 1/2in thick at the top using a drawknife and spokeshave. The mortices for the back sticks were bored prior to cutting the top profile.

The tapered crest rail.
Windsor chairs from other regions of England can be identified by their highly ornate crest rails. On this type of Thames Valley chair however, crest rails were invariably unadorned, or exhibited restraint in their decoration; the 'bear's ears' shape being virtually the only profile employed. On the bandsaw, I cut the bear's ears profile into the crest rail and then tidied up the edges with a spokeshave and scraper.
The arm posts were swabbed with glue and hammered into their mortices in the seat. The seat was then turned over and wedges were hammered into the saw kerfs in the arm post tennons. All the sticks were similarly glued into the seat and the arm bow was threaded onto the back sticks and suspended at a convenient height above the side sticks and arm posts. More glue was applied to the arm sticks and mortices and the arm was then lowered into place. Two more wedges secured the arm to the arm posts.
Glue was applied to the top of the back sticks and the crest rail mortices and the rail was tapped into place. Finally, I drilled 1/8in (3.2mm) diameter holes right through the crest rail and through the two end and two centre back sticks. I split some short pieces of Ash from an off-cut and then hammered them through a dowel plate to make four 1/8in diameter pegs. The pegs were dipped into the glue and then hammered through the crest rail and back sticks.
When the glue had dried, I trimmed the arm posts and the crest rail pegs and washed the entire chair down with hot water to remove any residual glue.
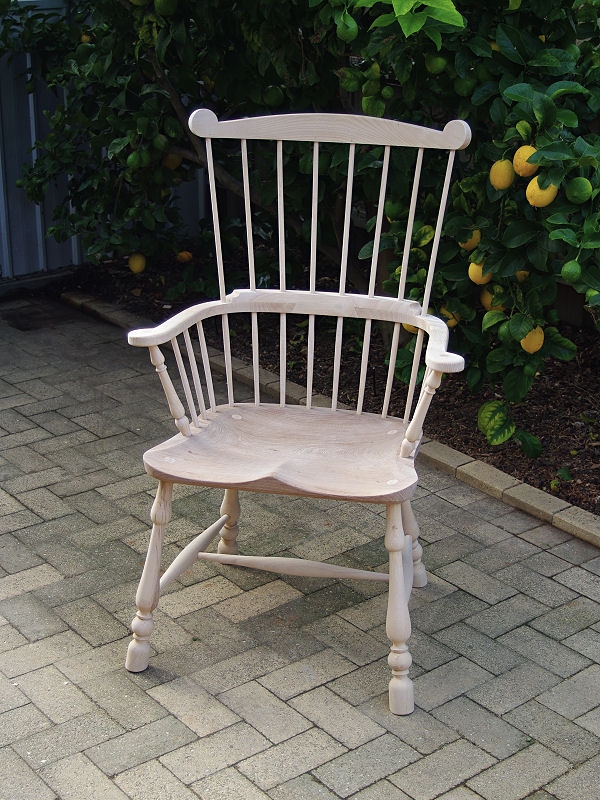
The Thames Valley comb-back in-the-white.
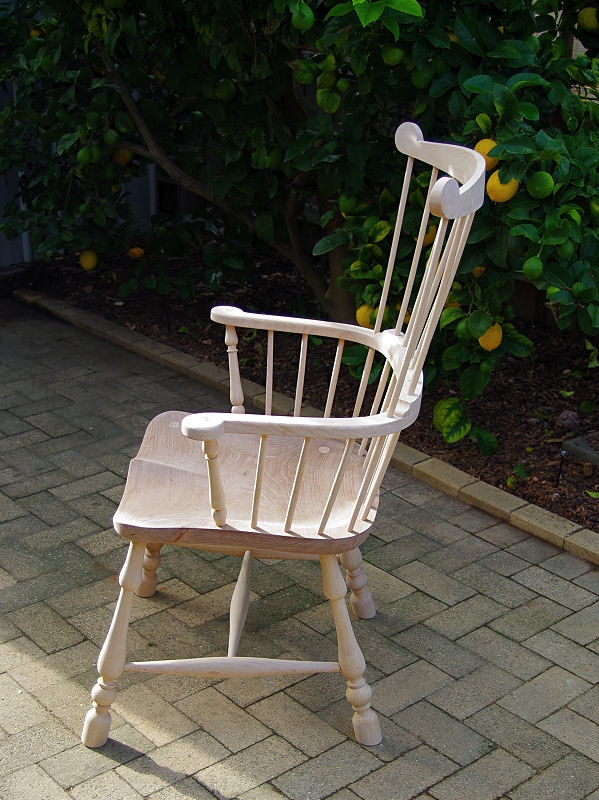
Ready for staining and polishing..
I know you believe you understand what you think I wrote, but I'm not sure you realize that what you just read is not what I meant.
Regards, Woodwould.
-
1st June 2010, 01:34 PM #128
.
- Join Date
- Jul 2005
- Location
- Victoria
- Posts
- 5,215
-
1st June 2010, 01:42 PM #129
What... you mean it's not 1792?
- Join Date
- Oct 2006
- Location
- Melbourne
- Posts
- 5,271
Thanks. Windsors are so easy to make and so many people like them and enjoy making them, you should add them to your curriculum. Originally Posted by Lignum
.
I know you believe you understand what you think I wrote, but I'm not sure you realize that what you just read is not what I meant.
Regards, Woodwould.
-
1st June 2010, 02:41 PM #130
GOLD MEMBER
- Join Date
- Mar 2005
- Location
- In the shed, Melbourne
- Age
- 52
- Posts
- 6,883
I'll echo Lignum's sentiment.
Look forward to seeing the chair with the finish applied.
-
1st June 2010, 02:48 PM #131
GOLD MEMBER
- Join Date
- Mar 2004
- Location
- Brisbane (western suburbs)
- Age
- 77
- Posts
- 12,137
Nice WW! There's something very appealing about a freshly-done chair 'in the white' - almost a shame to finish it!
You set a high bar. For some time I've been getting around to doing a continuous-arm Windsor rocker, but your comb-back looks so spiffy, maybe I will divert & do one of those instead - little bit easier than wrestling with all that complex bending.
Re the urea & glue-strength: All the key joints are wedged & the remainder are under little stress except the stretchers, which you have pre-loaded (as I always try to do, too) so glue-strength seems rather incidental to me - its main purpose would be to deny small creaturs a place to hide, wouldn't it?
Derek - might have to try modifying a 51 myself, but this is what I've been using to clean up chair seats for many a year. A small double-radiused plane like this takes very little effort to build & I find it a bit more controllable than the alternatives I tried. Blade is a bit of very heavy industrial hacksaw blade, which cleand up to about 1 3/8" wide - holds an edge very well, too.
Edit: I think the main radius is about 6", in case anyone asks - it's so long since I made it I've forgotten!
Cheers,IW
-
1st June 2010, 02:55 PM #132
GOLD MEMBER
- Join Date
- Aug 2004
- Location
- Brisbane
- Posts
- 4,986
Good stuff WW
. Very inspirational and just a little bit depressing . What's next? Georgian knife box please...
If one has a broken down old coffin smoother, this can be rebirthed into a useful little compass plane too.
Cheers
Michael
-
1st June 2010, 04:31 PM #133
What... you mean it's not 1792?
- Join Date
- Oct 2006
- Location
- Melbourne
- Posts
- 5,271
I concur. I often think of leaving chairs especially to get all sweaty and greasy from handprints and shiny from being buffed by clothing. This one will definitely be finished. Originally Posted by IanW
My glove lies before you Sir! Originally Posted by IanW
Hmm... since you put it like that... But what would I supplement Shed Dog's diet with if not the glue drips? Originally Posted by IanW
I like the plane idea. If I ever make another Windsor, I might make a 10" or 12" radiused plane..
I know you believe you understand what you think I wrote, but I'm not sure you realize that what you just read is not what I meant.
Regards, Woodwould.
-
1st June 2010, 04:35 PM #134
What... you mean it's not 1792?
- Join Date
- Oct 2006
- Location
- Melbourne
- Posts
- 5,271
I have some pistol-grip three-tine Georgian silver forks and knives and they'd look well in a Hepplewhite knife box, but I just don't have the space for dedicated storage for them. Originally Posted by mic-d
That would do me! Originally Posted by mic-d
 .
.
I know you believe you understand what you think I wrote, but I'm not sure you realize that what you just read is not what I meant.
Regards, Woodwould.
-
1st June 2010, 06:44 PM #135
SENIOR MEMBER
- Join Date
- Nov 2007
- Location
- belgrave
- Age
- 61
- Posts
- 7,934
 Its finished already? :knockmedownwithafeather: You don't muck about do you.
Just gorgeous. anne-maria.
Tea Lady
(White with none)
Follow my little workshop/gallery on facebook. things of clay and wood.


 Reply With Quote


Similar Threads
-
Easter Windsor Chair Course
By derekh in forum GREEN WOODWORKINGReplies: 14Last Post: 19th April 2009, 07:44 PM -
An 18th century style Windsor chair.
By Woodwould in forum WOODWORK - GENERALReplies: 38Last Post: 7th March 2009, 04:55 PM -
Windsor Chair Tools, Questions, Trials and Tribulations
By thumbsucker in forum HAND TOOLS - UNPOWEREDReplies: 17Last Post: 5th September 2008, 05:37 PM -
Windsor Chair
By Harv in forum WOODWORK - GENERALReplies: 2Last Post: 11th February 2008, 10:51 PM -
Making windsor chair slideshow
By JDarvall in forum HAND TOOLS - UNPOWEREDReplies: 3Last Post: 19th January 2008, 06:44 AM
