

 Thanks:
  Likes:
  Needs Pictures: 0
 Picture(s) thanks:
Results 76 to 88 of 88
Thread: Entry hall table for a niece
-
11th March 2020, 08:01 AM #76
 GOLD MEMBER


- Join Date
- Mar 2008
- Location
- Hobart, Tas
- Posts
- 1,211
 Derek, I'm interested in the little ramps you've placed on the top rear of each drawer side. Won't this allow the drawer to tip more when opened? Or does it not matter that much with the expected length that will remain within the case when fully extended?
 Originally Posted by derekcohen

On another note, your slips look outstanding. I was expecting there to be a significant ridge around the perimeter of the drawer bottom, but with the rebate in the bottom itself, the slips appear to sit almost flush. The moulding on the slips adds a lovely touch of elegance.
-
11th March 2020 08:01 AM # ADSGoogle Adsense Advertisement
- Join Date
- Always
- Location
- Advertising world
- Posts
- Many
-
11th March 2020, 10:54 AM #77
Be inspired. Be creative. Be bold.
- Join Date
- Apr 2001
- Location
- Perth
- Posts
- 10,824
Thanks Lance.
The ramp does not affect the drawer extension ... perhaps about 10mm at most. I did earlier on post a picture of a drawer extended ...
With the slips, my aim is to get them flush with the drawer bottom. This is a method I learned from Neil Erasmus (high end furniture maker in Perth. He has published a number of articles on drawer making in AWR over the years. Work seeking out).
Regards from Perth
DerekVisit www.inthewoodshop.com for tutorials on constructing handtools, handtool reviews, and my trials and tribulations with furniture builds.
-
11th March 2020, 07:06 PM #78
GOLD MEMBER
- Join Date
- Mar 2008
- Location
- Hobart, Tas
- Posts
- 1,211
Thanks Derek,
I found the articles and have sent a message to AWR asking about the possibility of purchasing a copy.
-
15th March 2020, 12:55 AM #79
Be inspired. Be creative. Be bold.
- Join Date
- Apr 2001
- Location
- Perth
- Posts
- 10,824
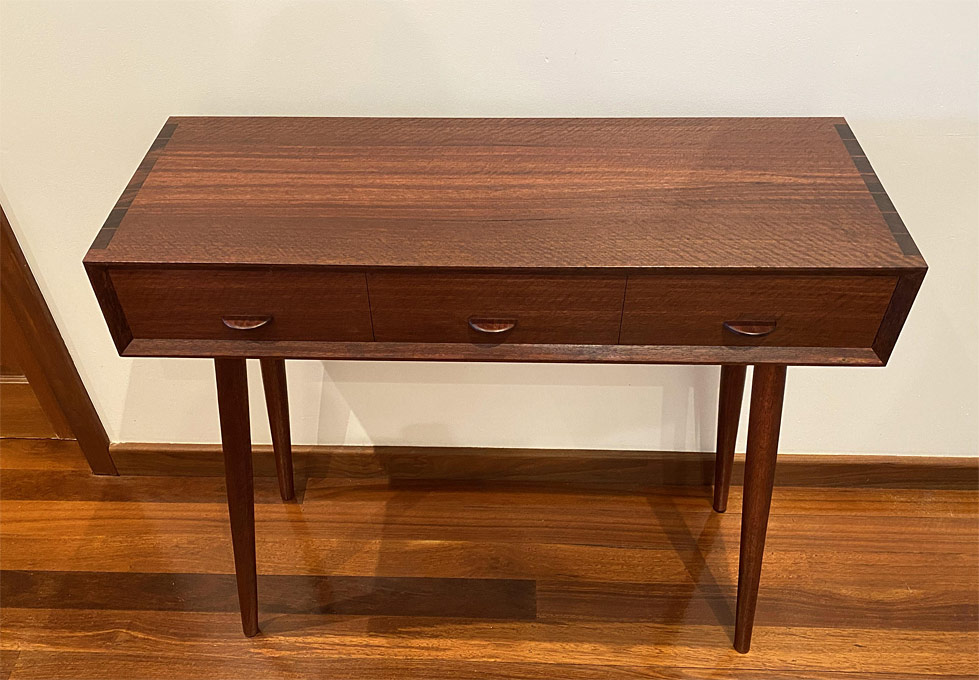
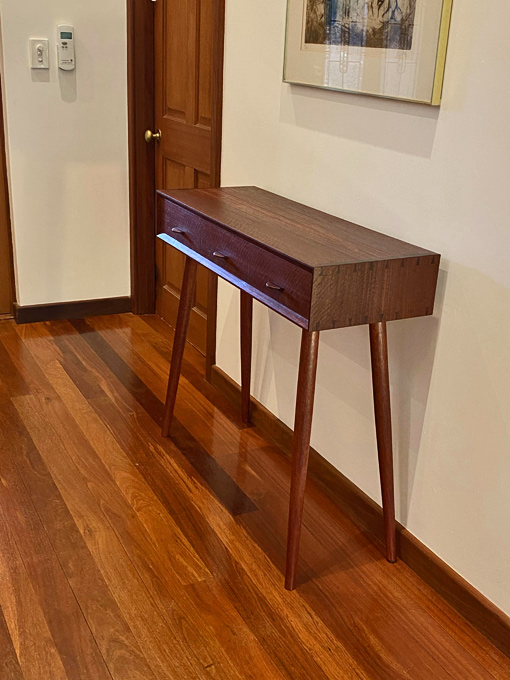
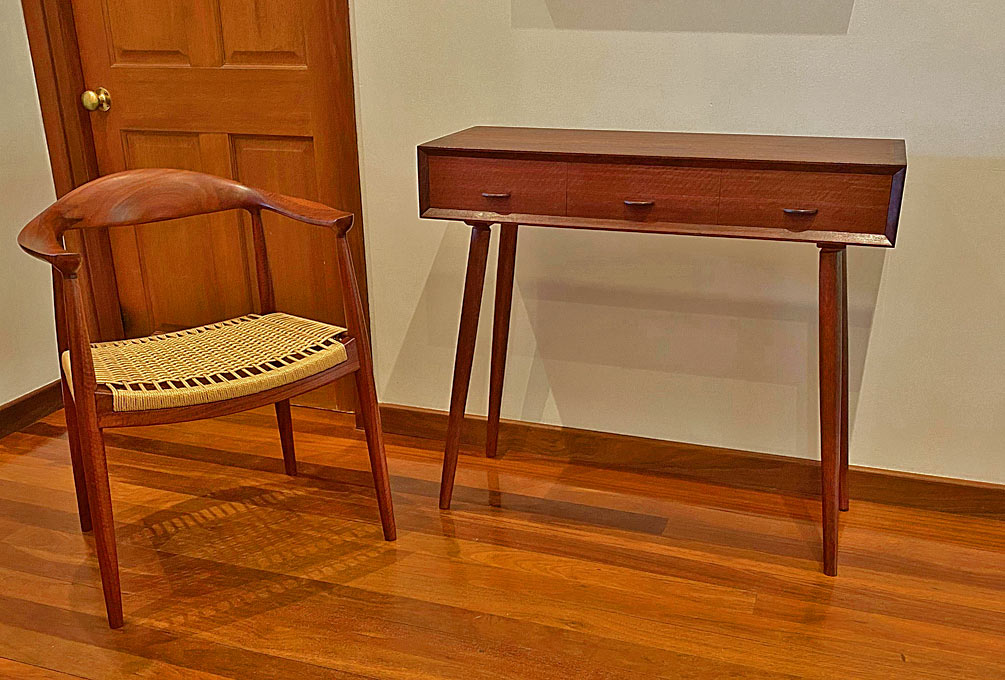
My niece is getting married at the end of March, the entry hall table she asked for is completed, and in a couple of days it will head off to Sydney.
This is the model for the table she wanted me to build, but to build it in Jarrah ...
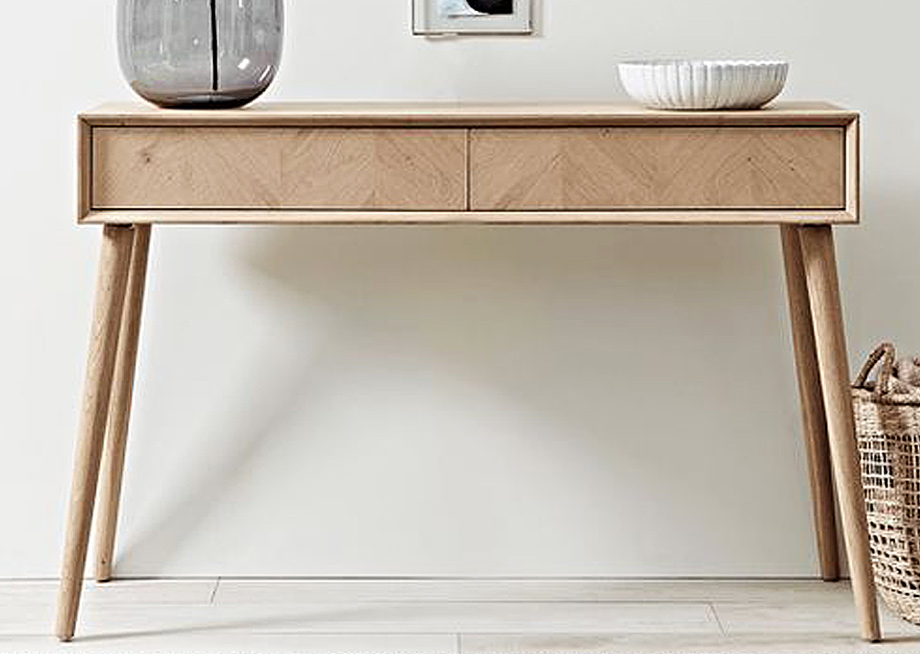
I needed to make a few modifications. The most notable were, firstly, that there are three drawers, where the model has two. With a little research, it became evident that the model was a "flat pack" build from a store in the UK, and it used slides and poppers for the drawers. Without slides, wide drawers will rack since the depth-to-width ratio is all wrong. Three drawers change this ratio and make it workable.
Secondly, building a drawer to ride wood-on-wood, one cannot use poppers - and so drawer handles are necessary. My niece was keen that drawer handles would not be seen, and I have done my best to make them unobtrusive.
Together with the desire to avoid drawer handles, there was also the request to make the drawers appear to be a single piece, rather than drawers separated by drawer dividers. The fact is, we had to have drawer dividers. So, to hide them, drawer fronts were given lips, with a lip covering half the width of a divider. In this way, the dividers could double as drawer stops. Making lipped, half-blind dovetails was a first for me. In the end, they were not too bad.
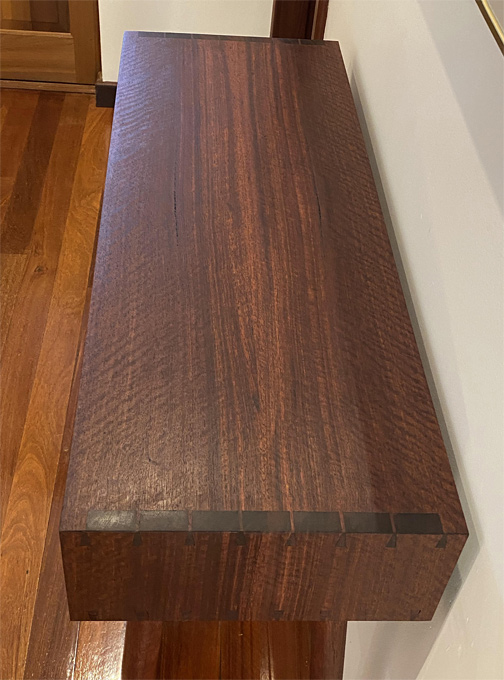
The case of the original table is mitred, and this is likely butt jointed and supported with either dowels, biscuits or dominos. My choice was to use mitred through dovetails, both for their strength and also for aesthetics. Although I have done a number of similar cases in recent years, this joint is one where you hold your breath until it all comes together. Then you wonder what the fuss was about
A fifth change was the attachment of the legs. The model likely used a metal screw per leg, which was common with Mid Century furniture. I wanted something stronger and durable so, in place of this, my decision was to stake the legs into a thicker base, which was firmly attached to the underside of the case with tapered, stopped sliding dovetails. A bit more work, but I will sleep better at night.
At the end of the day, it resembles a box, and only a woodworker will recognise that it is a very complex box.
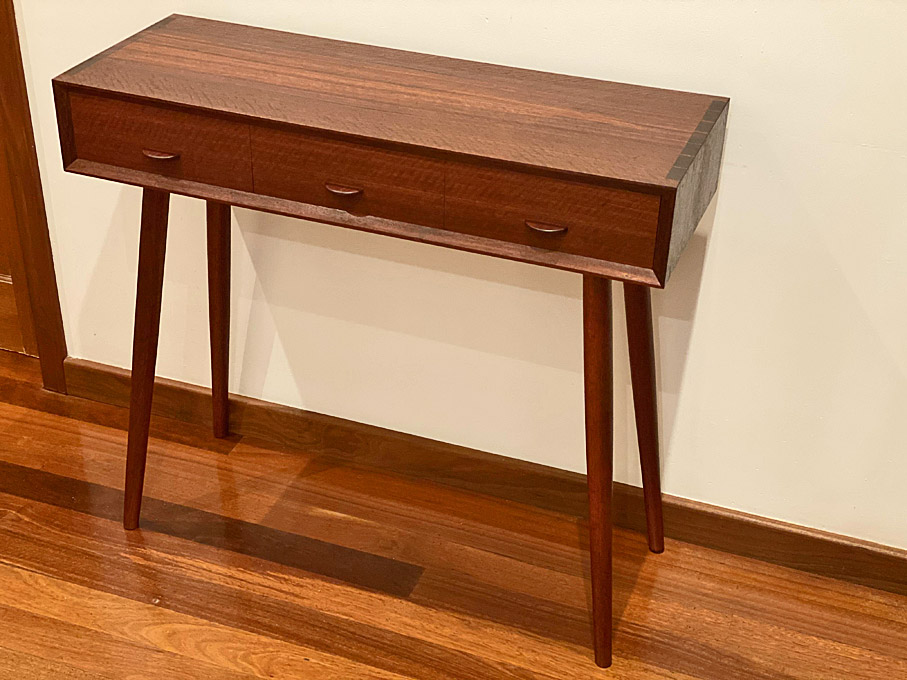
Okay, here it is. It is photographed in my entrance hall ....

The wood is fiddleback (curly) Jarrah.

A close up the waterfall on one side ...
... and on the other ...

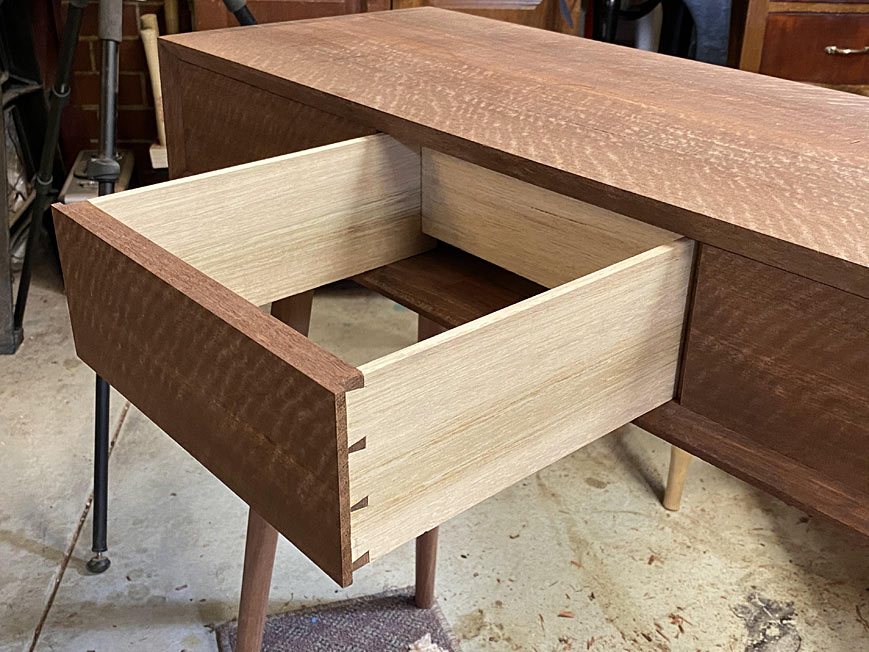
The obligatory dovetail shot ...
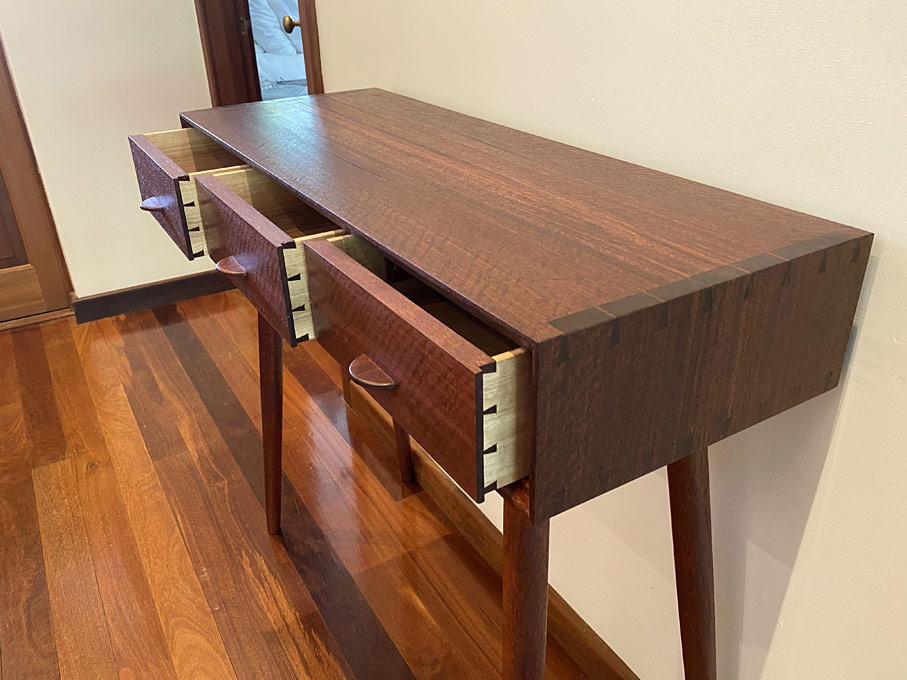
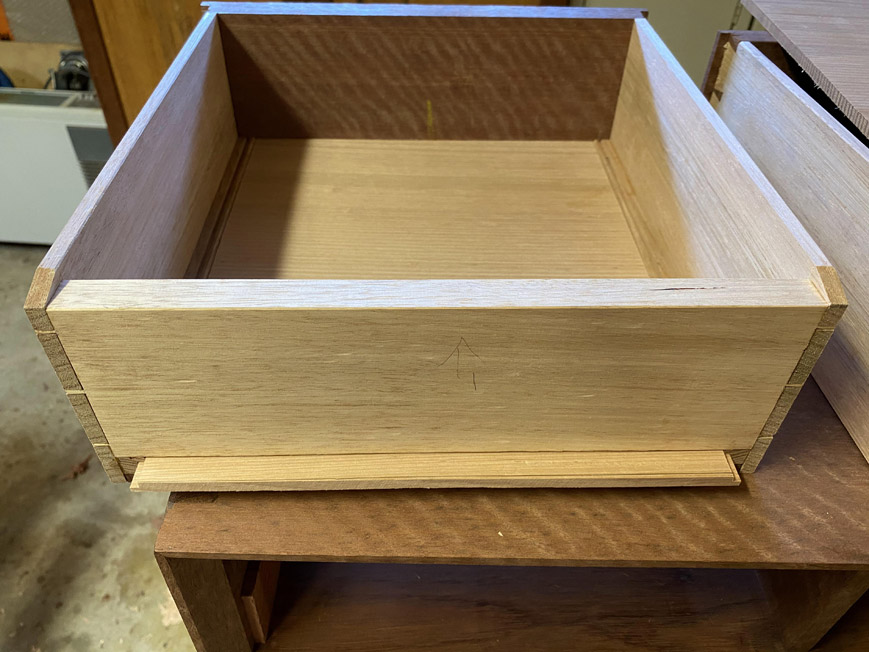
Those drawers! The lipped drawer fronts are 20mm, with the drawer sides 1/4". The back is 15mm thick. The thin sides necessitated drawer slips. These were beaded to create a transition from slip to drawer bottom. The drawer bottoms are 1/4". The wood used here is Tasmanian Oak.


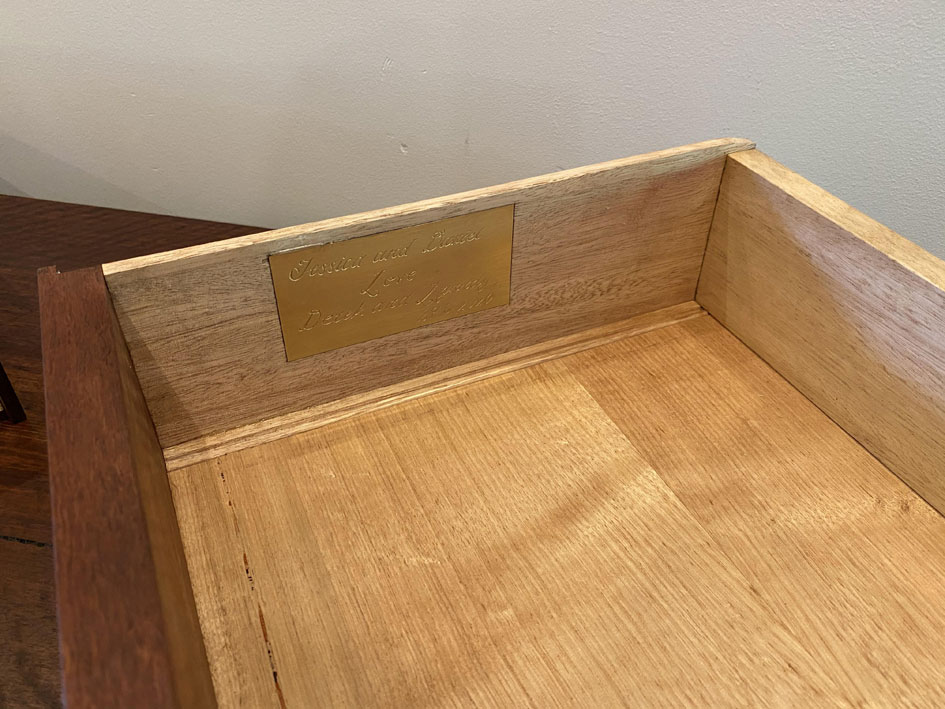
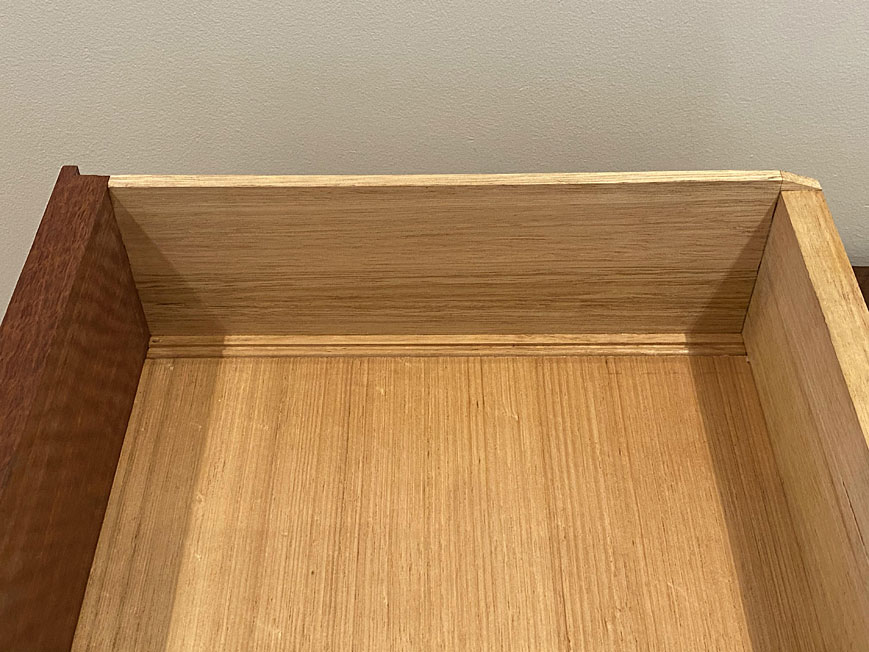
Since the case and internals are build from hard Jarrah, the underside of the slips was given a Jarrah slide to improve ware properties.

As mentioned earlier, the aim was to present a single board at the front ...
Here may be seen how the lips share the drawer divider and use it as a drawer stop. The spacers at the side of the case are half the width of the dividers as they do not share two drawers.


Now those drawer handles ...
I tried to keep the design as simple as possible, and used the same wood as the drawer fronts so they would blend in. The upper drawer shows the finger grip on underside of the handle ...

Drawer extension is good - about 80-85 percent ...

The internal bevels around the case ...

... maintained a straight edge to the drawer line. Plus the gap between the drawers (about 0.5mm) ...

Near-to-last, the case back: this is made from the same Jarrah - one never knows if the piece will end up against a wall or out in the open.

Someone will ask if the brass screws were clocked ... of course they were!
And a final photo to provide some scale. This is taken with a chair I built a few years ago ...
Thanks for coming along for the ride.
Regards from Perth
DerekVisit www.inthewoodshop.com for tutorials on constructing handtools, handtool reviews, and my trials and tribulations with furniture builds.
-
15th March 2020, 02:15 AM #80
GOLD MEMBER
- Join Date
- Feb 2003
- Location
- back in Alberta for a while
- Age
- 68
- Posts
- 12,006
Hi Derek Originally Posted by derekcohen
I assume that despite the current Covid-19 pandemic, your niece's wedding is going ahead.
BUT. Will there be a reception? or will she (and I presumable he) postpone the reception till a later date?
we've had this conversation before. Originally Posted by derekcohen
For me, the most notable modification is the absence of the cock-beading found in the prototype.
Three rather than two drawers is not, to my eye, a major departure from the prototype, nor is the use of highly figured Jarrah rather than the veneered drawer fronts.
It's an admittedly subtle detail for many, but for me the addition of Jarrah cock beading would help define the piece.
it's been a most enjoyable journey ... Originally Posted by derekcohen
thank youregards from Alberta, Canada
ian
-
15th March 2020, 02:39 AM #81
Be inspired. Be creative. Be bold.
- Join Date
- Apr 2001
- Location
- Perth
- Posts
- 10,824
A couple of extras ...

Regards from Perth
DerekVisit www.inthewoodshop.com for tutorials on constructing handtools, handtool reviews, and my trials and tribulations with furniture builds.
-
15th March 2020, 07:09 AM #82
SENIOR MEMBER
- Join Date
- Sep 2010
- Location
- Port Sorell, Tasmania
- Posts
- 592
Wow, that's a beautiful piece of furniture Derek and the workmanship is something I can only strive for. Thanks for taking the time to document your build and detail your thought during the construction.
TonyYou can't use up creativity. The more you use, the more you have. ~Oscar Wilde
-
15th March 2020, 08:46 AM #83
GOLD MEMBER
- Join Date
- Mar 2008
- Location
- Hobart, Tas
- Posts
- 1,211
That is a beautiful piece of furniture Derek.
I was out with my wife at a local sort-of cafe, which also sells furniture made by local woodworkers (is there a gender neutral term for �craftsman�?). There was a similar table to yours, and having followed this build with much interest I gave it a thorough looking over.
What makes your build so spectacular in comparison is the attention to detail and the thought process that has gone behind every element to create a piece that is unified throughout in its design and construction.
Well done.
-
15th March 2020, 10:03 AM #84
 Butcher of wood
- Join Date
- Jun 2010
- Location
- Bundaberg
- Age
- 54
- Posts
- 3,428
Thanks for sharing the build with us; another stunning piece!
Nothing succeeds like a budgie without a beak.
-
15th March 2020, 01:42 PM #85
 GOLD MEMBER
- Join Date
- Apr 2006
- Location
- Hobart
- Posts
- 5,125
Delightful work, Derek, in both the design and craftsmanship. I think that I prefer your design to the original. And a continuation with your love affair with jarrah! Privileged niece.
Although it has nothing to do with either country, I see it referencing the design ethic of both Japan and Scandinavia - eliminate the unnecessary and nothing more. Possibly cockbeading with be a distraction?
Have you given any thought as to why pins are usually placed on the sides of the carcase, as you have done, rather than on the top and bottom?
-
15th March 2020, 02:13 PM #86
GOLD MEMBER
- Join Date
- Feb 2003
- Location
- back in Alberta for a while
- Age
- 68
- Posts
- 12,006
Placement (of the pins) on the sides of a carcass is to prevent the bottom of the carcass falling off (or the top lifting off). Originally Posted by GraemeCook
In part it's convention -- for an entry table finger joints and glue would be more than strong enough.
But placing the pins on the side would be essential for a tool chest.regards from Alberta, Canada
ian
-
15th March 2020, 02:54 PM #87
GOLD MEMBER
- Join Date
- Apr 2006
- Location
- Hobart
- Posts
- 5,125
Reading between your lines, Derek, I think you are saying that you have always followed convention, like me, and have never really thought about it. Originally Posted by ian
To deconstruct your argument, consider a case with the pins on top and bottom and the legs attached to the bottom:
- gravity will cause the pins to sink deeper into the bottom,
- gravity will cause the top to sink deeper onto the sides,
- the dovetails will stop the sides from sliding sideways;
- this seems to be a win-win-win situation.
Next we consider the aesthetics and functionality of pins or tails being visible on the top surface.
As always, my definition of design is art plus engineering plus functionality. Next time I do a dovetailed carcase I am going to think really hard about where I put the pins and tails.
-
20th March 2020, 03:29 AM #88
GOLD MEMBER
- Join Date
- Feb 2003
- Location
- back in Alberta for a while
- Age
- 68
- Posts
- 12,006
Hi Derek Originally Posted by derekcohen
Is your niece's wedding still going ahead with the current restrictions on venue capacity?
BTW
I especially like this photoregards from Alberta, Canada
ian


 Reply With Quote


Similar Threads
-
Entry Hall Mirror - WIP
By Rookie in forum WOODWORK - GENERALReplies: 5Last Post: 31st August 2010, 11:12 PM -
A gift for my Niece's 21st ... ssshhh don't tell her!
By Touchwood in forum BANDSAWN BOXESReplies: 10Last Post: 22nd November 2009, 11:13 AM -
hall table, wine table, water stone box
By driftit in forum WOODWORK - GENERALReplies: 6Last Post: 1st May 2009, 11:20 PM -
Project 1 - Entry Way Table
By `Felix` in forum WOODWORK PICSReplies: 13Last Post: 25th March 2004, 03:54 PM
